Page 193 of 338

Features of your vehicle
110
4
1. INFO Selection Button
Displays the information of the file cur-
rently played in the order of FILE NAME
➟ TITLE ➟ ARTIST ➟ ALBUM ➟ FOLD-
ER ➟ TOTAL FILE ➟ NORMAL DISPLAY➟ FILE NAME ➟... (Displays no informa-
tion if the file has no song information.)
2. TRACK Moving Button
] button for less than 0.8 second to play from the begin-
ning of the song currently played. Press
the button for less than 0.8 second and
press it again within 1 seconds to move
and play the previous track. Press the
button for 0.8 second or longer to play
the song in reverse direction in fast
speed.
] button for less than 0.8 second to move to the next-
track. Press the button for 0.8 second or
longer to play the song in forward direc-
tion in fast speed.
3. RANDOM Playback Button
Press this button for less than 0.8 second
to activate 'RDM' mode and more than
0.8 second to activate 'ALL RDM' mode.
Only files in a folder are playedback in a random sequence.
ALL RDM : All files in a USB memory are played back in the random sequence.
4. REPEAT Button
Press this button for less than 0.8 second
to activate 'RPT' mode and more than
0.8 second to activate 'FLD RPT' mode.
Only a file is repeatedly playedback.
Only files in a folder are repeatedly played back.
5. USB Selection Button
If USB is connected, it switches to the
USB mode from the other mode to play
the song files stored in the USB.
If no CD and auxiliary device is not con-
nected, it displays "NO Media" for 3 sec-
onds and returns to the previous mode.
6. FOLDER Moving Button
] button sub folderof the current folder and displays the
first song in the folder.
Press TUNE/ENTER knob to move to
the folder displayed. It will play the first
song in the folder.
] button main folder and displays the first song in the folder.
Press TUNE/ENTER knob to move to
the folder displayed.
7. SEARCH Knob & ENTER Button
Turn this button clockwise to display the
songs next to the currently played song.
Turn the button counterclockwise to dis-
play the songs before the currently
played song.
Press the button to skip and play the
selected song.
8. SCAN Selection Button
Plays 10 seconds of each song in the
USB device.
Press the button once again to cancel
scanning.
Page 194 of 338
4111
Features of your vehicle
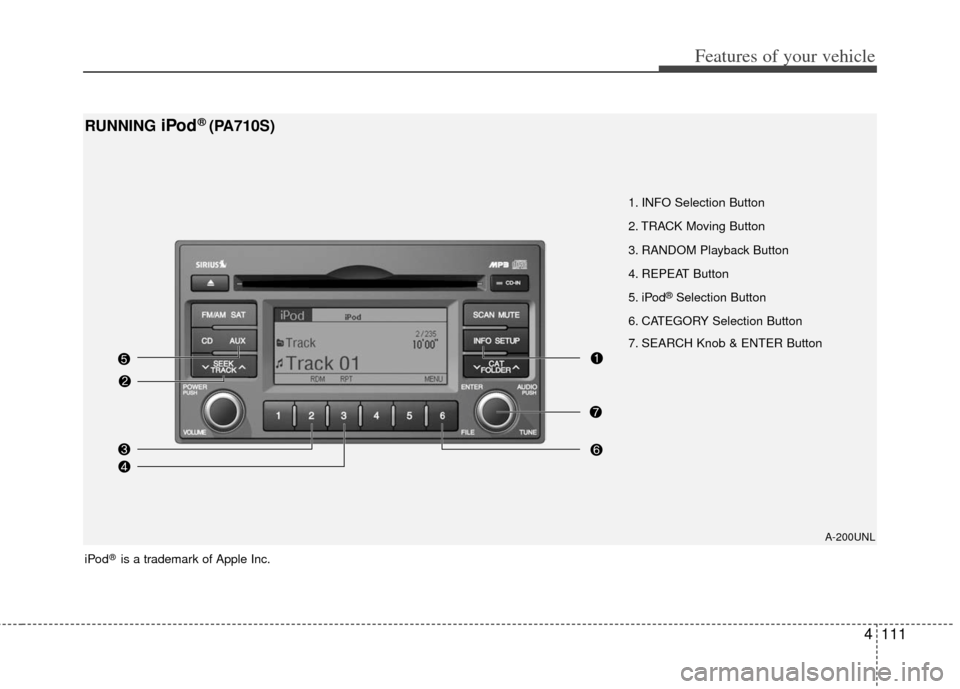
1. INFO Selection Button
2. TRACK Moving Button
3. RANDOM Playback Button
4. REPEAT Button
5. iPod
®Selection Button
6. CATEGORY Selection Button
7. SEARCH Knob & ENTER Button
A-200UNL
RUNNING iPod®(PA710S)
iPod®is a trademark of Apple Inc.
Page 195 of 338
Features of your vehicle
112
4
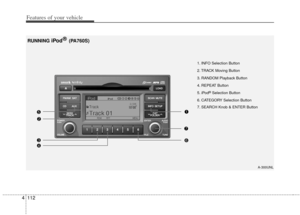
RUNNING iPod ®(PA760S)
A-300UNL
1. INFO Selection Button
2. TRACK Moving Button
3. RANDOM Playback Button
4. REPEAT Button
5. iPod
®Selection Button
6. CATEGORY Selection Button
7. SEARCH Knob & ENTER Button
Page 196 of 338

4113
Features of your vehicle
In case the iPod®exclusive cable is con-
nected to the multiple terminal inside the
consol on the right hand side of the dri-
ver's seat. When the iPod
®is connected,
the 'iPod®' icon will be displayed on the
top left corner of the display screen.
1. INFO Selection Button
Displays the information of the file cur-
rently played in the order of TITLE ➟ARTIST ➟ ALBUM ➟ NORMAL DISPLAY➟ TITLE ➟... (Displays no information if
the file has no song information.)
2. TRACK Moving Button
] button for less than 0.8 second to play from the begin-
ning of the song currently played. Press
the button for less than 0.8 second and
press it again within 1 seconds to move
and play the previous track. Press the
button for 0.8 second or longer to play
the song in reverse direction in fast
speed.
] button for less than 0.8 second to move to the next
track. Press the button for 0.8 second or
longer to play the song in forward direc-
tion in fast speed.
3. RANDOM Playback Button
Press the button for less than 0.8 second
to activate or deactivate the random play-
back of the songs within the current cat-
egory. Press the button for longer than
0.8 second to randomly play all songs in
the entire album of the iPod
®.
Press the button once again to cancel
the mode.
4. REPEAT Button
Repeats the song currently played.
5. iPod®Selection Button
If iPod®is connected, it switches to the
iPod®mode from the CD mode to play
the song files stored in the iPod®. If no
CD and auxiliary device is not connect-
ed, it displays "NO Media" for 3 seconds
and returns to the previous mode.
6. CATEGORY Selection Button
Moves to the upper category from cur-
rentlyplayed category of the iPod®.
To move to(play) the category(song) dis-
played, press preset6 button (MENU). You
will be able to search through the lower
category of the selected category.
The order of iPod
®'s category is SONG,
ALBUMS, ARTISTS, GENRES, and
iPod
®.
7. SEARCH Knob & ENTER Button
When you turn the button clockwise, it
will display the songs(category) next to
the song currently played(category in the
same level).
Also, when you turn the button counter-
clockwise, it will display the songs(catego-
ry) before the song currently played(cate-
gory in the same level).
If you want to listen to the song displayed
in the song category, press the button,
then it will skip to the selected song and
play.
Page 197 of 338

Features of your vehicle
114
4
✽
✽
NOTICE - Using the iPod®
device
• Some iPod®models might not support
the communication protocol and the
files will not be played. (iPod
®models
supported: Mini, 4G, Photo, Nano,
5G)
• The order of search or playback of songs in the iPod
®can be different
from the order searched in the audio
system.
• If the iPod
®crashes due to its own
trouble, reset the iPod®. (Reset: Refer
to iPod®manual)
• An iPod®may not operate normally
on low battery.
CAUTION IN USING THE
iPod®DEVICE
You need the power cable exclu-
sive for an iPod®in order to oper-
ate the iPod®with the buttons on
the audio system. The PC cable provided by Apple may cause amalfunction and should not beused in the vehicle.
When connecting the device with the iPod
®cable, push in the jack
fully.
When adjusting the sound effects of the iPod
®and the audio sys-
tem, the sound effects of both devices may overlap and distortthe quality of the sound.
Deactivate (turn off) the equalizer function of the iPod
®when adjust-
ing the audio system's volume, and turn off the equalizer of theaudio system when using the equalizer of the iPod
®.
(Continued)
(Continued) When the iPod®cable is connect-
ed, the system can be switched to the AUX mode even without theiPod
®device and may cause
noise. Disconnect the iPod®cable
when not using the iPod®device.
When the iPod®is not used with
the audio system, the iPod cable should be removed from theiPod
®.
Page 198 of 338

4115
Features of your vehicle
Satellite radio channels:
SIRIUS®Satellite Radio has over 130
channels, including 69 channels of 100%
commercial-free music, plus sports, news,
talk and entertainment available nation-
wide in your vehicle. For more information
and a complete list of SIRIUS
®Satellite
Radio channels, visit sirius.com in the
United States, sirius-canada.ca in
Canada, or call SIRIUS
®Satellite Radio at
1-888-539-7474.
Satellite radio reception factors:
To receive the satellite signal, your vehi-
cle has been equipped with a satellite
radio antenna located on the roof of your
vehicle. The vehicle roof provides the
best location for an unobstructed, open
view of the sky, a requirement of a satel-
lite radio system. Like AM/FM, there are
several factors that can affect satellite
radio reception performance:
Antenna obstructions: For optimal
reception performance, keep the anten-
na clear of snow and ice build-up and
keep luggage and other material as far
away from the antenna as possible.
Terrain: Hills, mountains, tall buildings, bridges, tunnels, freeway overpasses,
parking garages, dense tree foliage
and thunderstorms can interfere with
your reception.
SIRIUS®Satellite Radio service:
SIRIUS®Satellite Radio is a subscription-
based satellite radio service that broad-
casts music, sports, news and entertain-
ment programming to radio receivers,
which are available for installation in
motor vehicles or factory installed, as
well as for the home, portable and wire-
less devices, and through an Internet
connection on personal computer.
Vehicles that are equipped with a factory
installed SIRIUS
®Satellite Radio system
include:
Hardware and an introductory trial sub- scription term, which begins on the
date of sale or lease of the vehicle.
For a small upgrade fee, access to SIRIUS
®Satellite Radio m usic chan-
nels, and other select channels over
the Internet using any computer con-
nected to the Internet (U.S. customers
only).
For information on extended subscrip-
tion terms, contact SIRIUS
®Satellite
Radio at 1-888-539-7474.
✽ ✽
NOTICE
Satellite Radio requires SIRIUS®com-
patible receiver and a subscription serv-
ice fee after trial period.
Vehicles without a factory-installed
radio receiver require hardware pur-
chase and installation. Please see your
dealer for further details. All fees and
programming subject to change.
Subscriptions governed by the SIRIUS
®
Satellite Radio Terms & Conditions
available at www.sirius.com/ ser-
viceterms.
Available only in the 48 contiguous
United States and the District of
Columbia. Service available in Canada;
see www
.siriuscanada.caChrysler LLC shall not be responsible
for any such programming changes.
Satellite Radio Electronic Serial
Number (ESN): This 12-digit Satellite
Serial Number is needed to re-activate,
modify or track your satellite radio
account. You will need this number when
communicating with SIRIUS
®Satellite
Radio.
SIRIUS®SATELLITE RADIO INFORMATION (IF EQUIPPED)
Page 199 of 338
Features of your vehicle
116
4
1. SATELLITE RADIO Selection Button
2. Channel Selection Button
3. Preset Selection Button
4. SCAN Button
5. TUNE Knob and ENTER Button
6. CAT/FOLDER Button
7. INFO Selection Button
8. SETUP Button
A-200UNL
SIRIUS®SATELLITE RADIO (PA710S)
SIRIUS®SATELLITE RADIO (PA760S)
Page 200 of 338

4117
Features of your vehicle
How to Use SIRIUS®Satellite
Radio
Your Kia vehicle is equipped with 3 months
complimentary period of SIRIUS®Satellite
Radio so you have access to over 130
channels of music, information, and enter-
tainment programming.
Activation
In order to extend or reactivate your sub-
scription to SIRIUS®Satellite Radio, you
will need to contact SIRIUS Customer
Care at 888-539-7474. Have your 12 digit
SID (Sirius Identification Number)/ESN
(Electronic Serial Number) ready. To
retrieve the SID/ESN, turn on the radio,
press the [SAT] button and tune to chan-
nel zero. Please note that the vehicle will
need to be turned on, in Sirius mode, and
have an unobstructed view of the sky in
order for the radio to receive the activa-
tion signal.
1. SATELLITE RADIO Selection Button(SIRIUS Satellite Radio)
Press the [SAT] button to switch to SIR-
IUS Satellite Radio. It cycles through the
different bands as noted below.
SAT1
➟ SAT2 ➟ SAT3 ➟ SAT1 ➟...
2. Channel Selection Button
] or [SEEK ] but-
ton for less than 0.8 second to select
previous or next channel.
] or [SEEK ] but- ton for 0.8 or longer to continuously
move to previous or next channel.
top of the screen, channel up/down is
done through the channels within cur-
rent category.
3. Preset Selection Button
ond to play the channel saved in each
button.
second or longer to save current chan-
nel. An audible beep will play to confirm
the preset is stored.
4. SCAN Button
ically scans the radio stations upwards.
channel, starting from the initial chan-
nel, for ten seconds.
the scan feature and to listen to the cur-
rently selected channel.
top of the screen, channel changing is
done through the channels in current
category.
5. TUNE Knob and ENTER Button
While listening to SIRIUS broadcast,
rotate this knob to the right or left to
search other channels while listening to
current channels and push this knob to
select what you want to listen to.
(Turn to the right to search higher chan-
nels and left lower channels)
6. CAT/FOLDER Button
] or [FOLDER ] buttonto enter the Category List Mode, it dis-
plays cateogry items and highlights the
category that currently tuned channel
belongs to.
buttons to navigate category list.
Press [ENTER] button to select the low- est channel in highlighted category.
gory "CATEGORY" Icon is displayed at
the top of the screen.