2012 JEEP WRANGLER ECO mode
[x] Cancel search: ECO modePage 15 of 124

WARNING!(Continued)
• Being too close to the Seat-Mounted Side Air Bag during
deployment could cause you to be severely injured or killed.
• Do not drive your vehicle after the air bags have deployed. If you
are involved in another collision, the air bags will not be in place to
protect you.
• After any collision, the vehicle should be taken to an authorized
dealer immediately.
CHILD RESTRAINTS
• Children 12 years and under should ride properly buckled up in a rear
seat, if available. According to crash statistics, children are safer when
properly restrained in the rear seats rather than in the front.
• Every state in the United States and all Canadian provinces require that
small children ride in proper restraint systems. This is the law, and you
can be prosecuted for ignoring it.
Installing The LATCH - Compatible Child Restraint System
• Your vehicle's second row passenger seats are equipped with the child
restraint anchorage system called LATCH, which stands for Lower
Anchors and Tether for CHildren.
•Four-Doormodels: The rear outboard seating positions have lower
anchors, and all three rear seating positions have top tether anchors.
Child seats with fixed lower attachments must be installed in the
outboard positions only. Child seats with flexible lower attachments can
be used in all three seating positions.Neverinstall LATCH-compatible
child seats such that two seats share a common lower anchorage.
Four-Door Model
GETTING STARTED
13
Page 23 of 124
ENGINE BREAK-IN RECOMMENDATIONS
• A long break-in period is not required for the engine and drivetrain
(transmission and axle) in your vehicle.
• Drive moderately during the first 300 miles (500 km). After the initial
60 miles (100 km), speeds up to 50 or 55 mph (80 or 90 km/h) are
desirable.
• While cruising, brief full-throttle acceleration within the limits of local
traffic laws contributes to a good break-in. Wide-open throttle
acceleration in low gear can be detrimental and should be avoided.
• The engine oil installed in the engine at the factory is a high-quality
energy conserving type lubricant. Oil changes should be consistent with
anticipated climate conditions under which vehicle operations will occur.
For the recommended viscosity and quality grades, refer to “Maintaining
Your Vehicle”.
NOTE:A new engine may consume some oil during its first few thousand
miles (kilometers) of operation. This should be considered a normal part of
the break-in and not interpreted as an indication of difficulty.
CAUTION!
Never use Non-Detergent Oil or Straight Mineral Oil in the engine or
damage may result.
OPERATING YOUR VEHICLE
21
Page 39 of 124
Radio Operation
Seek Up/Down Buttons
• Press to seek through radio stations in AM, FM, or SAT bands.
• Hold either button to bypass stations without stopping.
Store Radio Presets
• Press the “SET/RND” button once and SET 1 will show in the display.
Then select button (1–6).
• A second station may be added to each push button. Press the
“SET/RND” button twice and SET 2 will show in the display. Then select
button (1–6).
CD/DISC Operation
Seek Up/Down Buttons
• Press to seek through CD tracks.
• Hold either button to bypass tracks without stopping.
SET/RND Button (Random Play)
• Press this button while the CD is playing to activate Random Play.
• This feature plays the selections on the CD in random order to provide an
interesting change of pace.
Audio Jack Operation
• The Audio Jack allows a portable device, such as an MP3 player or a
cassette player, to be plugged into the radio and utilize the vehicle’s
audio system, using a 3.5 mm audio cable, to amplify the source and play
through the vehicle speakers.
• Pressing the “AUX” button will change the mode to auxiliary device if the
Audio Jack is connected, allowing the music from your portable device
to play through the vehicle's speakers.
• The functions of the portable device are controlled using the device
buttons. The volume may be controlled using the radio or portable
device.
ELECTRONICS
37
Page 41 of 124
Equalizer, Balance And Fade
• Press the “TUNE/SCROLL” control knob and BASS, MID, TREBLE,
BALANCE and FADE will display. Rotate the “TUNE/SCROLL” control
knob to select the desired setting.
Radio Operation
Seek Up/Down Buttons
• Press to seek through radio stations in AM, FM, or SAT bands.
• Hold either button to bypass stations without stopping.
Store Radio Presets
• Press the “SET/RND” button once and SET 1 will show in the display.
Then select button (1–6).
• A second station may be added to each push button. Press the
“SET/RND” button twice and SET 2 will show in the display. Then select
button (1–6).
Music Type
• Press the “MUSIC TYPE” button to activate this mode. Press the “MUSIC
TYPE” button again or turn the “TUNE/SCROLL” control knob to select
the desired music type (Adult Hits, Country, Jazz, Oldies, Rock, etc.).
• Once a music type is chosen and the icon is displayed, press either
“SEEK” button and the radio will only search for stations with the
selected music type.
NOTE:The Music Type function only operates when in FM mode.
SETUP Button
• Pressing the “SETUP” button allows you to select between items that are
available in that particular mode.
• Turn the “TUNE/SCROLL” control knob to scroll through the entries.
Push the “AUDIO/SELECT” button to select an entry and make changes.
Sirius XM™ Satellite Radio
• Sirius XM™ Satellite Radio gives you over 130 channels, including 100%
commercial-free music from nearly every genre, plus all your favorite
sports, news, talk and entertainment channels–all with crystal clear,
coast-to-coast coverage, all in one place and all at your fingertips.
• To access Sirius XM™ Satellite Radio, press the “SAT” hard-key.
ELECTRONICS
39
Page 44 of 124
Equalizer, Balance And Fade
• Press the “TUNE/SCROLL” control knob and BASS, MID, TREBLE,
BALANCE and FADE will display. Rotate the “TUNE/SCROLL” control
knob to select the desired setting.
Radio Operation
Seek Up/Down Buttons
• Press to seek through radio stations in AM, FM, or SAT bands.
• Hold either button to bypass stations without stopping.
Store Radio Presets
• Press the “SET” button once and SET 1 will show in the display. Then
select button (1–6).
• A second station may be added to each push button. Press the “SET”
button twice and SET 2 will show in the display. Then select button (1–6).
Music Type
• Press the “MUSIC TYPE” button to activate this mode. Press the “MUSIC
TYPE” button again or turn the “TUNE/SCROLL” control knob to select
the desired music type (Adult Hits, Country, Jazz, Oldies, Rock, etc.).
• Once a music type is chosen and the icon is displayed, press the SEEK
button and the radio will only search for stations with the selected music
type.
NOTE:The Music Type function only operates when in FM mode.
SETUP Button
• Pressing the “SETUP” button allows you to select between items that are
available in that particular mode.
• Turn the “TUNE/SCROLL” control knob to scroll through the entries.
Push the “AUDIO/SELECT” button to select an entry and make changes.
ELECTRONICS
42
Page 49 of 124

CD/DVD Disc Operation
• Press the “MEDIA” hard key to display the media source tabs at the top
of the screen. Select the source by touching the “HDD,” “DISC,” or “AUX”
media source soft-key tab.
NOTE:Your Touch-Screen Radio will usually automatically switch to the
appropriate mode when something is first connected or inserted into the
system.
Insert a CD/DVD Disc
• To insert a disc, press the “LOAD” hard-key.
• With the printed side upwards, insert the disc into the disc slot of the
radio. The radio pulls the disc in automatically and closes the flip screen.
The radio selects the appropriate mode after the disc is recognized, and
starts playing the first track. The display shows “Reading...” during this
process.
Seek Up/Seek Down
• Press the “Seek Up” or “Seek Down” soft-keys to seek through tracks in
Disc Mode. Hold either Seek to bypass tracks without stopping.
Audio Jack Operation
• The Audio Jack allows a portable device, such as an MP3 player or a
cassette player, to be plugged into the radio and utilize the vehicle’s
audio system, using a 3.5 mm audio cable, to amplify the source and play
through the vehicle speakers.
ELECTRONICS
47
Page 58 of 124

CD/DVD Disc Operation
• Press the “RADIO/MEDIA” hard key until the media source tabs are
displayed at the top of the screen. Select the source by touching the
“HDD,” “DISC,” or “AUX” media source soft-key tab.
NOTE:Your Touch-Screen Radio will usually automatically switch to the
appropriate mode when something is first connected or inserted into the
system.
Insert a CD/DVD Disc
• To insert a disc, press the “OPEN/CLOSE” hard-key.
• With the printed side upwards, insert the disc into the disc slot of the
radio. The radio pulls the disc in automatically and closes the flip screen.
The radio selects the appropriate mode after the disc is recognized, and
starts playing the first track. The display shows “Reading...” during this
process.
Seek Up/Seek Down
• Press the “Seek Up” or “Seek Down” hard-keys to seek through tracks in
Disc Mode. Hold either Seek to bypass tracks without stopping.
ELECTRONICS
56
Page 67 of 124
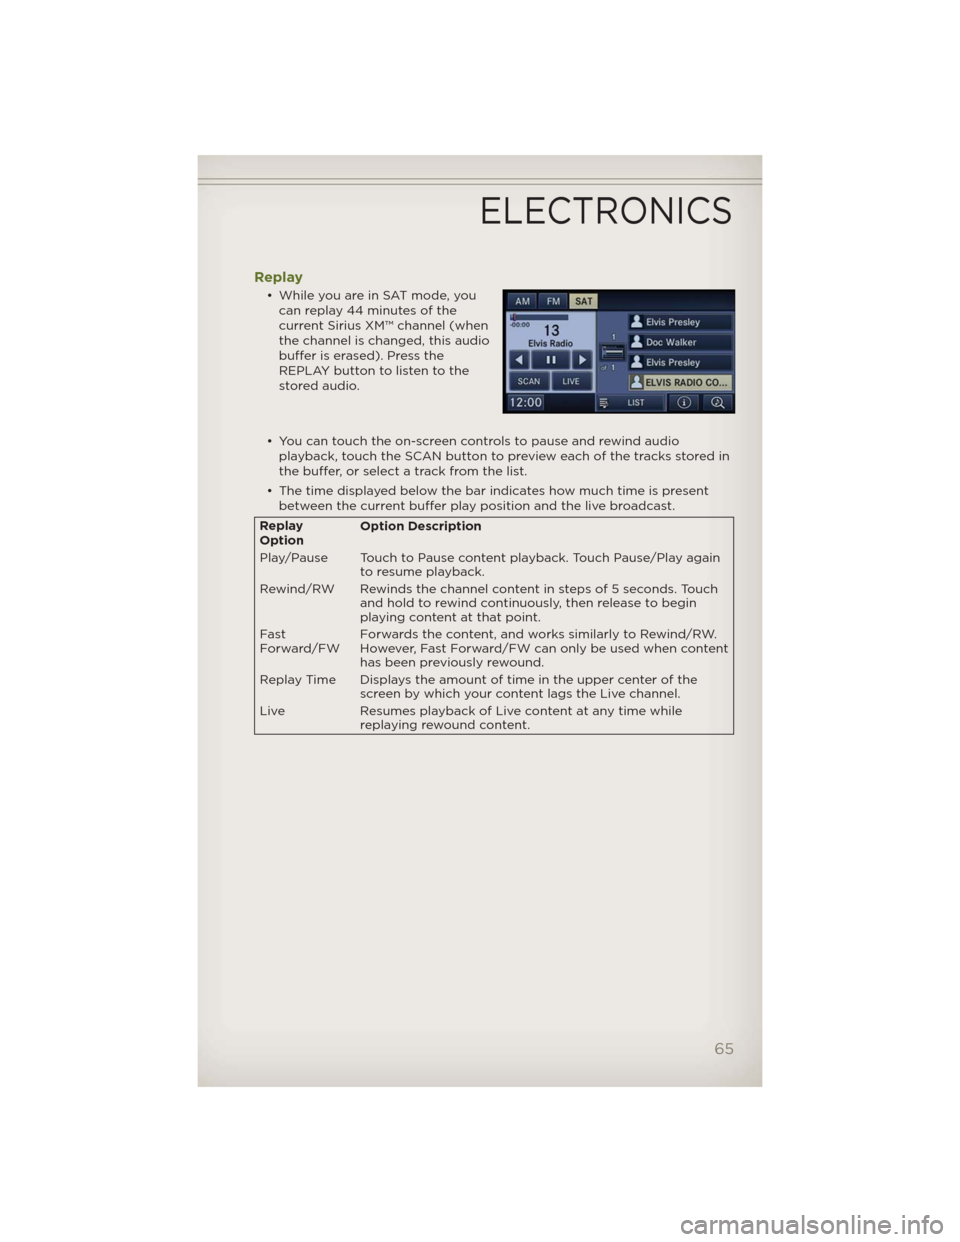
Replay
• While you are in SAT mode, you
can replay 44 minutes of the
current Sirius XM™ channel (when
the channel is changed, this audio
buffer is erased). Press the
REPLAY button to listen to the
stored audio.
• You can touch the on-screen controls to pause and rewind audio
playback, touch the SCAN button to preview each of the tracks stored in
the buffer, or select a track from the list.
• The time displayed below the bar indicates how much time is present
between the current buffer play position and the live broadcast.
Replay
OptionOption Description
Play/Pause Touch to Pause content playback. Touch Pause/Play again
to resume playback.
Rewind/RW Rewinds the channel content in steps of 5 seconds. Touch
and hold to rewind continuously, then release to begin
playing content at that point.
Fast
Forward/FWForwards the content, and works similarly to Rewind/RW.
However, Fast Forward/FW can only beused when content
has been previously rewound.
Replay Time Displays the amount of time in the upper center of the
screen by which your content lags the Live channel.
Live Resumes playback of Live content at any time while
replaying rewound content.
ELECTRONICS
65