Page 158 of 558
TO OPEN AND CLOSE THE HOOD
Two latches must be released to open the hood.
1. Pull the hood release lever located under the left side
of the instrument panel.2. Outside of the vehicle, locate the safety latch lever
between the grille and hood opening (left of center when
facing hood). Push the safety latch lever to the right and
then raise the hood.
Hood ReleaseUnderhood Safety Latch
156 UNDERSTANDING THE FEATURES OF YOUR VEHICLE
Page 160 of 558
LIGHTS
Multifunction Lever
The multifunction lever on the left side of the steering
column controls the operation of the headlights, parking
lights, turn signal lights, instrument panel lights, instru-
ment panel light dimming, interior lights and fog lights
(if equipped).
Headlights And Parking Lights
Turn the end of the multifunction lever to the first detent
for parking light operation. Turn the end of the lever to
the second detent for headlight operation.
Multifunction Lever
Headlight Switch
158 UNDERSTANDING THE FEATURES OF YOUR VEHICLE
Page 162 of 558
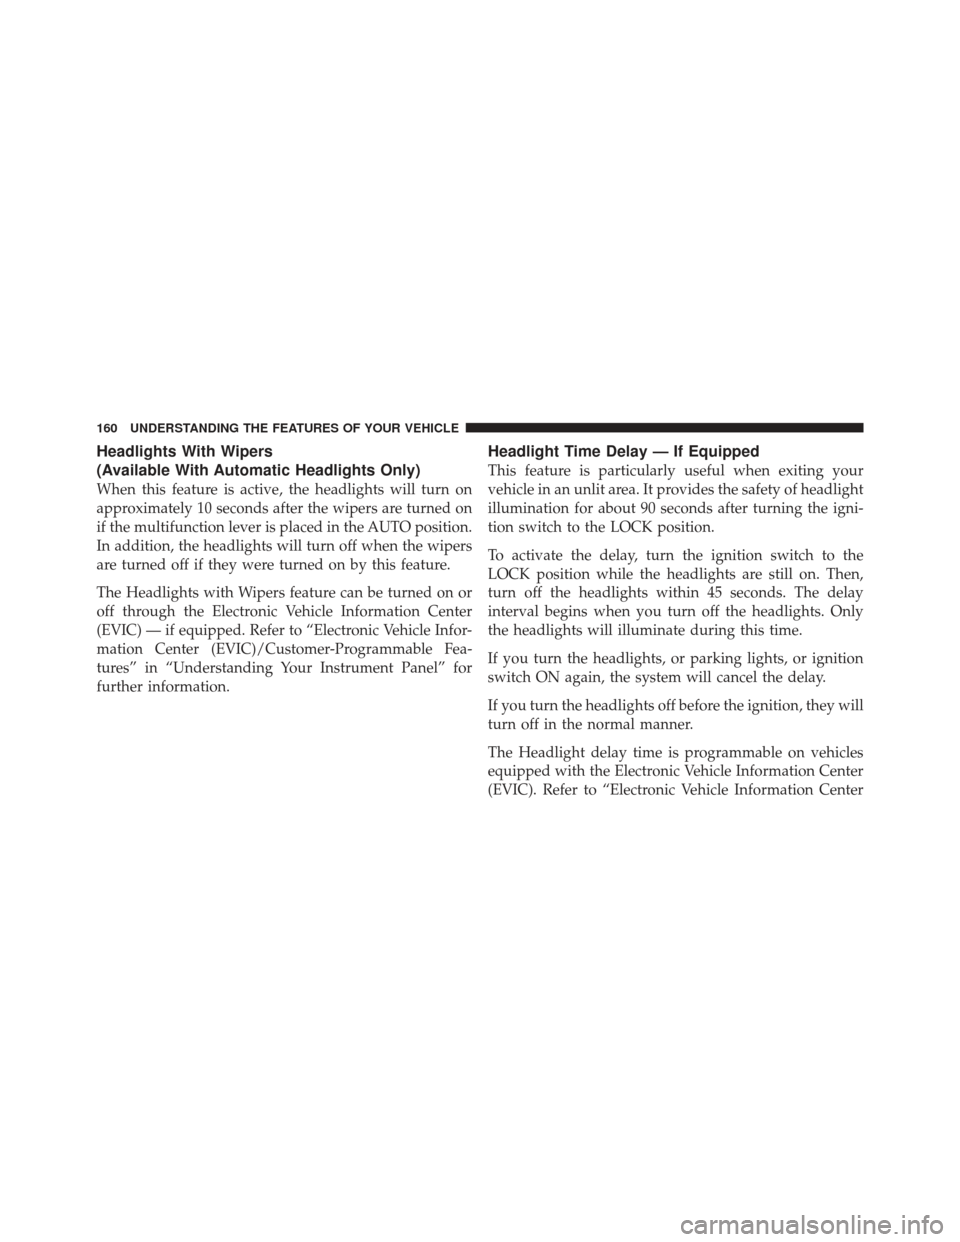
Headlights With Wipers
(Available With Automatic Headlights Only)
When this feature is active, the headlights will turn on
approximately 10 seconds after the wipers are turned on
if the multifunction lever is placed in the AUTO position.
In addition, the headlights will turn off when the wipers
are turned off if they were turned on by this feature.
The Headlights with Wipers feature can be turned on or
off through the Electronic Vehicle Information Center
(EVIC) — if equipped. Refer to “Electronic Vehicle Infor-
mation Center (EVIC)/Customer-Programmable Fea-
tures” in “Understanding Your Instrument Panel” for
further information.
Headlight Time Delay — If Equipped
This feature is particularly useful when exiting your
vehicle in an unlit area. It provides the safety of headlight
illumination for about 90 seconds after turning the igni-
tion switch to the LOCK position.
To activate the delay, turn the ignition switch to the
LOCK position while the headlights are still on. Then,
turn off the headlights within 45 seconds. The delay
interval begins when you turn off the headlights. Only
the headlights will illuminate during this time.
If you turn the headlights, or parking lights, or ignition
switch ON again, the system will cancel the delay.
If you turn the headlights off before the ignition, they will
turn off in the normal manner.
The Headlight delay time is programmable on vehicles
equipped with the Electronic Vehicle Information Center
(EVIC). Refer to “Electronic Vehicle Information Center
160 UNDERSTANDING THE FEATURES OF YOUR VEHICLE
Page 163 of 558
(EVIC)/Customer-Programmable Features” in “Under-
standing Your Instrument Panel” for further information.
Daytime Running Lights — If Equipped
The headlights will turn on as Daytime Running Lights
(DRL) and operate at lower intensity whenever the
ignition is ON, the engine is running, the headlight
switch is off, the parking brake is released and the shift
lever is in any position except PARK.
Lights-On Reminder
If the headlights or parking lights are on after the ignition
is turned to the LOCK position, a chime will sound to
alert the driver when the driver’s door is opened.
Fog Lights — If Equipped
To activate the front fog lights, turn on the parking
lights or the low beam headlights and pull out on
the end of the multifunction lever.NOTE:
The front fog lights will only operate with the
headlights on low beam. Selecting high beam headlights
will turn off the front fog lights.
Front Fog Light Control
3
UNDERSTANDING THE FEATURES OF YOUR VEHICLE 161
Page 165 of 558
NOTE:If the multifunction lever is held in the flash-to-
pass position for more than 15 seconds, the high beams
will shut off. If this occurs, wait 30 seconds before
activating the flash-to-pass function again.
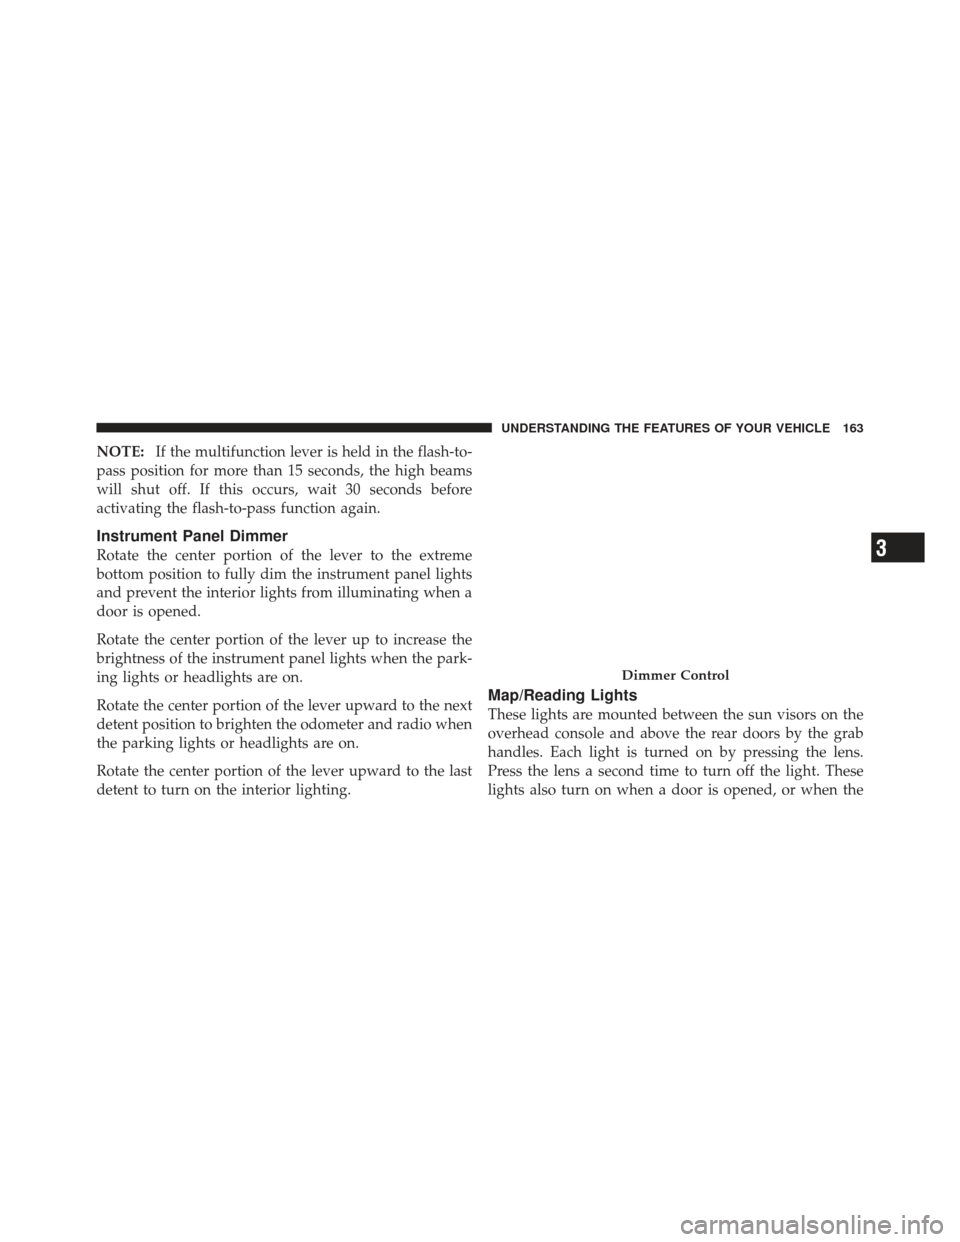
Instrument Panel Dimmer
Rotate the center portion of the lever to the extreme
bottom position to fully dim the instrument panel lights
and prevent the interior lights from illuminating when a
door is opened.
Rotate the center portion of the lever up to increase the
brightness of the instrument panel lights when the park-
ing lights or headlights are on.
Rotate the center portion of the lever upward to the next
detent position to brighten the odometer and radio when
the parking lights or headlights are on.
Rotate the center portion of the lever upward to the last
detent to turn on the interior lighting.
Map/Reading Lights
These lights are mounted between the sun visors on the
overhead console and above the rear doors by the grab
handles. Each light is turned on by pressing the lens.
Press the lens a second time to turn off the light. These
lights also turn on when a door is opened, or when the
Dimmer Control
3
UNDERSTANDING THE FEATURES OF YOUR VEHICLE 163
Page 171 of 558
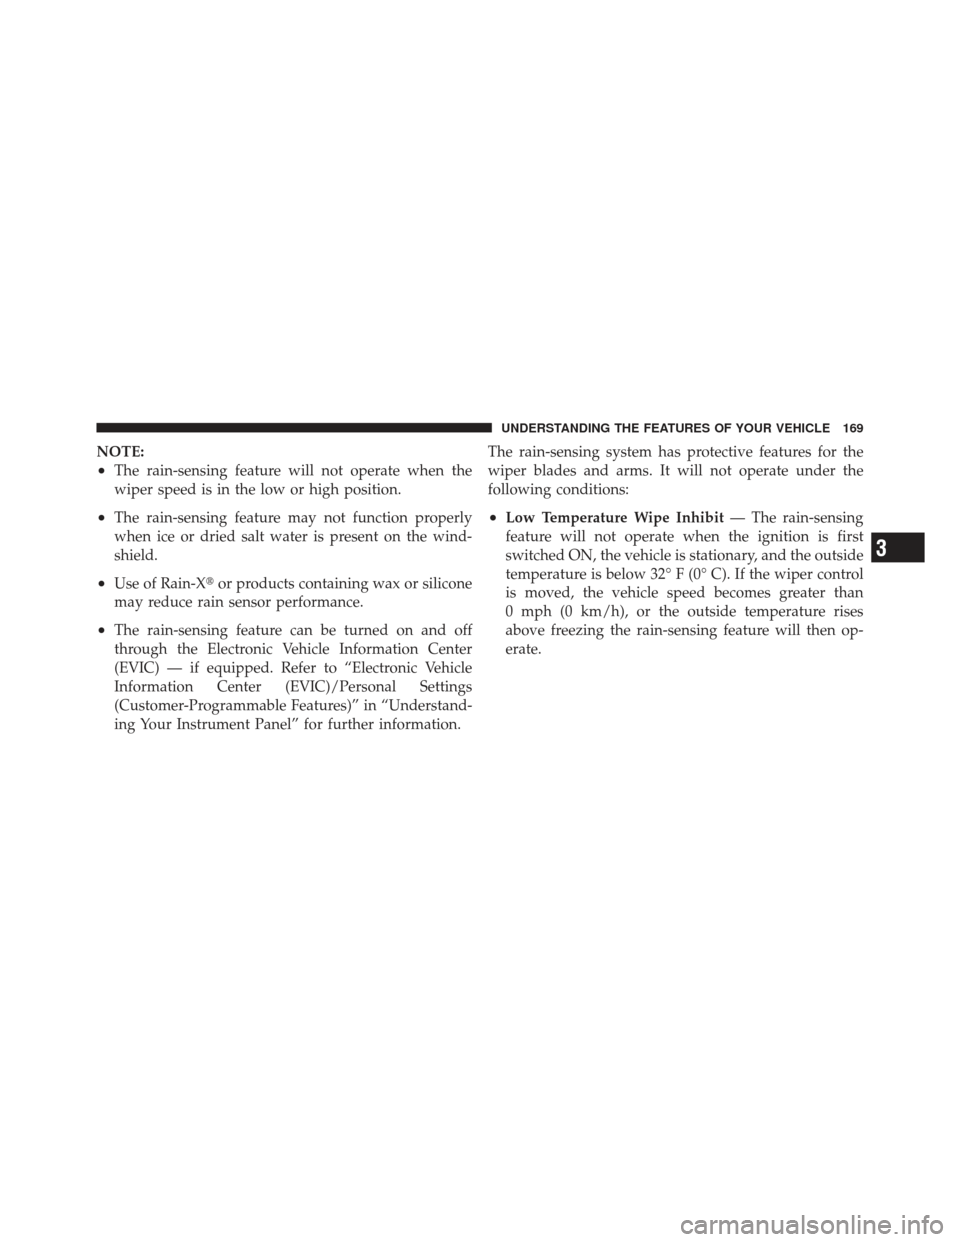
NOTE:
•The rain-sensing feature will not operate when the
wiper speed is in the low or high position.
•The rain-sensing feature may not function properly
when ice or dried salt water is present on the wind-
shield.
•Use of Rain-X�or products containing wax or silicone
may reduce rain sensor performance.
•The rain-sensing feature can be turned on and off
through the Electronic Vehicle Information Center
(EVIC) — if equipped. Refer to “Electronic Vehicle
Information Center (EVIC)/Personal Settings
(Customer-Programmable Features)” in “Understand-
ing Your Instrument Panel” for further information. The rain-sensing system has protective features for the
wiper blades and arms. It will not operate under the
following conditions:
•Low Temperature Wipe Inhibit
— The rain-sensing
feature will not operate when the ignition is first
switched ON, the vehicle is stationary, and the outside
temperature is below 32° F (0° C). If the wiper control
is moved, the vehicle speed becomes greater than
0 mph (0 km/h), or the outside temperature rises
above freezing the rain-sensing feature will then op-
erate.
3
UNDERSTANDING THE FEATURES OF YOUR VEHICLE 169
Page 182 of 558
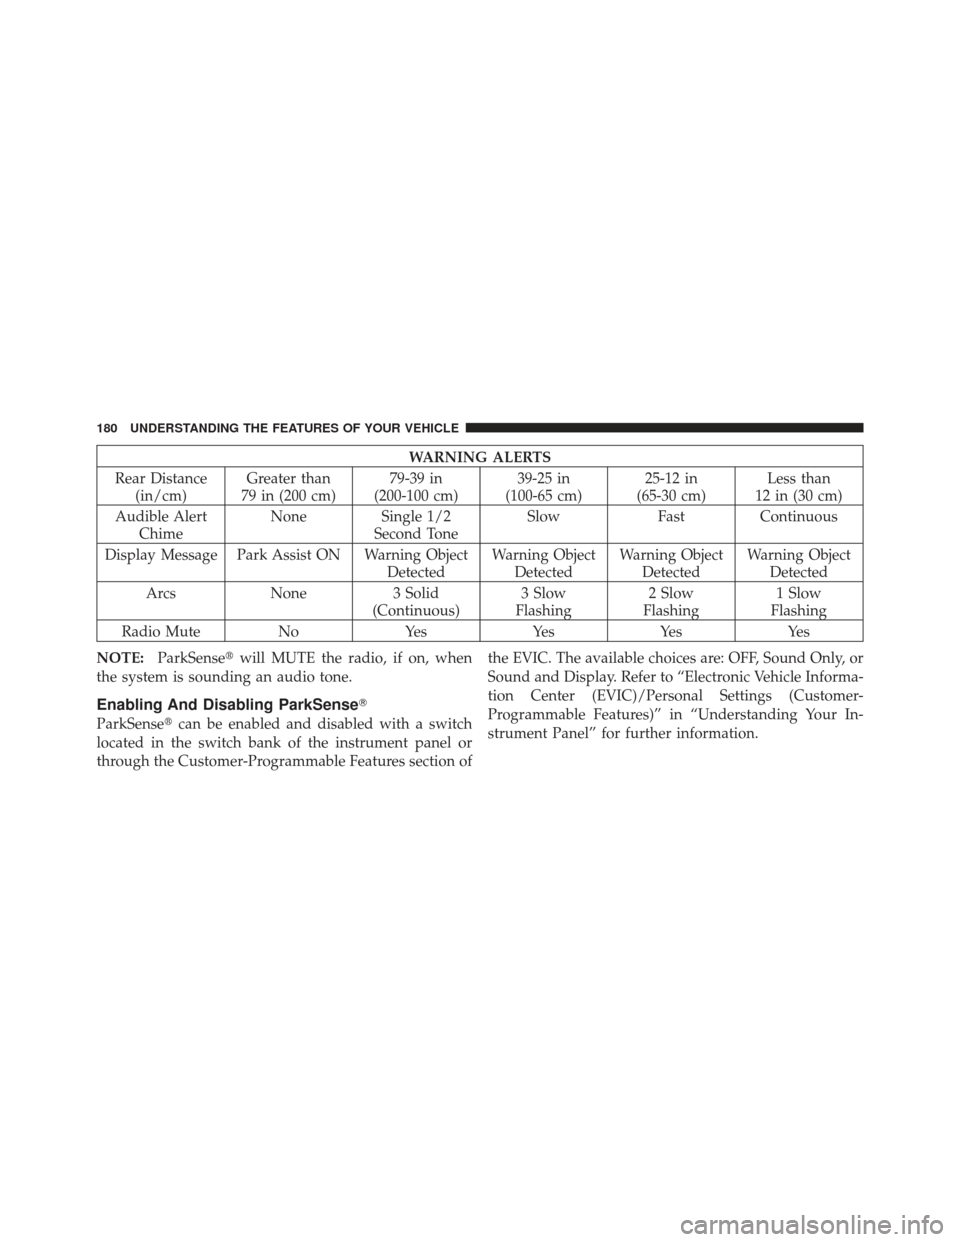
WARNING ALERTS
Rear Distance (in/cm) Greater than
79 in (200 cm) 79-39 in
(200-100 cm) 39-25 in
(100-65 cm) 25-12 in
(65-30 cm) Less than
12 in (30 cm)
Audible Alert Chime None
Single 1/2
Second Tone Slow
FastContinuous
Display Message Park Assist ON Warning Object DetectedWarning Object
Detected Warning Object
Detected Warning Object
Detected
Arcs None3 Solid
(Continuous) 3 Slow
Flashing 2 Slow
Flashing 1 Slow
Flashing
Radio Mute NoYes YesYesYes
NOTE: ParkSense� will MUTE the radio, if on, when
the system is sounding an audio tone.
Enabling And Disabling ParkSense �
ParkSense�can be enabled and disabled with a switch
located in the switch bank of the instrument panel or
through the Customer-Programmable Features section of the EVIC. The available choices are: OFF, Sound Only, or
Sound and Display. Refer to “Electronic Vehicle Informa-
tion Center (EVIC)/Personal Settings (Customer-
Programmable Features)” in “Understanding Your In-
strument Panel” for further information.
180 UNDERSTANDING THE FEATURES OF YOUR VEHICLE
Page 183 of 558
When the ParkSense�switch is pressed to
disable the system, the instrument cluster will
display the “PARK ASSIST OFF” message for
approximately five seconds. Refer to “Elec-
tronic Vehicle Information Center (EVIC)” in “Under-
standing Your Instrument Panel” for further information.
When the shift lever is moved to REVERSE and the
system is disabled, the EVIC will display the “PARK
ASSIST OFF” message for as long as the vehicle is in
REVERSE.
The ParkSense� switch LED will be ON when
ParkSense� is disabled or defective. The ParkSense �
switch LED will be OFF when the system is enabled.
Service The ParkSense� Rear Park Assist System
When the ParkSense�Rear Park Assist System is mal-
functioning, the instrument cluster will actuate a single
chime, once per ignition cycle, and it will display the
“SERVICE PARK ASSIST SYSTEM” message. Refer to “Electronic Vehicle Information Center (EVIC)” in “Un-
derstanding Your Instrument Panel” for further informa-
tion. When the shift lever is moved to REVERSE and the
system has detected a faulted condition, the EVIC will
display the “SERVICE PARK ASSIST SYSTEM” message
for as long as the vehicle is in REVERSE. Under this
condition, ParkSense�
will not operate.
If “SERVICE PARK ASSIST SYSTEM” appears in the
EVIC make sure the rear fascia/bumper is clean and clear
of snow, ice, mud, dirt or other obstruction and then cycle
the ignition. If the message appears again, see an autho-
rized dealer.
Cleaning The ParkSense �System
Clean the ParkSense� sensors with water, car wash soap
and a soft cloth. Do not use rough or hard cloths. Do not
scratch or poke the sensors. Otherwise, you could dam-
age the sensors.
3
UNDERSTANDING THE FEATURES OF YOUR VEHICLE 181