Page 265 of 371
What to do in an emergency
2
6
ROAD WARNING
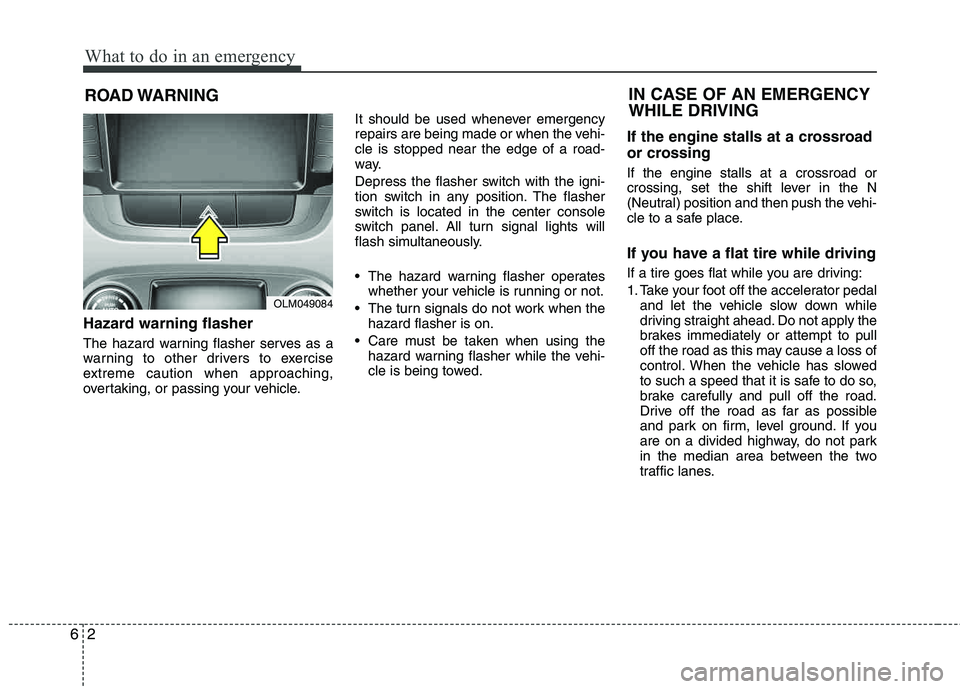
Hazard warning flasher
The hazard warning flasher serves as a
warning to other drivers to exercise
extreme caution when approaching,
overtaking, or passing your vehicle. It should be used whenever emergency
repairs are being made or when the vehi-cle is stopped near the edge of a road-
way.
Depress the flasher switch with the igni-
tion switch in any position. The flasher
switch is located in the center console
switch panel. All turn signal lights will
flash simultaneously.
• The hazard warning flasher operates
whether your vehicle is running or not.
The turn signals do not work when the hazard flasher is on.
Care must be taken when using the hazard warning flasher while the vehi-
cle is being towed.
If the engine stalls at a crossroad
or crossing
If the engine stalls at a crossroad or
crossing, set the shift lever in the N
(Neutral) position and then push the vehi-
cle to a safe place.
If you have a flat tire while driving
If a tire goes flat while you are driving:
1. Take your foot off the accelerator pedaland let the vehicle slow down while
driving straight ahead. Do not apply the
brakes immediately or attempt to pull
off the road as this may cause a loss of
control. When the vehicle has slowed
to such a speed that it is safe to do so,
brake carefully and pull off the road.
Drive off the road as far as possible
and park on firm, level ground. If you
are on a divided highway, do not park
in the median area between the two
traffic lanes.
IN CASE OF AN EMERGENCY WHILE DRIVING
OLM049084
Page 266 of 371
63
What to do in an emergency
2. When the vehicle is stopped, turn onyour emergency hazard flashers, set
the parking brake and put the transaxle
in P (automatic transaxle) or reverse
(manual transaxle).
3. Have all passengers get out of the vehicle. Be sure they all get out on the
side of the vehicle that is away from
traffic.
4. When changing a flat tire, follow the instruction provided later in this sec- tion.
If engine stalls while driving
1. Reduce your speed gradually, keeping a straight line. Move cautiously off the
road to a safe place.
2. Turn on your emergency flashers.
3. Try to start the engine again. If your vehicle will not start, contact an
authorized HYUNDAI dealer or seek
other qualified assistance.
If engine doesn't turn over or
turns over slowly
1. If your vehicle has an automatic
transaxle, be sure the shift lever is in N
(Neutral) or P (Park) and the emer-
gency brake is set.
2. Check the battery connections to be sure they are clean and tight.
3. Turn on the interior light. If the light dims or goes out when you operate the
starter, the battery is discharged.
4. Check the starter connections to be sure they are securely tightened.
5. Do not push or pull the vehicle to start it. See instructions for "Jump starting".
If engine turns over normally but
does not start
1. Check fuel level.
2. With the ignition switch in the LOCKposition, check all connectors at igni-
tion coils and spark plugs. Reconnect
any that may be disconnected or
loose.
3. Check the fuel line in the engine com- partment.
4. If the engine still does not start, call an authorized HYUNDAI dealer or seek
other qualified assistance.
IF THE ENGINE WILL NOT START
WARNING
If the engine will not start, do not
push or pull the vehicle to start it.This could result in a collision or
cause other damage. In addition,
push or pull starting may cause the
catalytic converter to be over-
loaded and create a fire hazard.
Page 268 of 371
65
What to do in an emergency
Jump starting procedure
1. Make sure the booster battery is 12-volt and that its negative terminal is
grounded.
2. If the booster battery is in another vehicle, do not allow the vehicles to touch.
3. Turn off all unnecessary electrical loads.
4. Connect the jumper cables in the exact sequence shown in the illustration.First connect one end of a jumper
cable to the positive terminal of the
discharged battery (1), then connect
the other end to the positive terminal
on the booster battery (2).
Proceed to connect one end of the
other jumper cable to the negative ter-
minal of the booster battery (3), then
the other end to a solid, stationary,
metallic point (for example, the engine
lifting bracket) away from the battery
(4). Do not connect it to or near any
part that moves when the engine is
cranked. Do not allow the jumper cables to con-
tact anything except the correct battery
terminals or the correct ground. Do not
lean over the battery when making
connections.
5. Start the engine of the vehicle with the booster battery and let it run at 2,000
rpm, then start the engine of the vehi-
cle with the discharged battery.
If the cause of your battery discharging is
not apparent, you should have your vehi-cle checked by an authorized HYUNDAIdealer.
Push-starting
Your manual transaxle-equipped vehicle
should not be push-started because it might damage the emission control sys- tem.
Vehicles equipped with automatic
transaxle cannot be push-started.
Follow the directions in this section for
jump-starting.
CAUTION - Battery cables
Do not connect the jumper cable
from the negative terminal of thebooster battery to the negative ter-
minal of the discharged battery.This can cause the discharged bat- tery to overheat and crack, releas-ing battery acid.
WARNING
Never tow a vehicle to start it
because the sudden surge forward
when the engine starts could cause
a collision with the tow vehicle.
Page 269 of 371
What to do in an emergency
6
6
IF THE ENGINE OVERHEATS
If your temperature gauge indicates over-
heating, you experience a loss of power,
or hear loud pinging or knocking, the
engine is probably too hot. If this hap-
pens, you should:
1. Pull off the road and stop as soon as it is safe to do so.
2. Place the shift lever in P (automatic transaxle) or neutral (manual transaxle)
and set the parking brake. If the air con-
ditioning is on, turn it off.
3. If engine coolant is running out under the vehicle or steam is coming out
from the hood, stop the engine. Do not open the hood until the coolant has
stopped running or the steaming has
stopped. If there is no visible loss of
engine coolant and no steam, leave
the engine running and check to be
sure the engine cooling fan is operat-
ing. If the fan is not running, turn the
engine off. 4. Check to see if the water pump drive
belt is missing. If it is not missing,
check to see that it is tight. If the drive
belt seems to be satisfactory, check for
coolant leaking from the radiator,
hoses or under the vehicle. (If the air
conditioning had been in use, it is nor-
mal for cold water to be draining from
it when you stop).
5. If the water pump drive belt is broken or engine coolant is leaking out, stop the engine immediately and call the
nearest authorized HYUNDAI dealer
for assistance. 6. If you cannot find the cause of the
overheating, wait until the engine tem-
perature has returned to normal. Then, if coolant has been lost, carefully add
coolant to the reservoir to bring the
fluid level in the reservoir up to the
halfway mark.
7. Proceed with caution, keeping alert for further signs of overheating. If over- heating happens again, call an author-
ized HYUNDAI dealer for assistance.
WARNING
While the engine is running, keep
hair, hands and clothing away from
moving parts such as the fan and
drive belts to prevent injury.
CAUTION
Serious loss of coolant indicates there is a leak in the cooling systemand this should be checked as soon
as possible by an authorizedHYUNDAI dealer.
WARNING
Do not remove the radiator cap
when the engine is hot. This can
allow coolant to be blown out of the
opening and cause serious burns.
Page 271 of 371
What to do in an emergency
8
6
✽✽
NOTICE
If the TPMS, Low Tire Pressure indi-
cator does not illuminate for 3 sec-
onds when the ignition switch is
turned to the ON position or the
engine is running, or if it remains
illuminated after coming on for
approximately 3 seconds, take your
vehicle to your nearest authorized
HYUNDAI dealer and have the sys-
tem checked.Low tire pressure tell- tale
When the tire pressure monitoring
system warning indicator is illuminat-
ed, one or more of your tires is sig-nificantly under-inflated.
Immediately reduce your speed,
avoid hard cornering and anticipate
increased stopping distances. You
should stop and check your tires as
soon as possible. Inflate the tires tothe proper pressure as indicated on
the vehicle’s placard or tire inflation
pressure label located on the driver’s
side center pillar outer panel. If you
cannot reach a service station or if
the tire cannot hold the newly added
air, replace the low pressure tire with
the compact spare tire.
Then the TPMS malfunction indicator
may turn on and the Low TirePressure telltale will remain on until
you have the low-pressure tire
repaired and replaced on the vehicle.✽✽ NOTICE
The compact spare tire is not
equipped with a tire pressure sensor.
Page 276 of 371
613
What to do in an emergency
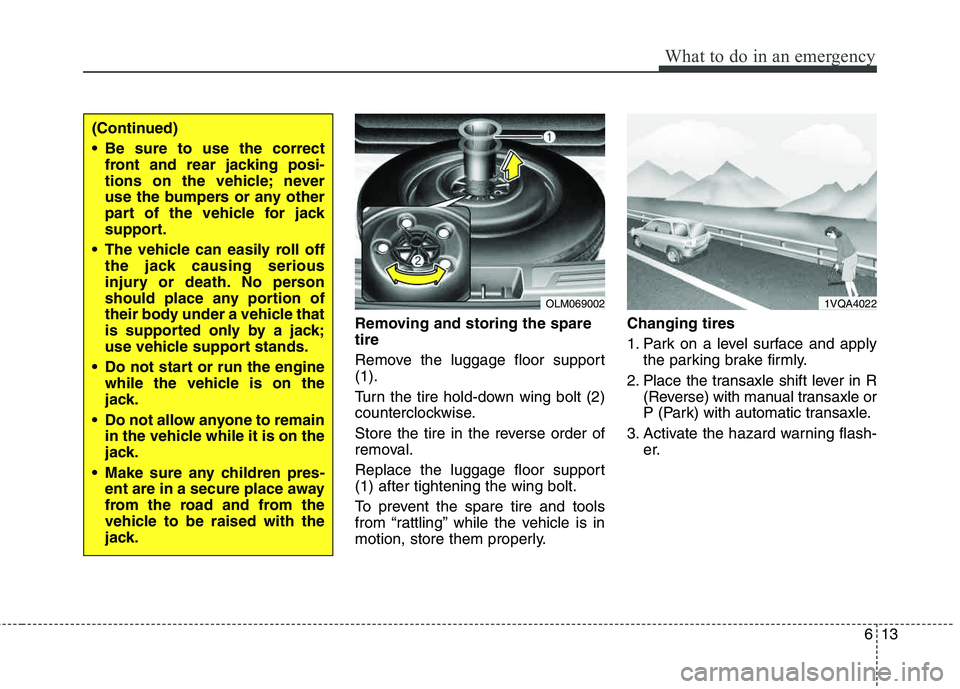
Removing and storing the spare tire
Remove the luggage floor support (1).
Turn the tire hold-down wing bolt (2)
counterclockwise.
Store the tire in the reverse order of
removal.
Replace the luggage floor support (1) after tightening the wing bolt.
To prevent the spare tire and tools
from “rattling” while the vehicle is in
motion, store them properly.Changing tires
1. Park on a level surface and apply
the parking brake firmly.
2. Place the transaxle shift lever in R (Reverse) with manual transaxle or
P (Park) with automatic transaxle.
3. Activate the hazard warning flash- er.
(Continued)
Be sure to use the correctfront and rear jacking posi-
tions on the vehicle; never
use the bumpers or any other
part of the vehicle for jack
support.
The vehicle can easily roll off the jack causing serious
injury or death. No person
should place any portion of
their body under a vehicle that
is supported only by a jack;
use vehicle support stands.
Do not start or run the engine while the vehicle is on the
jack.
Do not allow anyone to remain in the vehicle while it is on the
jack.
Make sure any children pres- ent are in a secure place away
from the road and from the
vehicle to be raised with the
jack.
OLM0690021VQA4022
Page 288 of 371
7
Engine compartment / 7-2
Maintenance services / 7-3
Owner maintenance / 7-4
Scheduled maintenance service / 7-6
Explanation of scheduled maintenance items / 7-18
Engine oil / 7-21
Engine coolant / 7-22
Brake/clutch fluid / 7-25
Washer fluid / 7-26
Parking brake / 7-27
Air cleaner / 7-28
Climate control air filter / 7-29
Wiper blades / 7-31
Battery / 7-34
Tires and wheels / 7-37
Fuses / 7-50
Light bulbs / 7-59
Appearance care / 7-66
Emission control system / 7-72
California perchlorate notice / 7-75
Maintenance
Page 289 of 371
Maintenance
2
7
ENGINE COMPARTMENT
1. Engine coolant reservoir
2. Engine oil filler cap
3. Brake/Clutch* fluid reservoir
4. Air cleaner
5. Fuse box
6. Negative battery terminal
7. Positive battery terminal
8. Radiator cap
9. Engine oil dipstick
10. Windshield washer fluid reservoir
* : if equipped
OLM079001
* The actual engine room in the vehicle may differ from the i llustration.