2012 Hyundai Sonata radio
[x] Cancel search: radioPage 2 of 411
F2
Your Hyundai should not be modified in any way. Such modifications may adversely affect the per-
formance, safety or durability of your Hyundai and may, in addition, violate conditions of the limited
warranties covering the vehicle. Certain modifications may also be in violation of regulations estab-
lished by the U.S. Department of Transportation and other federal or state agencies.Your vehicle is equipped with electronic fuel injection and other electronic c\
omponents. It is possible
for an improperly installed/adjusted two-way radio or cellular telephone to adversely affect electronic
systems. For this reason, we recommend that you carefully follow the radio manufacturer's instruc-
tions or consult your Hyundai dealer for precautionary measures or special instructions if you choose
to install one of these devices.
CAUTION: MODIFICATIONS TO YOUR HYUNDAI
TWO-WAY RADIO OR CELLULAR TELEPHONE INSTALLATION
Page 91 of 411

49
Features of your vehicle
PanicThe horn sounds and hazard warning
lights flash for about 30 seconds if this
button(4) is pressed for more than 1 sec-
ond. To stop the horn and lights, press
any button on the smart key.Start-upYou can start the engine without inserting
the key. For detailed information refer to
the “Engine start/stop button” in section
5.
Smart key precautions✽ ✽NOTICE• If, for some reason, you happen to lose
your smart key, you will not be able to
start the engine. Tow the vehicle, if
necessary, and contact an authorized
HYUNDAI dealer.
• A maximum of 2 smart keys can be registered to a single vehicle. If you
lose a smart key, you should immedi-
ately take the vehicle and key to your
authorized HYUNDAI dealer to pro-
tect it from potential theft.
• The smart key will not work if any of the following occur:
- The smart key is close to a radiotransmitter such as a radio station or
an airport which can interfere with
normal operation of the smart key.
- The smart key near a mobile two- way radio system or a cellular
phone.
- Another vehicle’s smart key is being operated close to your vehicle.
When the smart key does not work
correctly, open and close the door with
the mechanical key. If you have a
problem with the smart key, contact
an authorized HYUNDAI dealer.
CAUTION
Keep the smart key away from
water or any liquid. If the keyless entry system is inoperative due toexposure to water or liquids, it willnot be covered by your manufactur- er’s vehicle warranty.
Page 95 of 411

413
Features of your vehicle
Transmitter precautions✽
✽NOTICEThe transmitter will not work if any of
following occur:
• The ignition key is in ignition switch.
• You exceed the operating distance
limit (about 90 feet [30 m]).
• The battery in the transmitter is weak.
• Other vehicles or objects may be blocking the signal.
• The weather is extremely cold.
• The transmitter is close to a radio transmitter such as a radio station or
an airport which can interfere with
normal operation of the transmitter.
When the transmitter does not work
correctly, open and close the door with
the ignition key. If you have a problem
with the transmitter, contact an author-
ized HYUNDAI dealer.
This device complies with Part 15 of
the FCC rules.
Operation is subject to the following two
conditions:
1. This device may not cause harmful interference, and
2. This device must accept any interfer- ence received, including interference
that may cause undesired operation.
Battery replacementThe transmitter uses a 3 volt lithium bat-
tery which will normally last for several
years. When replacement is necessary,
use the following procedure.
1. Insert a slim tool into the slot and gen-tly pry open the transmitter center
cover.
2. Replace the battery with a new battery (CR2032). When replacing the battery,
make sure the battery positive “+” sym-
bol faces up.
3. Install the battery in the reverse order of removal.
For replacement transmitters, see an
authorized HYUNDAI dealer for transmit-
ter reprogramming.
CAUTION
Keep the transmitter away from water or any liquid. If the keylessentry system is inoperative due toexposure to water or liquids, it willnot be covered by your manufactur- er’s vehicle warranty.
WARNING
Changes or modifications not
expressly approved by the party
responsible for compliance could
void the user’s authority to operate
the equipment. If the keyless entry
system is inoperative due to
changes or modifications not
expressly approved by the party
responsible for compliance, it will
not be covered by your manufactur-
er’s vehicle warranty.
ONF048120
Page 126 of 411

Features of your vehicle44
4To adjust the Zone setting:
1. Determine the desired Zone Number
based upon your current location on
the Zone Map.
2. Press and hold the button for 6 sec- onds, the current Zone Number will
appear on the display.
3. Pressing and holding the button again will cause the numbers to incre-
ment (Note: they will repeat …13, 14,
15, 1, 2, …). Releasing the button
when the desired Zone Number
appears on the display will set the new
Zone.
4. Within about 5 seconds the compass will start displaying a compass head-
ing again.
There are some conditions that can
cause changes to the vehicle magnets,
such as installing a ski rack or a CB
antenna. Body repair work on the vehicle
can also cause changes to the vehicle's
magnetic field. In these situations, the
compass will need to be re-calibrated to
quickly correct for these changes. To re-
calibrate the compass: 1. Press and hold the button for more
than 9 seconds. When the compass
memory is cleared a "C" will appear in
the display.
2. To calibrate the compass, drive the vehicle in 2 complete circles at less
than 5 mph (8 km/h).
Integrated HomeLink
®Wireless Control
System
The HomeLink
®Wireless Control System
provides a convenient way to replace up
to three hand-held radio-frequency (RF)
transmitters with a single built-in device.
This innovative feature will learn the
radio frequency codes of most current
transmitters to operate devices such as
gate operators, garage door openers,
entry door locks, security systems, even
home lighting. Both standard and rolling
code-equipped transmitters can be pro-
grammed by following the outlined proce-
dures. Additional HomeLink
®information
can be found at: www.homelink.com or
by calling 1-800-355-3515. Retain the original transmitter of the RF
device you are programming for use in
other vehicles as well as for future
HomeLink
®programming. It is also sug-
gested that upon the sale of the vehicle,
the programmed HomeLink
®buttons be
erased for security purposes.
CAUTION
Before programming HomeLink
®to
a garage door opener or gate oper- ator, make sure that people andobjects are out of the way of thedevice to prevent potential harm or damage. Do not use HomeLink®
with any garage door opener thatlacks the safety stop and reversefeatures required by U.S. federal safety standards (this includes anygarage door opener model manu- factured before April 1, 1982). Agarage door that cannot detect anobject - signaling the door to stop and reverse - does not meet currentU.S. federal safety standards. Usinga garage door opener without these features increases the risk of seri-ous injury or death.
Page 127 of 411
445
Features of your vehicle
Programming HomeLink
®
✽
✽NOTICE• When programming a garage door
opener, it is advised to park the vehi-
cle outside of the garage.
• It is recommended that a new battery be placed in the hand-held transmit-
ter of the device being programmed to
HomeLink
®for quicker training and
accurate transaxle of the radio-fre-
quency signal.
• Some vehicles may require the igni- tion switch to be turned to the second
(or "accessories") position for pro-
gramming and/or operation of
HomeLink.
• In the event that there are still pro- gramming difficulties or questions
after following the programming steps
listed below, contact HomeLink
®at:
www.homelink.com or 1-800-355-
3515.
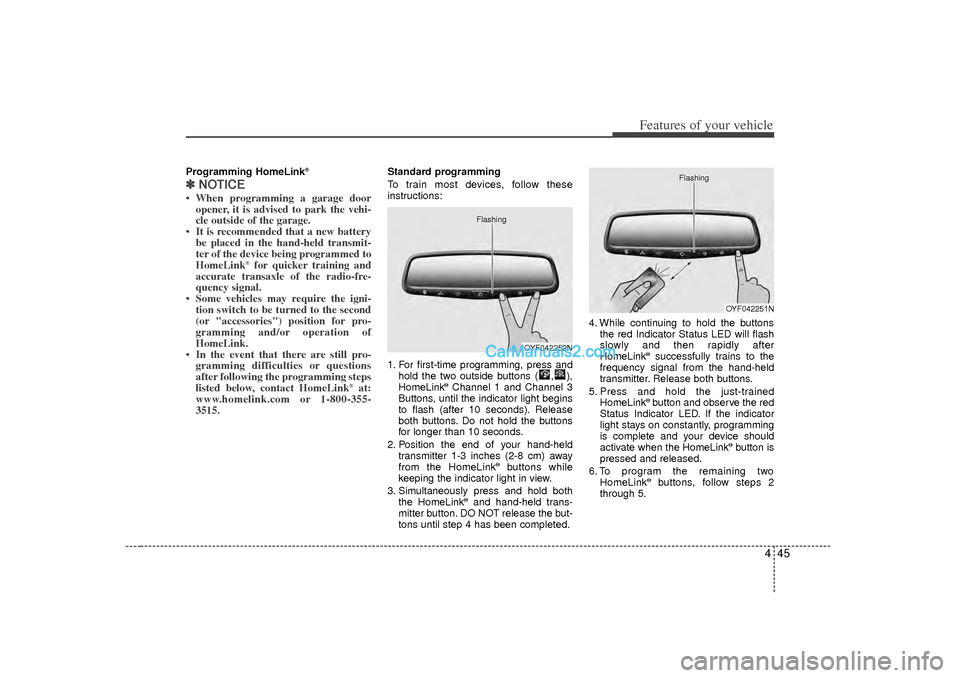
Standard programming
To train most devices, follow these
instructions:
1. For first-time programming, press and
hold the two outside buttons ( , ),
HomeLink
®Channel 1 and Channel 3
Buttons, until the indicator light begins
to flash (after 10 seconds). Release
both buttons. Do not hold the buttons
for longer than 10 seconds.
2. Position the end of your hand-held transmitter 1-3 inches (2-8 cm) away
from the HomeLink
®buttons while
keeping the indicator light in view.
3. Simultaneously press and hold both the HomeLink
®and hand-held trans-
mitter button. DO NOT release the but-
tons until step 4 has been completed. 4. While continuing to hold the buttons
the red Indicator Status LED will flash
slowly and then rapidly after
HomeLink
®successfully trains to the
frequency signal from the hand-held
transmitter. Release both buttons.
5. Press and hold the just-trained HomeLink®button and observe the red
Status Indicator LED. If the indicator
light stays on constantly, programming
is complete and your device should
activate when the HomeLink
®button is
pressed and released.
6. To program the remaining two HomeLink
®buttons, follow steps 2
through 5.
OYF042252N
Flashing
OYF042251N
Flashing
Page 194 of 411
Features of your vehicle112
4
■
■
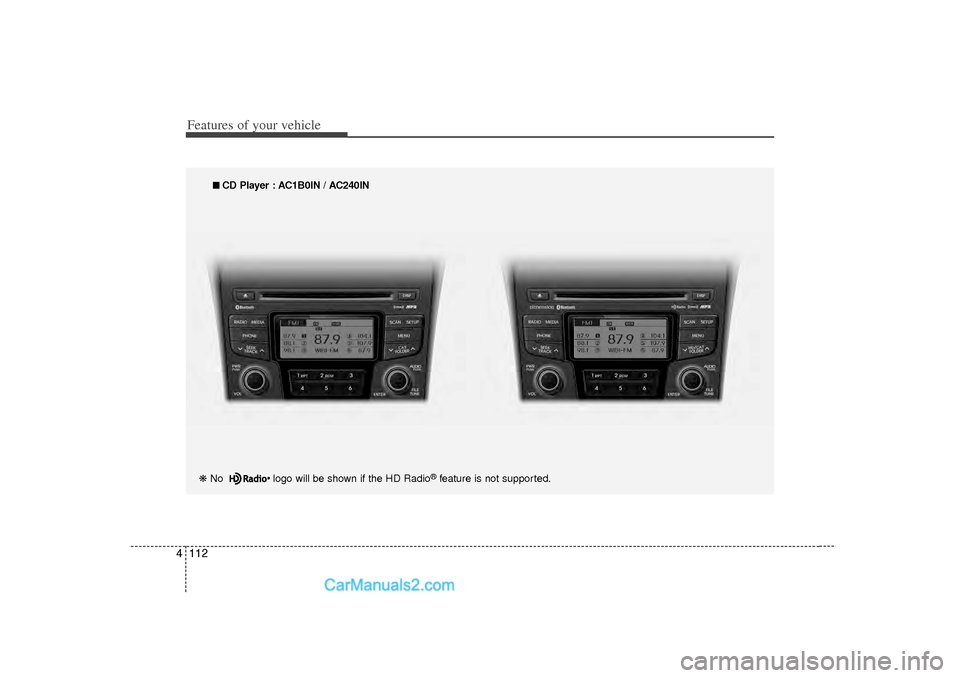
CD Player : AC1B0IN / AC240IN
❋ No logo will be shown if the HD Radio
®feature is not supported.
Features of your vehicle
Page 195 of 411
4 113
Features of your vehicle
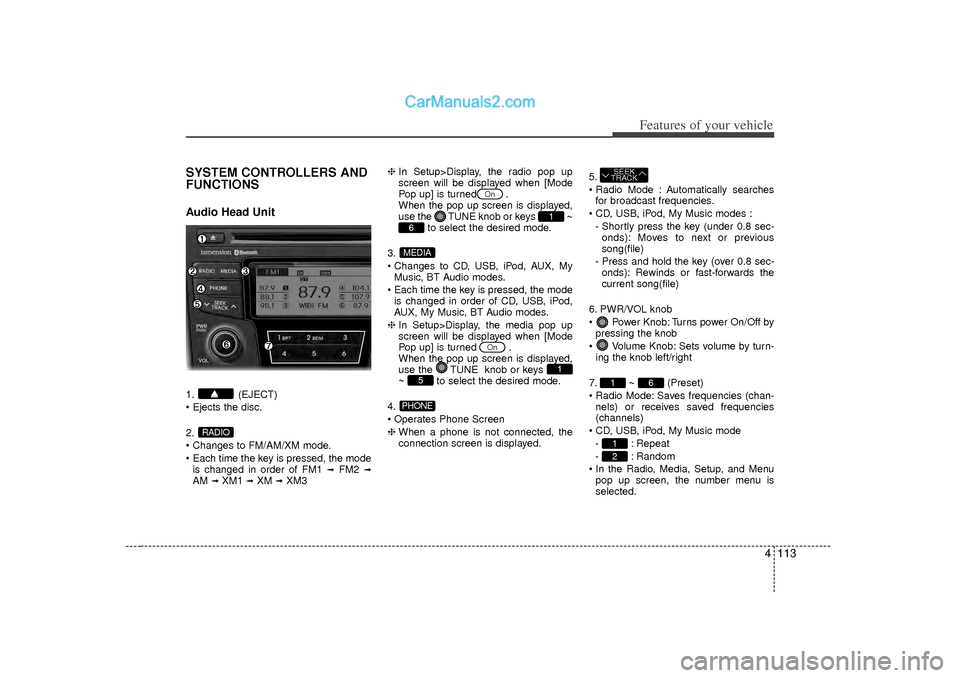
SYSTEM CONTROLLERS AND
FUNCTIONSAudio Head Unit1. (EJECT)
Ejects the disc.
2.
Changes to FM/AM/XM mode.
Each time the key is pressed, the modeis changed in order of FM1
➟
FM2
➟
AM
➟XM1
➟XM
➟XM3 ❈
In Setup>Display, the radio pop up
screen will be displayed when [Mode
Pop up] is turned .
When the pop up screen is displayed,
use the TUNE knob or keys
~
to select the desired mode.
3.
Changes to CD, USB, iPod, AUX, My Music, BT Audio modes.
Each time the key is pressed, the mode is changed in order of CD, USB, iPod,
AUX, My Music, BT Audio modes.
❈ In Setup>Display, the media pop up
screen will be displayed when [Mode
Pop up] is turned .
When the pop up screen is displayed,
use the TUNE knob or keys
~ to select the desired mode.
4.
Operates Phone Screen
❈ When a phone is not connected, the
connection screen is displayed. 5.
Radio Mode : Automatically searches
for broadcast frequencies.
CD, USB, iPod, My Music modes : - Shortly press the key (under 0.8 sec-onds): Moves to next or previous
song(file)
- Press and hold the key (over 0.8 sec- onds): Rewinds or fast-forwards the
current song(file)
6. PWR/VOL knob
Power Knob: Turns power On/Off by pressing the knob
Volume Knob: Sets volume by turn- ing the knob left/right
7. ~ (Preset)
Radio Mode: Saves frequencies (chan- nels) or receives saved frequencies
(channels)
CD, USB, iPod, My Music mode - : Repeat
- : Random
In the Radio, Media, Setup, and Menu pop up screen, the number menu is
selected.
21
6
1SEEK
TRACK
PHONE
5
1
On
MEDIA6
1
On
RADIO
Page 196 of 411
Features of your vehicle114
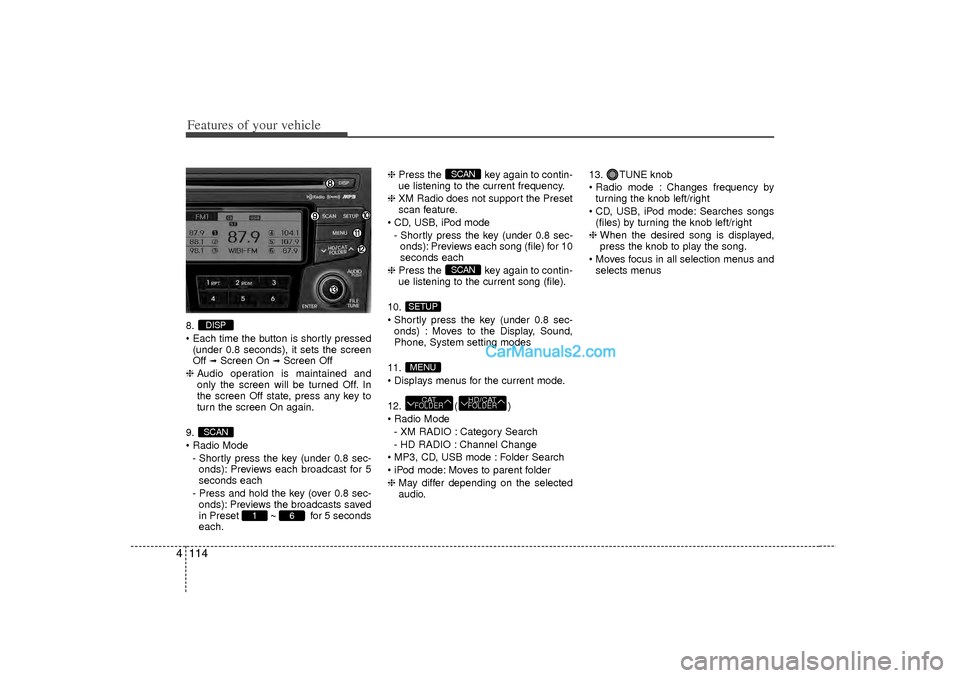
48.
Each time the button is shortly pressed
(under 0.8 seconds), it sets the screen
Off
➟Screen On
➟Screen Off
❈ Audio operation is maintained and
only the screen will be turned Off. In
the screen Off state, press any key to
turn the screen On again.
9.
Radio Mode - Shortly press the key (under 0.8 sec-onds): Previews each broadcast for 5
seconds each
- Press and hold the key (over 0.8 sec- onds): Previews the broadcasts saved
in Preset ~ for 5 seconds
each. ❈
Press the key again to contin-
ue listening to the current frequency.
❈ XM Radio does not support the Preset
scan feature.
CD, USB, iPod mode - Shortly press the key (under 0.8 sec-onds): Previews each song (file) for 10
seconds each
❈ Press the key again to contin-
ue listening to the current song (file).
10.
Shortly press the key (under 0.8 sec- onds) : Moves to the Display, Sound,
Phone, System setting modes
11.
Displays menus for the current mode.
12. ( )
Radio Mode - XM RADIO : Category Search
- HD RADIO : Channel Change
MP3, CD, USB mode : Folder Search
iPod mode: Moves to parent folder
❈ May differ depending on the selected
audio. 13. TUNE knob
Radio mode : Changes frequency by
turning the knob left/right
CD, USB, iPod mode: Searches songs (files) by turning the knob left/right
❈ When the desired song is displayed,
press the knob to play the song.
Moves focus in all selection menus and selects menus
HD/CATFOLDER
CATFOLDERMENUSETUP
SCANSCAN
6
1
SCANDISP