Page 142 of 363
Features of your vehicle
70
4
Lighting control
The light switch has a Headlight and a
Parking light position.
To operate the lights, turn the knob at the
end of the control lever to one of the fol-
lowing positions:
(1) OFF position
(2) Parking light position
(3) Headlight position
(4) Auto light position (if equipped)Parking light position ( )
When the light switch is in the parking
light position, the tail, license and instru-ment panel lights are ON and the tail light
indicator is ON. (if equipped)
Headlight position ( )
When the light switch is in the headlight position, the head, tail and license lightsare ON.
✽✽
NOTICE
The ignition switch must be in the ON
position to turn on the headlights.
OXM049110ROAM049041R-1OAM049042R-1
Page 144 of 363
Features of your vehicle
72
4
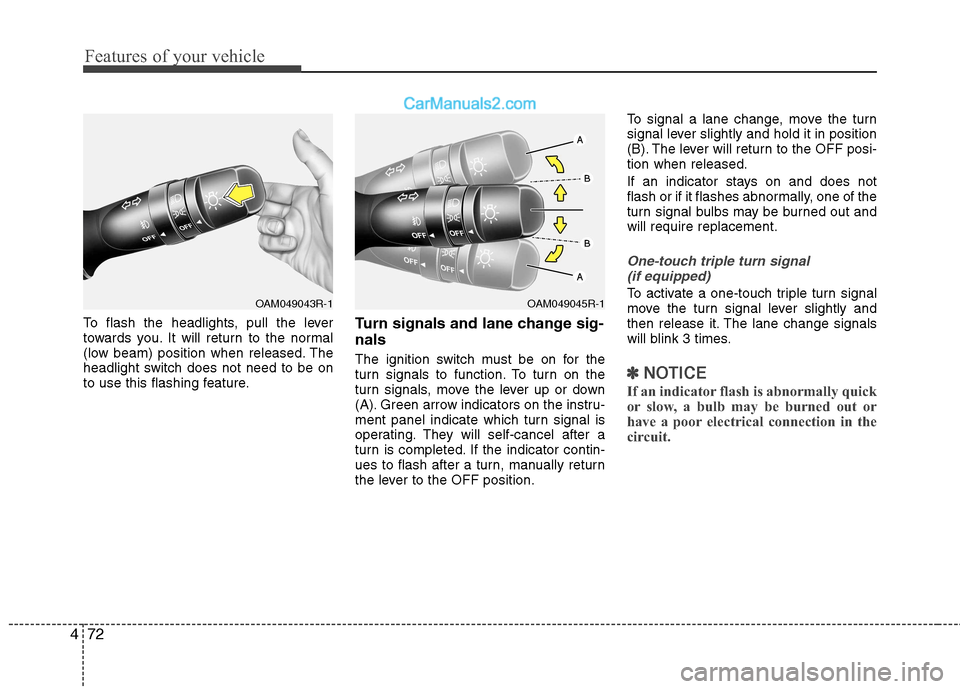
To flash the headlights, pull the lever
towards you. It will return to the normal
(low beam) position when released. The
headlight switch does not need to be on
to use this flashing feature. Turn signals and lane change sig- nals
The ignition switch must be on for the
turn signals to function. To turn on the
turn signals, move the lever up or down
(A). Green arrow indicators on the instru-
ment panel indicate which turn signal is
operating. They will self-cancel after a
turn is completed. If the indicator contin-
ues to flash after a turn, manually return
the lever to the OFF position.To signal a lane change, move the turn
signal lever slightly and hold it in position
(B). The lever will return to the OFF posi-tion when released.
If an indicator stays on and does not
flash or if it flashes abnormally, one of the
turn signal bulbs may be burned out andwill require replacement.
One-touch triple turn signal
(if equipped)
To activate a one-touch triple turn signal
move the turn signal lever slightly and
then release it. The lane change signals
will blink 3 times.
✽✽ NOTICE
If an indicator flash is abnormally quick
or slow, a bulb may be burned out or
have a poor electrical connection in the
circuit.
OAM049045R-1OAM049043R-1
Page 146 of 363
Features of your vehicle
74
4
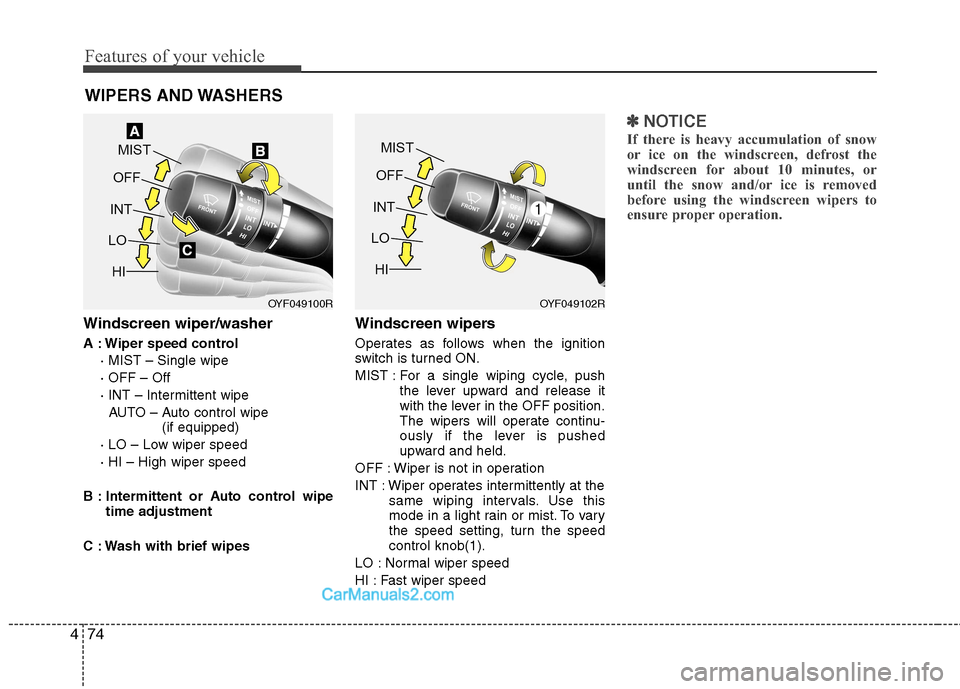
Windscreen wiper/washer
A : Wiper speed control
· MIST – Single wipe · OFF – Off
· INT – Intermittent wipe AUTO – Auto control wipe (if equipped)
· LO – Low wiper speed· HI – High wiper speed
B : Intermittent or Auto control wipe time adjustment
C : Wash with brief wipes Windscreen wipers
Operates as follows when the ignition
switch is turned ON.
MIST : For a single wiping cycle, push
the lever upward and release it
with the lever in the OFF position.
The wipers will operate continu-
ously if the lever is pushed
upward and held.
OFF : Wiper is not in operation
INT : Wiper operates intermittently at the same wiping intervals. Use this
mode in a light rain or mist. To vary
the speed setting, turn the speedcontrol knob(1).
LO : Normal wiper speed
HI : Fast wiper speed
✽✽ NOTICE
If there is heavy accumulation of snow
or ice on the windscreen, defrost the
windscreen for about 10 minutes, or
until the snow and/or ice is removed
before using the windscreen wipers to
ensure proper operation.
WIPERS AND WASHERS
OYF049100ROYF049102R
Page 147 of 363
475
Features of your vehicle
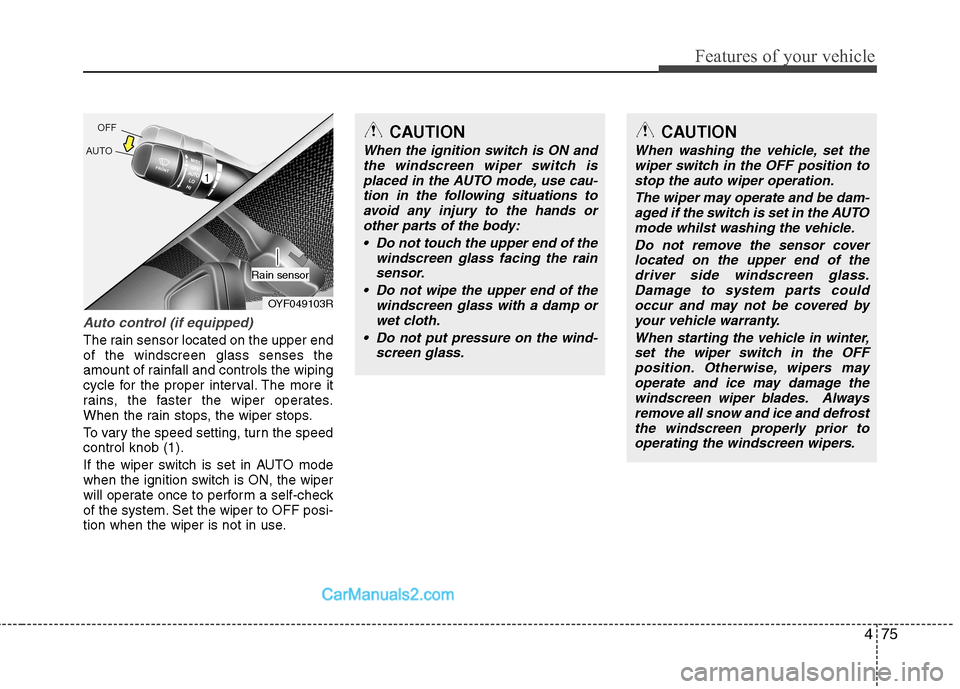
Auto control (if equipped)
The rain sensor located on the upper end of the windscreen glass senses the
amount of rainfall and controls the wiping
cycle for the proper interval. The more it
rains, the faster the wiper operates.
When the rain stops, the wiper stops.
To vary the speed setting, turn the speed control knob (1).
If the wiper switch is set in AUTO mode
when the ignition switch is ON, the wiper
will operate once to perform a self-check
of the system. Set the wiper to OFF posi-
tion when the wiper is not in use.
OYF049103R
Rain sensor
CAUTION
When the ignition switch is ON andthe windscreen wiper switch is
placed in the AUTO mode, use cau-tion in the following situations toavoid any injury to the hands or other parts of the body:
Do not touch the upper end of the windscreen glass facing the rainsensor.
Do not wipe the upper end of the windscreen glass with a damp or
wet cloth.
Do not put pressure on the wind- screen glass.
CAUTION
When washing the vehicle, set thewiper switch in the OFF position to
stop the auto wiper operation.
The wiper may operate and be dam-aged if the switch is set in the AUTOmode whilst washing the vehicle.
Do not remove the sensor coverlocated on the upper end of the driver side windscreen glass.Damage to system parts couldoccur and may not be covered by
your vehicle warranty.
When starting the vehicle in winter,set the wiper switch in the OFF position. Otherwise, wipers mayoperate and ice may damage the
windscreen wiper blades. Alwaysremove all snow and ice and defrost the windscreen properly prior tooperating the windscreen wipers.
Page 149 of 363
477
Features of your vehicle
INTERIOR LIGHT
Automatic turn off function (if equipped)
The interior lights automatically turn off
approximately 20 minutes after the igni-
tion switch is turned off.
If your vehicle is equipped with the theft
alarm system, the interior lights automat-
ically turns off approximately 5 seconds
after the system is armed stage. M
ap lamp
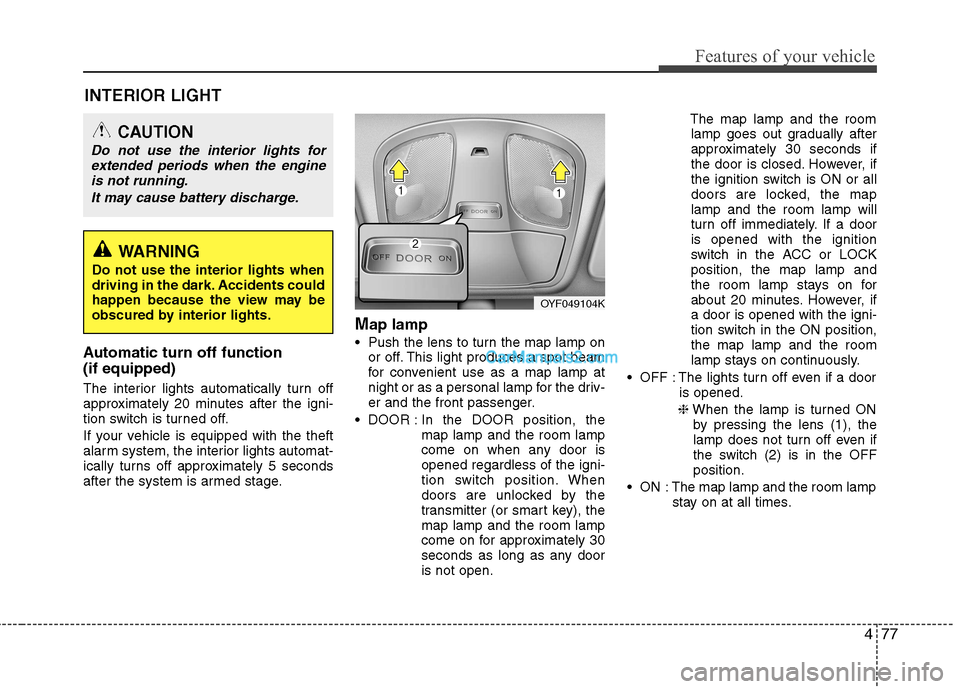
Push the lens to turn the map lamp on or off. This light produces a spot beam
for convenient use as a map lamp at
night or as a personal lamp for the driv-
er and the front passenger.
DOOR : In the DOOR position, the
map lamp and the room lamp
come on when any door isopened regardless of the igni-
tion switch position. When
doors are unlocked by the
transmitter (or smart key), themap lamp and the room lamp
come on for approximately 30
seconds as long as any dooris not open. The map lamp and the room
lamp goes out gradually after
approximately 30 seconds if
the door is closed. However, if
the ignition switch is ON or all
doors are locked, the maplamp and the room lamp will
turn off immediately. If a dooris opened with the ignition
switch in the ACC or LOCKposition, the map lamp and
the room lamp stays on for
about 20 minutes. However, ifa door is opened with the igni-
tion switch in the ON position,the map lamp and the room
lamp stays on continuously.
OFF : The lights turn off even if a door is opened.
❈ When the lamp is turned ON
by pressing the lens (1), the
lamp does not turn off even if
the switch (2) is in the OFFposition.
ON : The map lamp and the room lamp stay on at all times.
CAUTION
Do not use the interior lights for
extended periods when the engine
is not running.
It may cause battery discharge.
OYF049104K
WARNING
Do not use the interior lights when
driving in the dark. Accidents could
happen because the view may be
obscured by interior lights.
Page 152 of 363
Features of your vehicle
80
4
DEFROSTER
✽✽
NOTICE
If you want to defrost and defog the
front windscreen, refer to “Windscreen
defrosting and defogging” in this sec-
tion.
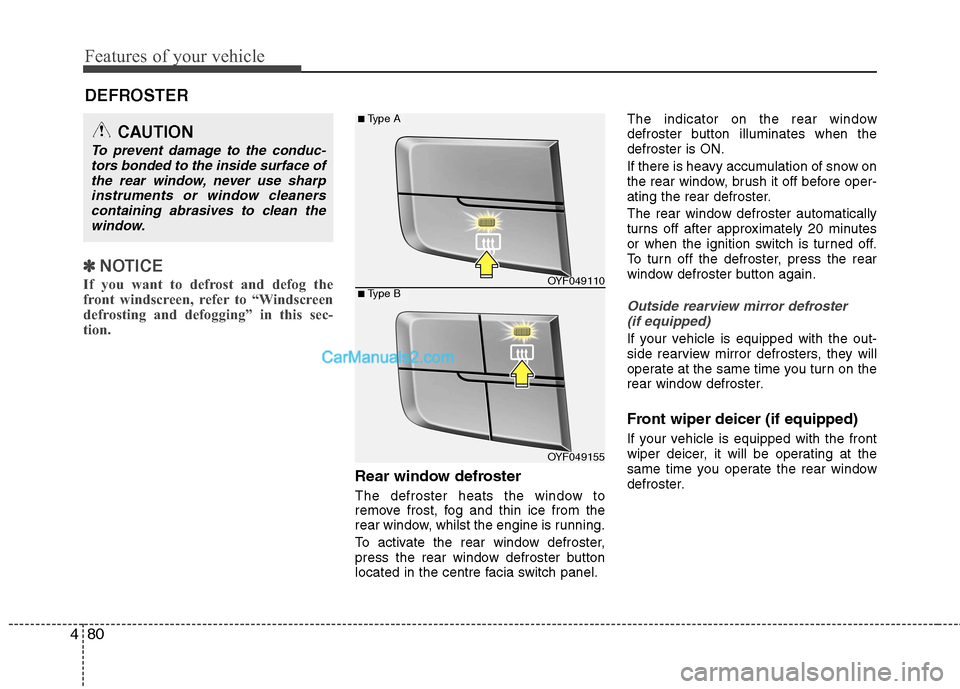
Rear window defroster
The defroster heats the window to
remove frost, fog and thin ice from the
rear window, whilst the engine is running.
To activate the rear window defroster,
press the rear window defroster button
located in the centre facia switch panel. The indicator on the rear window
defroster button illuminates when thedefroster is ON.
If there is heavy accumulation of snow on
the rear window, brush it off before oper-
ating the rear defroster.
The rear window defroster automatically
turns off after approximately 20 minutes
or when the ignition switch is turned off.
To turn off the defroster, press the rear
window defroster button again.
Outside rearview mirror defroster
(if equipped)
If your vehicle is equipped with the out-
side rearview mirror defrosters, they will
operate at the same time you turn on the
rear window defroster.
Front wiper deicer (if equipped)
If your vehicle is equipped with the front
wiper deicer, it will be operating at the
same time you operate the rear window
defroster.
CAUTION
To prevent damage to the conduc- tors bonded to the inside surface of
the rear window, never use sharpinstruments or window cleanerscontaining abrasives to clean the window.
OYF049110
OYF049155
■ Type B
■Type A
Page 158 of 363
Features of your vehicle
86
4
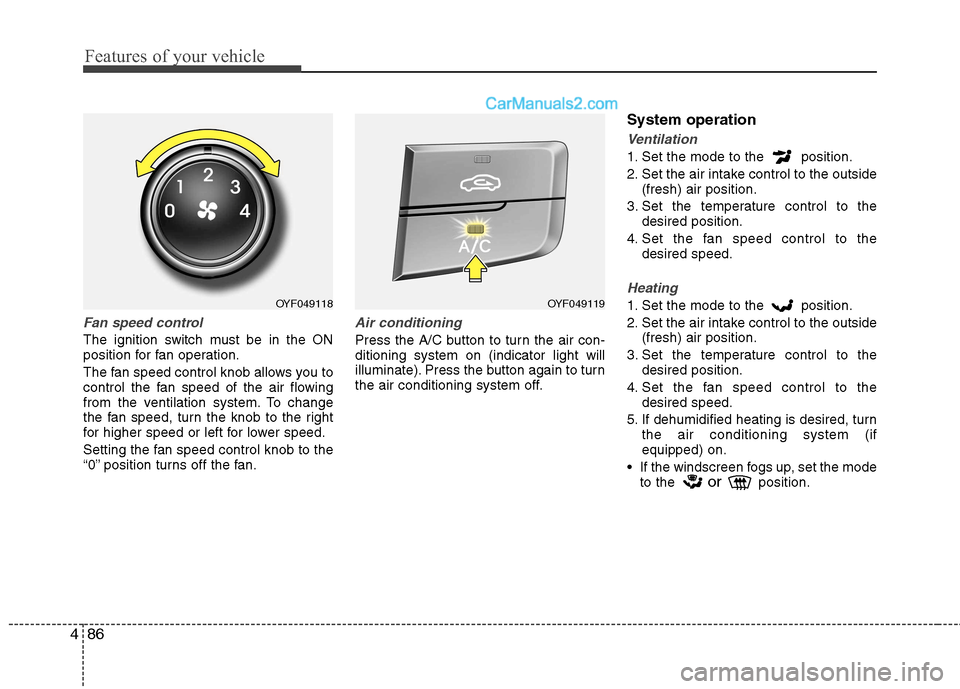
Fan speed control
The ignition switch must be in the ON
position for fan operation.
The fan speed control knob allows you to
control the fan speed of the air flowing
from the ventilation system. To change
the fan speed, turn the knob to the right
for higher speed or left for lower speed.
Setting the fan speed control knob to the
“0” position turns off the fan.
Air conditioning
Press the A/C button to turn the air con- ditioning system on (indicator light will
illuminate). Press the button again to turn
the air conditioning system off. System operation
Ventilation
1. Set the mode to the position.
2. Set the air intake control to the outside
(fresh) air position.
3. Set the temperature control to the desired position.
4. Set the fan speed control to the desired speed.
Heating
1. Set the mode to the position.
2. Set the air intake control to the outside(fresh) air position.
3. Set the temperature control to the desired position.
4. Set the fan speed control to the desired speed.
5. If dehumidified heating is desired, turn the air conditioning system (if equipped) on.
If the windscreen fogs up, set the mode to the or
position.OYF049118OYF049119
Page 168 of 363
Features of your vehicle
96
4
OFF mode
Push the OFF button to turn off the air cli-
mate control system. However, you can
still operate the mode and air intake but-
tons as long as the ignition switch is inthe ON position.
OYF049128