2012 Hyundai Sonata Hybrid set clock
[x] Cancel search: set clockPage 189 of 403

Features of your vehicle
108
4
Power outlet
The power outlet is designed to provide
power for mobile telephones or other
devices designed to operate with vehicle
electrical systems. The devices should
draw less than 10 amps with the engine
running.
Digital clock (if equipped)
Whenever the battery terminals or relat-
ed fuses are disconnected, you must
reset the time.
When the engine start/stop button is in
the ACC or ON position, the clock but-
tons operate as follows:
CAUTION
Use the power outlet only when
the engine is running and removethe accessory plug after use.Using the accessory plug for pro-longed periods of time with the engine off could cause the bat-tery to discharge.
Only use 12V electric accessories which are less than 10A in elec-tric capacity.
Adjust the air-conditioner or heater to the lowest operatinglevel when using the power outlet.
Close the cover when not in use. Some electronic devices can cause electronic interference whenplugged into a vehicle’s power out-let. These devices may causeexcessive audio static and malfunc-tions in other electronic systems ordevices used in your vehicle.
WARNING
Do not put a finger or a foreign ele-
ment (pin, etc.) into a power outlet
and do not touch with a wet hand.
You may get an electric shock.
OYF049146NOYF049224
WARNING
Do not adjust the clock while driv-
ing. You may lose your steering
control and cause an accident that
results in severe personal injury or
death.
Page 198 of 403
![Hyundai Sonata Hybrid 2012 Owners Manual 4117
Features of your vehicle
1. AM Selection Button
Pressing the [AM] button selects the AM
band. AM Mode is displayed on the LCD.
2. FM Selection Button
Turns to FM mode and toggles FM1and
FM2 when Hyundai Sonata Hybrid 2012 Owners Manual 4117
Features of your vehicle
1. AM Selection Button
Pressing the [AM] button selects the AM
band. AM Mode is displayed on the LCD.
2. FM Selection Button
Turns to FM mode and toggles FM1and
FM2 when](/manual-img/35/19651/w960_19651-197.png)
4117
Features of your vehicle
1. AM Selection Button
Pressing the [AM] button selects the AM
band. AM Mode is displayed on the LCD.
2. FM Selection Button
Turns to FM mode and toggles FM1and
FM2 when the button is pressed each
time.
3.Power ON/OFF Button & VolumeControl Knob
Turns on/off the set when the IGNITION
SWITCH is on ACC or ON. If the button
is turned to the right, it increases the vol-
ume and left,decreases the volume.
system. Rotate clockwise to increase
the volume or counterclockwise to
decrease.
4. Preset Button
Push [1]~[6] buttons less than 0.8 sec-
ond to play the channel saved in each
button.Push Preset button for 0.8 second
or longer to save current channel to the
respective button with a beep.
5. SCAN Button
ically scans the radio stations upwards.
station, starting from the initial station,
for ten seconds.
the scan feature and to listen to the cur-
rently selected channel.
6. MUTE Button
Press the button to mute the sound.
7. SETUP Button
Press this button to turn to the XM option
and the other adjustment mode.
If no action is taken for 5 seconds after
pressing the button, it will return to the
play mode.(After entering SEPUP mode,
move between items using the left, right
and PUSH functions of the [TUNE]
knob.)
The setup changes in the order of TEXT
SCROLL
➟AV C➟BT➟XM
This funtion is used to display characters
longer than the LCD text display and can
be turned ON/OFF through the sound
quality control knob.
This funtion automatically adjusts the
volume level according to the speed of
the vehicle and can be turned ON/OFF
through the sound quality control knob.
Page 199 of 403
![Hyundai Sonata Hybrid 2012 Owners Manual Features of your vehicle
118
4
It will be able to change the XM display.
ex) Display by category/channel or
artist/song title.
Select the XM Display through the [
FOLDER ] button(for CD Player :
PA71 Hyundai Sonata Hybrid 2012 Owners Manual Features of your vehicle
118
4
It will be able to change the XM display.
ex) Display by category/channel or
artist/song title.
Select the XM Display through the [
FOLDER ] button(for CD Player :
PA71](/manual-img/35/19651/w960_19651-198.png)
Features of your vehicle
118
4
It will be able to change the XM display.
ex) Display by category/channel or
artist/song title.
Select the XM Display through the [
FOLDER ] button(for CD Player :
PA710YF, Turn the control knob), and
press the [ENTER] button(for CD Player
: PA710YF, press the [TUNE] knob) to
complete and exit XM setup mode.8. Manual Channel Selector & Sound Quality Control Knob
Turn this control while listening to a radio
channel to manually adjust frequency.
Turn clockwise to increase frequency
and counterclockwise to reduce fre-
quency. Pressing the button changes
the BASS, MIDDLE, TREBLE, FADER
and BALANCE TUNE mode.
The mode selected is shown on the dis-
play. After selecting each mode, rotate
the Audio control knob clockwise or
counterclockwise.
BASS Control
To increase the BASS, rotate the knob
clockwise, while to decrease the BASS,
rotate the knob counterclockwise.
MIDDLE Control
To increase the MIDDLE, rotate the knob
clockwise, while to decrease the MID-
DLE, rotate the knob counterclockwise. TREBLE Control
To increase the TREBLE, rotate the knob
clockwise, while to decrease the TRE-
BLE, rotate the knob counterclockwise.
FADER Control
Turn the control knob clockwise to
emphasize rear speaker sound(front
speaker sound will be attenuated).
When the control knob is turned counter-
clockwise, front speaker sound will be
emphasized(rear speaker sound will be
attenuated).
BALANCE Control
Rotate the knob clockwise to emphasize
right speaker sound(left speaker sound
will be attenuated).
When the control knob is turned counter
clockwise, left speaker sound will be
emphasized(right speaker sound will be
attenuated).
Page 209 of 403

Features of your vehicle
128
4
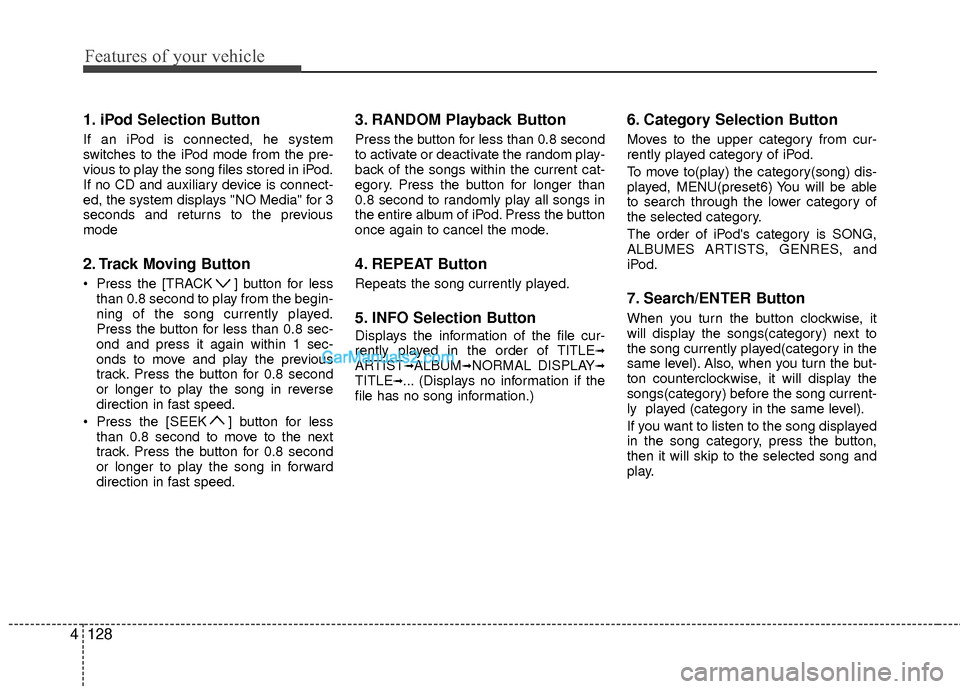
1. iPod Selection Button
If an iPod is connected, he system
switches to the iPod mode from the pre-
vious to play the song files stored in iPod.
If no CD and auxiliary device is connect-
ed, the system displays "NO Media" for 3
seconds and returns to the previous
mode
2. Track Moving Button
Press the [TRACK ] button for less
than 0.8 second to play from the begin-
ning of the song currently played.
Press the button for less than 0.8 sec-
ond and press it again within 1 sec-
onds to move and play the previous
track. Press the button for 0.8 second
or longer to play the song in reverse
direction in fast speed.
Press the [SEEK ] button for less than 0.8 second to move to the next
track. Press the button for 0.8 second
or longer to play the song in forward
direction in fast speed.
3. RANDOM Playback Button
Press the button for less than 0.8 second
to activate or deactivate the random play-
back of the songs within the current cat-
egory. Press the button for longer than
0.8 second to randomly play all songs in
the entire album of iPod. Press the button
once again to cancel the mode.
4. REPEAT Button
Repeats the song currently played.
5. INFO Selection Button
Displays the information of the file cur-
rently played in the order of TITLE➟ARTIST➟ALBUM➟NORMAL DISPLAY➟TITLE➟... (Displays no information if the
file has no song information.)
6. Category Selection Button
Moves to the upper category from cur-
rently played category of iPod.
To move to(play) the category(song) dis-
played, MENU(preset6) You will be able
to search through the lower category of
the selected category.
The order of iPod's category is SONG,
ALBUMES ARTISTS, GENRES, and
iPod.
7. Search/ENTER Button
When you turn the button clockwise, it
will display the songs(category) next to
the song currently played(category in the
same level). Also, when you turn the but-
ton counterclockwise, it will display the
songs(category) before the song current-
ly played (category in the same level).
If you want to listen to the song displayed
in the song category, press the button,
then it will skip to the selected song and
play.
Page 211 of 403

Features of your vehicle
130
4
Using XM satellite Radio
Your vehicle is equipped with 3 months
complimentary period of XM Satellite
Radio. XM provides access to over 130
channels of music, information, and
entertainment programming.
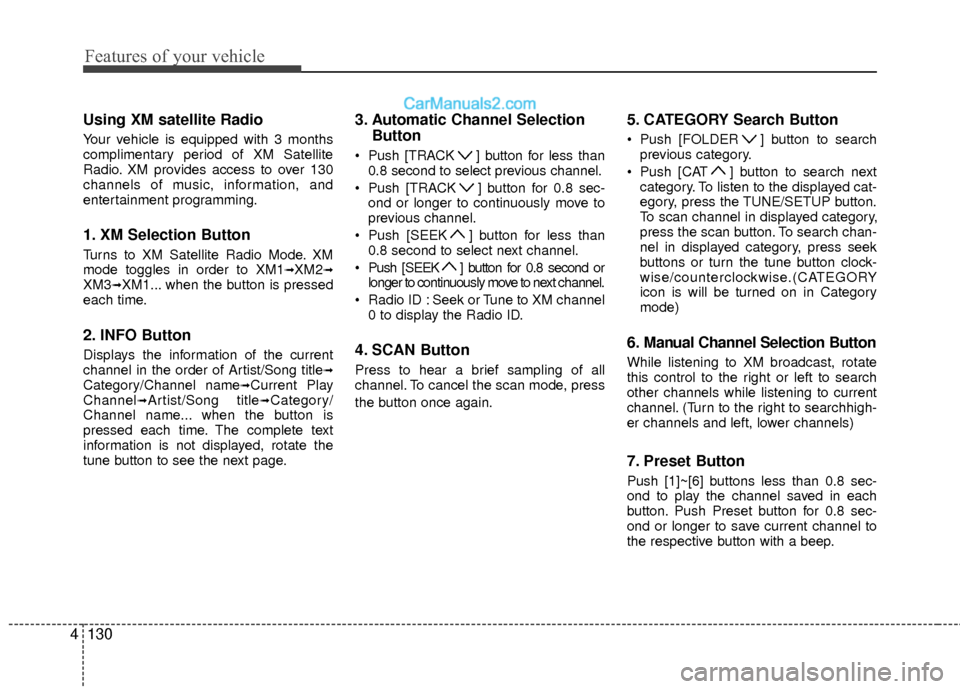
1. XM Selection Button
Turns to XM Satellite Radio Mode. XM
mode toggles in order to XM1➟XM2➟XM3➟XM1... when the button is pressed
each time.
2. INFO Button
Displays the information of the current
channel in the order of Artist/Song title➟Category/Channel name➟Current Play
Channel➟Artist/Song title➟Category/
Channel name... when the button is
pressed each time. The complete text
information is not displayed, rotate the
tune button to see the next page.
3. Automatic Channel Selection Button
Push [TRACK ] button for less than
0.8 second to select previous channel.
Push [TRACK ] button for 0.8 sec- ond or longer to continuously move to
previous channel.
Push [SEEK ] button for less than 0.8 second to select next channel.
Push [SEEK ] button for 0.8 second or longer to continuously move to next channel.
Radio ID : Seek or Tune to XM channel 0 to display the Radio ID.
4. SCAN Button
Press to hear a brief sampling of all
channel. To cancel the scan mode, press
the button once again.
5. CATEGORY Search Button
Push [FOLDER ] button to searchprevious category.
Push [CAT ] button to search next category. To listen to the displayed cat-
egory, press the TUNE/SETUP button.
To scan channel in displayed category,
press the scan button. To search chan-
nel in displayed category, press seek
buttons or turn the tune button clock-
wise/counterclockwise.(CATEGORY
icon is will be turned on in Category
mode)
6. Manual Channel Selection Button
While listening to XM broadcast, rotate
this control to the right or left to search
other channels while listening to current
channel. (Turn to the right to searchhigh-
er channels and left, lower channels)
7. Preset Button
Push [1]~[6] buttons less than 0.8 sec-
ond to play the channel saved in each
button. Push Preset button for 0.8 sec-
ond or longer to save current channel to
the respective button with a beep.
Page 281 of 403

615
What to do in an emergency
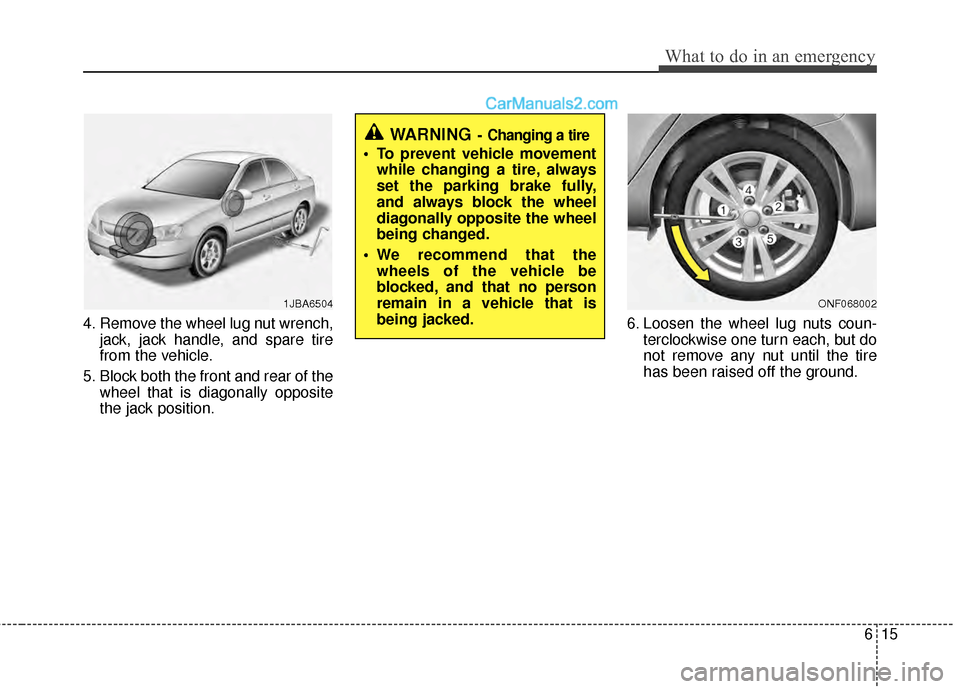
4. Remove the wheel lug nut wrench,jack, jack handle, and spare tire
from the vehicle.
5. Block both the front and rear of the wheel that is diagonally opposite
the jack position. 6. Loosen the wheel lug nuts coun-
terclockwise one turn each, but do
not remove any nut until the tire
has been raised off the ground.
1JBA6504
WARNING- Changing a tire
To prevent vehicle movementwhile changing a tire, always
set the parking brake fully,
and always block the wheel
diagonally opposite the wheel
being changed.
We recommend that the wheels of the vehicle be
blocked, and that no person
remain in a vehicle that is
being jacked.
ONF068002
Page 329 of 403

Maintenance
36
7
Reset items
Items should be reset after the battery
has been discharged or the battery has
been disconnected.
Auto up/down window (See section 4)
Sunroof (See section 4)
Trip computer (See section 4)
Climate control system
(See section 4)
Clock (See section 4)
Audio (See section 4)WARNING
Before performing maintenance or recharging the battery, turn off
all accessories and stop the
engine.
The negative battery cable must be removed first and installed
last when the battery is discon-
nected.
Operation related to the battery should be done in an authorized
HYUNDAI dealer.
WARNING- Rechargingbattery
When recharging the battery,
observe the following precautions:
The battery must be removed
from the vehicle and placed in an
area with good ventilation.
Do not allow cigarettes, sparks, or flame near the battery.
Watch the battery during charg- ing, and stop or reduce the charg-
ing rate if the battery cells begin
gassing (boiling) violently or if
the temperature of the electrolyte
of any cell exceeds 120°F (49°C).
Wear eye protection when check- ing the battery during charging.
Disconnect the battery charger in the following order.
1. Turn off the battery charger main switch.
2. Unhook the negative clamp from the negative battery terminal.
3. Unhook the positive clamp from the positive battery terminal.
Page 345 of 403

Maintenance
52
7
✽
✽
NOTICE
• If the memory fuse is pulled up from
the fuse panel, the warning chime,
audio, clock and interior lamps, etc.,
will not operate. Some items must be
reset after replacement. Refer to
“Battery” in this section.
• Even though the memory fuse is pulled up, the battery can still be dis-
charged by operation of the head-
lights or other electrical devices.
Engine compartment fuse
replacement
1. Turn the engine start/stop button and
all other switches off.
2. Remove the fuse panel cover by pressing the tab and pulling up. 3. Check the removed fuse; replace it if it
is blown. To remove or insert the fuse,
use the fuse puller in the engine com-
partment fuse panel.
4. Push in a new fuse of the same rating, and make sure it fits tightly in the clips.
If it fits loosely, consult an authorized
HYUNDAI dealer.
OYFH071023N
CAUTION
After checking the fuse panel in theengine compartment, securelyinstall the fuse panel cover. If not, electrical failures may occur fromwater contact.