2012 Hyundai Sonata Hybrid headlight bulb
[x] Cancel search: headlight bulbPage 153 of 403
Features of your vehicle
72
4
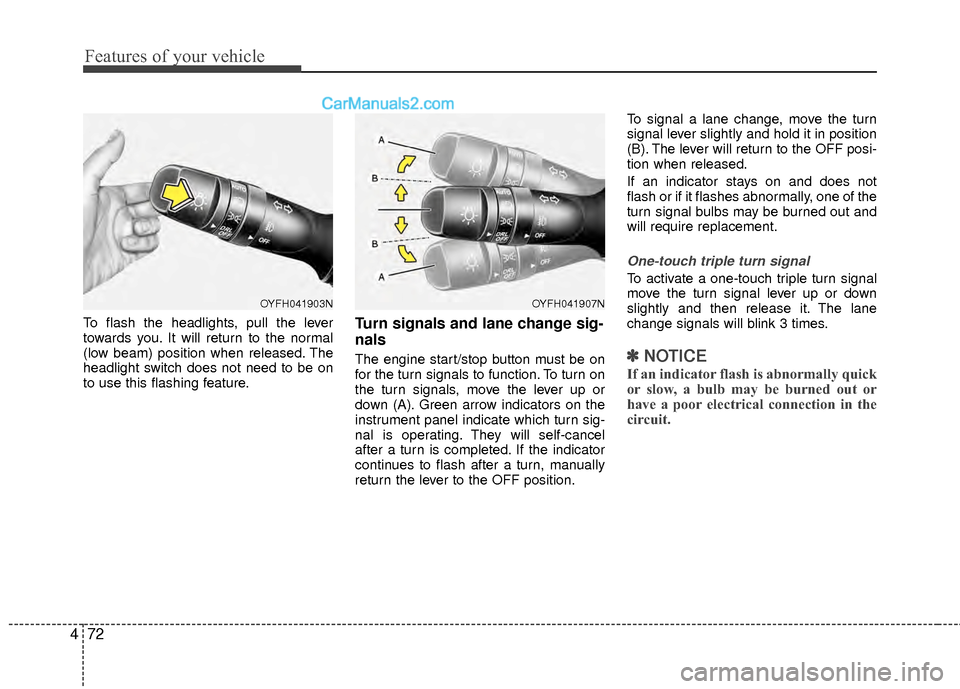
To flash the headlights, pull the lever
towards you. It will return to the normal
(low beam) position when released. The
headlight switch does not need to be on
to use this flashing feature.Turn signals and lane change sig-
nals
The engine start/stop button must be on
for the turn signals to function. To turn on
the turn signals, move the lever up or
down (A). Green arrow indicators on the
instrument panel indicate which turn sig-
nal is operating. They will self-cancel
after a turn is completed. If the indicator
continues to flash after a turn, manually
return the lever to the OFF position. To signal a lane change, move the turn
signal lever slightly and hold it in position
(B). The lever will return to the OFF posi-
tion when released.
If an indicator stays on and does not
flash or if it flashes abnormally, one of the
turn signal bulbs may be burned out and
will require replacement.
One-touch triple turn signal
To activate a one-touch triple turn signal
move the turn signal lever up or down
slightly and then release it. The lane
change signals will blink 3 times.
✽ ✽
NOTICE
If an indicator flash is abnormally quick
or slow, a bulb may be burned out or
have a poor electrical connection in the
circuit.
OYFH041903NOYFH041907N
Page 353 of 403
Maintenance
60
7
LIGHT BULBS
Use only bulbs of the specified wattage.
✽
✽
NOTICE
After heavy, driving rain or washing,
headlight and taillight lenses could
appear frosty. This condition is caused by
the temperature difference between the
lamp inside and outside. This is similar
to the condensation on your windows
inside your vehicle during the rain and
doesn’t indicate a problem with your
vehicle. If the water leaks into the lamp
bulb circuitry, have the vehicle checked
by an authorized HYUNDAI dealer.WARNING - Working on
the lights
Prior to working on the light, firmly
apply the parking brake, ensure
that the engine start/stop button is
turned to the LOCK position and
turn off the lights to avoid sudden
movement of the vehicle and burn-
ing your fingers or receiving an
electric shock.
CAUTION
Be sure to replace the burned-out
bulb with one of the same wattagerating. Otherwise, it may causedamage to the fuse or electric wiring system.
CAUTION
If you don’t have necessary tools,the correct bulbs and the expertise,consult an authorized HYUNDAIdealer. In many cases, it is difficultto replace vehicle light bulbsbecause other parts of the vehicle must be removed before you canget to the bulb. This is especiallytrue if you have to remove the head-light assembly to
get to the bulb(s).
Removing/installingthe headlight
assembly can result in damage to the vehicle.
WARNING
When you replace the bulb of front-
light, be careful the HPCU system,
high voltage cable (orange color)
and high voltage components for
hybrid.
It is very dangerous because the
HPCU has the high voltage. Always
pay strongly attention to your
hands. If not, it may result in the
electric shock or burns.
Page 354 of 403
761
Maintenance
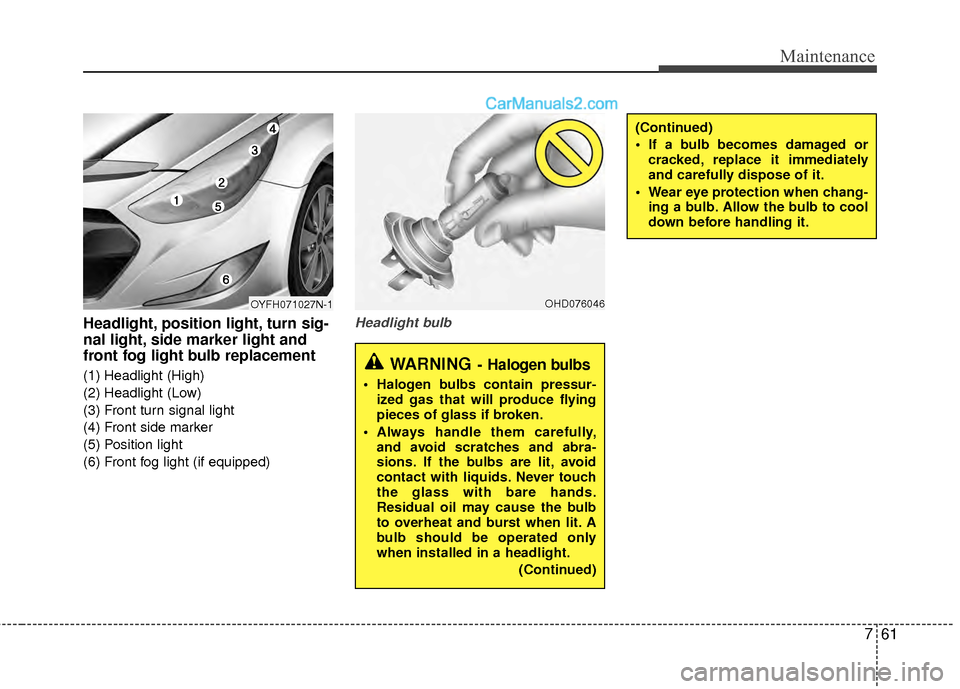
Headlight, position light, turn sig-
nal light, side marker light and
front fog light bulb replacement
(1) Headlight (High)
(2) Headlight (Low)
(3) Front turn signal light
(4) Front side marker
(5) Position light
(6) Front fog light (if equipped)
Headlight bulb
(Continued)
If a bulb becomes damaged orcracked, replace it immediately
and carefully dispose of it.
Wear eye protection when chang- ing a bulb. Allow the bulb to cool
down before handling it.
OHD076046
WARNING- Halogen bulbs
Halogen bulbs contain pressur-ized gas that will produce flying
pieces of glass if broken.
Always handle them carefully, and avoid scratches and abra-
sions. If the bulbs are lit, avoid
contact with liquids. Never touch
the glass with bare hands.
Residual oil may cause the bulb
to overheat and burst when lit. A
bulb should be operated only
when installed in a headlight.
(Continued)
OYFH071027N-1
Page 355 of 403

Maintenance
62
7
Front side marker / Position light
If the light bulb is not operating, have the
vehicle checked by an authorized
HYUNDAI dealer.
Head light (High/Low)
1. Open the hood
2. Remove the headlight bulb cover by
turning it counterclockwise.
3. Disconnect the headlight bulb socket connector.
4. Remove the bulb from the headlight assembly.
5. Install a new headlight bulb.
6. Connect the headlight bulb socket con- nector.
7. Install the headlight bulb cover by turn- ing it clockwise.
✽ ✽ NOTICE
If the headlight aiming adjustment is
necessary after the headlight assembly is
reinstalled, consult an authorized
HYUNDAI dealer.
OYFH071078N
Page 356 of 403
763
Maintenance
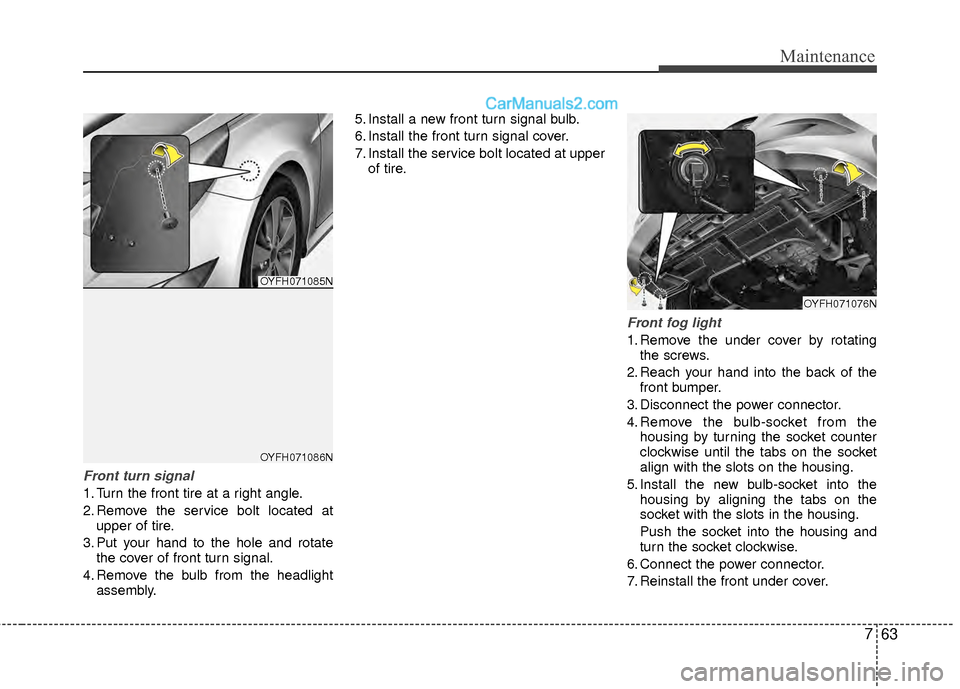
Front turn signal
1. Turn the front tire at a right angle.
2. Remove the service bolt located atupper of tire.
3. Put your hand to the hole and rotate the cover of front turn signal.
4. Remove the bulb from the headlight assembly. 5. Install a new front turn signal bulb.
6. Install the front turn signal cover.
7. Install the service bolt located at upper
of tire.
Front fog light
1. Remove the under cover by rotatingthe screws.
2. Reach your hand into the back of the front bumper.
3. Disconnect the power connector.
4. Remove the bulb-socket from the housing by turning the socket counter
clockwise until the tabs on the socket
align with the slots on the housing.
5. Install the new bulb-socket into the housing by aligning the tabs on the
socket with the slots in the housing.
Push the socket into the housing and
turn the socket clockwise.
6. Connect the power connector.
7. Reinstall the front under cover.
OYFH071076N
OYFH071085N
OYFH071086N
Page 374 of 403
83
Specifications, Consumer information, Reporting safety defects
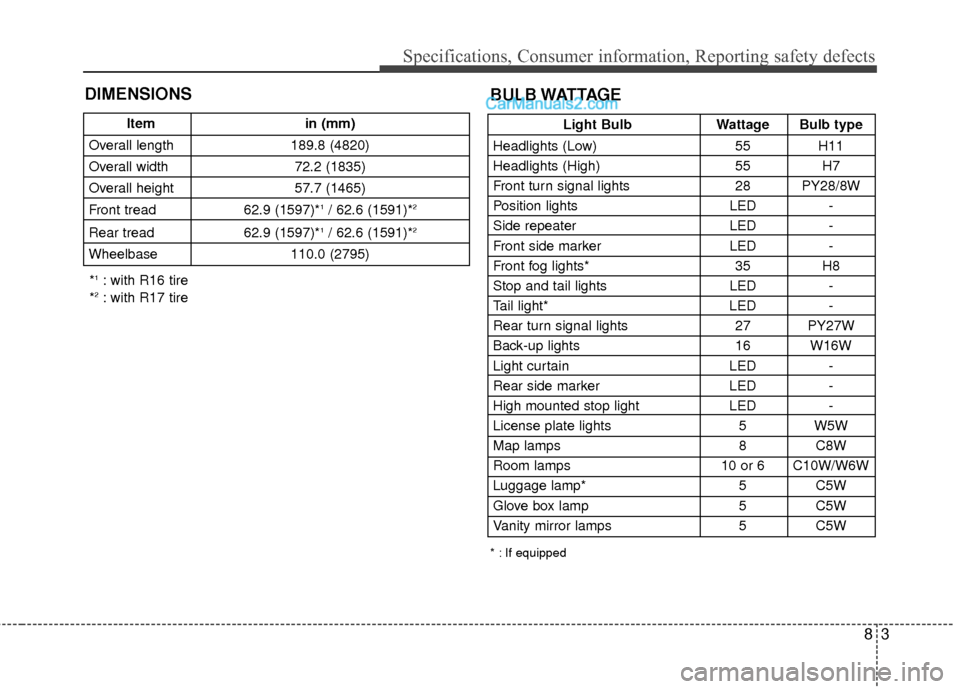
DIMENSIONS
Light BulbWattage Bulb type
Headlights (Low) 55 H11
Headlights (High) 55H7
Front turn signal lights 28 PY28/8W
Position lights LED-
Side repeater LED-
Front side marker LED-
Front fog lights* 35H8
Stop and tail lights LED-
Tail light* LED-
Rear turn signal lights 27 PY27W
Back-up lights 16 W16W
Light curtain LED-
Rear side marker LED-
High mounted stop light LED-
License plate lights 5 W5W
Map lamps 8 C8W
Room lamps 10 or 6 C10W/W6W
Luggage lamp* 5 C5W
Glove box lamp 5 C5W
Vanity mirror lamps 5 C5W
BULB WATTAGE
* : If equipped
Itemin (mm)
Overall length 189.8 (4820)
Overall width 72.2 (1835)
Overall height 57.7 (1465)
Front tread 62.9 (1597)*
1/ 62.6 (1591)*2
Rear tread62.9 (1597)*1/ 62.6 (1591)*2
Wheelbase 110.0 (2795)
*1: with R16 tire
*2: with R17 tire
Page 399 of 403
I5
Index
GaugeEngine temperature gauge··················\
··················\
·····4-42
Fuel gauge ··················\
··················\
··················\
···········4-43
Glass antenna ··················\
··················\
··················\
·········4-111
Glove box··················\
··················\
··················\
···············4-105
Hazard warning flasher··················\
··················\
··············4-68
Hazardous driving conditions ··················\
··················\
····5-30
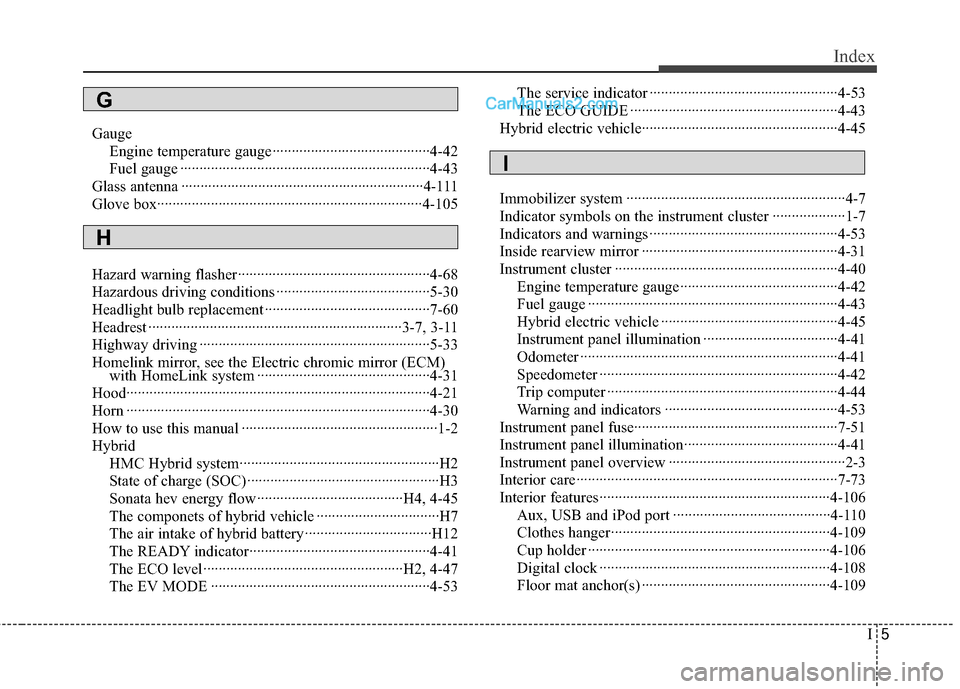
Headlight bulb replacement ··················\
··················\
·······7-60
Headrest ··················\
··················\
··················\
············3-7, 3-11
Highway driving ··················\
··················\
··················\
······5-33
Homelink mirror, see the Electric chromic mirror (ECM) with HomeLink system ··················\
··················\
·········4-31
Hood··················\
··················\
··················\
··················\
·······4-21
Horn ··················\
··················\
··················\
··················\
·······4-30
How to use this manual ··················\
··················\
···············1-2
Hybrid HMC Hybrid system··················\
··················\
················H2
State of charge (SOC) ··················\
··················\
··············H3
Sonata hev energy flow ··················\
··················\
··H4, 4-45
The componets of hybrid vehicle ··················\
··············H7
The air intake of hybrid battery ··················\
···············H12
The READY indicator··················\
··················\
···········4-41
The ECO level··················\
··················\
················H2, 4-47\
The EV MODE ··················\
··················\
··················\
···4-53 The service indicator ··················\
··················\
·············4-53
The ECO GUIDE ··················\
··················\
··················\
4-43
Hybrid electric vehicle··················\
··················\
···············4-45
Immobilizer system ··················\
··················\
··················\
···4-7
Indicator symbols on the instrument cluster ··················\
·1-7
Indicators and warnings ··················\
··················\
·············4-53
Inside rearview mirror ··················\
··················\
···············4-31
Instrument cluster ··················\
··················\
··················\
····4-40 Engine temperature gauge··················\
··················\
·····4-42
Fuel gauge ··················\
··················\
··················\
···········4-43
Hybrid electric vehicle ··················\
··················\
··········4-45
Instrument panel illumination ··················\
·················4-41\
Odometer ··················\
··················\
··················\
·············4-41
Speedometer ··················\
··················\
··················\
········4-42
Trip computer ··················\
··················\
··················\
······4-44
Warning and indicators ··················\
··················\
·········4-53
Instrument panel fuse··················\
··················\
·················7-51\
Instrument panel illumination··················\
··················\
····4-41
Instrument panel overview ··················\
··················\
··········2-3
Interior care··················\
··················\
··················\
··············7-73
Interior features··················\
··················\
··················\
······4-106 Aux, USB and iPod port ··················\
··················\
·····4-110
Clothes hanger··················\
··················\
··················\
···4-109
Cup holder ··················\
··················\
··················\
·········4-106
Digital clock ··················\
··················\
··················\
······4-108
Floor mat anchor(s) ··················\
··················\
·············4-109
G
I
H