2012 HYUNDAI IX35 clock
[x] Cancel search: clockPage 10 of 560

23
Your vehicle at a glance
INSTRUMENT PANEL OVERVIEW
1. Light control/Turn signals ................4-72
2. Streeing wheel audio controls* ....4-117
3. Bluetooth phone controls* ............4-140
4. Instrument cluster ..........................4-42
5. Horn ................................................4-34
6. Driver’s front air bag........................3-47
7. Wiper/Washer..................................4-78
8. Auto cruise controls* ......................5-43
9. Engine start/stop button* ..................5-8
10.Digital clock and Audio ....4-111, 4-116
11. Hazard warning flasher switch ......4-71
12. Climate control system* ................4-87
13. Seat warmer* ..................................3-8
14. Cigarette lighter* ........................4-108
15. AUX, USB and iPod port* ..........4-111
16. Power outlet* ..............................4-110
17. Shift lever ............................5-14, 5-17
18. Passenger’s front air bag* ............3-47
19. Glove box ....................................4-106
* : if equippedOEL019002R
* The actual shape may differ from the illustration.
EL UK 2.QXP 1/12/2010 2:52 PM Page 3
Page 101 of 560
Features of your vehicle
26
4
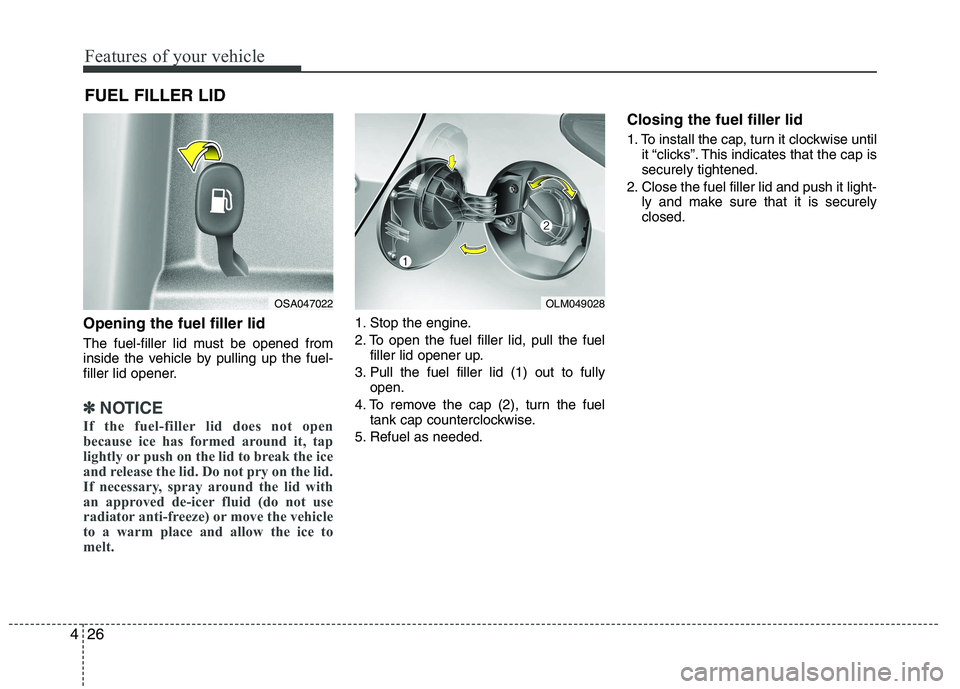
Opening the fuel filler lid
The fuel-filler lid must be opened from
inside the vehicle by pulling up the fuel-
filler lid opener.
✽✽
NOTICE
If the fuel-filler lid does not open
because ice has formed around it, tap
lightly or push on the lid to break the ice
and release the lid. Do not pry on the lid.
If necessary, spray around the lid with
an approved de-icer fluid (do not use
radiator anti-freeze) or move the vehicle
to a warm place and allow the ice to
melt.
1. Stop the engine.
2. To open the fuel filler lid, pull the fuel filler lid opener up.
3. Pull the fuel filler lid (1) out to fully open.
4. To remove the cap (2), turn the fuel tank cap counterclockwise.
5. Refuel as needed. Closing the fuel filler lid
1. To install the cap, turn it clockwise until
it “clicks”. This indicates that the cap is securely tightened.
2. Close the fuel filler lid and push it light- ly and make sure that it is securelyclosed.
FUEL FILLER LID
OSA047022OLM049028
Page 188 of 560
4113
Features of your vehicle
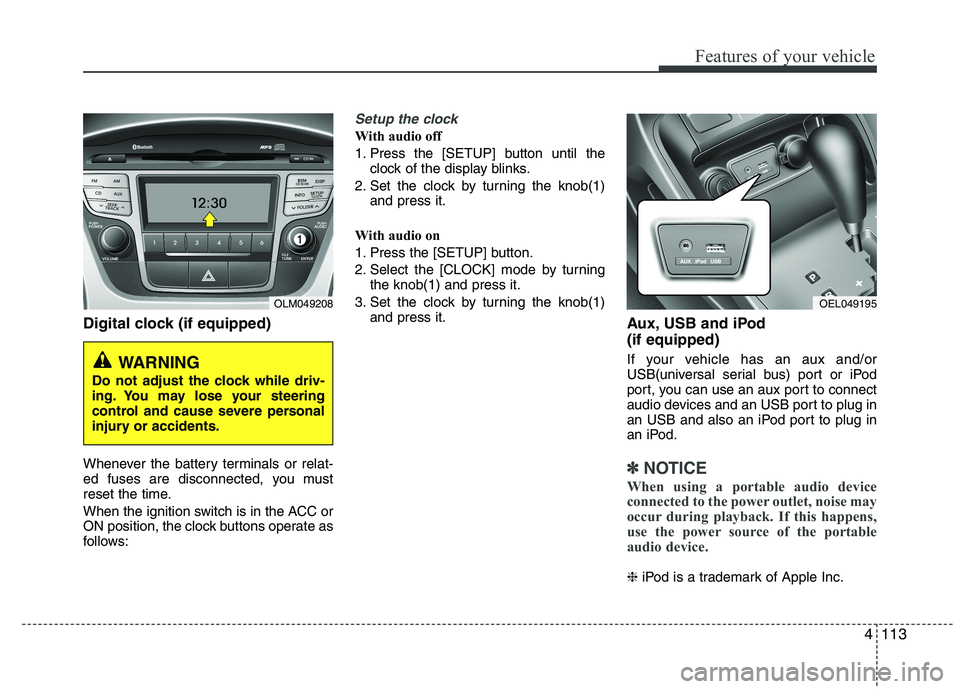
Digital clock (if equipped)
Whenever the battery terminals or relat-
ed fuses are disconnected, you must
reset the time.
When the ignition switch is in the ACC or
ON position, the clock buttons operate as
follows:
Setup the clock
With audio off
1. Press the [SETUP] button until theclock of the display blinks.
2. Set the clock by turning the knob(1) and press it.
With audio on
1. Press the [SETUP] button.
2. Select the [CLOCK] mode by turning the knob(1) and press it.
3. Set the clock by turning the knob(1) and press it. Aux, USB and iPod (if equipped)
If your vehicle has an aux and/or
USB(universal serial bus) port or iPod
port, you can use an aux port to connect
audio devices and an USB port to plug in
an USB and also an iPod port to plug in
an iPod.
✽✽NOTICE
When using a portable audio device
connected to the power outlet, noise may
occur during playback. If this happens,
use the power source of the portable
audio device.
❈ iPod is a trademark of Apple Inc.
OLM049208
WARNING
Do not adjust the clock while driv-
ing. You may lose your steering
control and cause severe personal
injury or accidents.
OEL049195
Page 193 of 560
Features of your vehicle
118
4
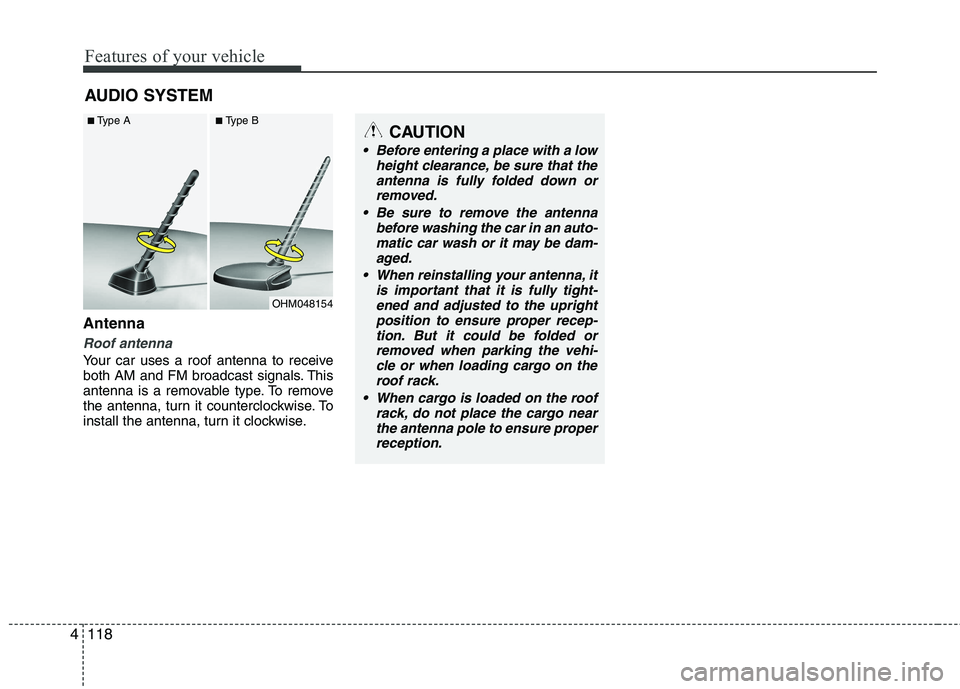
Antenna
Roof antenna
Your car uses a roof antenna to receive
both AM and FM broadcast signals. This
antenna is a removable type. To remove
the antenna, turn it counterclockwise. To
install the antenna, turn it clockwise. AUDIO SYSTEM
CAUTION
• Before entering a place with a low
height clearance, be sure that the
antenna is fully folded down orremoved.
Be sure to remove the antenna before washing the car in an auto-
matic car wash or it may be dam- aged.
When reinstalling your antenna, it is important that it is fully tight-ened and adjusted to the upright
position to ensure proper recep- tion. But it could be folded orremoved when parking the vehi-cle or when loading cargo on the
roof rack.
When cargo is loaded on the roof rack, do not place the cargo nearthe antenna pole to ensure properreception.
OHM048154
■
Type A ■Type B
Page 200 of 560
4125
Features of your vehicle
1. Power ON/OFF Button &Volume Control Button
Turns on/off the set when the IGNITION
SWITCH is on ACC or ON. If the button
is turned to the right, it increases the vol-
ume and left,decreases the volume.
Press this button to turn the audio sys- tem ON or OFF. (EUROPE MODEL
ONLY)
Depending on the model if the ignition switch is not on ACC or ON position.
the “Battery Discharge” warningappears on LCD after 10 seconds of
power-up, and automatically turns off
after 1 hours of operation.
Adjusts the volume of the car audio system. Rotate clockwise to increase
the volume or counterclockwise to
decrease.
2. FM Selection Button
Turns to FM mode and toggles FM1and
FM2 when the button is pressed each
time. ❈ May change in order of FM1 ➟FM2 ➟
FMA in some models. 3. AM Selection Button
Pressing the [AM] button selects the AM
band. AM Mode is displayed on the LCD. ❈
May change in order of AM ➟AMA in
some models.
4. Automatic Channel Selection Button
When the [SEEK ] button is pressed, it increases the band frequency to auto-
matically select channel. Stops at the
previous frequency if no channel is
found.
5. Preset Button
Push [1]~[6] buttons less than 0.8 sec-
ond to play the channel saved in each
button. Push Preset button for 0.8 sec-
ond or longer to save current channel to
the respective button with a beep. 6. AST(AUTO STORE Button)
When the button is pressed, it automati-
cally selects and saves channels with
high reception rate to PRESET buttons
[1]~[6] and plays the channel saved in
PRESET1. If no channel is saved after
AST, it will play the previous channel.
Saves only to the Preset memory
(1)~(6) of FMA or AMA mode in some
models.
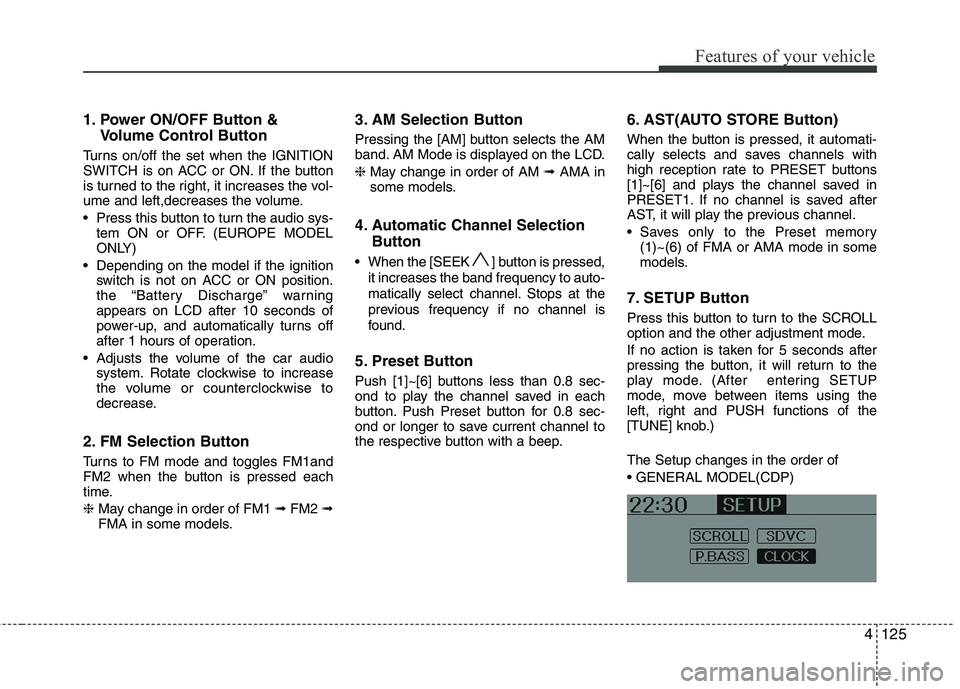
7. SETUP Button
Press this button to turn to the SCROLL
option and the other adjustment mode.
If no action is taken for 5 seconds after
pressing the button, it will return to the
play mode. (After entering SETUP
mode, move between items using the
left, right and PUSH functions of the
[TUNE] knob.) The Setup changes in the order of
Page 201 of 560

Features of your vehicle
126
4
This function is used to display charac-
ters longer than the LCD text display and
can be turned ON/OFF through the
sound quality control knob.
Control)
This function automatically adjusts the
volume level according to the speed of
the vehicle and can be turned ON/OFF
through the sound quality control knob.
with RDS MENU )
Select this item to turn the AF(Alternate
Frequency) feature ON or OFF.
NEWS (NEWS MENU indication is pos- sible with RDS MENU )
Turns the automatic NEWS reception
feature ON or OFF.
possible with RDS MENU )
Selects whether REGION code is used
(“ON”) or not (“OFF”) once the radio
determines the AF jump condition. If
AUTO is selected, AF jump condition is
determined automatically via PI recep-
tion status.
possible with RDS MENU )
Adjusts the TA(Traffic Announcement)
volume level. ❈ RDS MENU : RDS MENU includes
AF/ NEWS/ REGION/ TA VOL MENU
sequentially.
Select this item to enter BLUETOOTH
setup mode. Refer to “BLUETOOTH
PHONE OPERATION” section for
detailed information.
Press the [SETUP] button. Use the vol-
ume controller to adjust the clock in the
following order: CLOCK . ENTER . hour
or minute. Adjust the hour and press the
[ENTER] button to set. Use the same
method to adjust the minute and press
the [ENTER] button to complete and exit
from clock adjustment mode. Pressing
the [SETUP] button while in POWER
OFF screen will allow the user to make
immediately adjustments to the clock.
Page 202 of 560
4127
Features of your vehicle
Based on psychoacoustic technology,
this technology overcomes BASS limita-
tions which may occur due to the limited
number and size of speaker to offer
dynamic BASS sound quality.
It is possible to adjust in 3 levels of LOW/ MID/ HIGH. OFF ➟LOW ➟MID ➟HIGH
❈ AM, AMA is not supported.
❈ CDP ONLY.
This function displays the previous MODE screen.
8. Manual Channel Selector & Sound Quality Control Knob
Turn this control while listening to a radio
channel to manually adjust frequency.
Turn clockwise to increase frequency
and counterclockwise to reduce frequen-
cy.
Pressing TUNE button changes the
BASS, MIDDLE, TREBLE, FADER and
BALANCE mode.
The mode selected is shown on the dis-
play. After selecting each mode, rotate
the Audio control knob clockwise or
counterclockwise. BASS Control
To increase the BASS, rotate the knob
clockwise, while to decrease the BASS,
rotate the knob counterclockwise.
MIDDLE Control
To increase the MIDDLE, rotate the knob
clockwise, while to decrease the MID-
DLE, rotate the knob counterclockwise.
TREBLE Control
To increase the TREBLE, rotate the knob
clockwise, while to decrease the TRE-
BLE, rotate the knob counterclockwise.
FADER Control
Turn the control knob clockwise to
emphasize rear speaker sound(front
speaker sound will be attenuated). When
the control knob is turned counterclock-
wise, front speaker sound will be empha-
sized(rear speaker sound will be attenu-ated).
BALANCE Control
Rotate the knob clockwise to emphasize
right speaker sound(left speaker sound
will be attenuated).
When the control knob is turned counter
clockwise, left speaker sound will be
emphasized(right speaker sound will be
attenuated).
9. DISP(DARK) Button
Turn the LCD Display & Backlight on/off
when [DISP] button press. ❈ GENERAL : DISP, EUROPE : DARK
10. TA Selection Button
In FM, CD, AUX mode, turns on/off the
reception of TA channels of RDS.
11. PTY(FOLDER) Button
Moves [ PTY(FOLDER)] Button when searching PTY in RDS
Broadcasting Program Type selection.
Moves [PTY(FOLDER) ] button when searching PTY in RDS
Broadcasting Program Type selection.
Page 206 of 560
4131
Features of your vehicle
8. CD Indicator(CDP Only)
When car ignition switch is ACC or ON and if the CD is loaded, this indicator is
lighted. If the CD is ejected the light is
turned off.
9. Folder Moving Button
Moves [ PTY(FOLDER)] buttonchild folder of the current folder and
displays the first song in the folder.
Press TUNE/ ENTER knob to move to
the folder displayed. It will play the first
song in the folder.
Moves [PTY(FOLDER) ] button par- ent folder and displays the first song in
the folder. Press TUNE/ENTER knob to
move to the folder displayed.
10. Search/ENTER Button
Turn this button clockwise to display the
songs next to the currently played song.
Turn the button counterclockwise to dis-
play the songs before the currently
played song. Press the button to skip and
play the selected song. 11. SCAN Play Button
Plays first 10 seconds of each song in
the DISC. To cancel the mode, press the
button once again.
12. DISC Selection Button
[ DISC] Change Button Changes
disc to the previous disc.
[DISC ] Change Button Changes disc to the next disc.
13. CD LOAD Button
Push [LOAD] button to load CDs to avail-
able CDC deck (from 1~6). Push [LOAD]
button for more than 2 seconds to load
into all available decks. The last CD will
play. 10 seconds idle status will disable
loading process.
14. AUX Selection Button
If the auxiliary device is connected, it
turns to AUX mode from the other mode
to play the sound from the auxiliary play-
er. If no auxiliary device is connected, it
displays "NO Media" for 3 seconds and
returns to the previous mode(GENERAL
ONLY).