2012 HYUNDAI IX35 ESP
[x] Cancel search: ESPPage 142 of 560
467
Features of your vehicle
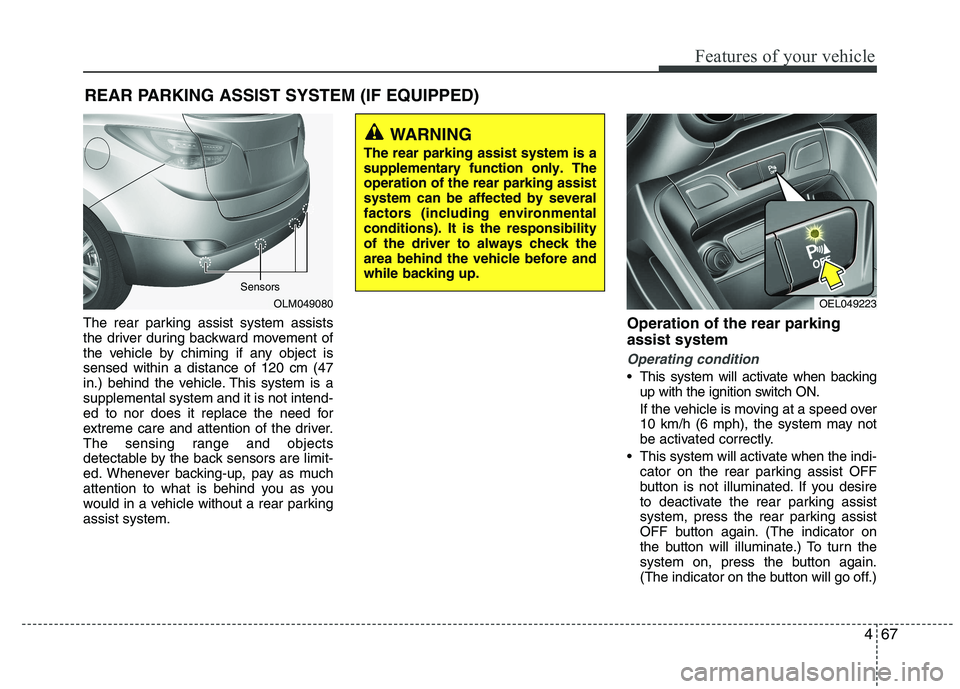
The rear parking assist system assists
the driver during backward movement of
the vehicle by chiming if any object issensed within a distance of 120 cm (47
in.) behind the vehicle. This system is asupplemental system and it is not intend-
ed to nor does it replace the need for
extreme care and attention of the driver.
The sensing range and objects
detectable by the back sensors are limit-
ed. Whenever backing-up, pay as much
attention to what is behind you as you
would in a vehicle without a rear parkingassist system.Operation of the rear parking assist system
Operating condition
This system will activate when backing
up with the ignition switch ON.
If the vehicle is moving at a speed over
10 km/h (6 mph), the system may not
be activated correctly.
This system will activate when the indi- cator on the rear parking assist OFF
button is not illuminated. If you desire
to deactivate the rear parking assist
system, press the rear parking assist
OFF button again. (The indicator on
the button will illuminate.) To turn the
system on, press the button again.
(The indicator on the button will go off.)
REAR PARKING ASSIST SYSTEM (IF EQUIPPED)
OLM049080
WARNING
The rear parking assist system is a supplementary function only. Theoperation of the rear parking assistsystem can be affected by severalfactors (including environmentalconditions). It is the responsibilityof the driver to always check thearea behind the vehicle before andwhile backing up.
Sensors
OEL049223
Page 144 of 560

469
Features of your vehicle
The detecting range may decrease when:
1. The sensor is stained with foreign mat-ter such as snow or water. (The sens-
ing range will return to normal when
removed.)
2. Outside air temperature is extremely hot or cold.
The following objects may not be rec-ognized by the sensor:
1. Sharp or slim objects such as ropes, chains or small poles.
2. Objects which tend to absorb the sen- sor frequency such as clothes, spongy
material or snow.
3. Undetectable objects smaller than 1 m (40 in.) in height and narrower than 14
cm (6 in.) in diameter. Rear parking assist system pre- cautions
The rear parking assist system may
not sound sequentially depending on the speed and shapes of the objectsdetected.
The rear parking assist system may malfunction if the vehicle bumperheight or sensor installation has been
modified or damaged. Any non-factory
installed equipment or accessories
may also interfere with the sensor per-
formance.
The sensor may not recognize objects less than 40 cm (15 in.) from the sen-
sor, or it may sense an incorrect dis-
tance. Use caution.
When the sensor is frozen or stained with snow, dirt, or water, the sensor
may be inoperative until the stains are
removed using a soft cloth.
Do not push, scratch or strike the sen- sor. Sensor damage could occur.✽✽ NOTICE
This system can only sense objects with-
in the range and location of the sensors;
It can not detect objects in other areas
where sensors are not installed. Also,
small or slim objects, such as poles or
objects located between sensors may not
be detected by the sensors.
Always visually check behind the vehi-
cle when backing up.
Be sure to inform any drivers of the
vehicle that may be unfamiliar with the
system regarding the systems capabili-
ties and limitations.
WARNING
Pay close attention when the vehi- cle is driven close to objects on theroad, particularly pedestrians, andespecially children. Be aware thatsome objects may not be detectedby the sensors, due to the object’sdistance, size or material, all ofwhich can limit the effectiveness ofthe sensor. Always perform a visu-al inspection to make sure the vehi-cle is clear of all obstructionsbefore moving the vehicle in anydirection.
Page 146 of 560
471
Features of your vehicle
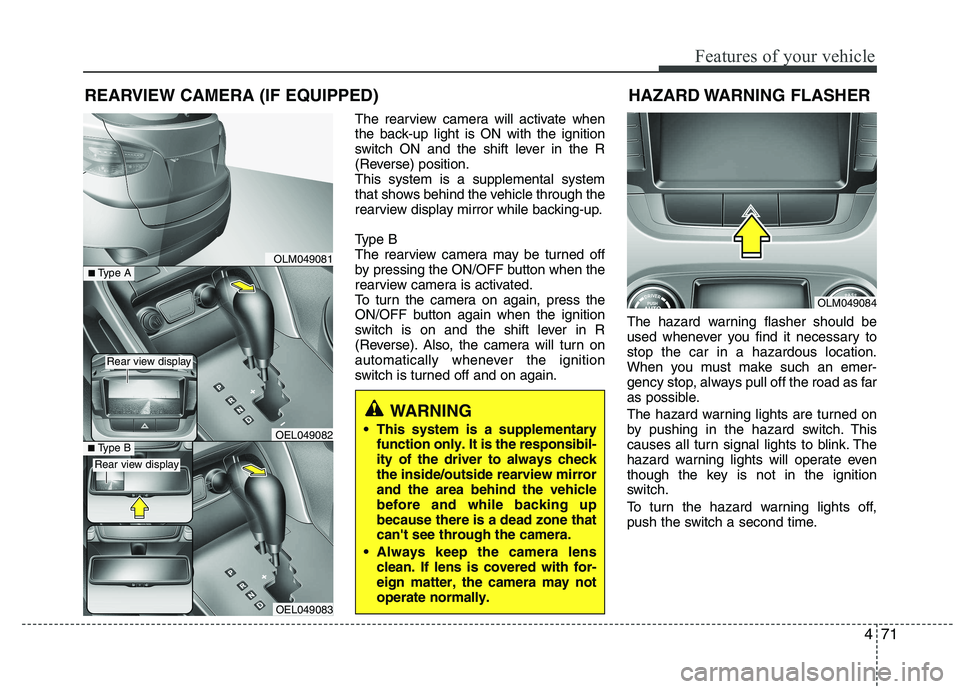
The rearview camera will activate when
the back-up light is ON with the ignition
switch ON and the shift lever in the R
(Reverse) position.This system is a supplemental system
that shows behind the vehicle through the
rearview display mirror while backing-up.
Type B
The rearview camera may be turned off
by pressing the ON/OFF button when the
rearview camera is activated.
To turn the camera on again, press the
ON/OFF button again when the ignition
switch is on and the shift lever in R
(Reverse). Also, the camera will turn on
automatically whenever the ignition
switch is turned off and on again.The hazard warning flasher should be
used whenever you find it necessary tostop the car in a hazardous location.
When you must make such an emer-
gency stop, always pull off the road as far
as possible.
The hazard warning lights are turned on
by pushing in the hazard switch. This
causes all turn signal lights to blink. The
hazard warning lights will operate even
though the key is not in the ignition
switch.
To turn the hazard warning lights off,
push the switch a second time.
REARVIEW CAMERA (IF EQUIPPED)
WARNING
This system is a supplementary function only. It is the responsibil- ity of the driver to always checkthe inside/outside rearview mirrorand the area behind the vehiclebefore and while backing upbecause there is a dead zone thatcan't see through the camera.
Always keep the camera lens clean. If lens is covered with for-eign matter, the camera may notoperate normally.
OLM049081
OLM049084
HAZARD WARNING FLASHER
OEL049083
■
Type BOEL049082
■Type A
Rear view display
Rear view display
Page 151 of 560
Features of your vehicle
76
4
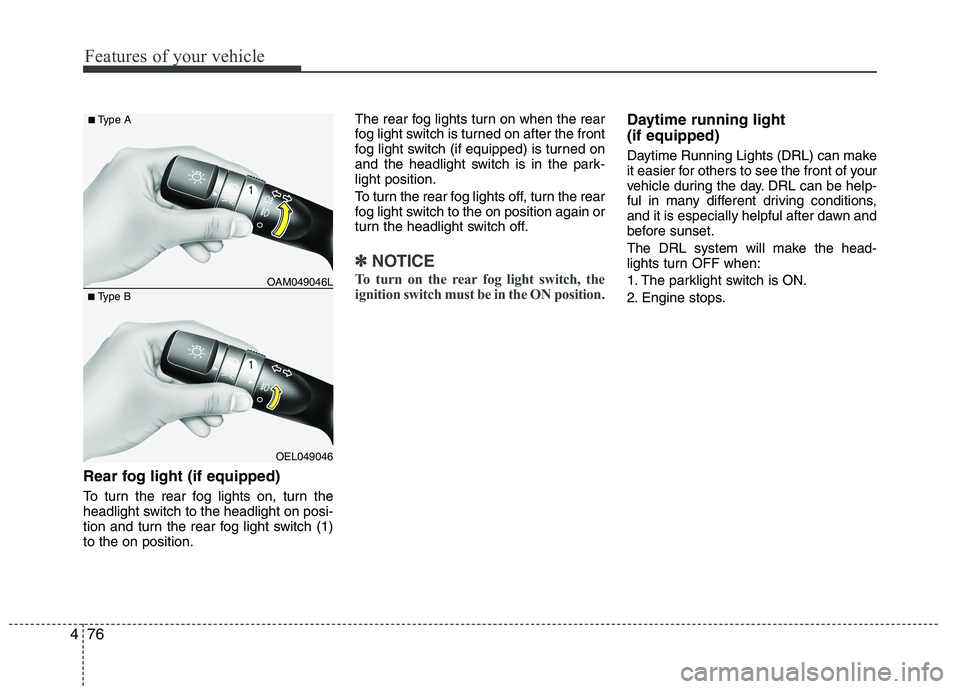
Rear fog light (if equipped)
To turn the rear fog lights on, turn the
headlight switch to the headlight on posi-
tion and turn the rear fog light switch (1)to the on position. The rear fog lights turn on when the rear
fog light switch is turned on after the front
fog light switch (if equipped) is turned on
and the headlight switch is in the park-light position.
To turn the rear fog lights off, turn the rear
fog light switch to the on position again or
turn the headlight switch off.
✽✽
NOTICE
To turn on the rear fog light switch, the
ignition switch must be in the ON position.
Daytime running light (if equipped)
Daytime Running Lights (DRL) can make
it easier for others to see the front of your
vehicle during the day. DRL can be help-
ful in many different driving conditions,
and it is especially helpful after dawn and
before sunset.
The DRL system will make the head-
lights turn OFF when:
1. The parklight switch is ON.
2. Engine stops.
OEL049046
■
Type B OAM049046L
■
Type A
Page 180 of 560
4105
Features of your vehicle
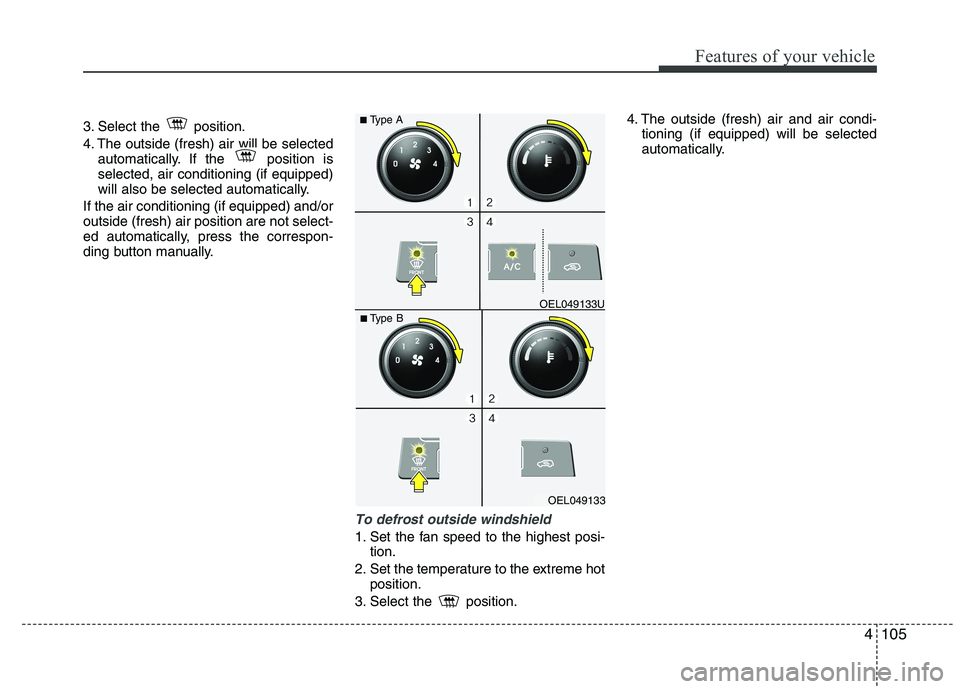
3. Select the position.
4. The outside (fresh) air will be selectedautomatically. If the position is selected, air conditioning (if equipped)
will also be selected automatically.
If the air conditioning (if equipped) and/oroutside (fresh) air position are not select-
ed automatically, press the correspon-
ding button manually.
To defrost outside windshield
1. Set the fan speed to the highest posi- tion.
2. Set the temperature to the extreme hot position.
3. Select the position. 4. The outside (fresh) air and air condi-
tioning (if equipped) will be selected
automatically.
OEL049133
■
Type B OEL049133U
■
Type A
Page 181 of 560
Features of your vehicle
106
4
Automatic climate control system
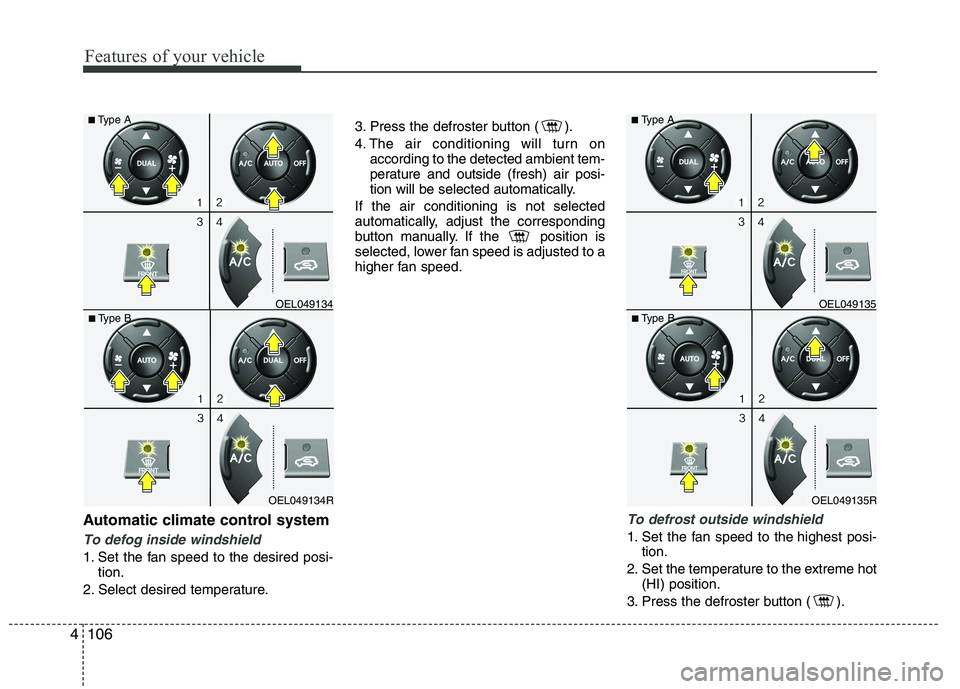
To defog inside windshield
1. Set the fan speed to the desired posi-
tion.
2. Select desired temperature. 3. Press the defroster button ( ).
4. The air conditioning will turn on
according to the detected ambient tem-
perature and outside (fresh) air posi-
tion will be selected automatically.
If the air conditioning is not selected
automatically, adjust the corresponding
button manually. If the position is
selected, lower fan speed is adjusted to a
higher fan speed.
To defrost outside windshield
1. Set the fan speed to the highest posi- tion.
2. Set the temperature to the extreme hot (HI) position.
3. Press the defroster button ( ).
OEL049135R
■
Type B OEL049135
■
Type AOEL049134R
■
Type B OEL049134
■
Type A
Page 192 of 560
4117
Features of your vehicle
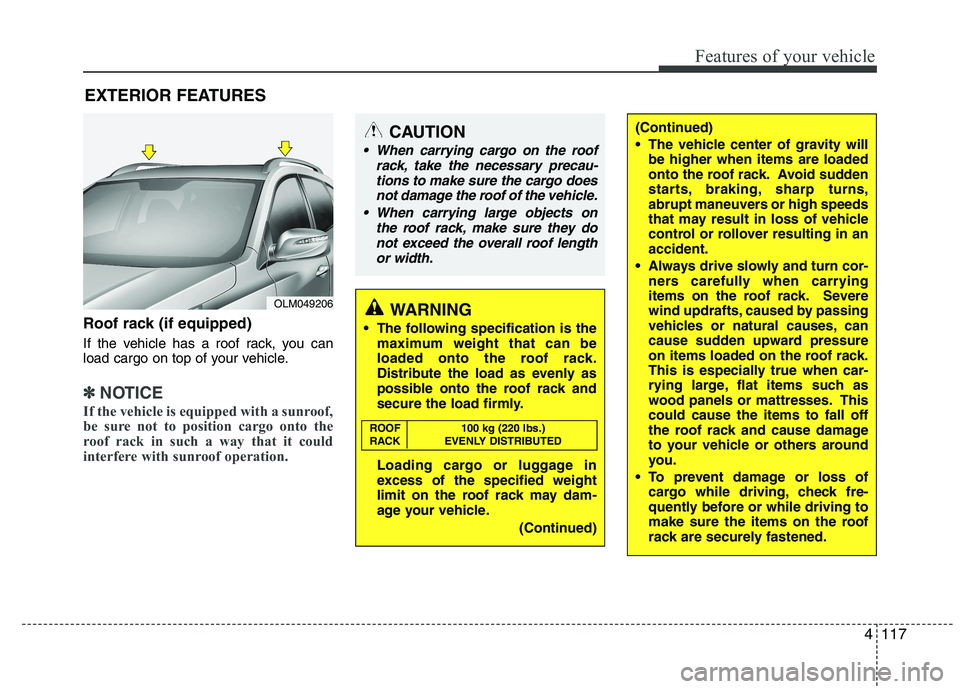
Roof rack (if equipped)
If the vehicle has a roof rack, you can
load cargo on top of your vehicle.
✽✽NOTICE
If the vehicle is equipped with a sunroof,
be sure not to position cargo onto the
roof rack in such a way that it could
interfere with sunroof operation.
EXTERIOR FEATURES
(Continued)
The vehicle center of gravity will be higher when items are loaded
onto the roof rack. Avoid sudden
starts, braking, sharp turns,
abrupt maneuvers or high speeds
that may result in loss of vehicle
control or rollover resulting in anaccident.
Always drive slowly and turn cor- ners carefully when carrying
items on the roof rack. Severe
wind updrafts, caused by passing
vehicles or natural causes, can
cause sudden upward pressure
on items loaded on the roof rack.
This is especially true when car-
rying large, flat items such as
wood panels or mattresses. Thiscould cause the items to fall off
the roof rack and cause damage
to your vehicle or others around
you.
To prevent damage or loss of cargo while driving, check fre-
quently before or while driving to
make sure the items on the roof
rack are securely fastened.CAUTION
When carrying cargo on the roof
rack, take the necessary precau-
tions to make sure the cargo doesnot damage the roof of the vehicle.
When carrying large objects on the roof rack, make sure they do
not exceed the overall roof length or width.
WARNING
The following specification is the maximum weight that can be
loaded onto the roof rack.
Distribute the load as evenly as
possible onto the roof rack and
secure the load firmly.
Loading cargo or luggage in
excess of the specified weight
limit on the roof rack may dam-
age your vehicle.
(Continued)
ROOF 100 kg (220 lbs.)
RACK EVENLY DISTRIBUTED
OLM049206
Page 200 of 560
4125
Features of your vehicle
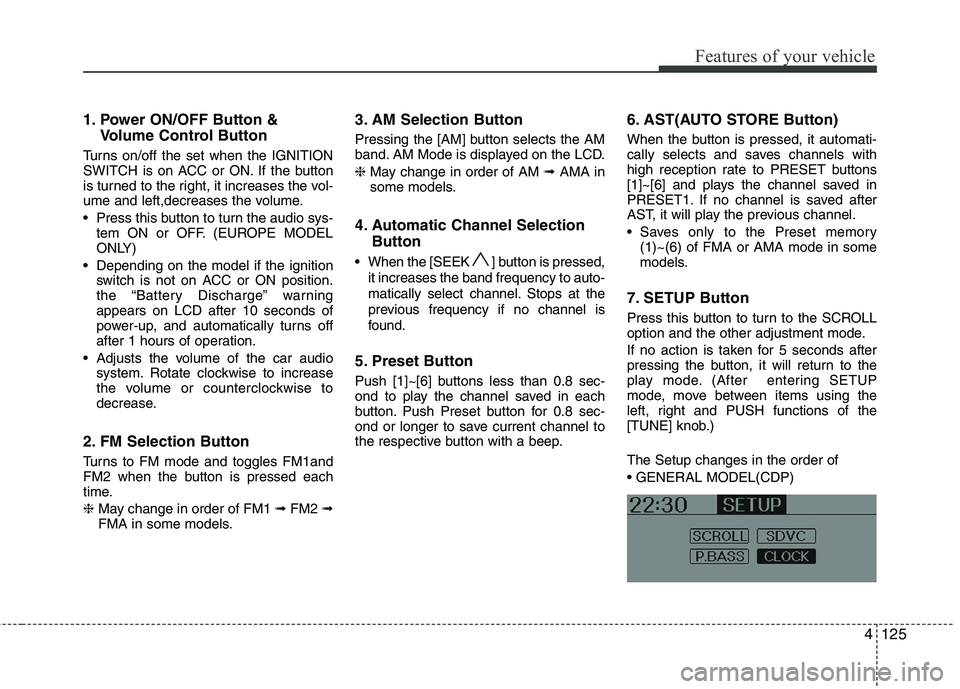
1. Power ON/OFF Button &Volume Control Button
Turns on/off the set when the IGNITION
SWITCH is on ACC or ON. If the button
is turned to the right, it increases the vol-
ume and left,decreases the volume.
Press this button to turn the audio sys- tem ON or OFF. (EUROPE MODEL
ONLY)
Depending on the model if the ignition switch is not on ACC or ON position.
the “Battery Discharge” warningappears on LCD after 10 seconds of
power-up, and automatically turns off
after 1 hours of operation.
Adjusts the volume of the car audio system. Rotate clockwise to increase
the volume or counterclockwise to
decrease.
2. FM Selection Button
Turns to FM mode and toggles FM1and
FM2 when the button is pressed each
time. ❈ May change in order of FM1 ➟FM2 ➟
FMA in some models. 3. AM Selection Button
Pressing the [AM] button selects the AM
band. AM Mode is displayed on the LCD. ❈
May change in order of AM ➟AMA in
some models.
4. Automatic Channel Selection Button
When the [SEEK ] button is pressed, it increases the band frequency to auto-
matically select channel. Stops at the
previous frequency if no channel is
found.
5. Preset Button
Push [1]~[6] buttons less than 0.8 sec-
ond to play the channel saved in each
button. Push Preset button for 0.8 sec-
ond or longer to save current channel to
the respective button with a beep. 6. AST(AUTO STORE Button)
When the button is pressed, it automati-
cally selects and saves channels with
high reception rate to PRESET buttons
[1]~[6] and plays the channel saved in
PRESET1. If no channel is saved after
AST, it will play the previous channel.
Saves only to the Preset memory
(1)~(6) of FMA or AMA mode in some
models.
7. SETUP Button
Press this button to turn to the SCROLL
option and the other adjustment mode.
If no action is taken for 5 seconds after
pressing the button, it will return to the
play mode. (After entering SETUP
mode, move between items using the
left, right and PUSH functions of the
[TUNE] knob.) The Setup changes in the order of