2012 Hyundai H-100 Truck tow
[x] Cancel search: towPage 15 of 217
1
FEATURES OF YOUR HYUNDAI
3BREAKING IN YOUR NEW HYUNDAI
B010F01A-AAT Operation in Foreign Countries If you are going to drive your Hyundai in another country, be sure to:
o Observe all regulations regarding registration and insurance.
o Determine that acceptable fuel is available. B020B01HR-GAT During the First 1,000 Km (600 Miles) No formal "break-in" procedure is re- quired with your new Hyundai. How-ever, you can contribute to the eco- nomical operation and durability of your Hyundai by observing the followingrecommendations during the first 1,000 km (600 miles).
o While driving, keep your engine
speed (rpm, or revolutions per minute) between 2,000 rpm and 4,000rpm.
o While driving, keep under three quar-
ters of maximum speed.
o Use moderate acceleration. Don't start, depress the accelerator pedalfully.
o For the first 300 km (200 miles), try to avoid hard stops.
o Don't lug the engine (in other words, don't drive so slowly in too-high a gear that the engine "bucks": shift to a lower gear).
CAUTION:
o Never use any fuel, whether diesel or B7 biodiesel or otherwise, thatfails to meet the latest petroleumindustry specification.
o Never use any fuel additives or
treatments that are not recom-mended or approved by the ve- hicle manufacturer.
! o Whether going fast or slow, vary your
speed from time to time.
o Don't let the engine idle longer than 3 minutes at one time.
o Don't tow a trailer during the first
1,000 km (600 miles) of operation.
o Do not exceed loading limits. B030A01P-GAT Before Operation Precautions for New Vehicle The performance and life of a vehicle depend largely on how the vehicle is handled when new.To maintain the parts smoothly and sustain high performance for a long time to come, be sure to observe thefollowing points. Make sure that your vehicle does not miss the first 5,000 km inspections. After the first 5,000 km of driving, take your vehicle to your nearest service shop for inspection.
Repair or replacement of worn or dam- aged components due to the use of non approved fuels will not be covered by the manufactures warranty.
Page 17 of 217
1
FEATURES OF YOUR HYUNDAI
5
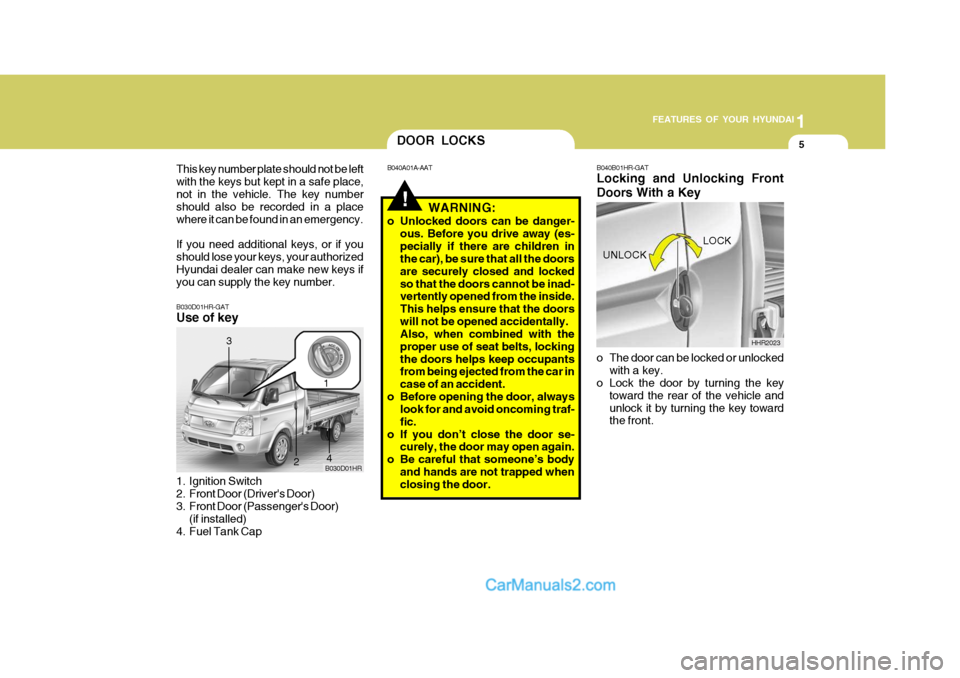
B030D01HR-GAT Use of key
1. Ignition Switch
2. Front Door (Driver's Door)
3. Front Door (Passenger's Door)
(if installed)
4. Fuel Tank Cap B030D01HR
1
2
3
4
!
DOOR LOCKS
B040A01A-AAT
WARNING:
o Unlocked doors can be danger- ous. Before you drive away (es- pecially if there are children in the car), be sure that all the doors are securely closed and lockedso that the doors cannot be inad- vertently opened from the inside. This helps ensure that the doorswill not be opened accidentally. Also, when combined with the proper use of seat belts, lockingthe doors helps keep occupants from being ejected from the car in case of an accident.
o Before opening the door, always look for and avoid oncoming traf-fic.
o If you don’t close the door se- curely, the door may open again.
o Be careful that someone’s body and hands are not trapped when closing the door.
UNLOCK
HHR2023
LOCK
B040B01HR-GAT Locking and Unlocking Front Doors With a Key
o The door can be locked or unlocked
with a key.
o Lock the door by turning the key
toward the rear of the vehicle and unlock it by turning the key toward the front.
This key number plate should not be left with the keys but kept in a safe place,not in the vehicle. The key number should also be recorded in a place where it can be found in an emergency. If you need additional keys, or if you should lose your keys, your authorizedHyundai dealer can make new keys if you can supply the key number.
Page 18 of 217

1FEATURES OF YOUR HYUNDAI
6
B040G02HR-GAT Central Door Lock (If Installed)
B040D01FC-GATLocking From the Inside To lock the doors from the inside, sim- ply close the door and push the lock switch to the "LOCK" position. When this is done, neither the outside nor theinside door handle can be used. NOTE: When the door is locked, the red mark on the switch is not visible and the character "LOCK" on the switch is visible.
HHR2023A
UNLOCK
B040C01HR
The central door locking is operated by pushing the driver's door lock switch toward the front or rear of the vehicle. If the passenger or rear doors are openwhen the switch is pushed, the door will remain locked when closed. NOTE:
o When pushing the switch toward the rear, all doors will unlock. When pushing the switch towardthe front, all doors will lock.
o When the door is unlocked, the
red mark on the switch is visibleand the character "LOCK" on the switch is not visible. UNLOCK
LOCK
LOCK
UNLOCK
B040C01S-AAT Locking From the Outside The doors can be locked without a key. To lock the doors, first push the inside lock switch to the "LOCK" position so that the red mark on the switch is notvisible, then close the door. NOTE:
o When locking the door this way,
be careful not to lock the door with the ignition key left in the vehicle.
o To protect against theft, always
remove the ignition key, close allwindows, and lock all doors when leaving your vehicle unattended. B040C01HR
LOCK
Page 19 of 217
1
FEATURES OF YOUR HYUNDAI
7
o The central door locking is oper- ated by turning the key (driver's door only) toward the front or rear of the vehicle.
CAUTION:
If the door is locked/unlocked mul-tiple times in rapid succession with either the vehicle key or door lockswitch, the system may stop operat- ing temporarily in order to protect the circuit and prevent damage tosystem components.
!
!
WINDOW GLASS
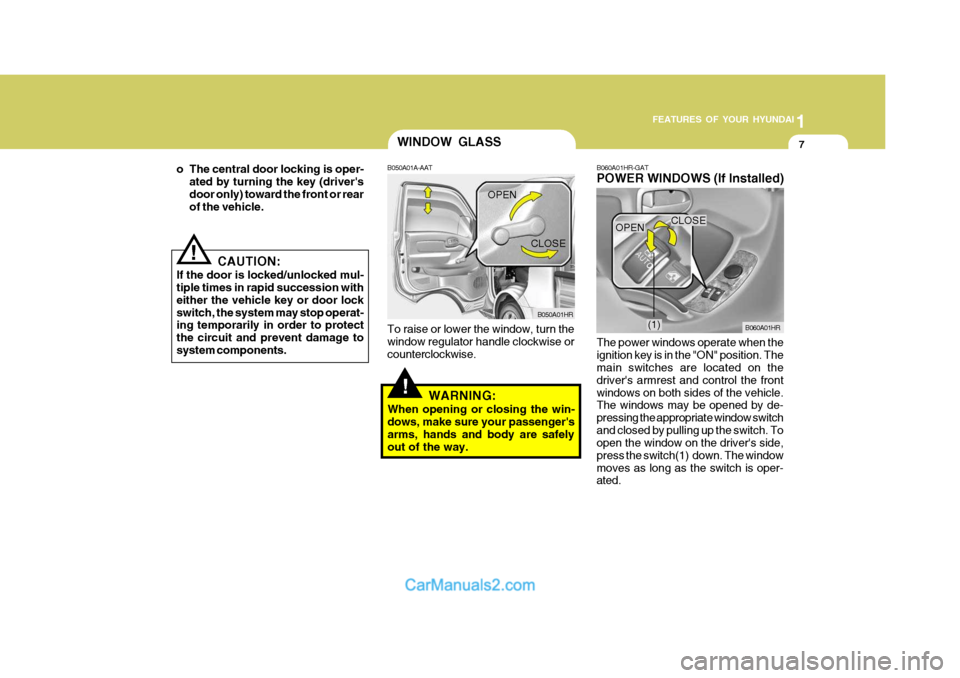
B050A01A-AAT To raise or lower the window, turn the window regulator handle clockwise or counterclockwise.
WARNING:
When opening or closing the win- dows, make sure your passenger'sarms, hands and body are safely out of the way. B050A01HR
OPEN
CLOSE
B060A01HR-GAT POWER WINDOWS (If Installed) The power windows operate when the ignition key is in the "ON" position. The main switches are located on the driver's armrest and control the frontwindows on both sides of the vehicle. The windows may be opened by de- pressing the appropriate window switchand closed by pulling up the switch. To open the window on the driver's side, press the switch(1) down. The windowmoves as long as the switch is oper- ated. B060A01HR
(1)
OPEN
CLOSE
Page 20 of 217
1FEATURES OF YOUR HYUNDAI
8
!
ADJUSTABLE SEATS
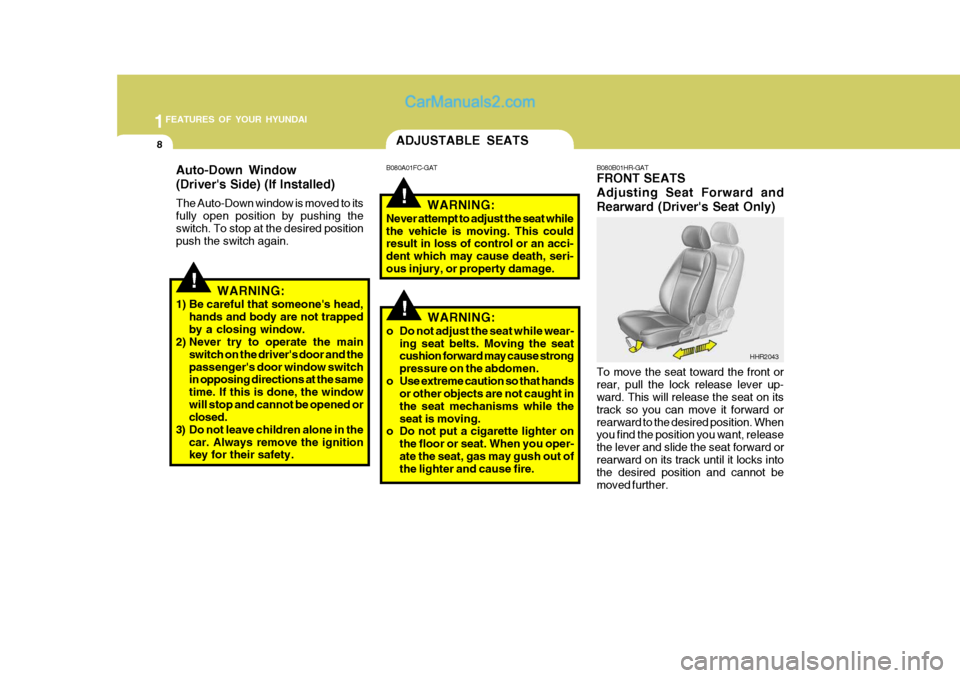
To move the seat toward the front or rear, pull the lock release lever up- ward. This will release the seat on its track so you can move it forward orrearward to the desired position. When you find the position you want, release the lever and slide the seat forward orrearward on its track until it locks into the desired position and cannot be moved further.
B080A01FC-GAT
B080B01HR-GAT
FRONT SEATS Adjusting Seat Forward andRearward (Driver's Seat Only)
WARNING:
Never attempt to adjust the seat while the vehicle is moving. This could result in loss of control or an acci- dent which may cause death, seri-ous injury, or property damage.
HHR2043
!
Auto-Down Window (Driver's Side) (If Installed) The Auto-Down window is moved to its fully open position by pushing theswitch. To stop at the desired position push the switch again.WARNING:
1) Be careful that someone's head, hands and body are not trapped by a closing window.
2) Never try to operate the main
switch on the driver's door and thepassenger's door window switch in opposing directions at the same time. If this is done, the windowwill stop and cannot be opened or closed.
3) Do not leave children alone in the car. Always remove the ignitionkey for their safety.
!WARNING:
o Do not adjust the seat while wear- ing seat belts. Moving the seat cushion forward may cause strong pressure on the abdomen.
o Use extreme caution so that hands or other objects are not caught inthe seat mechanisms while theseat is moving.
o Do not put a cigarette lighter on
the floor or seat. When you oper-ate the seat, gas may gush out of the lighter and cause fire.
Page 22 of 217
1FEATURES OF YOUR HYUNDAI
10
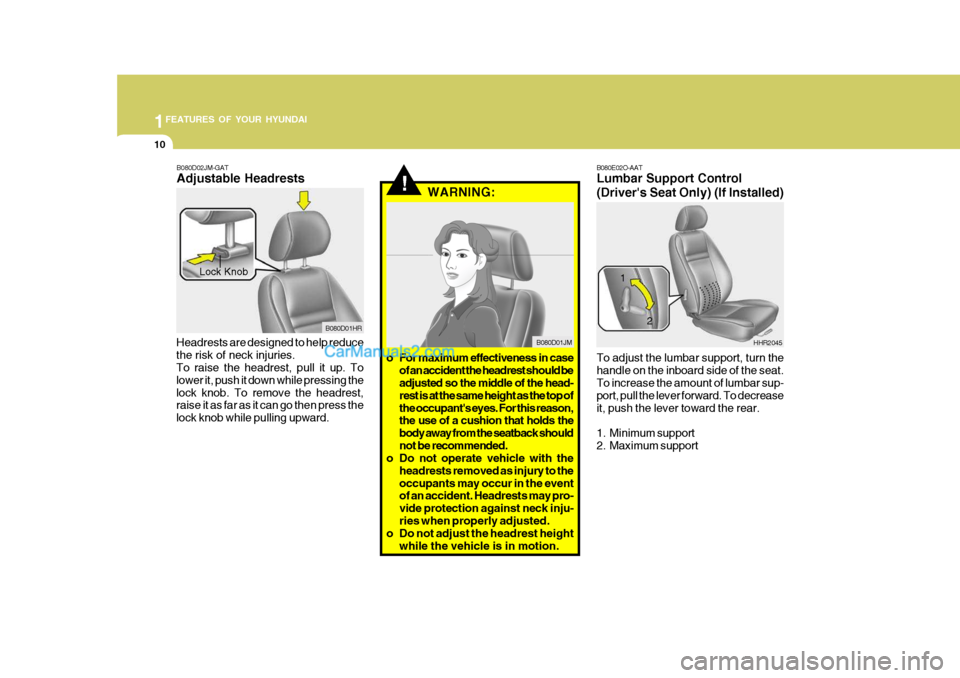
B080E02O-AAT Lumbar Support Control
(Driver's Seat Only) (If Installed) To adjust the lumbar support, turn the handle on the inboard side of the seat. To increase the amount of lumbar sup- port, pull the lever forward. To decreaseit, push the lever toward the rear.
1. Minimum support
2. Maximum support HHR2045
1
2
!
B080D02JM-GAT Adjustable Headrests
Headrests are designed to help reduce the risk of neck injuries. To raise the headrest, pull it up. To lower it, push it down while pressing thelock knob. To remove the headrest, raise it as far as it can go then press the lock knob while pulling upward. WARNING:
B080D01HR
Lock Knob
B080D01JM
o For maximum effectiveness in case of an accident the headrest should be adjusted so the middle of the head- rest is at the same height as the top ofthe occupant's eyes. For this reason, the use of a cushion that holds the body away from the seatback shouldnot be recommended.
o Do not operate vehicle with the
headrests removed as injury to theoccupants may occur in the event of an accident. Headrests may pro- vide protection against neck inju-ries when properly adjusted.
o Do not adjust the headrest height
while the vehicle is in motion.
Page 33 of 217
1
FEATURES OF YOUR HYUNDAI
21
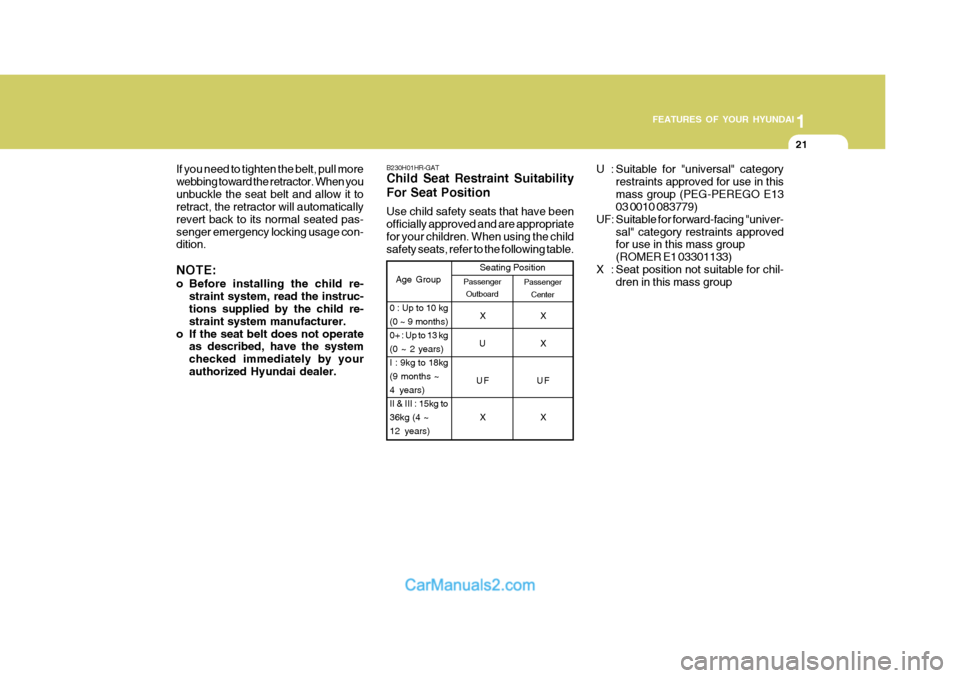
B230H01HR-GAT Child Seat Restraint Suitability For Seat Position Use child safety seats that have been officially approved and are appropriatefor your children. When using the child safety seats, refer to the following table.
PassengerCenter
Age Group Seating PositionPassenger
Outboard
0 : Up to 10 kg (0 ~ 9 months)0+ : Up to 13 kg(0 ~ 2 years)I : 9kg to 18kg(9 months ~4 years)II & III : 15kg to36kg (4 ~12 years) X
U
UF X X X
UF X
If you need to tighten the belt, pull more webbing toward the retractor. When youunbuckle the seat belt and allow it to retract, the retractor will automatically revert back to its normal seated pas-senger emergency locking usage con- dition. NOTE:
o Before installing the child re-
straint system, read the instruc- tions supplied by the child re- straint system manufacturer.
o If the seat belt does not operate as described, have the systemchecked immediately by yourauthorized Hyundai dealer. U : Suitable for "universal" category
restraints approved for use in thismass group (PEG-PEREGO E13 03 0010 083779)
UF: Suitable for forward-facing "univer- sal" category restraints approvedfor use in this mass group (ROMER E1 03301133)
X : Seat position not suitable for chil- dren in this mass group
Page 39 of 217

1
FEATURES OF YOUR HYUNDAI
27
! B260J01S-GAT
Charging System Warning Light
The charging system warning light should come on when the ignition isturned on, then go out when the engine is running. If the light stays on while the engine is running, there is a malfunc-tion in the electrical charging system. If the light comes on while you are driv- ing, stop, turn off the engine and checkunder the hood. First, make certain the generator drive belt is in place. If it is, check the tension of the belt.And then, have the system checked by your Hyundai dealer.
CAUTION:
If the drive belt (generator belt) is loosen, broken, or mission while the vehicle is driving, there may be a serious malfunction, engine couldoverheat because this belt also drives the water pump.!
time, you should slow the vehicle and bring it to a complete stop in a safelocation off the roadway. The brake fluid level warning light indi- cates that the brake fluid level in thebrake master cylinder is low and hy- draulic brake fluid conforming to DOT 3 or DOT 4 specifications should be added.After adding fluid, if no other trouble is found, the car should be immediately and carefully driven to a Hyundai dealerfor inspection. If further trouble is expe- rienced, the vehicle should not be driven at all but taken to a dealer by a profes-sional towing service or some other safe method. Your Hyundai is equipped with dual-diagonal braking systems. This means you still have braking on two wheels even if one of the dual systems shouldfail. With only one of the dual systems working, more than normal pedal travel and greater pedal pressure are requiredto stop the car. Also, the car will not stop in as short a distance with only half of the brake system working. If thebrakes fail while you are driving, shift to a lower gear for additional engine brak- ing and stop the car as soon as it is safeto do so. CAUTION:
The parking brake/low brake fluid warning light should also come on when the vacuum level in brakebooster descends to about 275 mmHg or below. The brake system is de- signed to stop the vehicle with re-serve assist if brake pedal is held down. This reserve is greatly reduced each time you release the brake.Without vacuum assist your vehicle can still be stopped by pushing much harder on brake pedal, however thestopping distance may be much longer. If the light comes on at any other time, you should slow the ve-hicle and bring it to a complete stop in a safe location off the roadway. After starting the engine, do not drivethe vehicle until the vacuum level is above 275 mmHg below atmosphere and warning light has turned off. Iffurther trouble is experienced, the vehicle should not be driven at all but taken to a dealer by a profes-sional towing service.