Page 157 of 217

6
DO-IT-YOURSELF MAINTENANCE
5
G020A01HR-GAT Engine Compartment The following should be checked regu- larly:
o Engine oil level and condition
o Transmission fluid level and condi-
tion
o Brake fluid level
o Engine coolant level
o Windshield washer fluid level
o Accessory drive belt condition
o Engine coolant hose condition
o Fluid leaks (on or below compo- nents)
o Power steering fluid level
o Battery condition
o Air filter condition G020C01HR-GAT Vehicle Interior The following should be checked each time when the vehicle is driven:
o Lights operation
o Windshield wiper operation
o Horn operation
o Defroster, heater system operation
(and air conditioning, if installed)
o Steering operation and condition
o Mirror condition and operation
o Turn signal operation
o Accelerator pedal operation
o Brake operation, including parking
brake
o Manual transmission operation, in- cluding clutch operation
o Seat control condition and operation
o Seat belt condition and operation
o Sunvisor operation If you notice anything that does not operate correctly or appears to be functioning incorrectly, inspect it care-fully and seek assistance from your Hyundai dealer if service is needed.
G020B01A-AAT Vehicle Exterior The following should be checked monthly:
o Overall appearance and condition
o Wheel condition and wheel nut torque
o Exhaust system condition
o Light condition and operation
o Windshield glass condition
o Wiper blade condition
o Paint condition and body corrosion
o Fluid leaks
o Door and hood lock condition
o Tire pressure and condition
(including spare tire)
GENERAL CHECKS
Page 158 of 217

6 DO-IT-YOURSELF MAINTENANCE
6
G030C01HR-GAT To Check the Oil Level 2.6 N/A
HHR5003
2.5 TCI
CHECKING THE ENGINE OIL
G030B01HR
G030B02HR-GAT Recommended Oil
(1) Select engine oil of the proper SAE
viscosity number according to the atmospheric temperature. Recommended viscosity is given in the following illustration. (2) The engine oil quality should meet
the following API classification:CF-4 or ABOVE
(3) The engine oil quality should meet
the following ACEA classification :B2 or B3
NOTE:
o For diesel-powered vehicle SAE 0W-30 oil should be used only in areas where extremely cold tem-peratures of 10°C (50°F) or below are experienced.
o For diesel-powered vehicle, if the
atmospheric temperatures are 0°C(32°F) or below, SAE 30 oil must not be used. This oil should beused only in areas where the at- mospheric temperatures are 0°C(32°F) or above. G030C01HR
G030A01HR-GAT Engine oil is essential to the perfor- mance and service of the engine. It issuggested that you check the oil level at least once a week or every 500 km in normal use and more often if you are ona trip or driving in severe conditions.
Page 159 of 217
6
DO-IT-YOURSELF MAINTENANCE
7
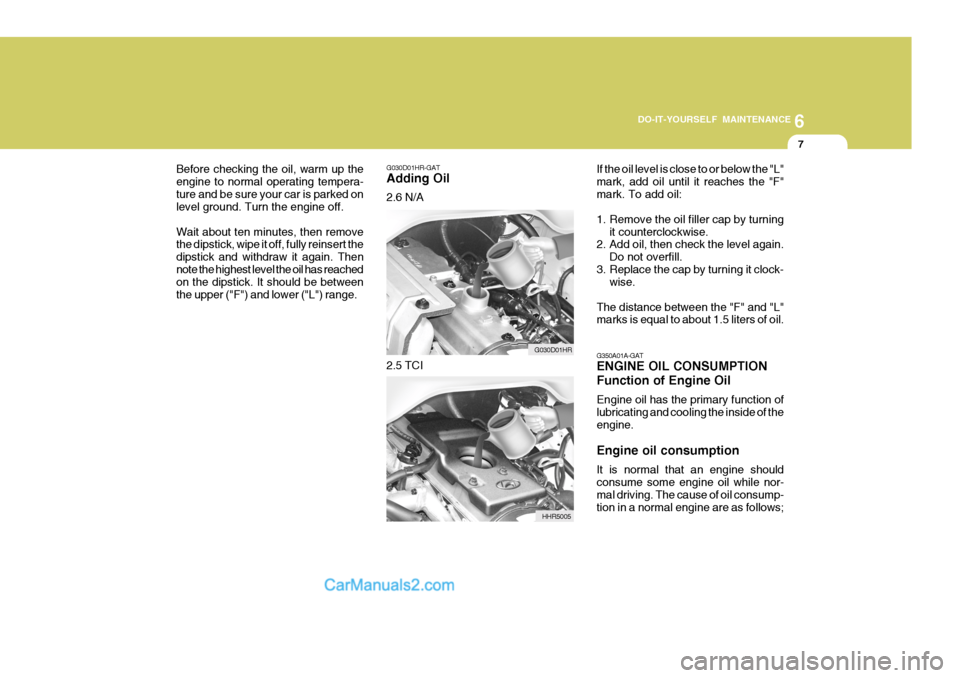
G030D01HR-GAT Adding Oil 2.6 N/A
Before checking the oil, warm up the engine to normal operating tempera-ture and be sure your car is parked on level ground. Turn the engine off. Wait about ten minutes, then remove the dipstick, wipe it off, fully reinsert the dipstick and withdraw it again. Thennote the highest level the oil has reached on the dipstick. It should be between the upper ("F") and lower ("L") range.
G030D01HR
2.5 TCI
HHR5005If the oil level is close to or below the "L"mark, add oil until it reaches the "F"mark. To add oil:
1. Remove the oil filler cap by turning
it counterclockwise.
2. Add oil, then check the level again.
Do not overfill.
3. Replace the cap by turning it clock- wise.
The distance between the "F" and "L" marks is equal to about 1.5 liters of oil. G350A01A-GAT ENGINE OIL CONSUMPTION Function of Engine Oil Engine oil has the primary function of
lubricating and cooling the inside of theengine. Engine oil consumption It is normal that an engine should consume some engine oil while nor- mal driving. The cause of oil consump- tion in a normal engine are as follows;
Page 160 of 217
6 DO-IT-YOURSELF MAINTENANCE
8
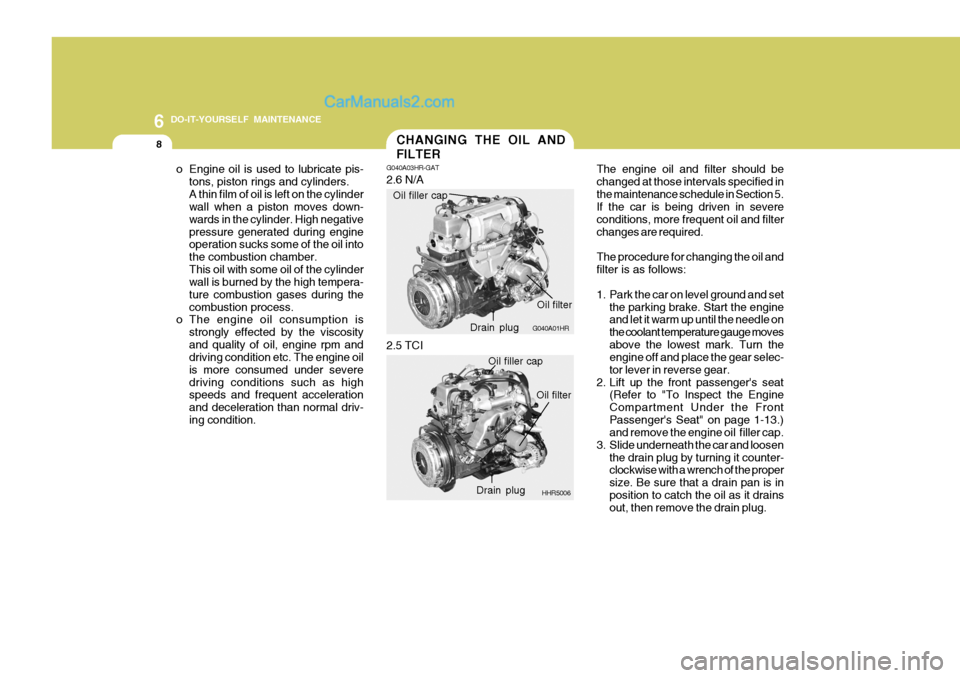
The engine oil and filter should be changed at those intervals specified inthe maintenance schedule in Section 5. If the car is being driven in severe conditions, more frequent oil and filterchanges are required. The procedure for changing the oil and filter is as follows:
1. Park the car on level ground and set
the parking brake. Start the engine and let it warm up until the needle on the coolant temperature gauge movesabove the lowest mark. Turn the engine off and place the gear selec- tor lever in reverse gear.
2. Lift up the front passenger's seat (Refer to "To Inspect the EngineCompartment Under the FrontPassenger's Seat" on page 1-13.) and remove the engine oil filler cap.
3. Slide underneath the car and loosen the drain plug by turning it counter-clockwise with a wrench of the proper size. Be sure that a drain pan is inposition to catch the oil as it drains out, then remove the drain plug.
CHANGING THE OIL AND FILTER
o Engine oil is used to lubricate pis- tons, piston rings and cylinders. A thin film of oil is left on the cylinder wall when a piston moves down- wards in the cylinder. High negativepressure generated during engine operation sucks some of the oil into the combustion chamber.This oil with some oil of the cylinder wall is burned by the high tempera-
ture combustion gases during thecombustion process.
o The engine oil consumption is
strongly effected by the viscosityand quality of oil, engine rpm and driving condition etc. The engine oil is more consumed under severedriving conditions such as high speeds and frequent acceleration and deceleration than normal driv-ing condition. G040A03HR-GAT 2.6 N/A
G040A01HR
Oil filler capDrain plugOil filter
2.5 TCI
HHR5006
Oil filler cap
Drain plug Oil filter
Page 161 of 217
6
DO-IT-YOURSELF MAINTENANCE
9
!WARNING:
Be very careful when draining the engine oil as it may be hot enough to burn you!
4. When the oil has stopped draining, replace the drain plug using a new gasket and retighten by turning it clockwise.
Tightening torque : 3.5 ~ 4.5 kgf.m
5. Remove the oil filter by turning it counterclockwise with a oil filter wrench of the proper size. A certainamount of oil will come out when you remove the filter. So be sure to have your drain pan in place underneathit.
6. Install a new oil filter in accordance
with the instructions on the carton oron the filter itself. Do not over-tighten.
Tightening torque: 2.3 ~ 2.5 kgf.m Be sure that the mounting surfaceon the engine is clean and that theold gasket is removed completely. Lubricate the new gasket on the filter with clean engine oil beforeinstallation.
!
7. Remove the engine oil level dipstick.
8. Refill the crankcase with the recom- mended engine oil slowly. Refer to the specification in chapter 9 for engine oil capacity.
CAUTION:
o Slowly pour the recommended oil by using a funnel. Do not overfill not to damage the engine.
o Do not spill engine oil, when add- ing or changing engine oil. If youdrop the engine oil on the engine room, wipe it off immediately. 9. Start the engine and check to be
sure no oil is leaking from the drainplug or oil filter.
10. Shut off the engine and recheck the
oil level.
NOTE: Always dispose of used engine oil in an environmentally acceptable man- ner. It is suggested that it be placedin a sealed container and taken to a service station for reclamation. Do not pour the oil on the ground or putit into the household trash.
WARNING:
Used motor oil may cause irritationor cancer of the skin if left in contact with the skin for prolonged periods of time. Wash your hands thoroughlywith soap and warm water as soon as possible after handling used oil.
!
Page 166 of 217
6 DO-IT-YOURSELF MAINTENANCE
14
To install the wiper blade
HHR5050
1. Put a new wiper blade onto the wiper arm and lower the wiper blade at the level of the wiper arm as shown in thedrawing.
2. Raise the wiper blade lightly and pull
up it. HHR5049
CAUTION:
o Do not operate the wipers on dry glass. This can result in more rapid wear of the wiper blades and may scratch the glass.
o Keep the blade rubber out of con- tact with petroleum products suchas engine oil, gasoline, etc.! G080B01HR-GAT Replacing the Wiper Blades To replace the wiper blades, raise the wiper to the vertical. To remove the wiper blade
1. Push down the wiper blade with the
locking clip (1) pressed to detach it from the wiper arm. HHR5048
(1)
Page 168 of 217
6 DO-IT-YOURSELF MAINTENANCE
16
Park the car on level ground with the engine off.
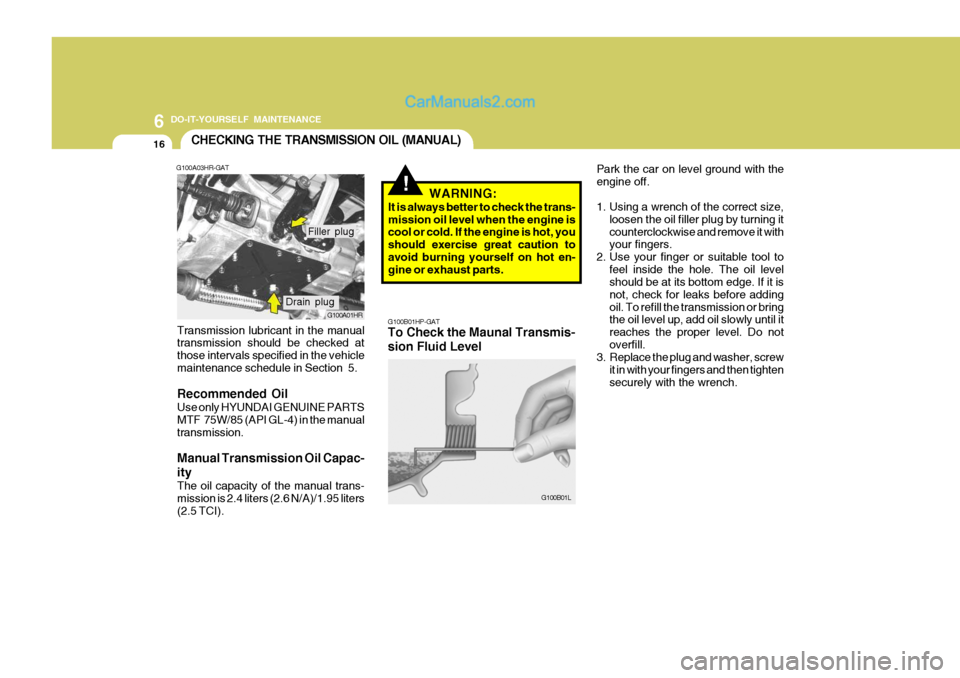
1. Using a wrench of the correct size,loosen the oil filler plug by turning it counterclockwise and remove it with your fingers.
2. Use your finger or suitable tool to
feel inside the hole. The oil levelshould be at its bottom edge. If it is not, check for leaks before addingoil. To refill the transmission or bring the oil level up, add oil slowly until it reaches the proper level. Do notoverfill.
3. Replace the plug and washer, screw
it in with your fingers and then tightensecurely with the wrench.CHECKING THE TRANSMISSION OIL (MANUAL)
G100A03HR-GAT
G100A01HR
Transmission lubricant in the manual transmission should be checked at those intervals specified in the vehiclemaintenance schedule in Section 5. Recommended Oil Use only HYUNDAI GENUINE PARTS MTF 75W/85 (API GL-4) in the manualtransmission. Manual Transmission Oil Capac- ity The oil capacity of the manual trans- mission is 2.4 liters (2.6 N/A)/1.95 liters(2.5 TCI).
Drain plug Filler plug
!
G100B01HP-GAT To Check the Maunal Transmis- sion Fluid Level
G100B01L
WARNING:
It is always better to check the trans- mission oil level when the engine is cool or cold. If the engine is hot, you should exercise great caution toavoid burning yourself on hot en- gine or exhaust parts.
Page 169 of 217
6
DO-IT-YOURSELF MAINTENANCE
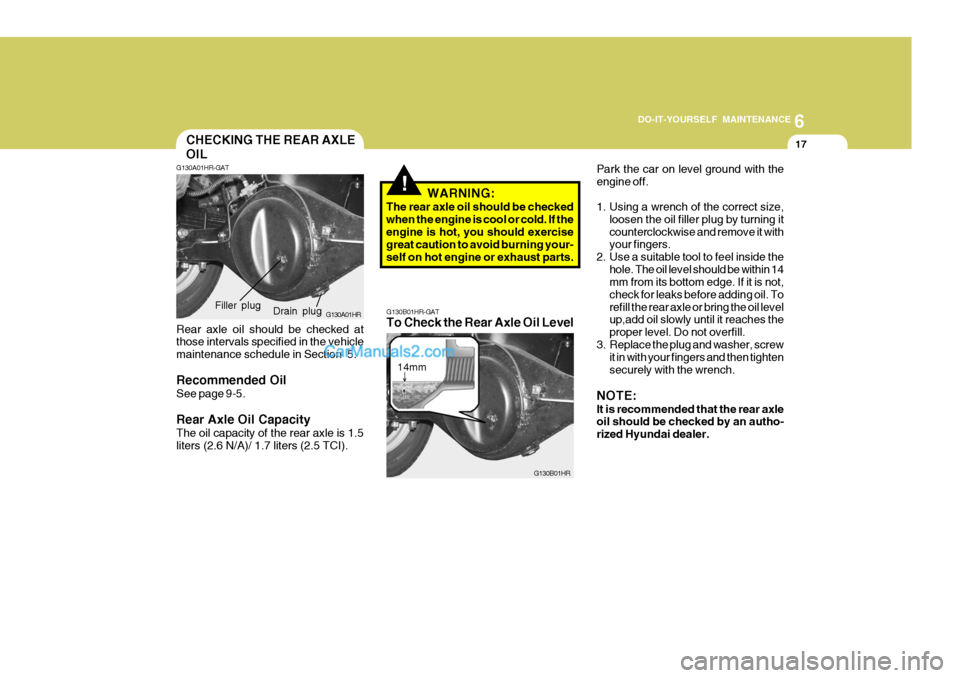
17CHECKING THE REAR AXLE OIL
!
G130A01HR-GAT
G130A01HR
Rear axle oil should be checked at those intervals specified in the vehicle maintenance schedule in Section 5. Recommended Oil See page 9-5. Rear Axle Oil Capacity The oil capacity of the rear axle is 1.5 liters (2.6 N/A)/ 1.7 liters (2.5 TCI). WARNING:
The rear axle oil should be checkedwhen the engine is cool or cold. If the engine is hot, you should exercise great caution to avoid burning your-self on hot engine or exhaust parts.
Drain plug
Filler plug
G130B01HR-GAT To Check the Rear Axle Oil Level
G130B01HR
14mmPark the car on level ground with the engine off.
1. Using a wrench of the correct size,
loosen the oil filler plug by turning it counterclockwise and remove it with your fingers.
2. Use a suitable tool to feel inside the
hole. The oil level should be within 14mm from its bottom edge. If it is not, check for leaks before adding oil. Torefill the rear axle or bring the oil level up,add oil slowly until it reaches the proper level. Do not overfill.
3. Replace the plug and washer, screw it in with your fingers and then tightensecurely with the wrench.
NOTE: It is recommended that the rear axle oil should be checked by an autho- rized Hyundai dealer.