2012 Hyundai Elantra buttons
[x] Cancel search: buttonsPage 80 of 384

Features of your vehicle
6
4
However, if any door remains open, the
doors won't lock and the chime will sound
for 3 seconds. Close the door and try
again to lock the doors. If boot lid or engine bonnet remains
open, the hazard warning light won't
operate. After this, if boot lid and engine
bonnet are closed, the hazard warning
lights blink once.
The button will only operate when the
smart key is within 0.7~1 m (28~40 in.)
from the outside door handle. If you want
to make sure that a door has locked or
not, you should check the door lock but-
ton inside the vehicle or pull the outside
door handle.
Even though you press the outside door
handle buttons, the doors will not lock
and the chime will sound for 3 seconds if
any of following occur:
The smart key is in the vehicle.
The engine start/stop button is in ACC
or ON position.
Any door except the boot is open. Using the button on the smart key
All doors are locked if the lock button(1)
is pressed. If all doors, boot and bonnet
are closed, the hazard warning lights will
blink once to indicate that all doors are
locked.
However, if any door, boot or engine bon-
net remains open, the hazard warning
lights will not operate. If all doors, bootand engine bonnet are closed after the
lock button is pressed, the hazard warn-
ing lights blink once.
The operating distance of the button is
the area of 10 m (30 feet) from the out-
side door handle.Unlocking
Using the door handle switch
Press the button of the front outside door
handles with all doors closed and locked,
unlocks all the doors. The hazard warn-
ing lights blink twice to indicate that all
doors are unlocked. The button will only
operate when the smart key is within0.7~1 m (28~40 in.) from the outside
door handle.
When the smart key is recognized in the area of 0.7~1 m (28~40 in.) from the front
outside door handle, other people canalso open the door without possession of
the smart key.
After pressing the button, the doors will
lock automatically unless you open any
door within 30 seconds.
Using the button on the smart key
All doors are unlocked if the unlock but-
ton(2) is pressed. The hazard warning
lights will blink twice to indicate that all
doors are unlocked.
After pressing this button, the doors will
lock automatically unless you open any
door within 30 seconds.
The operating distance of the button is
the area of 10 m (30 feet) from the out-
side door handle.
Page 155 of 384

481
Features of your vehicle
MANUAL CLIMATE CONTROL SYSTEM (IF EQUIPPED)
1. Front windscreen defrost button
2. Mode selection buttons
3. Rear window defroster button
4. MAX A/C (Max airconditioning) button (if equipped) 5. Air intake control button
6. Temperature control knob
7. Fan speed control knob
8. A/C (Air conditioning) button (if equipped)
OMD040100A/OMD041100L
■Type A ■
Type B
Page 166 of 384

Features of your vehicle
92
4
Manual heating and air condition- ing The heating and cooling system can be
controlled manually by pressing buttons
other than the AUTO button. In this case,
the system works sequentially according
to the order of buttons selected.
When pressing any button (or turning
any knob) except AUTO button whilst
automatic operation, the functions not
selected will be controlled automatically.
1. Start the engine.
2. Set the mode to the desired position.
3. Set the temperature control to the
desired position.
4. Set the air intake control to the outside (fresh) air position.
5. Set the fan speed control to the desired speed.
6. If air conditioning is desired, turn the air conditioning system on.
Press the AUTO button in order to con-
vert to full automatic control of the sys-tem.
Mode selection
The mode selection button controls the
direction of the air flow through the venti-lation system.
The air flow outlet port is converted as
follows:
Refer to the illustration in the “Manual cli- mate control system”. Floor & Defrost
Most of the air flow is directed to the floorand the windscreen with a small amount
directed to the side window defrosters.
Floor-Level
Most of the air flow is directed to the
floor, with a small amount of the air beingdirected to the windscreen and side win-
dow defrosters.
Bi-Level
Air flow is directed towards the face and
the floor.
Face-Level
Air flow is directed toward the upper body
and face. Additionally, each outlet can becontrolled to direct the air dischargedfrom the outlet.
OMD041112L
Page 178 of 384

Features of your vehicle
104
4
INTERIOR FEATURES
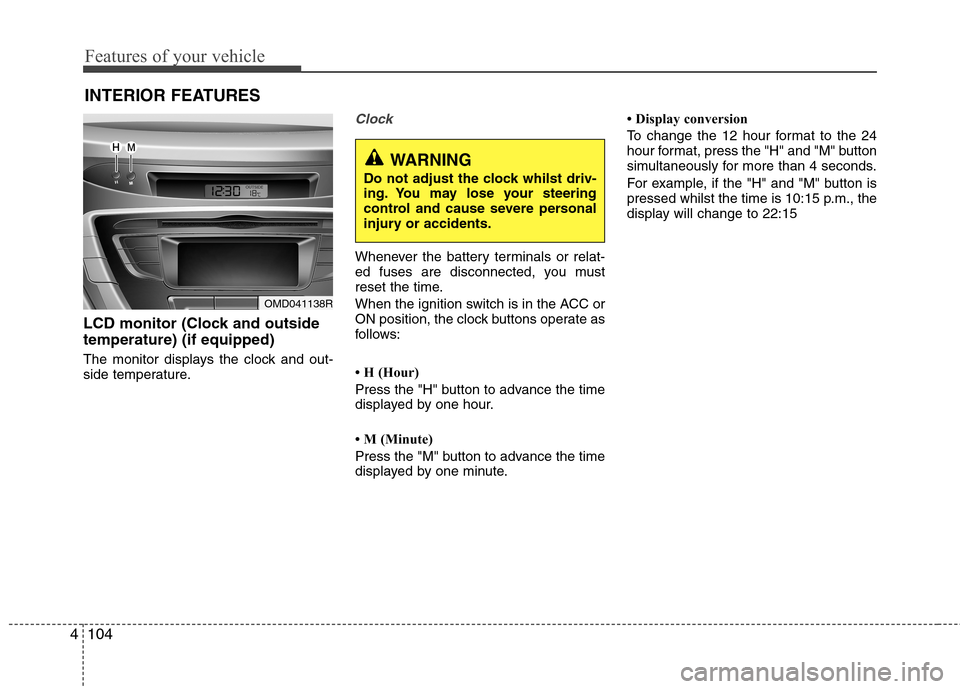
LCD monitor (Clock and outside temperature) (if equipped)
The monitor displays the clock and out-
side temperature.
Clock
Whenever the battery terminals or relat-
ed fuses are disconnected, you must
reset the time.
When the ignition switch is in the ACC or
ON position, the clock buttons operate as
follows:
H (Hour)
Press the "H" button to advance the time
displayed by one hour.
M (Minute)
Press the "M" button to advance the time
displayed by one minute. Display conversion
To change the 12 hour format to the 24
hour format, press the "H" and "M" button
simultaneously for more than 4 seconds.
For example, if the "H" and "M" button is
pressed whilst the time is 10:15 p.m., the
display will change to 22:15
OMD041138R
WARNING
Do not adjust the clock whilst driv-
ing. You may lose your steering
control and cause severe personal
injury or accidents.
Page 186 of 384

Steering wheel audio control (if equipped)
The steering wheel audio control button
is installed to promote safe driving.
VOLUME (VOL +/-) (1)
Press the up button (+) to increase vol-ume.
Press the down button (-) to decrease volume.
SEEK/PRESET ( / ) (2)
If the SEEK/PRESET button is pressed
for 0.8 second or more, it will work as fol-
lows in each mode.
RADIO mode
It will function as the AUTO SEEK select
button. It will SEEK until you release the
button.
CDP mode
It will function as the FF/REW button.
If the SEEK/PRESET button is pressed
for less than 0.8 second, it will work as
follows in each mode. RADIO mode
It will function as the PRESET STATION
select buttons.
CDP mode
It will function as the TRACK UP/DOWN
button.
MODE (3)
Press the MODE button to select Radio,
CD (Compact Disc) or AUX (Auxiliary, ifequipped).
MUTE (4, if equipped)
Press the button to mute the sound.
Press the button to turn off the micro-
phone during a telephone call.
Detailed information for audio control
buttons is included in the following pagesin this section.
CAUTION
Do not operate audio remote con- trol buttons simultaneously.
OMD040139N
OMD040139
■ Type A
■Type B
4112
Features of your vehicle
Page 191 of 384

4117
Features of your vehicle
Using RADIO, SETUP, VOLUME
and AUDIO CONTROL
1. Button
The FM/AM button toggles between FM
and AM. Listed below are the paths as
the system switches from FM to AM and
back to FM.
FM/AM : FM1➟FM2 ➟AM ➟FM1... 2. Button
When the is pressed, it will
automatically tune to the next lower station.
When the is pressed, it will automatically tune to the next higher station.
3. PRESET Buttons
Press ~ buttons less than 0.8 seconds to play the station saved
in each button.
Press ~ buttons more than 0.8 seconds or longer to save the cur-
rent station to the respective button
with a beep. 4. Button
Turn the LCD Display & Backlight
ON/OFF when button press.
5. Button
When the button is pressed, it automati-
cally selects and saves channels with
high reception rate to PRESET buttons
~ and plays the channel with
high reception rate to PRESET. If no
channel is saved after AST, it will play the
previous channel.
Saves only to the Preset memory
~ of FMA or AMA mode in
some models.
61
61
AST
DISP
DISP
61
61
SEEK
TRACK
SEEK
FM/AM
MD_GEN_RADIO
MD_GEN_RADIO
Page 195 of 384

4121
Features of your vehicle
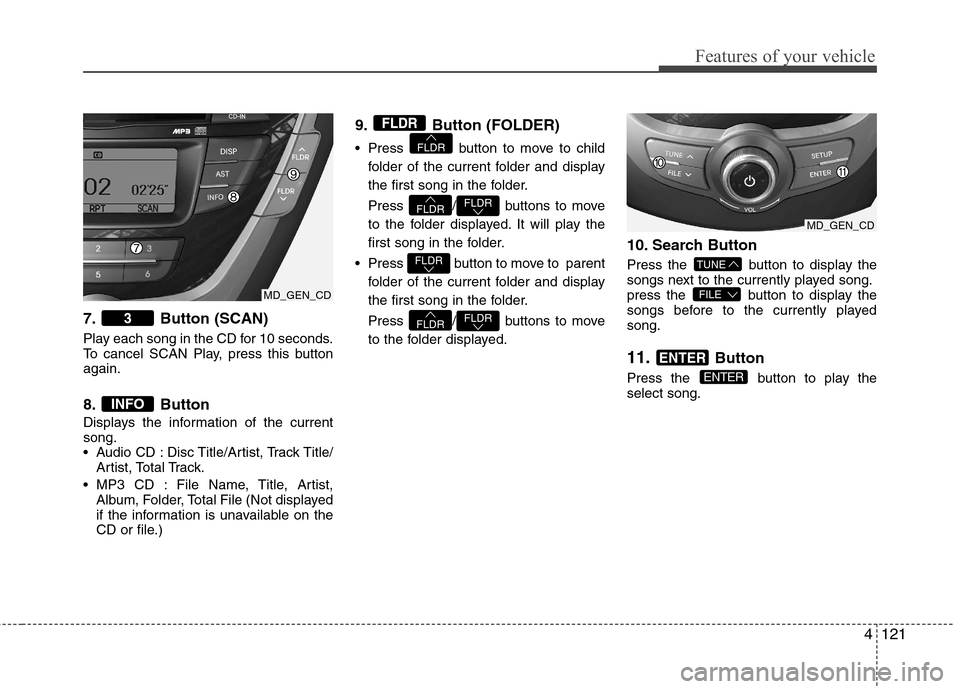
7. Button (SCAN)
Play each song in the CD for 10 seconds.
To cancel SCAN Play, press this buttonagain.
8. Button
Displays the information of the current song.
Audio CD : Disc Title/Artist, Track Title/Artist, Total Track.
MP3 CD : File Name, Title, Artist, Album, Folder, Total File (Not displayed
if the information is unavailable on the
CD or file.) 9. Button (FOLDER)
Press button to move to child
folder of the current folder and display
the first song in the folder.
Press / buttons to move
to the folder displayed. It will play the
first song in the folder.
Press button to move to parent folder of the current folder and display
the first song in the folder.
Press / buttons to move
to the folder displayed. 10. Search Button
Press the button to display the
songs next to the currently played song.
press the button to display the
songs before to the currently playedsong. 11.
Button
Press the button to play the select song.
ENTER
ENTER
FILE
TUNE
FLDRFLDR
FLDR
FLDRFLDR
FLDR
FLDR
INFO
3
MD_GEN_CD
MD_GEN_CD
Page 203 of 384

4129
Features of your vehicle
✽✽NOTICE FOR USING THE
iPod DEVICE
Some iPod models might not support the communication protocol and the
files will not be played.
Supported iPod models:
- iPod Mini
- iPod 4th(Photo) ~ 6th(Classic) gen-eration
- iPod Nano 1st~4th generation
- iPod Touch 1st~2nd generation
The order of search or playback of songs in the iPod can be different
from the order searched in the audio
system.
If the iPod disabled due to its own malfunction, reset the iPod. (Reset:
Refer to iPod manual)
An iPod may not operate normally on
low battery.
Some iPod devices, such as the
iPhone, can be connected through the
Bluetooth ®
interface. The device must
have audio Bluetooth ®
capability
(such as for stereo headphone
Bluetooth ®
). The device can play, but
it will not be controlled by the audio
system.CAUTION IN USING THE
iPod DEVICE
The HYUNDAI iPod Power Cable
is needed in order to operate iPod
with the audio buttons on theaudio system. The USB cable pro- vided by Apple may cause mal-function and should not be used
for HYUNDAI vehicles.
❋
❋ The HYUNDAI iPod Power
Cable may be purchasedthrough your HYUNDAI
Dealership.
When connecting iPod with the iPod Power Cable, insert the con-nector to the multimedia socket completely. If not inserted com-
pletely, communications betweeniPod and audio may be interrupt- ed.
When adjusting the sound effects of the iPod and the audio system,
the sound effects of both devices will overlap and might reduce ordistort the quality of the sound.
(Continued)
(Continued) Deactivate (turn off) the equalizer function of an iPod when adjust-ing the audio system’s volume,and turn off the equalizer of the
audio system when using theequalizer of an iPod.
When the iPod cable is connect- ed, the system can be switched to
AUX mode even without iPoddevice and may cause noise.Disconnect the iPod cable whenyou are not using the iPod device.
When not using iPod with car audio, detach the iPod cable fromiPod. Otherwise, iPod may remain in accessory mode, and may notwork properly.
When connecting the iPod, use the USB/AUX terminals.
(Continued)
Detachable USB/AUXAll-in-one USB/AUX