2012 Hyundai Elantra warning light
[x] Cancel search: warning lightPage 104 of 384

Features of your vehicle
30
4
(Continued)
Use only approved portable plas-
tic fuel containers designed to
carry and store petrol.
Do not use mobile phones whilst refuelling. Electric current and/or
electronic interference from
mobile phones can potentially
ignite fuel vapours causing a fire.
When refuelling, always switch the engine off. Sparks produced
by electrical components relatedto the engine can ignite fuel
vapours causing a fire. Once
refuelling is complete, check tomake sure the filler cap and filler
door are securely closed, before
starting the engine.
DO NOT use matches or a lighter and DO NOT SMOKE or leave a lit
cigarette in your vehicle whilst at
a petrol station especially during
refuelling. Automotive fuel is
highly flammable and can, when
ignited, result in fire.
(Continued)(Continued)
Do not get back into a vehicleonce you have begun refuelling
since you can generate static
electricity by touching, rubbing
or sliding against any item or fab-
ric (polyester, satin, nylon, etc.)
capable of producing static elec-
tricity. Static electricity discharge
can ignite fuel vapours resulting
in rapid burning. If you must re-
enter the vehicle, you should
once again eliminate potentially
dangerous static electricity dis-
charge by touching a metal part
of the vehicle, away from the fuel
filler neck, nozzle or other petrol
source.
When using an approved portable fuel container, be sure toplace the container on the
ground prior to refuelling. Static
electricity discharge from the
container can ignite fuel vapours
causing a fire. Once refuelling
has begun, contact with the vehi-
cle should be maintained until
the filling is complete.
(Continued)WARNING - Refuelling
dangers
Automotive fuels are flammable
materials. When refuelling, please
note the following guidelines care-
fully. Failure to follow these guide-
lines may result in severe personal
injury, severe burns or death by fire
or explosion.
Read and follow all warning at the petrol station facility.
Before refuelling note the loca- tion of the Emergency Petrol
Shut-Off, if available, at the petrol
station facility.
Before touching the fuel nozzle, you should eliminate potentially
dangerous static electricity dis-
charge by touching another metal
part of the vehicle, a safe dis-
tance away from the fuel filler
neck, nozzle, or other gas source.
(Continued)
Page 110 of 384

Features of your vehicle
36
4
Electric power steering (EPS)
Power steering uses an electric motor to
assist you in steering the vehicle. If the
engine is off or if the power steering sys-
tem becomes inoperative, the vehicle
may still be steered, but it will require an
increased steering effort.
The motor driven power steering is con-
trolled by the power steering control unit
which senses the steering wheel torque
and vehicle speed to command the
motor.
The steering effort becomes heavier as
the vehicle’s speed increases and
becomes lighter as the vehicle’s speed
decreases for better control of the steer-ing wheel.
Should you notice any change in the
effort required to steer during normal
vehicle operation, have the power steer-
ing checked by an authorised HYUNDAI
dealer.✽✽
NOTICE
The following symptoms may occur dur-
ing normal vehicle operation:
The EPS warning light does not illu- minate.
The steering effort is high immediate- ly after turning the ignition switch on.
This happens as the EPS system per-
forms the diagnostics. When the diag-
nostics is completed, the steering
effort will return to its normal condi-
tion.
A click noise may be heard from the
EPS relay after the ignition switch is
turned to the ON or LOCK position.
Motor noise may be heard when the vehicle is at a stop or at a low driving
speed.
If the Electric Power Steering System
does not operate normally, the warn-
ing light will illuminate on the instru-
ment cluster. The steering wheel may
become difficult to control or operate
abnormally. Take your vehicle to an
authorised HYUNDAI dealer and
have the vehicle checked as soon as
possible. (Continued)(Continued)
When the vehicle is stationary, if you
turn the steering wheel all the way to
the left or right continuously, the
steering wheel becomes heavier
towards the end. This is for your safe-
ty, not a system malfunction. As time
passes, the steering wheel return to its
normal condition.
The steering effort increases if the
steering wheel is rotated continuously
when the vehicle is not in motion.
However, after a few minutes, it will
return to its normal conditions.
When you operate the steering wheel in low temperature, abnormal noise
could occur. If temperature rises, the
noise will disappear. This is a normal
condition.
When the charging system warning light comes on or the voltage is low
(When the alternator (or battery) does
not operate normally or it malfunc-
tions), the steering wheel may get
heavy and become difficult to control
operate abnormally.
STEERING WHEEL
Page 111 of 384

437
Features of your vehicle
✽✽NOTICE
If the steering wheel is turned to full
lock in either direction for a long period
of time whilst stationary (especially dur-
ing parking) the system could overheat.
Should this occur, steering assistance
will be reduced until the system cools
down. This is to protect the electric
power steering system.Tilt steering
Tilt steering allows you to adjust the
steering wheel before you drive. You can
also raise it to give your legs more room
when you exit and enter the vehicle.
The steering wheel should be positioned
so that it is comfortable for you to drive,
whilst permitting you to see the instru-
ment panel warning lights and gauges.
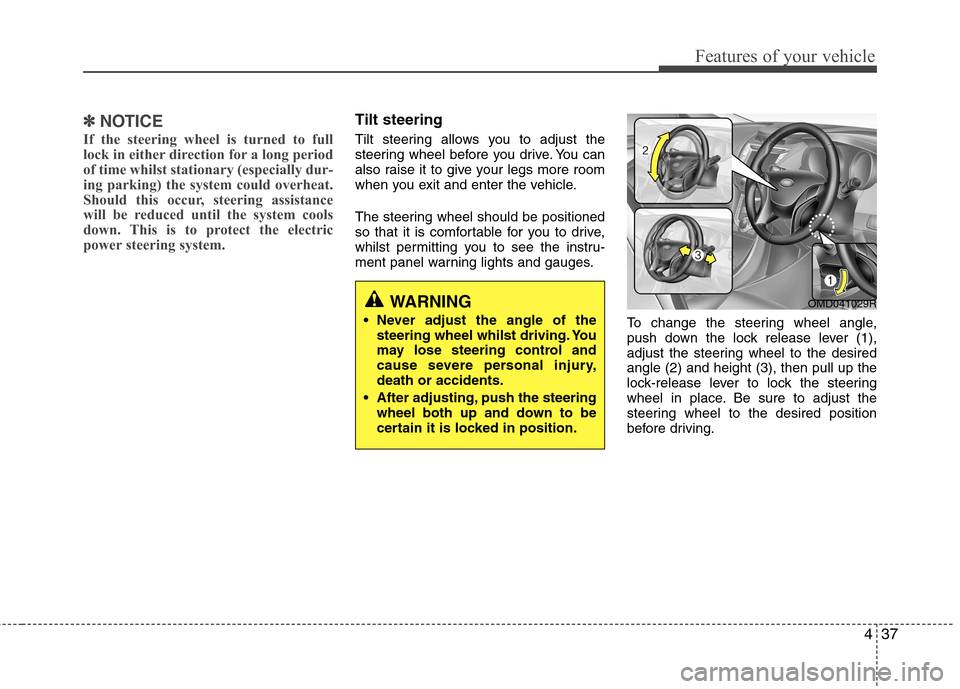
To change the steering wheel angle,
push down the lock release lever (1),
adjust the steering wheel to the desiredangle (2) and height (3), then pull up the
lock-release lever to lock the steering
wheel in place. Be sure to adjust the
steering wheel to the desired position
before driving.
WARNING
Never adjust the angle of the steering wheel whilst driving. You
may lose steering control and
cause severe personal injury,death or accidents.
After adjusting, push the steering wheel both up and down to be
certain it is locked in position.OMD041029R
Page 112 of 384

Features of your vehicle
38
4
WARNING - Rear visibility
Do not place objects in the rear
seat or cargo area which would
interfere with your vision out of the
rear window.
WARNING
Do not adjust the rearview mirror
whilst the vehicle is moving. This
could result in loss of control, and
an accident which could cause
death, serious injury or property
damage.
WARNING
Do not modify the inside mirror and
do not install a wide mirror. It could
result in injury, during an accident
or deployment of the air bag.
Horn
To sound the horn, press the horn sym-
bol on your steering wheel.
Check the horn regularly to be sure it
operates properly.
✽✽ NOTICE
To sound the horn, press the area indi-
cated by the horn symbol on your steer-
ing wheel (see illustration). The horn will
operate only when this area is pressed.
Inside rearview mirror
Adjust the rearview mirror so that the
centre view through the rear window is
seen. Make this adjustment before you
start driving.
Day/night rearview mirror
Make this adjustment before you start
driving and whilst the day/night lever is in
the day position.
Pull the day/night lever toward you to reduce glare from the headlights of the
vehicles behind you during night driving.
Remember that you lose some rearview clarity in the night position.
CAUTION
Do not strike the horn severely to operate it, or hit it with your fist. Donot press on the horn with a sharp-pointed object.
OMD040030 MIRRORS OMD040031
Day
Night
Page 113 of 384

439
Features of your vehicle
Electrochromic mirror (ECM) (if equipped)
The electric rearview mirror automatical- ly controls the glare from the headlights
of the car behind you in nighttime or low
light driving conditions. The sensormounted in the mirror senses the light
level around the vehicle, and automati-cally controls the headlight glare from
vehicles behind you.
When the engine is running, the glare is
automatically controlled by the sensor
mounted in the rearview mirror.
Whenever the shift lever is shifted into
reverse, the mirror will automatically go
to the brightest setting in order to
improve the drivers view behind the vehi-
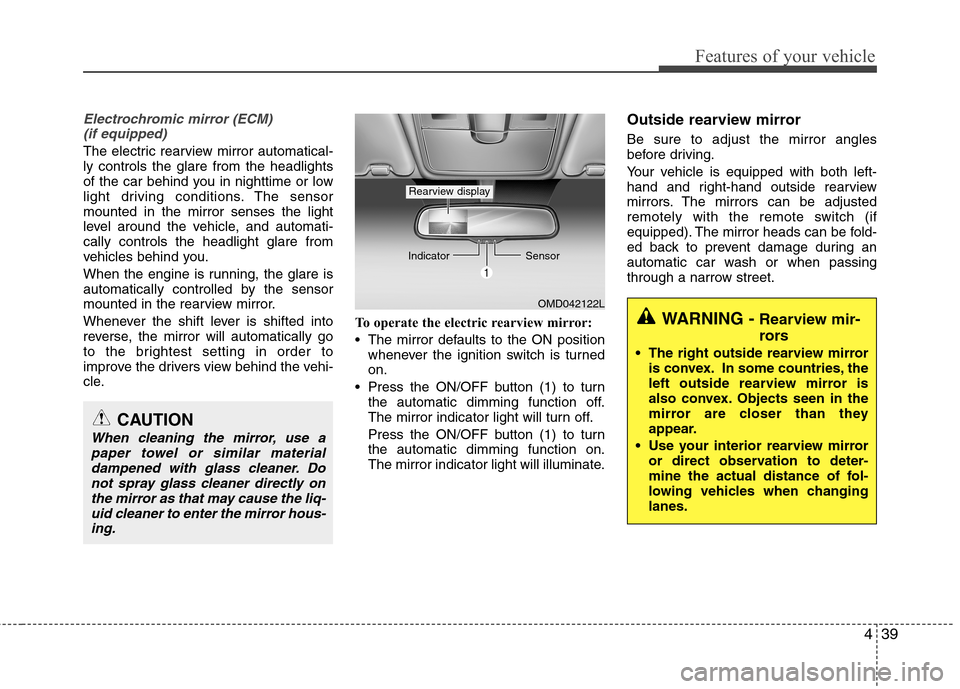
cle. To operate the electric rearview mirror:
The mirror defaults to the ON position
whenever the ignition switch is turned on.
Press the ON/OFF button (1) to turn the automatic dimming function off.
The mirror indicator light will turn off.
Press the ON/OFF button (1) to turn the automatic dimming function on.
The mirror indicator light will illuminate. Outside rearview mirror Be sure to adjust the mirror angles
before driving.
Your vehicle is equipped with both left-
hand and right-hand outside rearview
mirrors. The mirrors can be adjusted
remotely with the remote switch (if
equipped). The mirror heads can be fold-
ed back to prevent damage during an
automatic car wash or when passing
through a narrow street.
CAUTION
When cleaning the mirror, use a
paper towel or similar materialdampened with glass cleaner. Do
not spray glass cleaner directly onthe mirror as that may cause the liq-uid cleaner to enter the mirror hous- ing.
OMD042122L
Indicator
Sensor
Rearview display
WARNING - Rearview mir-
rors
The right outside rearview mirror is convex. In some countries, the
left outside rearview mirror is
also convex. Objects seen in the
mirror are closer than they
appear.
Use your interior rearview mirror or direct observation to deter-
mine the actual distance of fol-
lowing vehicles when changinglanes.
Page 116 of 384

Features of your vehicle
42
4
INSTRUMENT CLUSTER
OMD040040L/OMD040041L* The actual cluster in the vehicle may differ from the illustration.
■ Type A
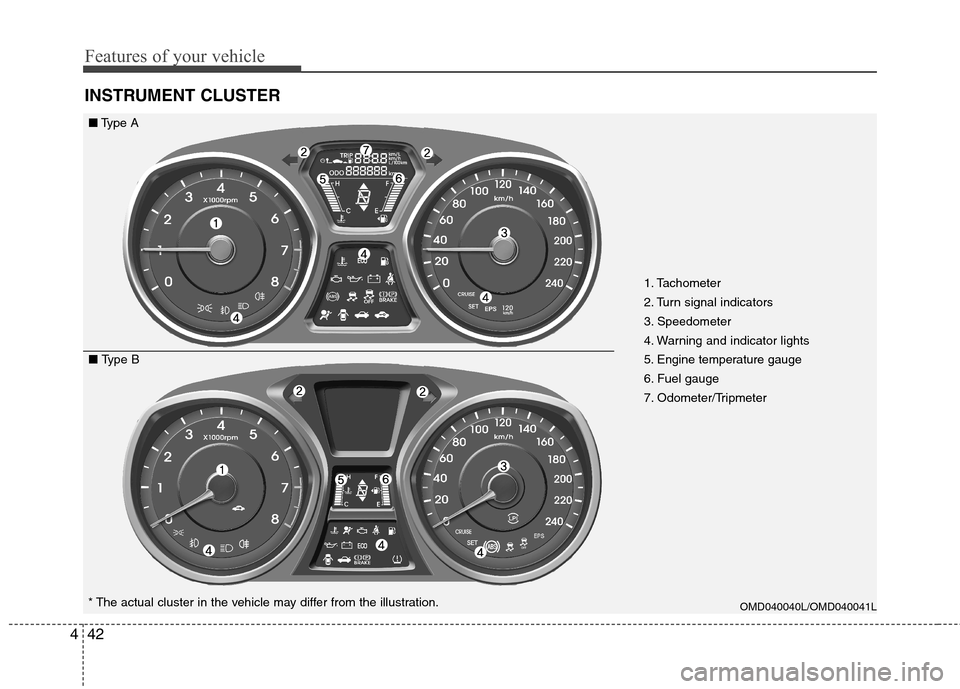
■ Type B 1. Tachometer
2. Turn signal indicators
3. Speedometer
4. Warning and indicator lights
5. Engine temperature gauge
6. Fuel gauge
7. Odometer/Tripmeter
Page 118 of 384

Features of your vehicle
44
4
The tachometer pointer may move slight-
ly when the ignition switch is in ON posi-
tion with the engine OFF. This movement
is normal and will not affect the accuracy
of the tachometer once the engine is run-ning.
Engine temperature gauge
This gauge shows the temperature of the
engine coolant when the ignition switch
is ON. The gauge is supplemented by a
Engine coolant temperature warninglight, which illuminates when the engine
is overheating.
Do not continue driving with an overheat-
ed engine. If your vehicle overheats, refer
to “If the engine overheats” in section 6.
OMD040048
■
Type A
■Type B
CAUTION
Do not operate the engine within
the tachometer's RED ZONE.
This may cause severe engine dam-age.
CAUTION
If the gauge shows beyond the nor- mal range area toward the “H” posi-
tion, it indicates overheating that may damage the engine.
WARNING
Never remove the radiator cap
when the engine is hot. The enginecoolant is under pressure and
could cause severe burns. Wait
until the engine is cool before
adding coolant to the reservoir.
Page 119 of 384

445
Features of your vehicle
Fuel gauge
The fuel gauge indicates the approxi- mate amount of fuel remaining in the fueltank.
The fuel tank capacity is given in
section 8.The fuel gauge is supplement-
ed by a low fuel warning light, which will
illuminate when the fuel tank is nearly
empty.
On inclines or curves, the fuel gauge
may fluctuate or the low fuel warning light
may come on earlier than usual due to
the movement of fuel in the tank.
: The arrow indicates the fuel filler lidis in the left side of the vehicle.
Odometer (km or mi.)
The odometer indicates the total dis-
tance the vehicle has been driven.
You will also find the odometer useful to
determine when periodic maintenance
should be performed.
WARNING - Fuel gauge
Running out of fuel can expose
vehicle occupants to danger.
You must stop and obtain addition-
al fuel as soon as possible after thewarning light comes on or when the
gauge indicator comes close to the
“E” level.
CAUTION
Avoid driving with a very low fuel level. Running out of fuel could cause the engine to misfire, damag-ing the catalytic converter.OMD040050
■
Type A
■Type BOMD040053/OMD040054
■
Type A
■Type B