Page 12 of 384

15
Introduction
INDICATOR SYMBOLS ON THE INSTRUMENT CLUSTER
Seat belt warning light
High beam indicator
Turn signal indicator
Anti-lock brake system (ABS)
warning light*
Parking brake & Brake fluid
warning light
Malfunction indicator
Immobiliser indicator*
Boot open warning light*
Charging system warning light
Door ajar warning light*
ESP (ESC*
1
) indicator*
ESP (ESC* 1
) OFF indicator*
Front fog light indicator*
Engine oil pressure warning lightElectric power steering (EPS)
system warning light
Air bag warning light*
Rear fog light indicator*
Cruise control SET indicator*
Cruise control indicator*
Light on indicator
Automatic transaxle shift posi-
tion indicator (Automatic
transaxle only)
Manual transaxle shift indicator
(Manual transaxle only)
Low fuel level warning light
❈ For more detailed explanations, refer to “Instrument cluster” in section 4. ECO indicator*ECO
Overspeed warning light*120km/h
* if equipped *
1
Some countries use the term ESC (Electronic stability control) instead of
ESP. Please refer to the term your
country uses.
Page 14 of 384
Your vehicle at a glance
2
2
INTERIOR OVERVIEW
OMD012001ER
1. Inside door handle ............................4-17
2. Outside rearview mirror control
switch*...............................................4-40
3. Central door lock switch....................4-18
4. Power window lock switch* ...............4-25
5. Power window switches* ...................4-22
6. Bonnet release lever .........................4-27
7. Instrument panel illumination* ..........4-43
8. ESP OFF button* ..............................5-28
9. Fuse box ............................................7-47
10. Brake pedal .....................................5-22
11. Accelerator pedal.....................5-6, 5-11
12. Boot lid release switch ....................4-20
13. Fuel filler lid release lever ...............4-29
14. Steering wheel ................................4-36
15. Steering wheel tilt lever...................4-37* if equipped
Page 18 of 384
Safety features of your vehicle
2
3
Driver’s seat
(1) Seat adjustment, forward/backward
(2) Seatback recliner
(3) Seat adjustment, height
(4) Lumbar support*
(5) Seat warmer*
(6) Headrest adjustment
Front passenger seat
(7) Seat adjustment, forward/backward
(8) Seatback recliner
(9) Seat warmer*
(10) Headrest adjustment Rear seat
(11) Seat warmer*
(12) Armrest
(13) Headrest adjustment
(14) Seat back folding knob (boot)** if equipped
SEATS
OMD031001R
■
Type A■Type B
■Type A
■Type B
❈ The actual feature in the vehicle may differ from the illustration.
Page 29 of 384

313
Safety features of your vehicle
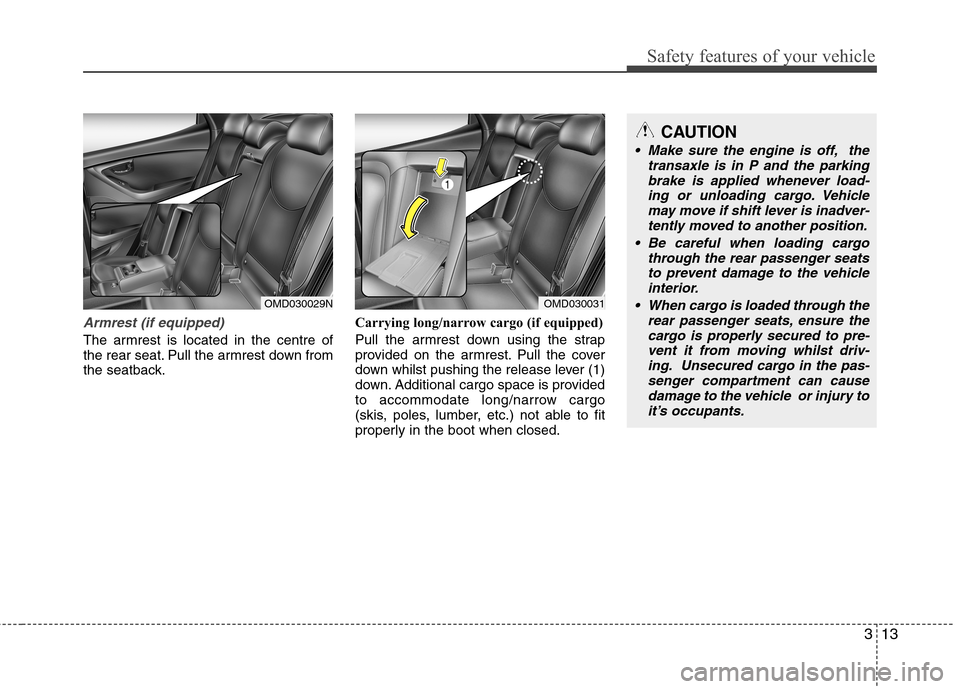
Armrest (if equipped)
The armrest is located in the centre of
the rear seat. Pull the armrest down from
the seatback.Carrying long/narrow cargo (if equipped)
Pull the armrest down using the strap
provided on the armrest. Pull the cover
down whilst pushing the release lever (1)
down. Additional cargo space is provided
to accommodate long/narrow cargo
(skis, poles, lumber, etc.) not able to fit
properly in the boot when closed.
OMD030029N
CAUTION
Make sure the engine is off, the
transaxle is in P and the parking
brake is applied whenever load- ing or unloading cargo. Vehiclemay move if shift lever is inadver-tently moved to another position.
Be careful when loading cargo through the rear passenger seatsto prevent damage to the vehicle interior.
When cargo is loaded through the rear passenger seats, ensure thecargo is properly secured to pre- vent it from moving whilst driv- ing. Unsecured cargo in the pas-
senger compartment can causedamage to the vehicle or injury toit’s occupants.
OMD030031
Page 30 of 384

Safety features of your vehicle
14
3
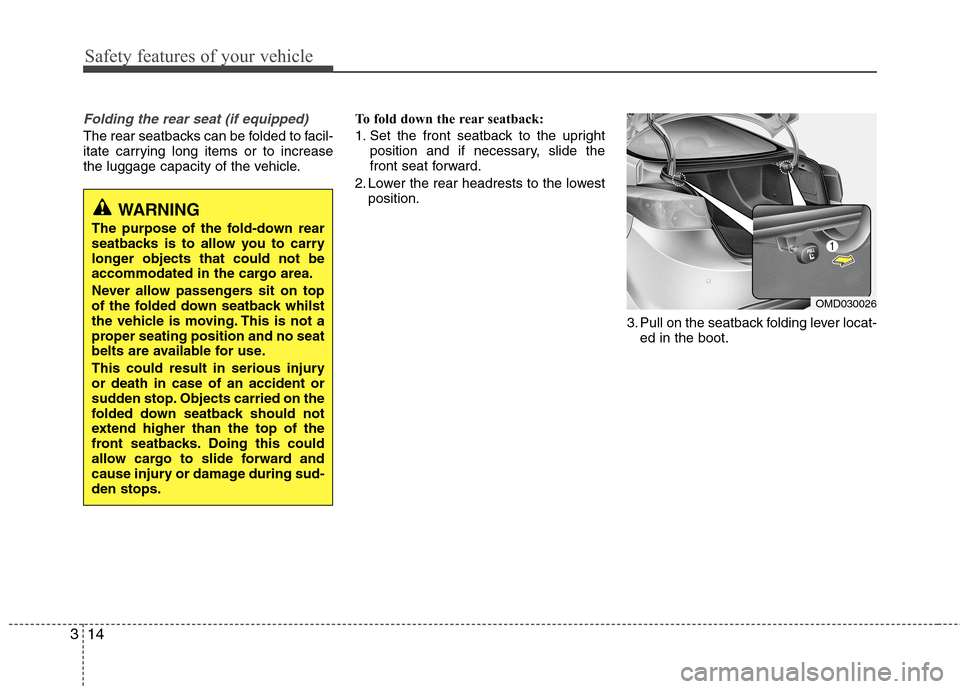
Folding the rear seat (if equipped)
The rear seatbacks can be folded to facil-
itate carrying long items or to increase
the luggage capacity of the vehicle. To fold down the rear seatback:
1. Set the front seatback to the upright
position and if necessary, slide the
front seat forward.
2. Lower the rear headrests to the lowest position.
3. Pull on the seatback folding lever locat-ed in the boot.
OMD030026
WARNING
The purpose of the fold-down rear
seatbacks is to allow you to carry
longer objects that could not be
accommodated in the cargo area.
Never allow passengers sit on top
of the folded down seatback whilst
the vehicle is moving. This is not a
proper seating position and no seat
belts are available for use.
This could result in serious injury or death in case of an accident or
sudden stop. Objects carried on the
folded down seatback should not
extend higher than the top of the
front seatbacks. Doing this could
allow cargo to slide forward and
cause injury or damage during sud-den stops.
Page 75 of 384
4
Keys / 4-2
Smart key / 4-5
Remote keyless entry / 4-11
Theft-alarm system / 4-13
Door locks / 4-16
Boot / 4-20
Windows / 4-22
Bonnet / 4-27
Fuel filler lid / 4-29
Sunroof / 4-32
Steering wheel / 4-36
Mirrors / 4-38
Instrument cluster / 4-42
Rear parking assist system / 4-65
Rearview camera / 4-68
Hazard warning flasher / 4-69
Lighting / 4-70
Wipers and washers / 4-75
Interior light / 4-78
Defroster / 4-80
Manual climate control system / 4-81
Automatic climate control system / 4-90
Windscreen defrosting and defogging / 4-98
Storage compartment / 4-102
Interior features / 4-104
Audio system / 4-111
Features of your vehicle
Page 79 of 384
45
Features of your vehicle
With a smart key, you can lock or unlock
a door (and boot) and even start the
engine without inserting the key. ❈The word “HOLD” is written on the but-
ton to inform you that you must press
and hold the button for 1 second.
To remove the mechanical key, press and
hold the release button (1) and remove
the mechanical key (2).
To reinstall the mechanical key, put the
key into the hole and push it until a clicksound is heard. Smart key functions
With the smart key, you can lock and
unlock the vehicle doors (and boot), and
the smart key enables starting of the
engine as well. Detailed information fol-
lows:
Locking
Using the door handle switch
Pressing the button of the front outside door handles with all doors closed and
any door unlock, locks all the doors. If all
doors, boot and engine bonnet are
closed, the hazard warning lights will
blink once to indicate that all doors are
locked.
SMART KEY (IF EQUIPPED)
OMD040001L
OYF049302N
OMD040008/H
Page 80 of 384

Features of your vehicle
6
4
However, if any door remains open, the
doors won't lock and the chime will sound
for 3 seconds. Close the door and try
again to lock the doors. If boot lid or engine bonnet remains
open, the hazard warning light won't
operate. After this, if boot lid and engine
bonnet are closed, the hazard warning
lights blink once.
The button will only operate when the
smart key is within 0.7~1 m (28~40 in.)
from the outside door handle. If you want
to make sure that a door has locked or
not, you should check the door lock but-
ton inside the vehicle or pull the outside
door handle.
Even though you press the outside door
handle buttons, the doors will not lock
and the chime will sound for 3 seconds if
any of following occur:
The smart key is in the vehicle.
The engine start/stop button is in ACC
or ON position.
Any door except the boot is open. Using the button on the smart key
All doors are locked if the lock button(1)
is pressed. If all doors, boot and bonnet
are closed, the hazard warning lights will
blink once to indicate that all doors are
locked.
However, if any door, boot or engine bon-
net remains open, the hazard warning
lights will not operate. If all doors, bootand engine bonnet are closed after the
lock button is pressed, the hazard warn-
ing lights blink once.
The operating distance of the button is
the area of 10 m (30 feet) from the out-
side door handle.Unlocking
Using the door handle switch
Press the button of the front outside door
handles with all doors closed and locked,
unlocks all the doors. The hazard warn-
ing lights blink twice to indicate that all
doors are unlocked. The button will only
operate when the smart key is within0.7~1 m (28~40 in.) from the outside
door handle.
When the smart key is recognized in the area of 0.7~1 m (28~40 in.) from the front
outside door handle, other people canalso open the door without possession of
the smart key.
After pressing the button, the doors will
lock automatically unless you open any
door within 30 seconds.
Using the button on the smart key
All doors are unlocked if the unlock but-
ton(2) is pressed. The hazard warning
lights will blink twice to indicate that all
doors are unlocked.
After pressing this button, the doors will
lock automatically unless you open any
door within 30 seconds.
The operating distance of the button is
the area of 10 m (30 feet) from the out-
side door handle.