2012 Hyundai Accent ECU
[x] Cancel search: ECUPage 127 of 370

449
Features of your vehicle
Cruise SET indicator
The indicator light illuminates when the
cruise function switch (SET- or RES+) is
ON.
The cruise SET indicator light in the
instrument cluster is illuminated when
the cruise control switch (SET- or RES+)
is pushed. The cruise SET indicator light
does not illuminate when the cruise con-
trol switch (CANCEL) is pushed or the
system is disengaged.Electric power steering(EPS) system warning light
This indicator light comes on after the
ignition key is turned to the ON position
and then it will go out.
This light also comes on when the EPS
needs repairs. If it comes on while driv-
ing, have your vehicle inspected by an
authorized HYUNDAI dealer.
Steering effort may increase significantly
if this lamp illuminates. See EPS system
in this section.
Engine coolant tempera-ture warning light
The warning light illuminates if the tem-
perature of the engine coolant is above
257±4.5°F (125±2.5°C).
Do not continue driving with an overheat-
ed engine. If your vehicle overheats, refer
to “Overheating” in section 6.
✽ ✽ NOTICE
If the engine coolant temperature warn-
ing light illuminates, it indicates over-
heating that may damage the engine.
Fuel cap open warning
indicator
This warning light indicates the fuel filler
cap is not tight securely.
Always make sure that the fuel filler cap
is tight.
SETEPS
Page 137 of 370
459
Features of your vehicle
In the DOOR position, the light comes on
when any door is opened regardless of
the ignition switch position.
When doors are unlocked by the trans-
mitter, the light comes on for approxi-
mately 30 seconds as long as any door is
not open. The light goes out gradually
after approximately 30 seconds if the
door is closed. However, if the ignition
switch is ON or all doors are locked, the
light will turn off immediately.
If a door is opened with the ignition
switch in the ACC or LOCK position, the
light stays on for about 20 minutes.
However, if a door is opened with the
ignition switch in the ON position, the
light stays on continuously.
In the OFF position, the light stays off at
all times even when a door is open.
Luggage room lamp
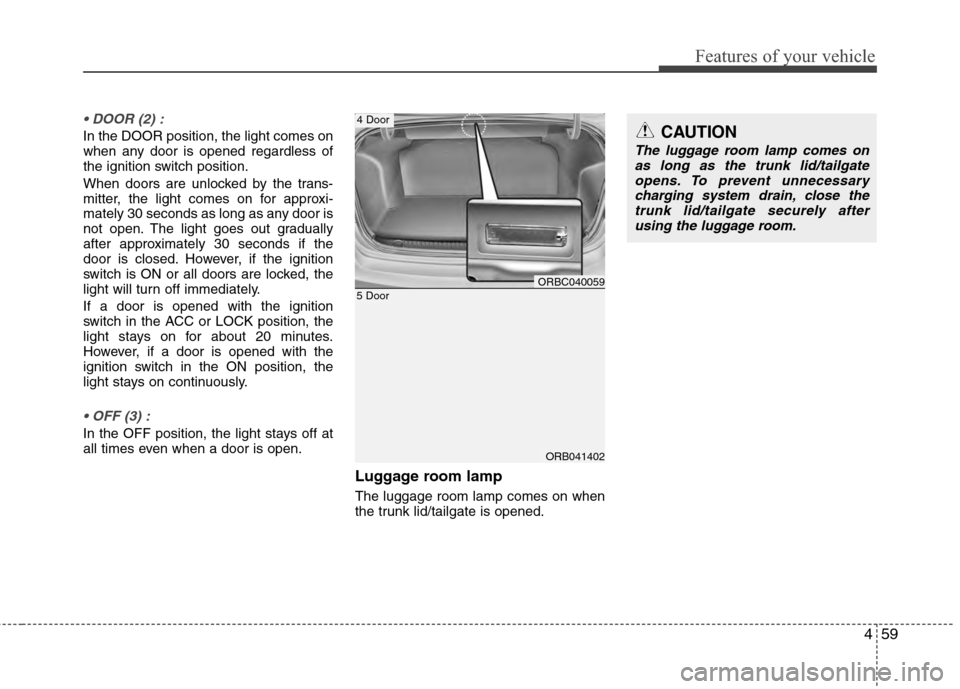
The luggage room lamp comes on when
the trunk lid/tailgate is opened.
ORB041402
5 DoorORBC040059
4 DoorCAUTION
The luggage room lamp comes onas long as the trunk lid/tailgateopens. To prevent unnecessary charging system drain, close thetrunk lid/tailgate securely afterusing the luggage room.
Page 158 of 370
Features of your vehicle
80
4
These compartments can be used to
store small items.
Center console storage
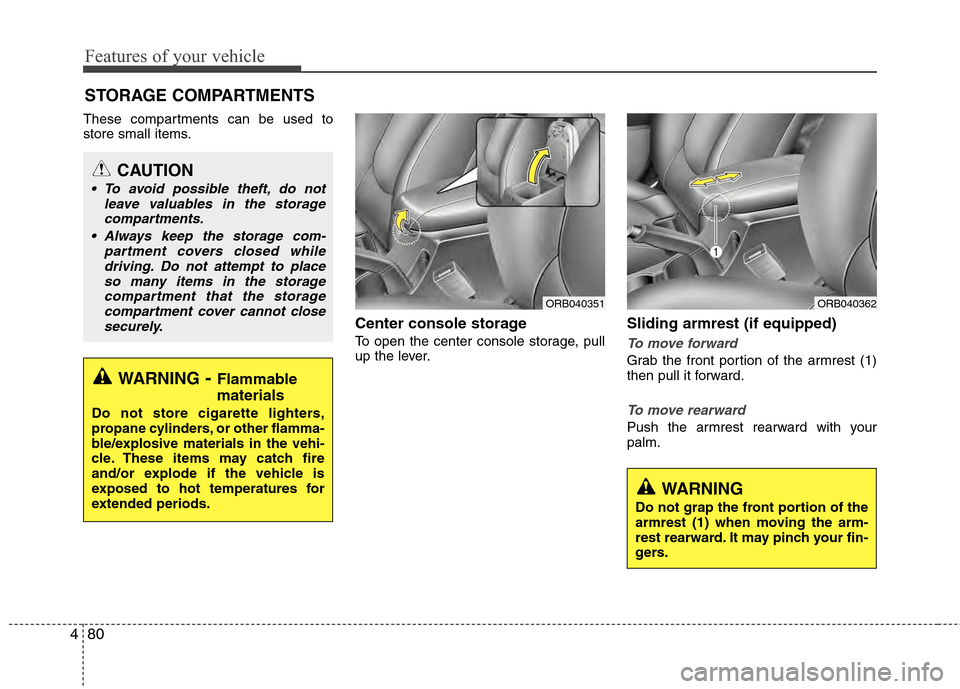
To open the center console storage, pull
up the lever.
Sliding armrest (if equipped)
To move forward
Grab the front portion of the armrest (1)
then pull it forward.
To move rearward
Push the armrest rearward with your
palm.
STORAGE COMPARTMENTS
WARNING- Flammable
materials
Do not store cigarette lighters,
propane cylinders, or other flamma-
ble/explosive materials in the vehi-
cle. These items may catch fire
and/or explode if the vehicle is
exposed to hot temperatures for
extended periods.
CAUTION
To avoid possible theft, do not
leave valuables in the storagecompartments.
Always keep the storage com- partment covers closed whiledriving. Do not attempt to placeso many items in the storage compartment that the storagecompartment cover cannot closesecurely.
WARNING
Do not grap the front portion of the
armrest (1) when moving the arm-
rest rearward. It may pinch your fin-
gers.
ORB040351ORB040362
Page 161 of 370
483
Features of your vehicle
INTERIOR FEATURES
Cup holder
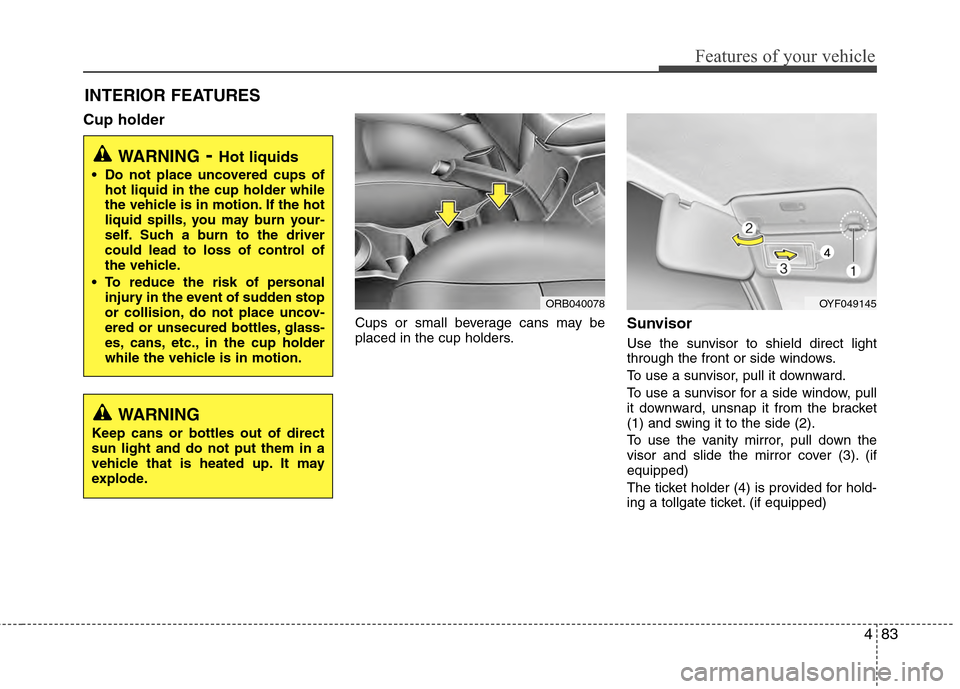
Cups or small beverage cans may be
placed in the cup holders.Sunvisor
Use the sunvisor to shield direct light
through the front or side windows.
To use a sunvisor, pull it downward.
To use a sunvisor for a side window, pull
it downward, unsnap it from the bracket
(1) and swing it to the side (2).
To use the vanity mirror, pull down the
visor and slide the mirror cover (3). (if
equipped)
The ticket holder (4) is provided for hold-
ing a tollgate ticket. (if equipped)
WARNING- Hot liquids
Do not place uncovered cups ofhot liquid in the cup holder while
the vehicle is in motion. If the hot
liquid spills, you may burn your-
self. Such a burn to the driver
could lead to loss of control of
the vehicle.
To reduce the risk of personal injury in the event of sudden stop
or collision, do not place uncov-
ered or unsecured bottles, glass-
es, cans, etc., in the cup holder
while the vehicle is in motion.
OYF049145
WARNING
Keep cans or bottles out of direct
sun light and do not put them in a
vehicle that is heated up. It may
explode.
ORB040078
Page 164 of 370
Features of your vehicle
86
4
Floor mat anchor(s)
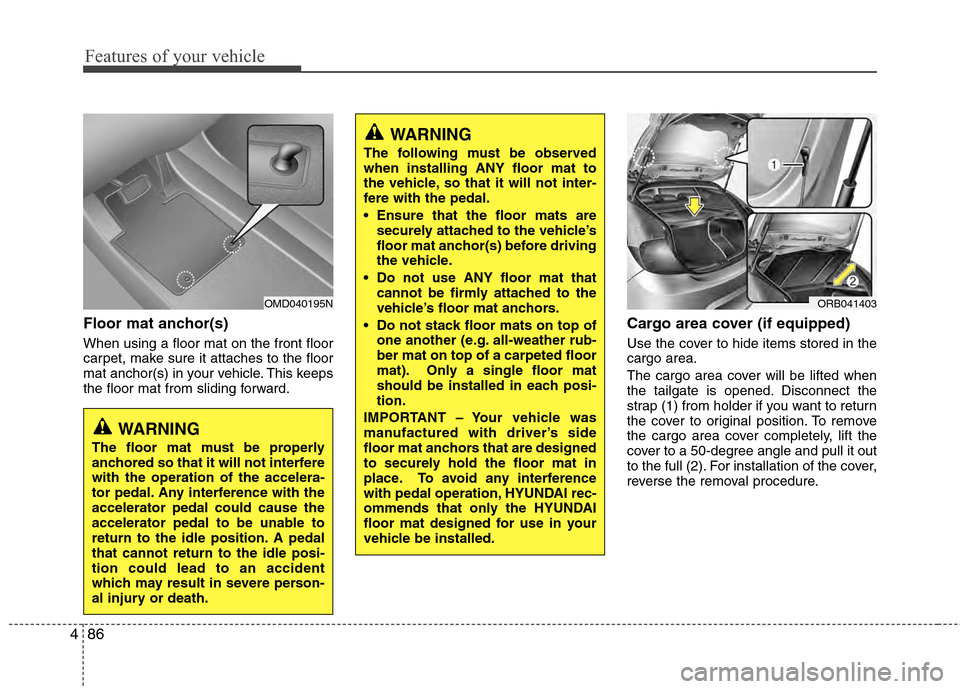
When using a floor mat on the front floor
carpet, make sure it attaches to the floor
mat anchor(s) in your vehicle. This keeps
the floor mat from sliding forward.
Cargo area cover (if equipped)
Use the cover to hide items stored in the
cargo area.
The cargo area cover will be lifted when
the tailgate is opened. Disconnect the
strap (1) from holder if you want to return
the cover to original position. To remove
the cargo area cover completely, lift the
cover to a 50-degree angle and pull it out
to the full (2). For installation of the cover,
reverse the removal procedure.
OMD040195N
WARNING
The floor mat must be properly
anchored so that it will not interfere
with the operation of the accelera-
tor pedal. Any interference with the
accelerator pedal could cause the
accelerator pedal to be unable to
return to the idle position. A pedal
that cannot return to the idle posi-
tion could lead to an accident
which may result in severe person-
al injury or death.
WARNING
The following must be observed
when installing ANY floor mat to
the vehicle, so that it will not inter-
fere with the pedal.
Ensure that the floor mats are
securely attached to the vehicle’s
floor mat anchor(s) before driving
the vehicle.
Do not use ANY floor mat that cannot be firmly attached to the
vehicle’s floor mat anchors.
Do not stack floor mats on top of one another (e.g. all-weather rub-
ber mat on top of a carpeted floor
mat). Only a single floor mat
should be installed in each posi-
tion.
IMPORTANT – Your vehicle was
manufactured with driver’s side
floor mat anchors that are designed
to securely hold the floor mat in
place. To avoid any interference
with pedal operation, HYUNDAI rec-
ommends that only the HYUNDAI
floor mat designed for use in your
vehicle be installed.
ORB041403
Page 194 of 370
![Hyundai Accent 2012 Owners Manual Features of your vehicle
116
4
Call [Name]Ex) Call John (at Home)
Ex) Dial 911
Dial [Number]
Redial
Call Back
Add entryPhonebook
Change name
Delete name
By phone
By voice
CallBy name
By number
✽
✽ Hyundai Accent 2012 Owners Manual Features of your vehicle
116
4
Call [Name]Ex) Call John (at Home)
Ex) Dial 911
Dial [Number]
Redial
Call Back
Add entryPhonebook
Change name
Delete name
By phone
By voice
CallBy name
By number
✽
✽](/manual-img/35/14378/w960_14378-193.png)
Features of your vehicle
116
4
Call [Name]Ex) Call John (at Home)
Ex) Dial 911
Dial [Number]
Redial
Call Back
Add entryPhonebook
Change name
Delete name
By phone
By voice
CallBy name
By number
✽
✽
Tip
■Voice Operation
To get the best performance out of the
Voice Recognition System, observe the
followings:
- Keep the interior of the vehicle as quiet as possible. Close the window
to eliminate surrounding noise
(traffic noise, vibration sounds,
etc), which may disturb recogniz-
ing the voice command correctly.
- Speak a command after a beep sound within 5 seconds. Otherwise
the command will not be received
properly.
- Speak in a natural voice without pausing between words.
- While receiving voice commands, press the button on the steer-
ing wheel remote controller to ter-
minate guidance. Voice command
will convert back to waiting mode
to allow the user to say a new voice
command.
■Voice Recognition Activation
in the Bluetooth®System can be acti-
vated in the following conditions:
- Button Activation
The voice recognition system will be
active when the button is pressed
and after the sound of a Beep.
- Active Listening The voice recognition system will be
active for a period of time when the
Voice Recognition system has asked
for a customer response.
from zero to nine while number greater
than ten will not be recognized.
tion mode in following cases : When
pressing the button and saying
cancel following the beep. When not
making a call and pressing the
button. When voice recognition has
failed 3 consecutive times.
will announce what commands are
available.
■Menu tree
The menu tree identifies available voice
recognition Bluetooth®functions.
Page 211 of 370

513
Driving your vehicle
✽
✽NOTICE
• In sports mode, the driver must exe-
cute upshifts in accordance with road
conditions, taking care to keep the
engine speed below the red zone.
• In sports mode, only the 6 forward gears can be selected. To reverse or
park the vehicle, move the shift lever
to the R (Reverse) or P (Park) position
as required.
• In sports mode, downshifts are made automatically when the vehicle slows
down. When the vehicle stops, 1st gear
is automatically selected.
• In sports mode, when the engine rpm approaches the red zone, the transaxle
will upshift automatically.
• To maintain the required levels of vehicle performance and safety, the
system may not execute certain
gearshifts when the shift lever is oper-
ated.
• When driving on a slippery road, push the shift lever forward into the
+(up) position. This causes the
transaxle to shift into the next upper
gear which is better for smooth driv-
ing on a slippery road. Push the shift
lever to the -(down) side to shift back
to the next lower gear.
Shift lock system
For your safety, the automatic transaxle
has a shift lock system which prevents
shifting the transaxle from P (Park) or N
(Neutral) into R (Reverse) unless the
brake pedal is depressed.
To shift the transaxle from P (Park) or N
(Neutral) into R (Reverse):
1. Depress and hold the brake pedal.
2. Move the shift lever.
If the brake pedal is repeatedly
depressed and released with the shift
lever in the P (Park) position, a chattering
noise near the shift lever may be heard.
This is a normal condition.
Ignition key interlock system
The ignition key cannot be removed
unless the shift lever is in the P (Park)
position. Even if the ignition switch is in
the LOCK position, the key also cannot
be removed.
Good driving practices
Never move the gear shift lever from P
(Park) or N (Neutral) to any other posi-
tion with the accelerator pedal
depressed.
Never move the gear shift lever into P (Park) when the vehicle is in motion.
Be sure the car is completely stopped before you attempt to shift into R
(Reverse) or D (Drive).
Never take the car out of gear and coast down a hill. This may be
extremely hazardous. Always leave the
car in gear when moving.
Do not "ride" the brakes. This can cause them to overheat and malfunc-
tion. Instead, when you are driving
down a long hill, slow down, shift into
Sport mode and shift to a lower gear.
When you do this, engine braking will
help slow the car.
Slow down before shifting to a lower gear. Otherwise, the lower gear may
not be engaged.
WARNING
Always fully depress the brake
pedal before and while shifting out
of the P (Park) position into anoth-
er position to avoid inadvertent
motion of the vehicle which could
injure persons in or around the car.
Page 216 of 370
Driving your vehicle
18
5
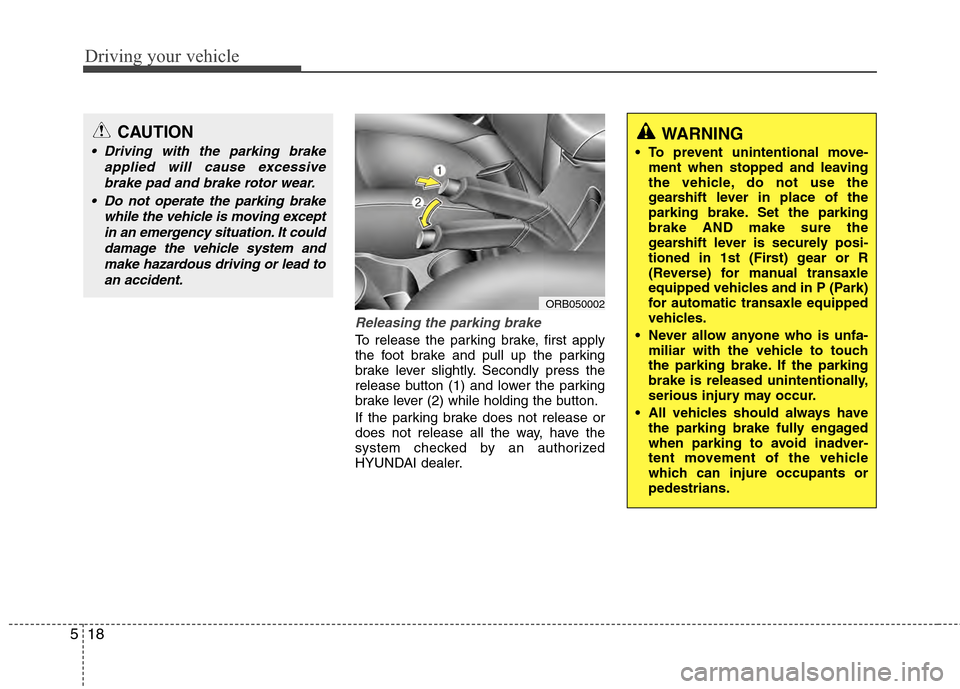
Releasing the parking brake
To release the parking brake, first apply
the foot brake and pull up the parking
brake lever slightly. Secondly press the
release button (1) and lower the parking
brake lever (2) while holding the button.
If the parking brake does not release or
does not release all the way, have the
system checked by an authorized
HYUNDAI dealer.
ORB050002
CAUTION
Driving with the parking brake
applied will cause excessivebrake pad and brake rotor wear.
Do not operate the parking brake while the vehicle is moving exceptin an emergency situation. It coulddamage the vehicle system andmake hazardous driving or lead toan accident.
WARNING
To prevent unintentional move- ment when stopped and leaving
the vehicle, do not use the
gearshift lever in place of the
parking brake. Set the parking
brake AND make sure the
gearshift lever is securely posi-
tioned in 1st (First) gear or R
(Reverse) for manual transaxle
equipped vehicles and in P (Park)
for automatic transaxle equipped
vehicles.
Never allow anyone who is unfa- miliar with the vehicle to touch
the parking brake. If the parking
brake is released unintentionally,
serious injury may occur.
All vehicles should always have the parking brake fully engaged
when parking to avoid inadver-
tent movement of the vehicle
which can injure occupants or
pedestrians.