Page 333 of 429

�Î �Î
�Ì �Ì
�µ�µ
�Î �Ì
Maintenance Minder
326 Maintenance Main Items
Replace engine oil
Replace engine oil and oil filter
Inspect front and rear brakes
Check parking brake adjustment
Inspect these items: Tie rod ends, steering gear box, and boots
Suspension components
Driveshaft boots
Brake hoses and lines (including ABS/VSA)
All fluid levels and condition of fluids
Exhaust system
Fuel lines and connections Maintenance Sub Items
Rotate tires
Replace air cleaner element
Replace dust and pollen filter
Inspect drive belt
Replace transmission and transfer fluid
Replace spark plugs
Replace timing belt and inspect water pump
Inspect valve clearance
Replace engine coolant
Replace VTM-4 rear differential fluid
Symbol
Symbol
A
B 1 2 3 4 5 6
TM
Inspect idle speed every 160,000 miles (256,000 km).
Adjust the valves during services A, B, 1, 2, or 3 if they are noisy.
See information on maintenance and emissions warranty on page .
Independent of the Maintenance Minder information, replace the brake
fluid every 3 years.
If the message ‘‘SERVICE DUE NOW’’ does not appear more than 12 months
after the display is reset, change the engine oil every year.
NOTE : : :
325If you drive in dusty conditions, replace every 15,000
miles (24,000 km).
If you drive primarily in urban areas that have high
concentrations of soot in the air from industry and from
diesel-powered vehicles, replace every 15,000 miles
(24,000 km).
If you drive regularly in very high temperatures
(over 110
Page 334 of 429
�Î
�Î
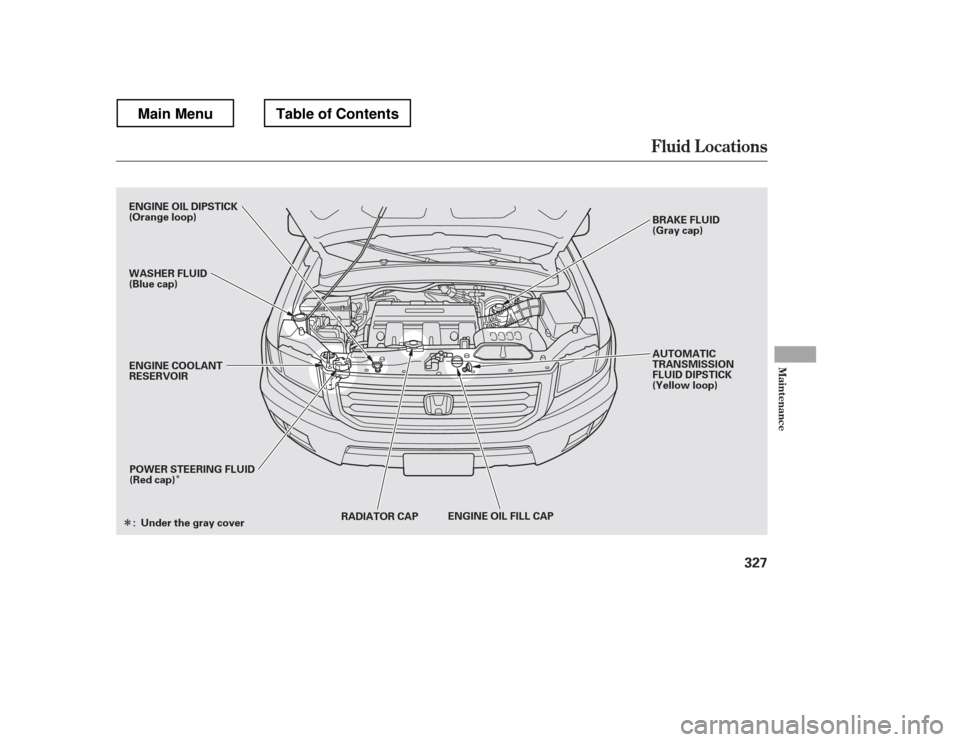
Fluid Locations
Maint enance
327
RADIATOR CAP ENGINE OIL FILL CAP
POWER STEERING FLUID
(Red cap) AUTOMATIC
TRANSMISSION
FLUID DIPSTICK
(Yellow loop)
ENGINE COOLANT
RESERVOIR
ENGINE OIL DIPSTICK
(Orange loop)
WASHER FLUID
(Blue cap)
BRAKE FLUID
(Gray cap)
Under the gray cover
:
Main MenuTable of Contents
Page 342 of 429
The f luid level should be between
theMINandMAXmarksontheside
of the reservoir. If the level is at or
below the MIN mark, your brake
system needs attention. Have the
brake system inspected f or leaks or
worn brake pads.
Using any non-Honda brake f luid can
cause corrosion and decrease the lif e
of the system. Have the brake
system f lushed and ref illed with
Honda Heavy Duty Brake Fluid
DOT 3 as soon as possible.
Brake f luid marked DOT 5 is not
compatible with your vehicle
Page 348 of 429
Remove the socket by turning it
one-quarter turn counterclockwise.
Remove the burned-out bulb by
pulling it straight out of the socket.
Drop open the tailgate.
Remove the two bolts, and remove
the rear light assembly f rom the
rear pillar.
Determine which of the three
bulbs is burned out: brake/
taillight, turn signal/hazard light,
or back-up light.
Install the new bulb into the hole
and turn it one-quarter turn
clockwise to lock it in place.
Push the electrical connector back
onto the bulb. Make sure it is on
all the way.
Turn on the lights to test the new bulb.
Reinstall the inner f ender. Make
sure it is installed under the edge
of the f ront bumper.
Reinstall the holding clip, and push
in its head, then install the bolts
and tighten them securely.
1. 2. 3. 4. 5.
5. 6. 7. 8. 9.
CONT INUED
Replacing Rear Bulbs
Lights
Maint enance
341
BULB
SOCKET
Main MenuTable of Contents
Page 349 of 429
Remove the three mounting
screws f rom the light assembly.
Remove the lens f rom the light
assembly.
Pull the bulb straight out of its
socket. Push the new bulb straight
into the socket until it bottoms.
Place a cloth on the edge of the
lens segment to prevent scratches.
Remove each lens segment by
caref ully prying on its edge with a
small f lat-tip screwdriver.
Remove the screw under each lens.
Pull the high-mount brake light
assembly out of the vehicle.
Install the new bulb into the
socket.
Push the socket into the light
assembly, and turn it clockwise
until it locks.
Turn on the lights to make sure
the new bulb is working.
Install the rear light assembly in
the rear pillar. Tighten the two
bolts securely.
1. 2. 3. 4. 5. 6.
6.7. 8. 9.
Replacing a High-mount Brake
Light Bulb
Lights
342
LENS SEGMENT
SCREW SCREW
BULB
Main MenuTable of Contents
Page 363 of 429
If you ever hear the chains
contacting the body or chassis, stop
and investigate. If the chains have
loosened, retighten them. Make sure
they do not contact the brake lines
or suspension.
Removethechainsassoonasyou
begin driving on cleared roads.
Tires
356
Using the wrong chains, or not
properly installing chains, can
damage the brake lines and
cause a crash in which you can
be seriously injured or killed.
Follow all instructions in this
owner
Page 370 of 429
 position. Have all
passengers get out of the vehicle
while you change the tire.
Park the vehicle on f irm, level, and
n")
Turn on the hazard warning lights,
and turn the ignition switch to the
LOCK (0) position. Have all
passengers get out of the vehicle
while you change the tire.
Park the vehicle on f irm, level, and
non-slippery ground. Put the
transmission in Park. Apply the
parking brake.
If you are towing a trailer, unhitch
it.
If you have a f lat tire while driving,
stop in a saf e place to change it.
Drive slowly along the shoulder until
you get to an exit or an area to stop
that is far away from the traffic lanes.
If you tow a trailer f requently, we
recommend that you use a regular
tire as a spare. You can store the
regular size spare tire on the tire tray,
but store the tool kit at the side of
the In-Bed Trunk (see page ),
and secure it.
2.
1.
369
CONT INUED
Changing a Flat T ire
T aking Care of the Unexpected
363
TOOL BOX SPARE TIRE
The vehicle can easily roll off
the jack, seriously injuring
anyone underneath.
Follow the directions for
changing a tire exactly, and
never get under the vehicle
when it is supported only by the jack.
Main MenuTable of Contents
Page 374 of 429
CONT INUED
Put on the spare tire. Put the
wheel nuts back on f inger-tight,
then tighten them in a crisscross
pattern with the wheel nut wrench
until the wheel is f irmly against
the hub. Do not try to tighten the
wheel nuts f ully.
Lower the vehicle to the ground,
and remove the jack.
Bef ore mounting the spare tire,
wipeanydirtoff themounting
surface of the wheel and hub with
a clean cloth. Wipe the hub
carefully;itmaybehotfrom
driving.
The wheel cap cannot be removed
without first removing the wheel
nuts.
Remove the wheel nuts and the
wheel cap (on RT and DX models)
then remove the f lat tire. Handle
the wheel nuts caref ully; they may
be hot from driving. Place the flat
tire on the ground with the outside
surface facing up.
14. 15. 16. 17.
On RT and DX models
Changing a Flat T ire
T aking Care of the Unexpected
367
BRAKE HUB
WHEEL CAP
RT/DX model is shown.
Main MenuTable of Contents