Page 191 of 429
. Press and
release the side, to skip
backward t")
�µEach time you press and
releasethe sideof theSEEK/
SKIP bar, the player skips f orward to
the beginning of the next track (f ile
in MP3 or WMA mode). Press and
release the side, to skip
backward to the beginning of the
current track. Press it again to skip
to the beginning of the previous
track.
To move rapidly within a track or f ile,
press and hold either side ( or ) of the SEEK/SKIP bar.
Use the SEEK/SKIP bar while a disc
is playing to select passages and
change tracks (f iles in MP3 or WMA
mode).
In MP3 or WMA mode, use the
TUNE/FOLDER bar to select
f olders in the disc and use either
side of the SEEK/SKIP bar to
change f iles.
To select a dif f erent disc, use the
appropriate preset buttons (1
through 6). If you select an empty
position, the system will go into the
loading sequence (see page ).
When you insert a disc, and the
system begins to play.
When you change the audio mode
to play a disc with text data or in
MP3 or WMA.
When playing a CD-DA with text
data, the album and track name are
showninthedisplay.Withadiscin
MP3 or WMA, the display shows the
f older and f ile name.
182
CD Changer (Models without navigation system)
SK IPT o Change or Select T racks/Files
184
Main MenuTable of Contents
Page 198 of 429
The indicators above the disc
buttons of the empty positions will
blink, and the green load indicator
above the CD slot comes on.If you press the LOAD button while
a CD is playing, the system will stop
playing that CD and start the loading
sequence. It will then play the CD
just loaded.Repeat this until all six positions
are loaded. The system will then
begin playing the f irst CD loaded.
If you stop loading CDs bef ore all six
positions are f illed, the system will
wait f or 10 seconds, then stop the
load operation and begin playing the
last CD loaded.
You can also load a CD into an empty
position while a CD is playing by
pressing the appropriate disc button.
Select an empty disc button (the
indicator above the button is of f ),
and press the button. The system
will stop playing the current CD and
start the loading sequence. It will
then play the CD just loaded.
You cannot load and play 3-inch
(8-cm)discsinthissystem.
Do not try to insert a disc until
‘‘LOAD
Page 225 of 429

�·�µ
Units manuf actured between April 1,
1982 and January 1, 1993 may be
equipped with saf ety stop and
reverse f eatures. If your unit does
not have an external entrapment
protection system, an easy test to
conf irm the f unction and
perf ormance of the saf ety stop and
reverse f eature is to lay a 2 4
under the closing door. The door
should stop and reverse upon
contacting the piece of wood.
As an additional safety feature,
garage door openers manuf actured
af ter January 1, 1993 are required to
have external entrapment protection
systems, such as an electronic eye,
which detect an object obstructing
the door. Refer to the safety information that
came with your garage door opener
to test that the safety features are
f unctioning properly. If you do not
have this information, contact the
manuf acturer of the equipment.
Bef ore programming HomeLink to a
garage door or gate opener, make
sure that people and objects are out
of thewayof thedevicetoprevent
potential injury or damage.
When programming a garage door
opener, park just outside the garage.
If you just
received your vehicle and have not
trained any of the buttons in
HomeLink bef ore, you should erase
any previously learned codes bef ore
training the first button. To do this,
press and hold the two outside
buttons on the HomeLink
transceiver for about 20 seconds,
until the red indicator f lashes.
Release the buttons, then proceed to
step 1.
HomeL inkUniversal T ransceiver
Important Saf ety Precautions T raining HomeL ink
Bef ore you begin
218
Main MenuTable of Contents
Page 226 of 429
If you are training the second or third buttons, go directly to step 1.
CONT INUED
HomeL inkUniversal T ransceiver
Features
219
Main MenuTable of Contents
Page 228 of 429
�µ�µ
Bluetooth
handsf reelink.honda.
com
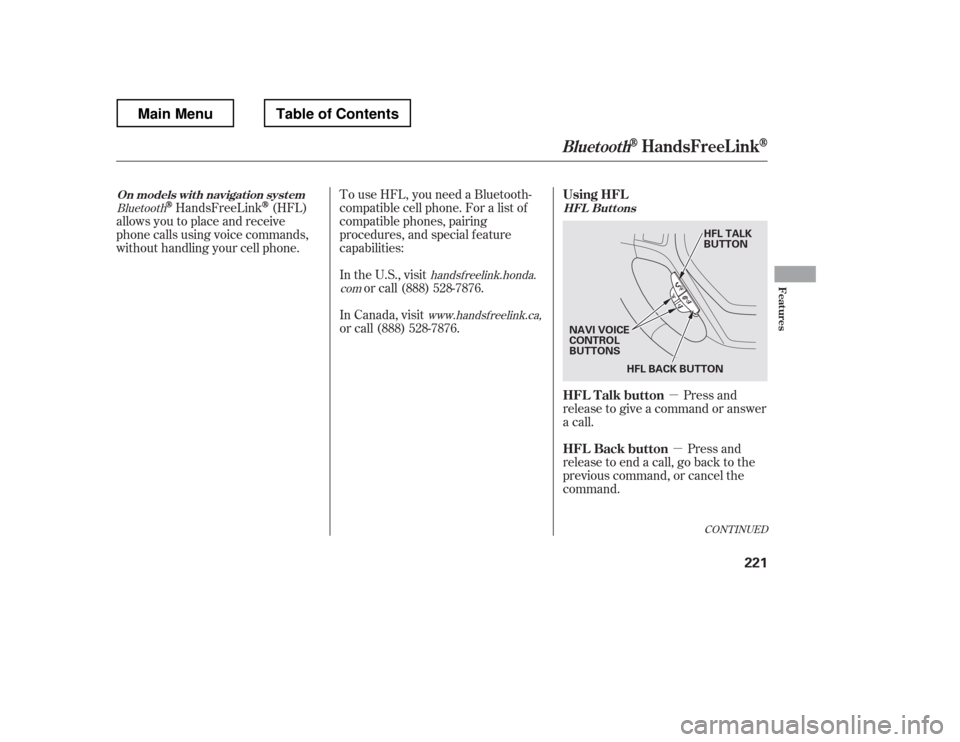
www.handsfreelink.ca,HandsFreeLink(HFL)
allows you to place and receive
phone calls using voice commands,
without handling your cell phone.
Press and
release to give a command or answer
a call.
Press and
release to end a call, go back to the
previous command, or cancel the
command.
To use HFL, you need a Bluetooth-
compatible cell phone. For a list of
compatible phones, pairing
procedures, and special f eature
capabilities:
In the U.S., visit
or call (888) 528-7876.
In Canada, visit
or call (888) 528-7876.
CONT INUED
On models wit h navigat ion syst em HFL Buttons
BluetoothHandsFreeL ink
Using HFL
HFL Talk button
HFL Back button
Features
221
HFL BACK BUTTON
NAVI VOICE
CONTROL
BUTTONS HFL TALK
BUTTON
Main MenuTable of Contents
Page 421 of 429

....................
Filling the Fuel Tank . 250
Filters
.........................
Dust and Pollen . 346
...............................................
Oil . 330
.............
Flashers, Hazard Warning . 99
...................
Flat Tire, Changing a . 363
.....................................
Floor Mats . 346
Fluids
..........
Automatic Transmission . 333
..........................................
Brake . 335
..........................
Power Steering . 336
.......................
Rear Differential . 390
...................
Transf er Assembly . 391
..................
Windshield Washer . 332
FM Stereo Radio ...................................
Reception . 165
.................
Folding the Rear Seats . 125
........................................
Fog Lights . 97
..........................
Four-way Flashers . 99
..............................
Front Seat . 119, 121
............................
Adjusting . 119, 121
.....................................
Airbags . 9, 25
.......................................
Heaters . 126
.................................................
Fuel . 248
......................
Fill Door and Cap . 250
...........................................
Gauge . 76 ................
Octane Requirement . 248
...............................
Oxygenated . 249
........................
Reserve Indicator . 68
........................
Tank, Filling the . 250
...............................
Fuel Economy . 256
Actual Mileage and EPA Fuel Economy Estimates .......................
Comparison . 256
......
Calculating Fuel Economy . 258
.............
Fuel Economy Factors . 257
........
Improving Fuel Economy . 257
.....................
Fuses, Checking the . 380
....
Halogen Headlight Bulbs . 337, 340
...........................
HandsFreeLink
. 221
..............................
HFL Buttons . 221
..............
Hazard Warning Flashers . 99
...............
Gas Mileage, Improving . 256
Gasoline
...............
Fuel Reserve Indicator . 68
...........................................
Gauge . 76
................
Octane Requirement . 248
........................
Tank, Filling the . 250
................
Gas Station Procedures . 250
Gauges
...
Engine Coolant Temperature . 76
...............................................
Fuel . 76
...............................
Speedometer . 76 .................................
Tachometer . 76
GAWR (Gross Axle Weight .......................................
Rating) . 296
GCWR (Gross Combined
.................
Weight Rating) . 296, 390
............
Gearshif t Lever Positions . 274
......................................
Glove Box . 138
GVWR (Gross Vehicle
.................
Weight Rating) . 296, 390
Index
G H
IV
Main Menu