Page 285 of 429
Insert the built-in key into the shift
lock release slot.
Push down on the key while you
pull the shif t lever towards you,
and move it out of Park to neutral.Remove the key from the shift
lock release slot, then reinstall the
cover. Make sure the notch on the
cover is on the instrument panel
side. Insert the key into the
ignition switch, press the brake
pedal, and restart the engine.Your vehicle is equipped with a
Variable Torque Management
4-wheel-drive system (VTM-4)that
distributes engine torque to the
appropriate drive axle depending on
the available traction conditions. The
system is completely automatic,
always active, and does not require
any driver interaction.
If you need to use the shif t lock
release, it means your vehicle is
developing a problem. Have it
checked by your dealer.
6.
4. 5.
Automatic Transmission, VTM-4System
VTM-4System
278
SHIFT LOCK RELEASE SLOT
COVER
VTM-4 LOCK BUTTON
Main MenuTable of Contents
Page 286 of 429

Press the VTM-4 LOCK button.
The indicator in the button comeson.
To get unstuck, apply light pressure
to the accelerator pedal. Do not spin
the f ront tires f or more than a f ew
seconds. Because of the amount of
torque applied to the rear tires, they
should not spin. This is normal. If
you are not able to move the vehicle,
stop and reverse direction.
If you become stuck, you can
activatetheVTM-4bypressingthe
VTM-4 LOCK button while in f irst
(1), second (2), or reverse (R) gear
below18mph(30km/h).Thismode
overrides the auto system to send
maximum torque to the rear axle.
This mode is only intended f or
intermittent use at low speed to free
your vehicle if it becomes stuck or
when you encounter a steep grade
with one wheel on a slippery surf ace.
Generally, you should f irst allow the
auto mode to operate to adjust for
the available traction conditions.
Turn the ignition switch to the
LOCK (0) position.
Move the shift lever to D.
Press the VTM-4 LOCK button. do
any of the f ollowing:
The VTM-4 Lock will temporarily
disengage when the vehicle speed
exceeds 18 mph (30 km/h). The
indicator in the button will remain on.
The vehicle speed must be below
18 mph (30 km/h).
Move the shift lever to first (1),
second (2), or reverse (R) gear.
1. 2. 3.
VTM-4System
To Engage the VTM-4 Lock:
To Disengage the VTM-4 L ock,
Driving
279
Do not use the VTM-4 LOCK button on
dry, paved roads. Driving on dry,
paved roads with VTM-4 Lock ON may
damage the rear dif f erential when
making a turn. Strange noise and
vibration can also result.
Do not continuously spin the f ront tires
of your vehicle. Continuously spinning
the f ront tires can cause transmission
or rear dif f erential damage.
Main MenuTable of Contents
Page 313 of 429
Drive slower than normal in all
driving situations, and obey posted
speed limits f or vehicles with trailers.
When towing a f ixed-sided trailer
(e.g., camper), do not exceed 55 mph
(88 km/h). At higher speeds, the
trailer may sway or affect vehicle
handling.
When towing a trailer on level roads
under normal driving conditions, do
not use D3. This will increase the
automatic transmission fluid
temperature and may cause
overheating.With heavy cargo on the pickup bed,
your vehicle has a higher center of
gravity. Drive slowly and cautiously,
and allow more time and distance f or
braking. Loading heavy cargo could
af f ect your vehicle
Page 320 of 429

This section explains why it is
important to keep your vehicle well
maintained and how to f ollow basic
maintenance saf ety precautions.
This section also includes
instructions on how to read the
Maintenance Minder messages on
the inf ormation display or multi-
inf ormation display (depending on
the model), and instructions for
simple maintenance tasks you may
want to take care of yourself.U.S. Vehicles:
If you have the skills and tools to
perf orm more complex maintenance
tasks on your vehicle, you may want
to purchase the service manual. See
page f or inf ormation on how to
obtain a copy, or see your dealer. ......................
Maintenance Saf ety . 314
.................
Maintenance Minder . 315
..............................
Fluid Locations . 327
........................
Adding Engine Oil . 328
Changing the Engine Oil and
...........................................
Filter . 329
..............................
Engine Coolant . 331
....................
Windshield Washers . 332
....
Automatic Transmission Fluid . 333
....................................
Brake Fluid . 335
....................
Power Steering Fluid . 336
....................................
Timing Belt . 337
.............................................
Lights . 337
................
Cleaning the Seat Belts . 345
.....................................
Floor Mats . 346
..................
Dust and Pollen Filter . 346
.................................
Wiper Blades . 347
...........................................
Wheels . 349
...............................................
Tires . 349
...................
Checking the Battery . 357
.............................
Vehicle Storage . 358
..................................
Interior Care . 359
409
Maintenance
Maintenance, replacement, or
repair of emissions control
devices and systems may be done
by any automotive repair
establishment or individual using
parts that are ‘‘certif ied
Page 332 of 429

�µ�µ�µ �µ
�µ
�µ
�Ì
Youshouldcheckthefollowing
items at the specif ied intervals. If
you are unsure of how to perf orm
any check, turn to the appropriate
page listed.
Engine oil level Check every
time you fill the fuel tank. See
page .
Engine coolant level Check the
radiator reserve tank every time
you f ill the f uel tank. See page .
Automatic transmission Check
the f luid level monthly. See page . Brakes Check the f luid level
monthly. See page .
Tires Check the tire pressure
monthly. Examine the tread f or
wear and foreign objects. See page
.
Lights Check the operation of
all the lights monthly. See page .
According to state and federal
regulations, f ailure to perf orm
maintenance on the items marked
with will not void your emissions
warranties. However, all
maintenance services should be
perf ormed in accordance with the
intervals indicated by the odometer/
trip meter display or the multi-
inf ormation display. 255
333255
337349 335
CONT INUED
Maintenance Minder
Owner
Page 333 of 429

�Î �Î
�Ì �Ì
�µ�µ
�Î �Ì
Maintenance Minder
326 Maintenance Main Items
Replace engine oil
Replace engine oil and oil filter
Inspect front and rear brakes
Check parking brake adjustment
Inspect these items: Tie rod ends, steering gear box, and boots
Suspension components
Driveshaft boots
Brake hoses and lines (including ABS/VSA)
All fluid levels and condition of fluids
Exhaust system
Fuel lines and connections Maintenance Sub Items
Rotate tires
Replace air cleaner element
Replace dust and pollen filter
Inspect drive belt
Replace transmission and transfer fluid
Replace spark plugs
Replace timing belt and inspect water pump
Inspect valve clearance
Replace engine coolant
Replace VTM-4 rear differential fluid
Symbol
Symbol
A
B 1 2 3 4 5 6
TM
Inspect idle speed every 160,000 miles (256,000 km).
Adjust the valves during services A, B, 1, 2, or 3 if they are noisy.
See information on maintenance and emissions warranty on page .
Independent of the Maintenance Minder information, replace the brake
fluid every 3 years.
If the message ‘‘SERVICE DUE NOW’’ does not appear more than 12 months
after the display is reset, change the engine oil every year.
NOTE : : :
325If you drive in dusty conditions, replace every 15,000
miles (24,000 km).
If you drive primarily in urban areas that have high
concentrations of soot in the air from industry and from
diesel-powered vehicles, replace every 15,000 miles
(24,000 km).
If you drive regularly in very high temperatures
(over 110
Page 334 of 429
�Î
�Î
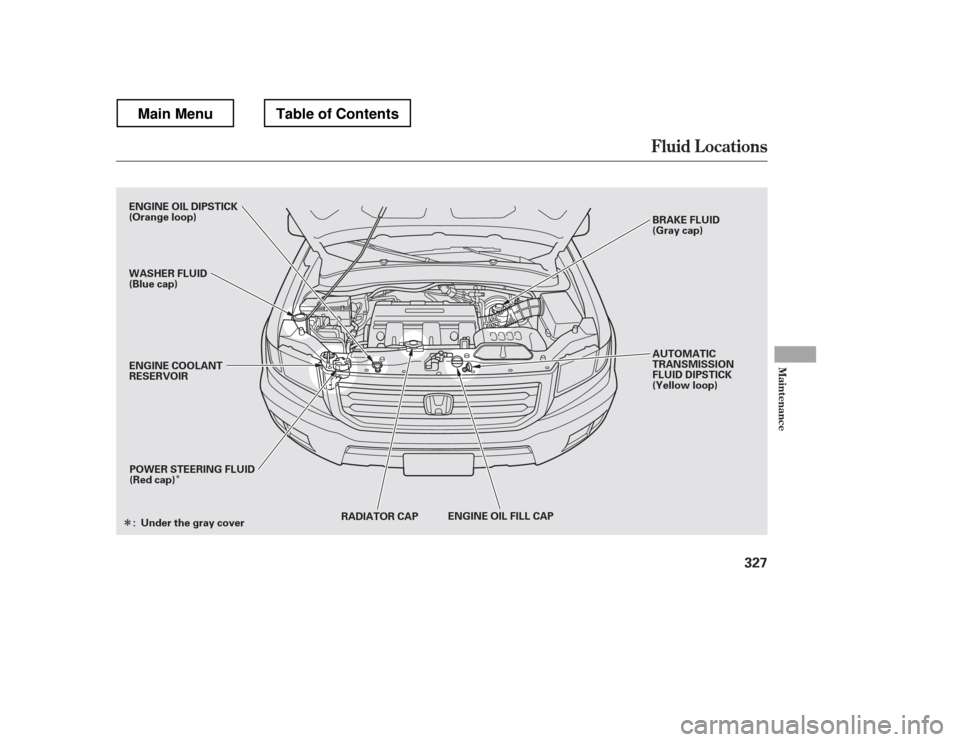
Fluid Locations
Maint enance
327
RADIATOR CAP ENGINE OIL FILL CAP
POWER STEERING FLUID
(Red cap) AUTOMATIC
TRANSMISSION
FLUID DIPSTICK
(Yellow loop)
ENGINE COOLANT
RESERVOIR
ENGINE OIL DIPSTICK
(Orange loop)
WASHER FLUID
(Blue cap)
BRAKE FLUID
(Gray cap)
Under the gray cover
:
Main MenuTable of Contents
Page 336 of 429

Open the hood, and remove the
engine oil f ill cap. Remove the oil
drain bolt and washer f rom the
bottom of the engine. Drain the oil
into an appropriate container.
You may use a synthetic motor oil if
it meets the same requirements
given f or a conventional motor oil: it
displays the API Certif ication Seal,
and it is the proper weight. You must
f ollow the oil and f ilter change
intervals shown on the odometer/
trip meter display or on the multi-
inf ormation display.
Your vehicle does not require any oil
additives. Additives may adversely
af f ect the engine or transmission
perf ormance and durability.
Changing the oil and f ilter requires
special tools and access f rom
underneath the vehicle. The vehicle
should be raised on a service station-
type hydraulic lif t f or this service.
Unless you have the knowledge and
proper equipment, you should have
this maintenance done by a skilled
mechanic.
Run the engine until it reaches
normal operating temperature,
then shut it off.
Always change the oil and f ilter
according to the maintenance
messages shown on the inf ormation
display or multi-inf ormation display
(depending on the model). The oil
and f ilter collect contaminants that
can damage your engine if they are
not removed regularly. 1.
2.
CONT INUED
Synthetic Oil Changing the Engine Oil and
Filter
Engine Oil A dditives
A dding Engine Oil, Changing the Engine Oil and Filter
Maint enance
329
WASHER DRAIN BOLT
Main MenuTable of Contents

, do not exceed 55 mph
(88 km/h). At hi")