Page 193 of 429
�µ
�µ
�µ The SCAN function
samples all the tracks on the disc in
the order they are recorded on the
disc (all f iles in the current f older in
MP3 or WMA mode). To activate the
scan feature, press and release the
SCAN button. You will see ‘‘SCAN
Page 195 of 429

To remove the disc currently in play,
press the eject button ( ). When
a disc is removed f rom a slot, the
system automatically begins the load
sequence so you can load another
disc in that position. If you do not
remove the disc f rom the changer
within 10 seconds, the disc will
reload into the slot. Then the system
returns to the previous mode [AM,
FM, or XM (if equipped)].
To remove a different disc from the
changer,firstselectitwiththe
appropriate preset bar. When that
disc begins playing, press the eject
button. Continue pressing the eject
button to remove all the discs from
the changer.
Press the eject button ( ) to
remove the disc. If you eject the disc,
but do not remove it f rom the slot,
the system will automatically reload
the disc af ter 10 seconds. To begin
playing, press the CD or CD/AUX
button.
You can also eject the disc when the
ignition switch is of f .
To play the radio when a disc is
playing, press the AM/FM or XM (if
equipped) button. Press the CD
(CD/AUX on models with XM
satellite radio) button again to switch
back to the CD changer.
If you turn the system of f while a
disc is playing, either with the PWR
button or by turning of f the ignition
switch, the disc will stay in the drive.
When you turn the system back on,
the disc will begin playing where it
left off.
For inf ormation on how to handle
and protect compact discs, see page
.
You can also eject discs when the
ignition switch is on or of f :
To eject one disc, press and release
the eject button.
To eject all discs, press and hold the
eject button until the LOAD
indicator begins to blink.
198
Removing Discs f rom t he In-dashDisc ChangerTo Stop Playing a Disc
Protecting Discs
CD Changer (Models without navigation system)
188
Main MenuTable of Contents
Page 202 of 429

�µ
CONT INUED
Each time you press and release the
SCAN button, the mode changes
from scan, disc scan, then to normal
play.
Each time you press and release the
SCAN button, the mode changes
f rom f ile scan, f older scan, disc scan,
then to normal play.
When the f irst track in the last disc,
or the f irst f ile in the last main f older
in the last disc begins to play, the
disc scan mode will be canceled.
Pressing either side of the SEEK/
SKIP bar or selecting a dif f erent
folder with the TUNE bar also turns
off the scan feature.
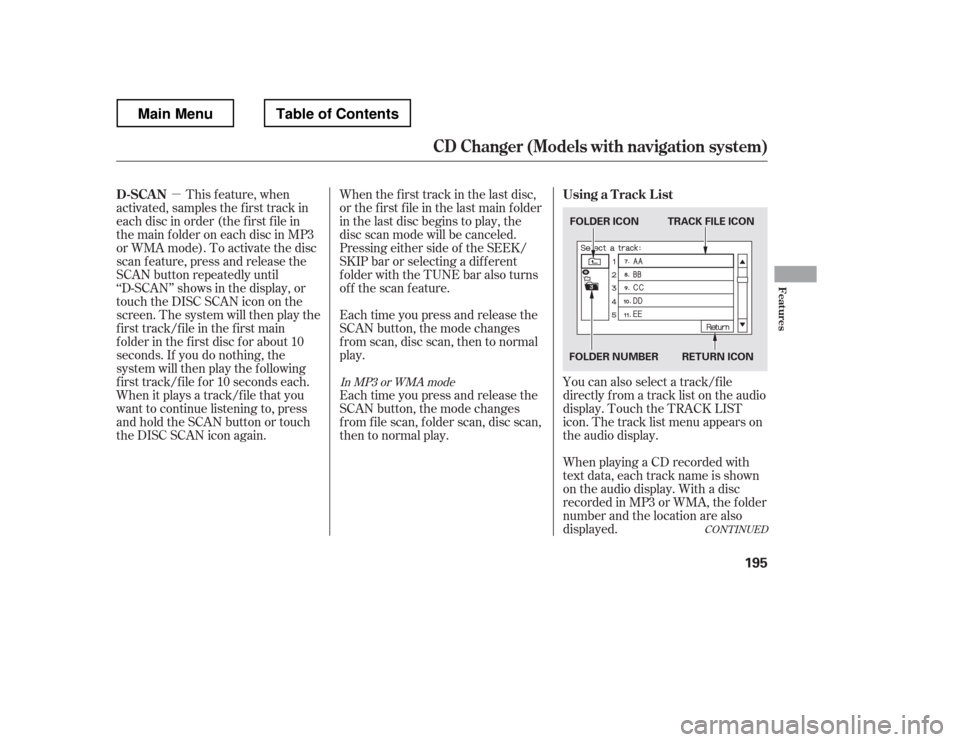
You can also select a track/f ile
directly f rom a track list on the audio
display. Touch the TRACK LIST
icon. The track list menu appears on
the audio display.
When playing a CD recorded with
text data, each track name is shown
on the audio display. With a disc
recorded in MP3 or WMA, the f older
number and the location are also
displayed.
This f eature, when
activated, samples the first track in
each disc in order (the f irst f ile in
themainfolderoneachdiscinMP3
or WMA mode). To activate the disc
scan feature, press and release the
SCAN button repeatedly until
‘‘D-SCAN
Page 210 of 429

�´
�µ �´�µ
�Û�Ý
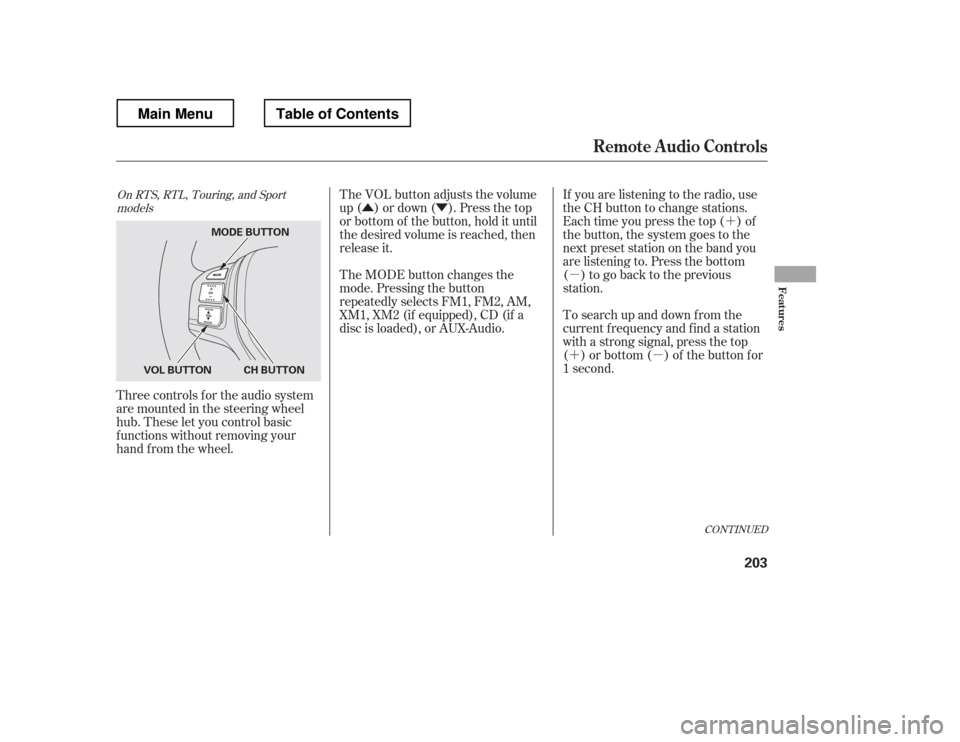
Three controls f or the audio system
are mounted in the steering wheel
hub. These let you control basic
f unctions without removing your
hand f rom the wheel. If you are listening to the radio, use
the CH button to change stations.
Each time you press the top ( ) of
the button, the system goes to the
next preset station on the band you
are listening to. Press the bottom
( ) to go back to the previous
station.
To search up and down f rom the
current f requency and f ind a station
with a strong signal, press the top
( ) or bottom ( ) of the button for
1 second.
The VOL button adjusts the volume
up ( ) or down ( ). Press the top
or bottom of the button, hold it until
the desired volume is reached, then
release it.
The MODE button changes the
mode. Pressing the button
repeatedly selects FM1, FM2, AM,
XM1, XM2 (if equipped), CD (if a
disc is loaded), or AUX-Audio.
CONT INUED
On RTS, RTL, Touring, and Sport
models
Remote Audio Controls
Features
203
MODE BUTTON
CH BUTTON
VOL BUTTON
Main MenuTable of Contents
Page 211 of 429

�´�µ �´
�µ
�´
�µ �´
�µ
�´ �µ
If you are playing a disc, the system
skips to the beginning of the next
track each time you press the top
( ) of the CH button. Press the
bottom ( ) to return to the
beginning of the current track. Press
it again to return to the previous
track. You will see the disc and track
numbers in the upper display.
To go to the next disc, press the top
( ) of the button for 1 second.
Press the bottom ( ) f or 1 second
to go back to the previous disc.
When you play an MP3/WMA disc,
press the top ( ) of the button for 1
second to go to the next folder. Press
the bottom ( ) for 1 second to go
back to the previous folder. If you are listening to XM Radio, use
the CH button to change channels.
Each time you press the top ( ) of
the button, the system goes to the
next preset channel. Press the
bottom( )togobacktothe
previous preset channel.
To go to the next channel of the
category you are listening to, press
the top ( ) of the button for 1
second. Press the bottom ( ) f or 1
second to go back to the previous
channel.
On models without navigation system
Remote Audio Controls
204
Main MenuTable of Contents
Page 286 of 429

Press the VTM-4 LOCK button.
The indicator in the button comeson.
To get unstuck, apply light pressure
to the accelerator pedal. Do not spin
the f ront tires f or more than a f ew
seconds. Because of the amount of
torque applied to the rear tires, they
should not spin. This is normal. If
you are not able to move the vehicle,
stop and reverse direction.
If you become stuck, you can
activatetheVTM-4bypressingthe
VTM-4 LOCK button while in f irst
(1), second (2), or reverse (R) gear
below18mph(30km/h).Thismode
overrides the auto system to send
maximum torque to the rear axle.
This mode is only intended f or
intermittent use at low speed to free
your vehicle if it becomes stuck or
when you encounter a steep grade
with one wheel on a slippery surf ace.
Generally, you should f irst allow the
auto mode to operate to adjust for
the available traction conditions.
Turn the ignition switch to the
LOCK (0) position.
Move the shift lever to D.
Press the VTM-4 LOCK button. do
any of the f ollowing:
The VTM-4 Lock will temporarily
disengage when the vehicle speed
exceeds 18 mph (30 km/h). The
indicator in the button will remain on.
The vehicle speed must be below
18 mph (30 km/h).
Move the shift lever to first (1),
second (2), or reverse (R) gear.
1. 2. 3.
VTM-4System
To Engage the VTM-4 Lock:
To Disengage the VTM-4 L ock,
Driving
279
Do not use the VTM-4 LOCK button on
dry, paved roads. Driving on dry,
paved roads with VTM-4 Lock ON may
damage the rear dif f erential when
making a turn. Strange noise and
vibration can also result.
Do not continuously spin the f ront tires
of your vehicle. Continuously spinning
the f ront tires can cause transmission
or rear dif f erential damage.
Main MenuTable of Contents
Page 292 of 429
CONT INUED
To see the inf lation pressures of all
f our tires, press the SEL/RESET
button. The display changes as
shown above.Each tire pressure is shown in PSI
(U.S. models) or in kPa (Canadian
models).
Each tire has its own pressure
sensor. If the air pressure of a tire
becomes signif icantly low, the
sensor in that tire immediately sends
a signal that causes the low tire
pressure/TPMS indicator in the
instrument panel to come on. If this
happens, you will see which tire is
losing pressure on the multi-
inf ormation display along with a
‘‘CHECK TIRE PRESSURE
Page 297 of 429

Your vehicle is equipped with disc
brakes at all f our wheels. A power
assist helps reduce the ef f ort needed
on the brake pedal. The emergency
brake assist system increases the
stopping f orce when you depress the
brake pedal hard in an emergency
situation. The anti-lock brake system
(ABS) helps you retain steering
control when braking very hard.
Resting your f oot on the pedal keeps
the brakes applied lightly, builds up
heat, reduces their ef f ectiveness and
reduces brake pad lif e. In addition,
f uel economy can be reduced. It also
keeps your brake lights on all the
time, conf using drivers behind you.Constant application of the brakes
when going down a long hill builds
up heat and reduces their ef f ective-
ness. Use the engine to assist the
brakes by taking your f oot of f the
accelerator and downshif ting to a
lower gear.
Check the brakes after driving
through deep water. Apply the
brakes moderately to see if they f eel
normal. If not, apply them gently and
f requently until they do. Be extra
cautious and alert in your driving.
The hydraulic system that operates
the brakes has two separate circuits.
Each circuit works diagonally across
the vehicle (the lef t-f ront brake is
connected with the right-rear brake,
etc.). If one circuit should develop a
problem, you will still have braking
at two wheels.
If the brake pads need replacing, you
will hear a distinctive, metallic
screeching sound when you apply
the brake pedal. If you do not have
the brake pads replaced, they will
screech all the time. It is normal f or
the brakes to occasionally squeal or
squeak when you apply them.
Braking System Design
Brake Pad Wear Indicators
Braking System
290
Main MenuTable of Contents