Page 129 of 681

�Î
�Î
�Î
�Î �Î
�Î
�Î �Î
�Î
�Î
�Î
�Î
�Î �Î�Î�ÎTo use the horn, press the center pad of the steering wheel.
Only on vehicles equipped with navigation system. Ref er to the navigati
on system manual.
If equipped
1:2: 3:
4 : 4WD models only
Controls Near the Steering Wheel
122
HORN HAZARD WARNING
BUTTON
GLASS HATCH RELEASE BUTTON/
POWER TAILGATE SWITCH
FUEL FILL DOOR RELEASE
HANDLE
POWER WINDOW
SWITCHES
POWER DOOR LOCK MASTER
SWITCH
MIRROR CONTROLS
DRIVING POSITION MEMORY
SYSTEM
VEHICLE STABILITY ASSIST
SYSTEM OFF SWITCH
PARKING SENSOR SYSTEM
SWITCH
HEADLIGHT/TURN SIGNAL/
FRONT FOG LIGHTS
STEERING WHEEL AUDIO CONTROLS
PARKING BRAKE RELEASE
HANDLE STEERING WHEEL
ADJUSTMENT
VOICE CONTROL
BUTTONS PASSENGER AIRBAG
OFF INDICATOR
VTM-4 LOCK
BUTTON
ACCESSORY POWER
SOCKET
SEAT HEATER
SWITCHES
CRUISE CONTROL
BUTTONS MULTI-INFORMATION
BUTTONS (P.186)
BLUETOOTH
HANDSFREELINK SYSTEM
VOICE CONTROL BUTTONS
REAR WINDOW
DEFOGGER/
HEATED MIRROR
BUTTONWINDSHIELD
WIPERS/WASHERS
On Touring models is shown. (P.125)
(P.137)
(P.144, 149) (P.129)
(P.123)
(P.35)
(P.85)
(P.132)
(P.534)
(P.484) (P.174) (P.172)
(P.167)
(P.497)
(P.171) (P.430)
(P.165)
(P.129, 173)
(P.520)
(P.392)
(P.441, 462)
1
3
3
3 3
3
2 4
3
3
3
3
Main MenuTable of Contents
Page 133 of 681
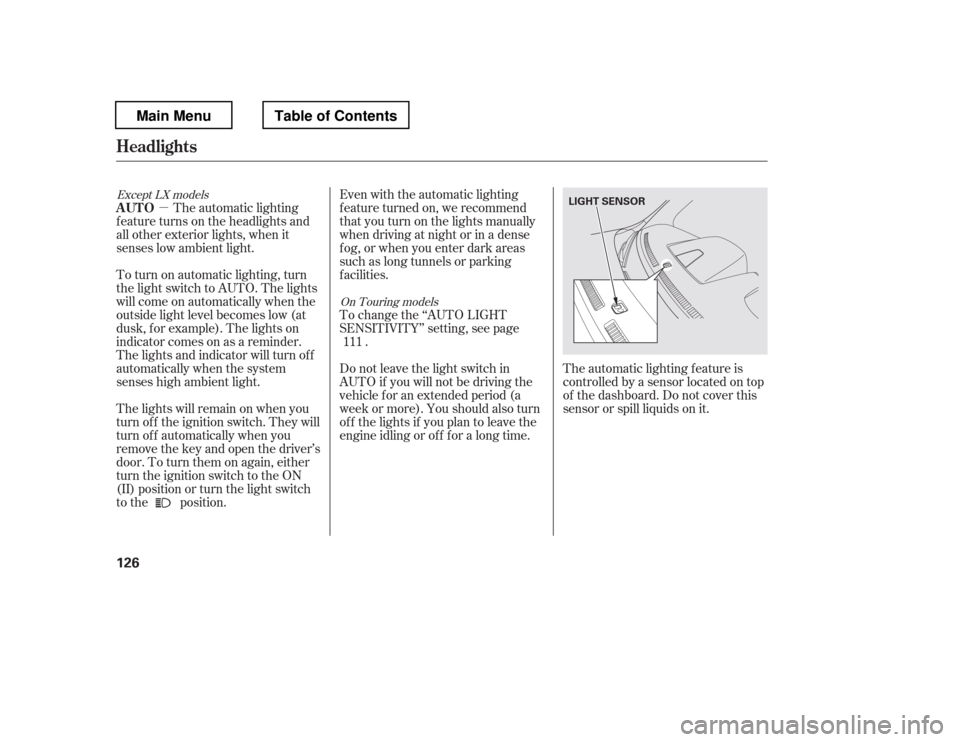
�µEven with the automatic lighting
f eature turned on, we recommend
thatyouturnonthelightsmanually
when driving at night or in a dense
f og, or when you enter dark areas
such as long tunnels or parking
f acilities.
To change the ‘‘AUTO LIGHT
SENSITIVITY
Page 134 of 681
Turn the f og lights on and of f by
turning the switch next to the
headlight switch.
You can use the f og lights only when
the headlights are on low beam.
With the light switch in the AUTO
position, you can also use the f og
lights when the headlights turn on
automatically. They will go of f when
the headlights turn of f .With the headlight switch off, the
daytime running lights come on
when you turn the ignition switch to
the ON (II) position and release the
parkingbrake.Theyremainonuntil
you turn the ignition switch of f , even
if you set the parking brake.
When the headlights are on, the
daytime running lights are of f .
If you see a ‘‘CHECK DRL
SYSTEM
Page 153 of 681

�µ
When the tailgate or the roof is
covered with snow or ice.
Do not install any accessories on the
tailgate. It may cause the tailgate to
malf unction. If there is snow or ice
on the tailgate, make sure to remove
it bef ore you operate the tailgate.
If you push the tailgate release
button inside the handle while the
tailgate is opening or closing, it will
stop moving. You need to open or
close it the rest of the way manually.
The tailgate has sensors on both
sides. Be caref ul not to damage them.
If the sensors are damaged, the
power tailgate does not f unction
properly. ANYTIME The tailgate unlocks
andopenswhenyoupressandhold
the tailgate button on the remote
transmitter for 1 second. The
tailgate will automatically relock
when you close it when the doors are
locked.
There are two settings you can
choose f rom:
When you customize the setting,
make sure your vehicle is parked
saf ely, the parking brake is applied,
all doors and the tailgate are f ully
closed and locked, and the key is
removed f rom the ignition switch.
You can customize the power
tailgate setting not to open without
unlocking the tailgate lock f irst by
remote transmitter from the outside.
If you try to drive off with the
tailgate open, a beeper sounds and a
‘‘TAILGATE OPEN
Page 178 of 681
You will also see a ‘‘RELEASE
PARKING BRAKE
Page 185 of 681
The courtesy light between the f ront
map lights comes on when you turn
the parking lights on. To adjust its
brightness, turn the instrument
panel brightness control dial on the
dashboard (see page ).The courtesy lights in all f our doors
come on when you open any door.
The light around the ignition switch
only comes on when you open the
driver
Page 190 of 681
To open the sunglasses holder, push
on the f ront edge. Make sure the
holder is closed while you are driving.
Some larger styles of sunglasses
may not f it in the holder.
Each rear door has an integrated
sunshade. To use a sunshade, hold
the tab on the top, and pull the
sunshade all the way up. Insert the
holes on the sunshade into the hooks
on the window f rame.
Open the glove box by pulling up on
thehandle.Closeitwithafirmpush.
Lock or unlock the glove box with
the master key.
The glove box light comes on when
the parking lights are on.
CONT INUED
On Touring models
Interior Convenience Items
Sunglasses Holder
Integrated Sunshades
Glove Box
Inst rument s and Cont rols
183
TAB
HOOK
SUNGLASSES HOLDER
Push
An open glove box can cause
serious injury to your passenger
inacrash,evenifthe
passenger is wearing the seatbelt.
Always keep the glove box
closed while driving.
Main MenuTable of Contents
Page 198 of 681

The heating and air conditioning
system in your vehicle provides a
comf ortable driving environment in
all weather conditions.
The standard audio system has
many f eatures. This section
describes those f eatures and how to
use them.
Your vehicle has an anti-theft audio
system that requires a code number
to enable it.
The security system helps to
discourage vandalism and thef t of
your vehicle.
Theclimatecontrolsystemandthe
audio system have a voice control
feature. Refer to the navigation
system manual f or more inf ormation..............
Vents, Heating, and A/C . 192
...............
Climate Control System . 199
................................
Audio System . 209
..........
Playing the FM/AM Radio . 212 ................................
Playing a Disc . 219
.......
Disc Player Error Messages . 226
................................
Audio System . 227
..........
Playing the FM/AM Radio . 228
................
Playing the XM
Radio . 237
................................
Playing a Disc . 243
.......
Disc Player Error Messages . 253
...........
Playing CD Library Audio . 254
............................
PlayinganiPod
. 265
.................
iPod
Error Messages . 273
.. 274
USB Flash Memory Device Error
...................................
Messages . 281
.............
Audio System . 282............................
Wallpaper Setup . 288
.................................
Display Setup . 291
..........................
Setting the Clock . 294
...................
Setting the Language . 297
................................
Audio System . 298
..........
Playing the FM/AM Radio . 299
................
Playing the XM
Radio . 312
................................
Playing a Disc . 319
.......
Disc Player Error Messages . 331 ..................
Protecting Your Discs . 332
Playing Hard Disc Drive (HDD)
..........................................
Audio . 335
............................
PlayinganiPod
. 363
.................
iPod
Error Messages . 371
.. 372
USB Flash Memory Device Error
...................................
Messages . 383
.............
Audio System . 384
............
FM/AM Radio Reception . 389
......................
Auxiliary Input Jack . 391
................
Remote Audio Controls . 392
.................
Radio Thef t Protection . 394
........
Rear Entertainment System . 396
............................
Security System . 429
...............................
Cruise Control . 430
.........................................
Compass . 433
...... 437
HandsFreeLink
(Models without navigation..................................
system) . 441
HandsFreeLink
(Models with navigation
..................................
system) . 462
................
Parking Sensor System . 484
....
Reaview Camera and Monitor . 491
U.S. LX model EX, EX-L, and Canadian LX models
without navigation system
BluetoothModels with navigation system Bluetooth
BluetoothBluetooth
On vehicles with navigation system
Playing a USB Flash Memory Device Playing a USB Flash Memory Device
HomeLink
Universal Transceiver
Features
Features
191
Main Menu


")
