2012 HONDA ODYSSEY power steering
[x] Cancel search: power steeringPage 11 of 441

10Quick Reference Guide
Steering Wheel
(P151)
●To adjust, push the adjustment lever
down, adjust to the desired position, then
pull up the lever back in place.
Power Sliding Door
*
(P128)
●When the main switch is ON, the power
sliding door opens and closes
automatically when you press OPEN or
CLOSE side of the / switch.
Tailgate
(P120)
●To open the tailgate, push the tailgate
release button, and lift up.
●Press the power tailgate button on the
driver’s door or the remote transmitter to
open and close the power tailgate.
Power Door Mirrors
(P153)
●With the ignition switch in ON (w
, move
the selector switch to L or R.
●Push the appropriate edge of the
adjustment switch to adjust the mirror.
●Place the selector switch in the L or R
position to use the reverse tilt door mirror
feature.
Tailgate
Release
ButtonModels with the power tailgate
Selector Switch
Adjustment Switch
Power Windows
(P137)
●With the ignition switch in ON
(w
, open
and close the power windows.
●If the power window lock button is in the
OFF position, the passenger's window can
be opened and closed with its own
switch.
●If the power window lock button is in the
ON position (indicator is on), the
passenger's window switch is disabled.
Power Window Lock Button
Window SwitchIndicator
Page 108 of 441

107
Controls
This chapter explains how to operate the various controls necessary for driving.
Setting the Clock.............................. 108
Locking and Unlocking the Doors
Key Types and Functions .................. 110
Locking/Unlocking the Doors from the
Outside .......................................... 112
Locking/Unlocking the Doors from the
Inside ............................................. 114
Childproof Door Locks ..................... 115
Auto Door Locking/Unlocking .......... 116
Opening and Closing the Tailgate... 120Opening and Closing the Sliding Doors
...... 126
Security System................................ 134
Immobilizer System .......................... 134
Security System Alarm
*.................... 134
Opening and Closing the Windows.... 137Opening and Closing the Moonroof
*...... 140
Operating the Switches Around the
Steering Wheel
Ignition Switch ................................. 141
Turn Signals ..................................... 142
Light Switches.................................. 142
Fog Lights
*...................................... 144
Daytime Running Lights ................... 144
Wipers and Washers ........................ 145
Brightness Control ........................... 147
Rear Defogger/Heated Door Mirror
*
Button ........................................... 148
Driving Position Memory System
*.... 149
Adjusting the Steering Wheel........... 151Adjusting the Mirrors....................... 152
Interior Rearview Mirror ................... 152
Power Door Mirrors ......................... 153
Adjusting the Seats.......................... 154
Adjusting the Seat Positions ............. 154
Interior Lights/Interior Convenience
Items................................................ 169
Interior Lights .................................. 169
Interior Convenience Items .............. 171
Heating and Cooling
*....................... 183
Using Vents, Heating and A/C.......... 183
Climate Control System*.................. 187
Using Automatic Climate Control .... 187
Automatic Climate Control Sensors . 192
* Not available on all models
Page 147 of 441

uuOperating the Switches Around the Steering WheeluWipers and Washers
146Controls
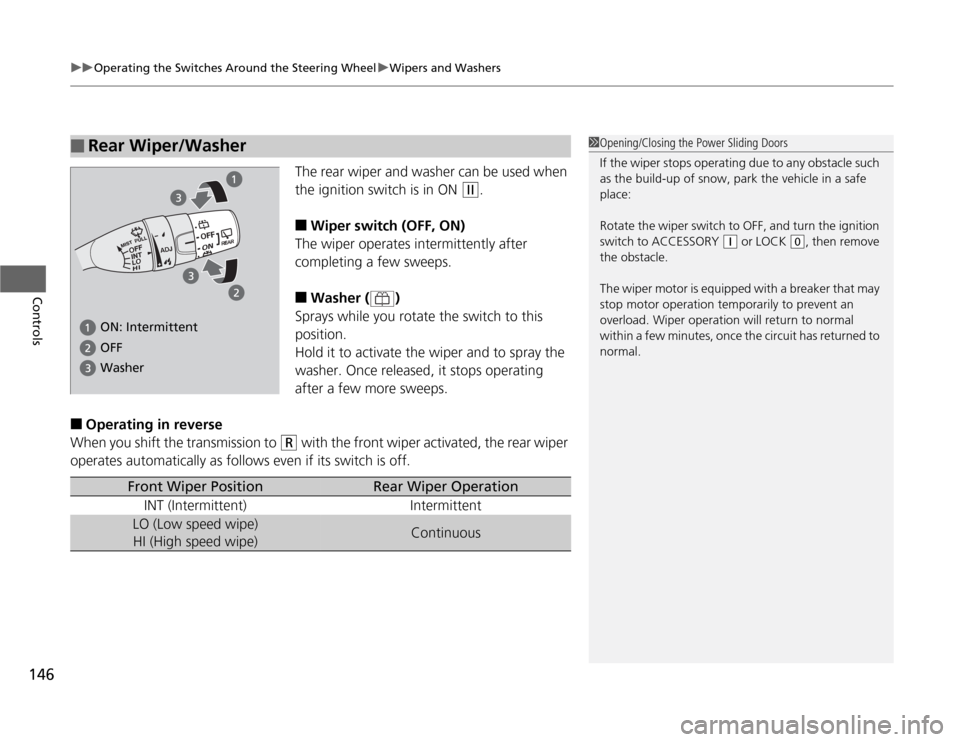
The rear wiper and washer can be used when
the ignition switch is in ON
(w
.
■
Wiper switch (OFF, ON)
The wiper operates intermittently after
completing a few sweeps.
■
Washer ( )
Sprays while you rotate the switch to this
position.
Hold it to activate the wiper and to spray the
washer. Once released, it stops operating
after a few more sweeps.
■
Operating in reverse
When you shift the transmission to
(R
with the front wiper activated, the rear wiper
operates automatically as follows even if its switch is off.
■
Rear Wiper/Washer
1Opening/Closing the Power Sliding Doors
If the wiper stops operating due to any obstacle such
as the build-up of snow, park the vehicle in a safe
place:
Rotate the wiper switch to OFF, and turn the ignition
switch to ACCESSORY
(q
or LOCK
(0
, then remove
the obstacle.
The wiper motor is equipped with a breaker that may
stop motor operation temporarily to prevent an
overload. Wiper operation will return to normal
within a few minutes, once the circuit has returned to
normal.
ON: Intermittent Washer OFF
Front Wiper Position
Rear Wiper Operation
INT (Intermittent) Intermittent
LO (Low speed wipe)
HI (High speed wipe)
Continuous
Page 149 of 441

148
uuOperating the Switches Around the Steering WheeluRear Defogger/Heated Door Mirror
* Button
Controls
Rear Defogger/Heated Door Mirror
* Button
Press the rear defogger and heated door
mirror button to defog the rear window and
mirrors when the ignition switch is in ON
(w
.
The rear defogger and heated door mirrors*
automatically switch off after 20 minutes.
The rear defogger and heated door mirrors
automatically switch off after 10-30 minutes
depending on the outside temperature.
However, if the outside temperature is 32°F
(0°C) or below, they do not automatically
switch off.
1Rear Defogger/Heated Door Mirror Button
NOTICEWhen cleaning the inside of the rear window, be
careful not to damage the heating wires.
It is critical to wipe the window from side to side
along the defogger heating wires.
This system consumes a lot of power, so turn it off
when the window has been defogged.
Also, do not use the system for a long period when
the engine is idling. This may weaken the battery,
making it difficult to start the engine.
If the outside temperature is below 41°F (5°C), the
heated mirror function will come on automatically for
10 minutes when you turn the ignition switch to ON (w
.
Models with heating and cooling systemModels with climate control system
* Not available on all models
Page 155 of 441

154Controls
Adjusting the SeatsAdjusting the Seat Positions
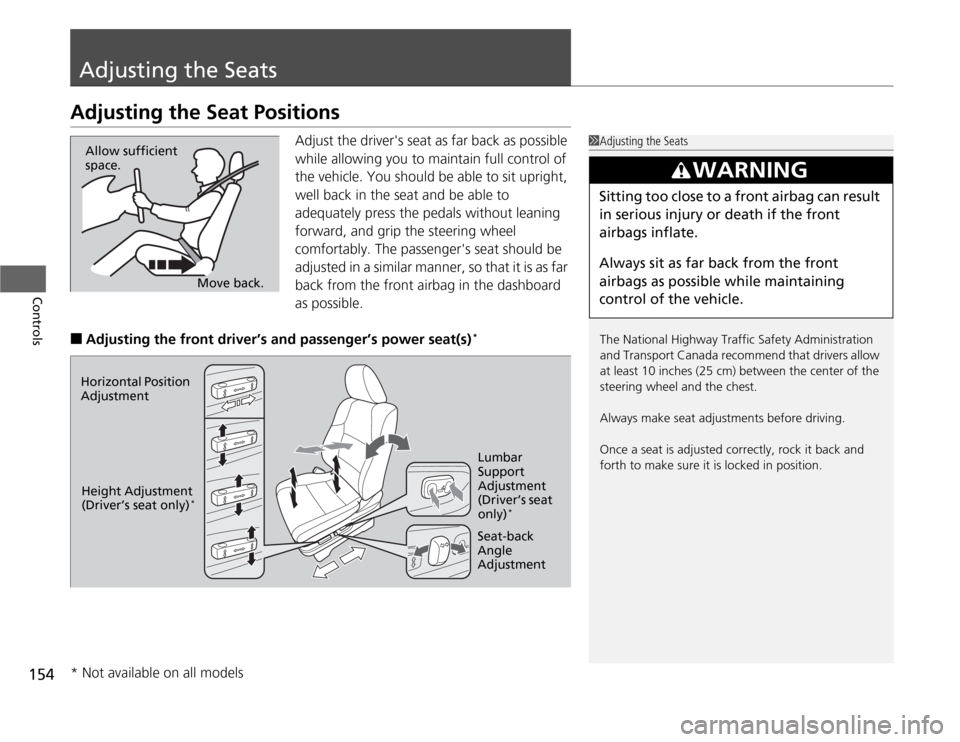
Adjust the driver's seat as far back as possible
while allowing you to maintain full control of
the vehicle. You should be able to sit upright,
well back in the seat and be able to
adequately press the pedals without leaning
forward, and grip the steering wheel
comfortably. The passenger's seat should be
adjusted in a similar manner, so that it is as far
back from the front airbag in the dashboard
as possible.
■
Adjusting the front driver’s and passenger’s power seat(s)
*
1Adjusting the Seats
The National Highway Traffic Safety Administration
and Transport Canada recommend that drivers allow
at least 10 inches (25 cm) between the center of the
steering wheel and the chest.
Always make seat adjustments before driving.
Once a seat is adjusted correctly, rock it back and
forth to make sure it is locked in position.
3
WARNING
Sitting too close to a front airbag can result
in serious injury or death if the front
airbags inflate.
Always sit as far back from the front
airbags as possible while maintaining
control of the vehicle.
Move back. Allow sufficient
space.
Horizontal Position
Adjustment
Height Adjustment
(Driver’s seat only)
*
Seat-back
Angle
AdjustmentLumbar
Support
Adjustment
(Driver’s seat
only)
*
* Not available on all models
Page 300 of 441

299
uuWhen DrivinguPrecautions While Driving
Driving
Precautions While DrivingAvoid driving in deep water and on flooded roads. This can damage the engine or
cause electrical component failure.
If there is a strong impact with something under the vehicle, stop in a safe location.
Check the underside of the vehicle for damage or any fluid leaks.■
In Rain
■
Other Precautions
1Precautions While Driving
NOTICEDo not operate the shift lever while pressing the
accelerator pedal. You could damage the
transmission.
If the ignition switch is turned to ACCESSORY
(q
or
LOCK
(0
while driving, the engine will shut down
and all steering and brake power assist functions will
stop, making it difficult to control the vehicle.
Do not put the shift lever in
(N
, as you will lose
engine braking (and acceleration) performance.
During the first 600 miles (1,000 km) of operation,
avoid sudden acceleration or full throttle operation so
as to not damage the engine or powertrain.
Avoid hard braking for the first 200 miles (300 km).
You should also follow this when the brake pads are
replaced.
Page 316 of 441

315
uuBrakinguBrake System
Driving
Your vehicle is equipped with disc brakes at all four wheels. A power assist helps
reduce the effort needed on the brake pedal. The brake assist system increases the
stopping force when you depress the brake pedal hard in an emergency situation.
The anti-lock brake system (ABS) helps you retain steering control when braking very
hard.
2Brake Assist System P. 317
2ABS (Anti-lock Brake System) P. 316
■
Foot Brake
1Foot Brake
Check the brakes after driving through deep water,
or if there is a buildup of road surface water. If
necessary, dry the brakes by lightly depressing the
pedal several times.
If you hear a continuous metallic friction sound when
applying the brakes, the brake pads need to be
replaced. Have the vehicle checked by a dealer.
Constantly using the brake pedal while going down a
long hill builds up heat, which reduces the brake
effectiveness. Apply engine braking by taking your
foot off the accelerator pedal and downshifting to a
lower gear.
Do not rest your foot on the brake pedal while
driving, as it will lightly apply the brakes and cause
them to lose effectiveness over time and reduce pad
life. It will also confuse drivers behind you.
Page 332 of 441

331
Maintenance
This chapter discusses basic maintenance.
Before Performing Maintenance
Inspection and Maintenance ............ 332
Safety When Performing Maintenance..... 333Parts and Fluids Used in Maintenance
Service ........................................... 334
Maintenance Minder™.................... 335
Maintenance Under the HoodMaintenance Items Under the Hood ..... 343Opening the Hood ........................... 344
Recommended Engine Oil ................ 345
Oil Check ......................................... 346
Adding Engine Oil ............................ 347Changing the Engine Oil and Oil Filter ..... 348
Engine Coolant ................................ 350
Transmission Fluid ............................ 352
Brake Fluid ....................................... 353
Power Steering Fluid Check.............. 354
Refilling Window Washer Fluid......... 354
Replacing Light Bulbs....................... 355
Checking and Maintaining Wiper Blades
.... 366
Checking and Maintaining Tires
Checking Tires ................................. 370
Tire and Loading Information Label ...... 371Tire Labeling .................................... 371DOT Tire Quality Grading (U.S. Vehicles)....... 373Wear Indicators................................ 375Tire Service Life ................................ 375
Tire and Wheel Replacement ........... 376
Tire Rotation .................................... 377
Winter Tires ..................................... 378
Battery............................................... 379
Remote Transmitter Care................. 380
Remote Control and Wireless
Headphone Care
*........................... 382
Heating and Cooling System
*/Climate
Control System
* Maintenance....... 384
Cleaning
Interior Care .................................... 385
Exterior Care.................................... 387
* Not available on all models