Page 401 of 441

400Handling the Unexpected
Engine Does Not StartChecking the EngineIf the engine does not start, turn the ignition switch to START
(e
and check the
starter.
Starter condition
Checklist
Starter doesn’t turn or turns
over slowly.
The battery may be dead. Check
each of the items on the right and
respond accordingly.
Check brightness of the interior light.
Turn on interior lights and check brightness.●
If the interior lights are dim or do not come on at all
2Battery P. 379
●
If the interior lights come on normally
2 Fuses P. 411
The starter turns over normally
but the engine doesn’t start.
There may be a problem with the
fuse. Check each of the items on
the right and respond accordingly.
Review the engine start procedure.
Follow its instructions, and try to start the engine again.
2 Starting the Engine P. 297
Check the immobilizer system indicator.
When the immobilizer system indicator is blinking, the engine cannot be started.
2Immobilizer System P. 134
Check the fuel level.
There should be enough fuel in the tank.
2 Fuel Gauge P. 86
Check the fuse.
Check all fuses, or have the vehicle checked by a dealer.
2Inspecting and Changing Fuses P. 416
If the problem continues:
2Emergency Towing P. 417
1Checking the Engine
If you must start the vehicle immediately, use an
assisting vehicle to jump start it.
2Jump Starting P. 401
Page 402 of 441

401
Continued
Handling the Unexpected
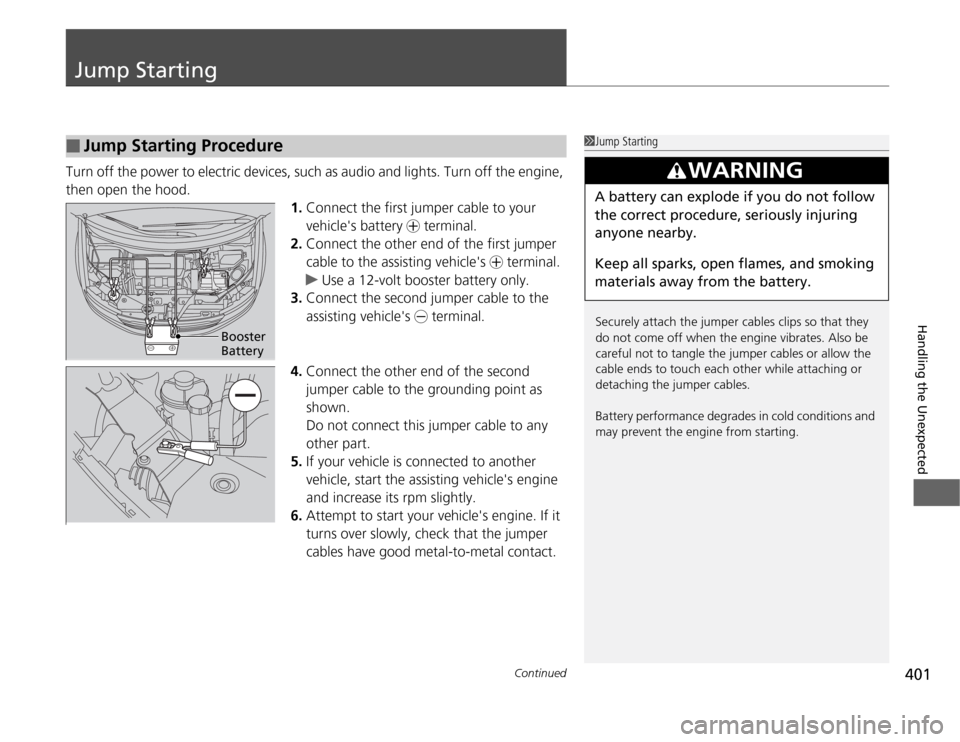
Jump StartingTurn off the power to electric devices, such as audio and lights. Turn off the engine,
then open the hood.
1.Connect the first jumper cable to your
vehicle's battery + terminal.
2.Connect the other end of the first jumper
cable to the assisting vehicle's + terminal.
uUse a 12-volt booster battery only.
3.Connect the second jumper cable to the
assisting vehicle's - terminal.
4.Connect the other end of the second
jumper cable to the grounding point as
shown.
Do not connect this jumper cable to any
other part.
5.If your vehicle is connected to another
vehicle, start the assisting vehicle's engine
and increase its rpm slightly.
6.Attempt to start your vehicle's engine. If it
turns over slowly, check that the jumper
cables have good metal-to-metal contact.■
Jump Starting Procedure
1Jump Starting
Securely attach the jumper cables clips so that they
do not come off when the engine vibrates. Also be
careful not to tangle the jumper cables or allow the
cable ends to touch each other while attaching or
detaching the jumper cables.
Battery performance degrades in cold conditions and
may prevent the engine from starting.
3
WARNING
A battery can explode if you do not follow
the correct procedure, seriously injuring
anyone nearby.
Keep all sparks, open flames, and smoking
materials away from the battery.
Booster
Battery
Page 405 of 441
404Handling the Unexpected
OverheatingHow to Handle OverheatingOverheating symptoms are as follows:
•The temperature gauge needle is at the mark or the engine suddenly loses
power.
•Steam is coming out of the engine compartment.■
First thing to do
1.Immediately park the vehicle in a safe place.
uMove the shift lever to
(P
and set the parking brake. Turn off all accessories
and turn on the hazard warning lights.
2. No steam coming out: Keep the engine running and open the hood.
Steam coming out: Turn off the engine and wait until steam goes away. Then,
open the hood.
1How to Handle Overheating
NOTICEContinuing to drive with the temperature gauge
needle at the mark may damage the engine.
3
WARNING
Steam and spray from an overheated
engine can seriously scald you.
Do not open the hood if steam is coming
out.
H
H
Page 407 of 441

406Handling the Unexpected
Indicator, Coming On/BlinkingIf the Low Oil Pressure Indicator Comes On
■
Reasons for the indicator to come on
Comes on when the engine oil pressure is low.
■
What to do as soon as the indicator comes on
1.Immediately park the vehicle in a safe place.
2.If necessary, turn the hazard warning lights on.
■
What to do after parking the vehicle
1.Stop the engine and let it sit for about one minute.
2.Open the hood and check the oil level.
uAdd oil as necessary.
3.Start the engine and check the low oil pressure indicator.
uThe light goes out: Start driving again.
uThe light does not go out within 10 seconds: Stop the engine and
contact a dealer for repairs immediately.
If the Charging System Indicator Comes On
■
Reasons for the indicator to come on
Comes on when the battery is not being charged.
■
What to do when the indicator comes on
Turn off the heating and cooling system
*/climate control system
*, rear
defogger, and other electrical systems, and immediately contact a dealer
for repairs.
1If the Low Oil Pressure Indicator Comes On
NOTICERunning the engine with low oil pressure can cause
serious mechanical damage almost immediately.1If the Charging System Indicator Comes On
If you need to stop temporarily, do not turn off the
engine. Restarting the engine may rapidly discharge
the battery.
* Not available on all models
Page 412 of 441

411
Continued
Handling the Unexpected
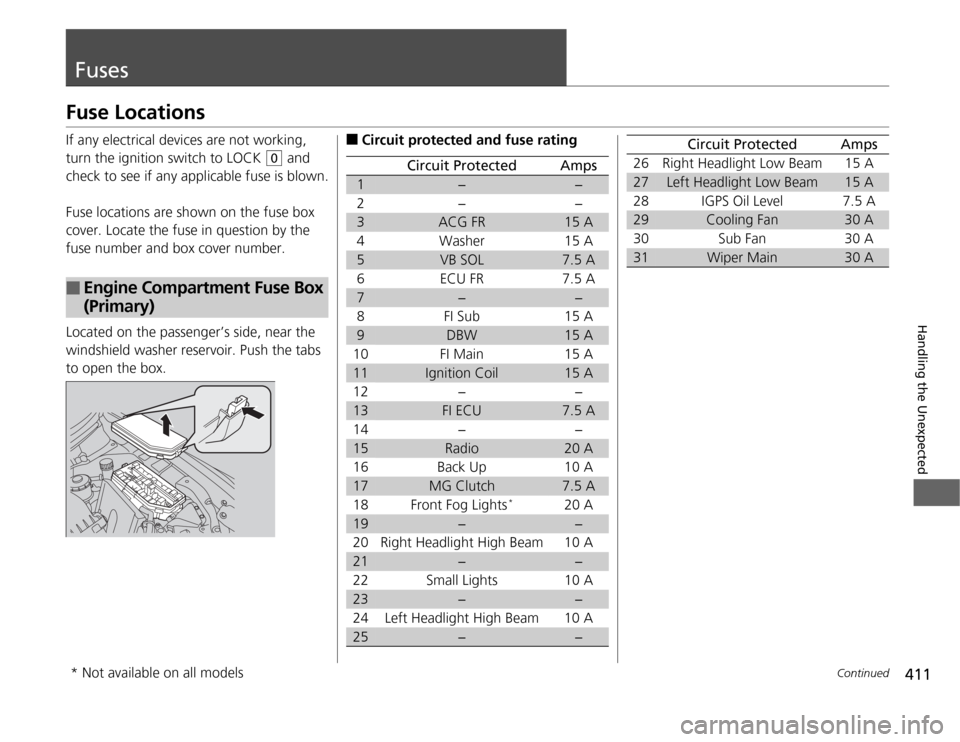
FusesFuse LocationsIf any electrical devices are not working,
turn the ignition switch to LOCK
(0
and
check to see if any applicable fuse is blown.
Fuse locations are shown on the fuse box
cover. Locate the fuse in question by the
fuse number and box cover number.
Located on the passenger’s side, near the
windshield washer reservoir. Push the tabs
to open the box.
■
Engine Compartment Fuse Box
(Primary)
■
Circuit protected and fuse rating
Circuit Protected
Amps
1
−
−
2− −
3
ACG FR
15 A
4Washer 15 A
5
VB SOL
7.5 A
6 ECU FR 7.5 A
7
−
−
8FI Sub 15A
9
DBW
15 A
10 FI Main 15 A11
Ignition Coil
15 A
12 − −13
FI ECU
7.5 A
14 − −15
Radio
20 A
16 Back Up 10 A17
MG Clutch
7.5 A
18 Front Fog Lights
*
20 A
19
−
−
20 Right Headlight High Beam 10 A
21
−
−
22 Small Lights 10 A
23
−
−
24 Left Headlight High Beam 10 A
25
−
−
26 Right Headlight Low Beam 15 A27
Left Headlight Low Beam
15 A
28 IGPS Oil Level 7.5 A
29
Cooling Fan
30 A
30 Sub Fan 30 A
31
Wiper Main
30 A
Circuit Protected
Amps
* Not available on all models
Page 413 of 441
412
uuFusesuFuse Locations
Handling the Unexpected
Located near the battery. Push the tabs to
open the box.■
Engine Compartment Fuse Box
(Secondary)
■
Circuit protected and fuse rating
Circuit Protected
Amps
1
Battery
125 A
2-1
Fan Main 60 A
2-2
Passenger’s Side Fuse Box 2 50 A
2-3
Rear Blower 30 A
2-4
FI Main 30 A
2-5
VSA Motor 40 A
2-6
Stop & Horn, Hazard 30 A
2-7
VSA FSR 30 A
2-8
Battery Management
System Main30 A
3-1
Driver’s Side Fuse Box 2
50 A
3-2
IG1 Main
50 A
3-3
Rear Fuse Box 1
60 A
3-4
Passenger’s Side Fuse Box 1
50 A
3-5
Driver’s Side Fuse Box 1
50 A
3-6
Primary Under-hood Fuse
Box Main
60 A
3-7
Front Blower
40 A
3-8
Passenger’s Side Power
Slide Door Motor
*
40 A
4
−−
5
−
−
6 Rear Window Defogger 40 A
7
−
−
8Battery Management
System7.5 A
9
Stop & Horn
20 A
10 Hazard 15 A
11
Interior Lights
7.5 A
Circuit Protected
Amps
* Not available on all models
Page 417 of 441

416
uuFusesuInspecting and Changing Fuses
Handling the Unexpected
Inspecting and Changing Fuses
1.Turn the ignition switch to LOCK
(0
. Turn
headlights and all accessories off.
2.Remove the fuse box cover.
3.Check the large fuse in the engine
compartment.
uIf the fuse is blown, use a Phillips-head
screwdriver to remove the screw and
replace it with a new one.
4.Inspect the small fuses in the engine
compartment and the vehicle interior.
uIf there is a burned out fuse, remove it
with the fuse puller and replace it with a
new one.
1Inspecting and Changing Fuses
NOTICEReplacing a fuse with one that has a higher rating
greatly increases the chances of damaging the
electrical system.
Replace fuse with a spare fuse of the same specified
amperage.
Use the charts to locate the fuse in question and
confirm the specified amperage on the fuse label.
2Fuse Locations P. 411
There is a fuse puller on the back of the engine
compartment fuse box (primary) cover.
Blown FuseBlown
FuseFuse Puller
Page 421 of 441

420Information
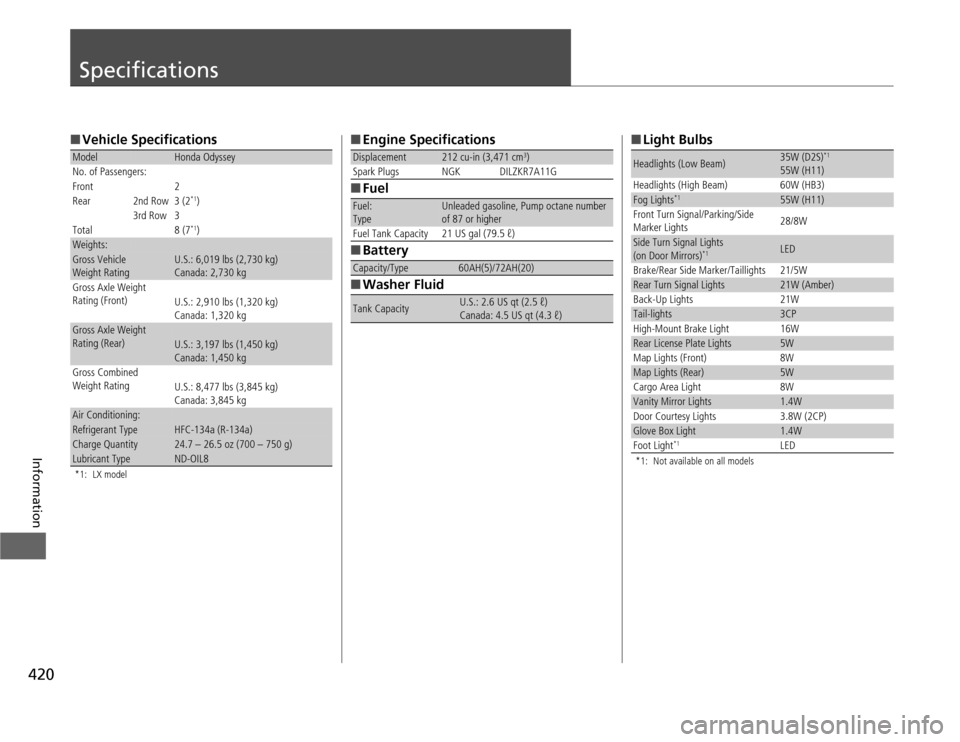
Specifications■Vehicle Specifications*1: LX modelModel
Honda Odyssey
No. of Passengers:
Front 2
Rear 2nd Row 3 (2
*1)
3rd Row 3
Total 8 (7*1)
Weights:Gross Vehicle
Weight Rating
U.S.: 6,019 lbs (2,730 kg)
Canada: 2,730 kg
Gross Axle Weight
Rating (Front)
U.S.: 2,910 lbs (1,320 kg)
Canada: 1,320 kg
Gross Axle Weight
Rating (Rear)
U.S.: 3,197 lbs (1,450 kg)
Canada: 1,450 kg
Gross Combined
Weight Rating
U.S.: 8,477 lbs (3,845 kg)
Canada: 3,845 kg
Air Conditioning:Refrigerant Type
HFC-134a (R-134a)
Charge Quantity
24.7 – 26.5 oz (700 – 750 g)
Lubricant Type
ND-OIL8
■Engine Specifications
■Fuel
■Battery
■Washer FluidDisplacement
212 cu-in (3,471 cm
3)
Spark Plugs NGK DILZKR7A11G
Fuel:
Type
Unleaded gasoline, Pump octane number
of 87 or higher
Fuel Tank Capacity 21 US gal (79.5 ℓ)
Capacity/Type
60AH(5)/72AH(20)
Tank Capacity
U.S.: 2.6 US qt (2.5 ℓ)
Canada: 4.5 US qt (4.3 ℓ)
■Light Bulbs*1: Not available on all modelsHeadlights (Low Beam)
35W (D2S)
*1
55W (H11)
Headlights (High Beam) 60W (HB3)
Fog Lights
*1
55W (H11)
Front Turn Signal/Parking/Side
Marker Lights28/8W
Side Turn Signal Lights
(on Door Mirrors)
*1
LED
Brake/Rear Side Marker/Taillights 21/5W
Rear Turn Signal Lights
21W (Amber)
Back-Up Lights 21W
Tail-lights
3CP
High-Mount Brake Light 16W
Rear License Plate Lights
5W
Map Lights (Front) 8W
Map Lights (Rear)
5W
Cargo Area Light 8W
Vanity Mirror Lights
1.4W
Door Courtesy Lights 3.8W (2CP)
Glove Box Light
1.4W
Foot Light
*1
LED