Page 332 of 441

331
Maintenance
This chapter discusses basic maintenance.
Before Performing Maintenance
Inspection and Maintenance ............ 332
Safety When Performing Maintenance..... 333Parts and Fluids Used in Maintenance
Service ........................................... 334
Maintenance Minder™.................... 335
Maintenance Under the HoodMaintenance Items Under the Hood ..... 343Opening the Hood ........................... 344
Recommended Engine Oil ................ 345
Oil Check ......................................... 346
Adding Engine Oil ............................ 347Changing the Engine Oil and Oil Filter ..... 348
Engine Coolant ................................ 350
Transmission Fluid ............................ 352
Brake Fluid ....................................... 353
Power Steering Fluid Check.............. 354
Refilling Window Washer Fluid......... 354
Replacing Light Bulbs....................... 355
Checking and Maintaining Wiper Blades
.... 366
Checking and Maintaining Tires
Checking Tires ................................. 370
Tire and Loading Information Label ...... 371Tire Labeling .................................... 371DOT Tire Quality Grading (U.S. Vehicles)....... 373Wear Indicators................................ 375Tire Service Life ................................ 375
Tire and Wheel Replacement ........... 376
Tire Rotation .................................... 377
Winter Tires ..................................... 378
Battery............................................... 379
Remote Transmitter Care................. 380
Remote Control and Wireless
Headphone Care
*........................... 382
Heating and Cooling System
*/Climate
Control System
* Maintenance....... 384
Cleaning
Interior Care .................................... 385
Exterior Care.................................... 387
* Not available on all models
Page 333 of 441

332Maintenance
Before Performing MaintenanceInspection and MaintenanceFor your safety, perform all listed inspections and maintenance to keep your vehicle
in good condition. If you become aware of any abnormality (noise, smell, insufficient
brake fluid, oil residue on the ground, etc.), have your vehicle inspected by a dealer.
(Note, however, that service at a dealer is not mandatory to keep your warranties in
effect.) Refer to the separate maintenance booklet for detailed maintenance and
inspection information.■
Daily inspections
Perform inspections before long distance trips, when washing the vehicle, or when
refueling.
■
Periodic inspections
•Check the automatic transmission fluid level monthly.
2Automatic Transmission Fluid P. 352
•Check the brake fluid level monthly.
2Brake Fluid P. 353
•Check the tire pressure monthly. Examine the tread for wear and foreign objects.
2Checking and Maintaining Tires P. 370
•Check the operation of the exterior lights monthly.
2Replacing Light Bulbs P. 355
•Check the condition of the wiper blades at least every six months.
2Checking and Maintaining Wiper Blades P. 366
■
Types of Inspection and Maintenance
1Inspection and Maintenance
Maintenance, replacement, or repair of
emissions control devices and systems may be
done by any automotive repair establishment or
individuals using parts that are "certified" to
EPA standards.
According to state and federal regulations, failure to
perform maintenance on the maintenance main
items marked with # will not void your emissions
warranties. However, all maintenance services should
be performed in accordance with the intervals
indicated by the information display
*/multi-
information display
*.
2Maintenance Service Items P. 337, 341
If you want to perform complex maintenance tasks
that require more skills and tools, you can purchase a
subscription to the Service Express website at
www.techinfo.honda.com.
2Authorized Manuals P. 429
If you want to perform maintenance yourself, make
sure that you have the necessary tools and skills first.
After performing maintenance, update the records in
the separate maintenance booklet.
U.S. models
* Not available on all models
Page 345 of 441

344
uuMaintenance Under the HooduOpening the Hood
Maintenance
Opening the Hood
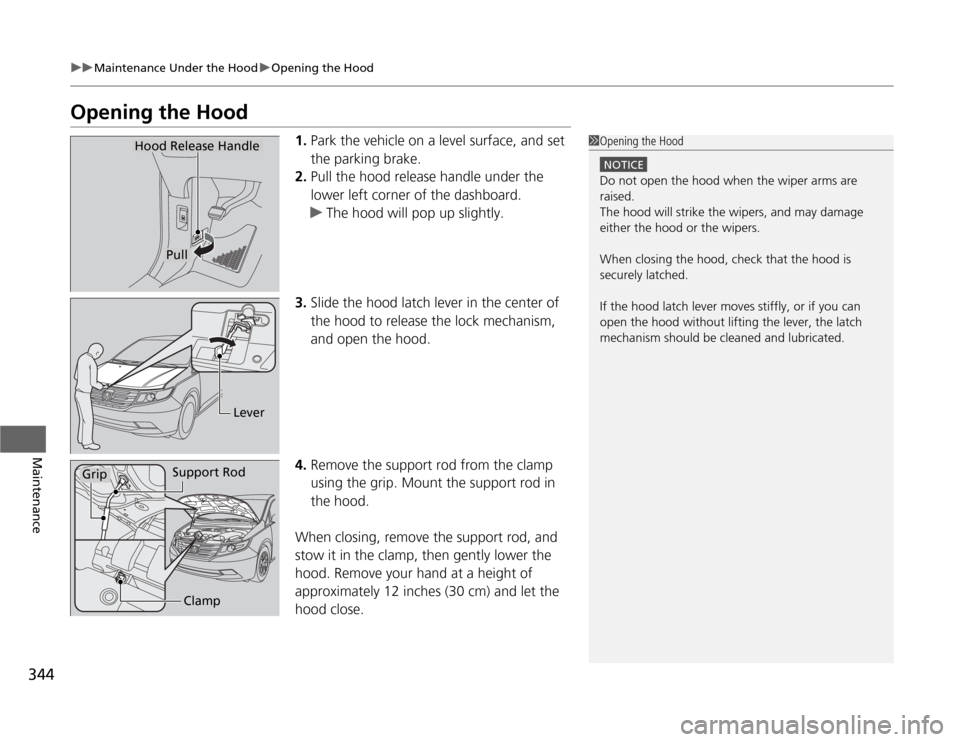
1.Park the vehicle on a level surface, and set
the parking brake.
2.Pull the hood release handle under the
lower left corner of the dashboard.
uThe hood will pop up slightly.
3.Slide the hood latch lever in the center of
the hood to release the lock mechanism,
and open the hood.
4.Remove the support rod from the clamp
using the grip. Mount the support rod in
the hood.
When closing, remove the support rod, and
stow it in the clamp, then gently lower the
hood. Remove your hand at a height of
approximately 12 inches (30 cm) and let the
hood close.
1Opening the Hood
NOTICEDo not open the hood when the wiper arms are
raised.
The hood will strike the wipers, and may damage
either the hood or the wipers.
When closing the hood, check that the hood is
securely latched.
If the hood latch lever moves stiffly, or if you can
open the hood without lifting the lever, the latch
mechanism should be cleaned and lubricated.
Hood Release Handle
Pull
Lever
Support Rod
Grip
Clamp
Page 356 of 441

355
Continued
Maintenance
Replacing Light BulbsHeadlight BulbsWhen replacing, use the following bulbs.
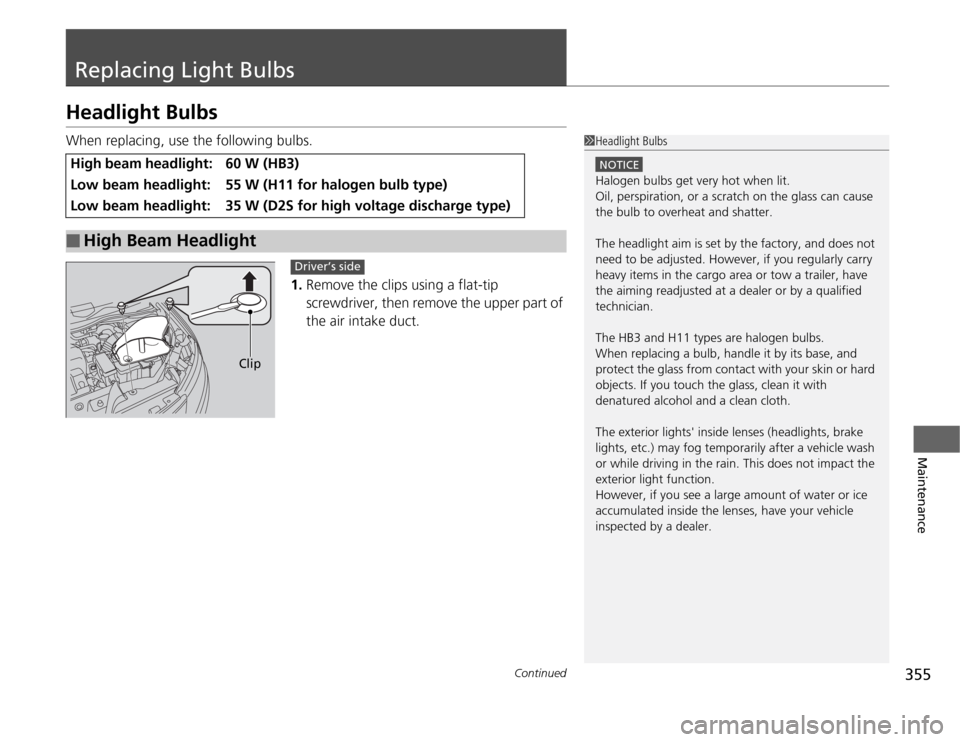
1.Remove the clips using a flat-tip
screwdriver, then remove the upper part of
the air intake duct.High beam headlight:
60 W (HB3)
Low beam headlight:
55 W (H11 for halogen bulb type)
Low beam headlight:
35 W (D2S for high voltage discharge type)
■
High Beam Headlight
1Headlight Bulbs
NOTICEHalogen bulbs get very hot when lit.
Oil, perspiration, or a scratch on the glass can cause
the bulb to overheat and shatter.
The headlight aim is set by the factory, and does not
need to be adjusted. However, if you regularly carry
heavy items in the cargo area or tow a trailer, have
the aiming readjusted at a dealer or by a qualified
technician.
The HB3 and H11 types are halogen bulbs.
When replacing a bulb, handle it by its base, and
protect the glass from contact with your skin or hard
objects. If you touch the glass, clean it with
denatured alcohol and a clean cloth.
The exterior lights' inside lenses (headlights, brake
lights, etc.) may fog temporarily after a vehicle wash
or while driving in the rain. This does not impact the
exterior light function.
However, if you see a large amount of water or ice
accumulated inside the lenses, have your vehicle
inspected by a dealer.
Clip
Driver’s side
Page 362 of 441
361
uuReplacing Light BulbsuBrake/Rear Side Marker/Taillight and Rear Turn Signal Light Bulbs
Continued
Maintenance
Brake/Rear Side Marker/Taillight and Rear Turn Signal Light BulbsWhen replacing, use the following bulbs.
1.Remove the mounting bolts.
2.Slightly pull the assembly outward, and
then pull the lower part. The bottom of the
taillight housing is exposed.Brake/Rear Side Marker/Taillight: 21/5 W
Rear Turn Signal Light: 21 W (Amber)Mounting
Bolts
Page 363 of 441
uuReplacing Light BulbsuBrake/Rear Side Marker/Taillight and Rear Turn Signal Light Bulbs
362Maintenance
3.Slowly pull out the assembly to release the
lower fastener from the grommet, using
your fingers.
uPlace one hand at the upper left corner,
and the other at the diagonal lower
corner.
4.Pull the upper corner to release the upper
fastener.
5.Turn the socket to the left and remove it.
6.Remove the old bulb and insert a new bulb.
1Brake/Rear Side Marker/Taillight and Rear Turn Signal Light Bulbs
To reinstall, insert the fasteners into the grommets
and push the assembly back into place.
uDo not reinstall the assembly if the grommets are
loose or out of the holes. Contact a dealer to
replace them.
Grommet
Bulb
SocketUpper
Fastener
Lower
Fastener
Page 366 of 441
365
uuReplacing Light BulbsuHigh-Mount Brake Light Bulb
Maintenance
High-Mount Brake Light BulbWhen replacing, use the following bulb.
1.Remove the lens segment by prying on the
edge using a flat-tip screwdriver.
uWrap the flat-tip screwdriver with a cloth
to prevent scratches.
2.Turn the socket to the left and remove it.
3.Remove the old bulb and insert a new bulb.High-Mount Brake Light: 16 W
Screw
Lens Segment
Bulb
Socket
Page 392 of 441

391
Continued
Handling the Unexpected
If a Tire Goes FlatChanging a Flat TireIf a tire goes flat while driving, grasp the steering wheel firmly, and brake gradually
to reduce speed. Then, stop in a safe place. Replace the flat tire with a compact
spare tire. Go to a dealer as soon as possible to have the full-size tire repaired or
replaced.
1.Park the vehicle on firm, level, and non-slippery ground.
2.Put the shift lever in
(P
.
3.Set the parking brake.
4.Turn on the hazard warning lights and turn the ignition switch to LOCK
(0
.
1Changing a Flat Tire
Periodically check the tire pressure of the compact
spare. It should be set to the specified pressure.
Specified Pressure: 60 psi (420 kPa, 4.2 kgf/cm
2)
When driving with the compact spare tire, keep the
vehicle speed under 50 mph (80 km/h). Replace with
a full-size tire as soon as possible.
The compact spare tire and wheel in your vehicle are
specifically for this model.
Do not use them with another vehicle.
Do not use another type of compact spare tire or
wheel with your vehicle.
Do not mount tire chains on a compact spare tire.
If a chain-mounted front tire goes flat, remove one of
the full-size rear tires and replace it with the compact
spare tire. Remove the flat front tire and replace it
with the full-size tire that was removed from the rear.
Mount the tire chains on the front tire.
Do not use a puncture-repairing agent on a flat tire,
as it can damage the tire pressure sensor.
U.S. models only