Page 4 of 286
3Quick Reference Guide
❙Headlights/Turn Signals
(P95)
❙Fog Lights
* (P96)
❙Wipers/Washers
(P97)
❙Paddle Shifter (Shift Down)
* (P 170)
❙Paddle Shifter (Shift Up)
* (P170)
❙Cruise Control Buttons
* (P173)
❙Bluetooth® HandsFreeLink® System
*
(P140)❙Horn (Press an area around .)❙
(Select/Reset) Knob
(P73)
❙Brightness Control
(P99)
❙Audio Remote Control Buttons
*
() See Navigation System Manual❙Navigation System Voice Control Buttons
*
() See Navigation System Manual
* Not available on all models
Page 13 of 286
12Quick Reference Guide
Features
(P121)
Audio System
(P125)
For navigation system operation
() See Navigation System Manual
FM/AM Button
SCAN Button
(SEEK) Button
Selector Knob Button
(Sound) Button
(Power) Button
CD Button
(CD Eject) ButtonPreset Buttons (1-6)
ButtonTITLE ButtonRDM/A.SEL Button
Auxiliary Input Jack
RPT Button
(SEEK) Button
AUX Button Audio Display
Page 64 of 286
63
Instrument Panel
This chapter describes the buttons, indicators, and gauges that are used while driving.
Indicators............................................ 64
Gauges and Displays
Gauges .............................................. 72
Information Display............................ 73
Page 123 of 286
122Features
Audio SystemAbout Your Audio SystemOn models with navigation system, see the Navigation System Manual for operation
of the audio system, and Bluetooth®HandsFreeLink®.
The audio system features FM/AM radio. It can also play audio CDs, WMA/MP3/AAC
files, iPods®, and USB flash drives.
You can operate the audio system from the buttons and switches on the panel.
1About Your Audio System
Video CDs, DVDs, and 3-inch (8-cm) mini CDs are not
supported.
iPod® is a registered trademark owned by Apple Inc.
MP3 and AAC are standard audio compression
formats. WMA is an audio compression format
developed by Microsoft Corporation.
iPod®
USB Flash
Drive Auxiliary
Input Jack
Page 124 of 286

123
uuAudio SystemuUSB Adapter Cable
*
Features
USB Adapter Cable
*
1.Unclip the USB connector and loosen the
adapter cable.
2.Install the iPod® dock connector or the USB
flash drive to the USB connector.
Auxiliary Input JackUse the jack to connect standard audio devices.
1.Open the AUX cover.
2.Connect a standard audio device to the
input jack using a 1/8 inch (3.5 mm) stereo
miniplug.
uThe audio system automatically switches
to the AUX mode.
1USB Adapter Cable
*
•Do not leave the iPod® or USB flash drive in the
vehicle. Direct sunlight and high temperatures may
damage it.•Do not use an extension cable with the USB
adapter cable.•Do not connect the iPod® or USB flash drive using a
hub.•Do not use a device such as a card reader or hard
disk drive, as the device or your files may be
damaged.•We recommend backing up your data before using
the device in your vehicle.•Displayed messages may vary depending on the
device model and software version.
If the audio system does not recognize the iPod®, try
reconnecting it a few times or reboot the device. To
reboot, follow the manufacturer’s instructions
provided with the iPod® or visit www.apple.com/
ipod.
1Auxiliary Input Jack
To switch the mode, press any of the audio mode
buttons. You can return to the AUX mode by
pressing the AUX button.
You cannot use the auxiliary input jack if you replace
the audio system.
State or local laws may limit the circumstances in
which you can launch or control your attached audio
device.
* Not available on all models
Page 125 of 286

124
uuAudio SystemuAudio Antenna
Features
Audio Antenna
Your vehicle is equipped with a removable
antenna at the rear of the roof.
Audio System Theft ProtectionThe audio system is disabled when it is disconnected from the power source, such as
when the battery is disconnected or goes dead.■
Entering the Audio Security Code
ENTER CODE appears on the display when the power is reconnected.
1.Turn on the audio system.
2.Enter the security code using the preset buttons.
Touch the icon to enter the code, then touch the Done icon to set it.
If you enter an incorrect digit, continue to the last digit, then try again. If you do
not enter the code correctly after 10 tries, leave the system for one hour before
trying again, or visit a dealer to have the system reset.
1Audio Antenna
NOTICEBefore using a “drive-through” car wash, remove the
antenna by unscrewing it by hand. This prevents the
antenna from being damaged by the car wash
brushes.1Audio System Theft Protection
Find the audio system’s security code and serial
number in your owner’s manual kit.
We recommend that you write down the serial
number in this owner’s manual.
Do not store the label in your vehicle. If you lose the
label, you must first retrieve the serial number, and
then obtain the code.
You can find out about your serial number and
security code from a dealer.
You can register the security code at Owner Link
(owners.honda.com), and find information on how
to retrieve the serial number and obtain the code at
radio-navicode.honda.com.
U.S. models
Models with navigation system
Page 128 of 286

127
uuAudio System Basic OperationuPlaying the FM/AM Radio
Continued
Features
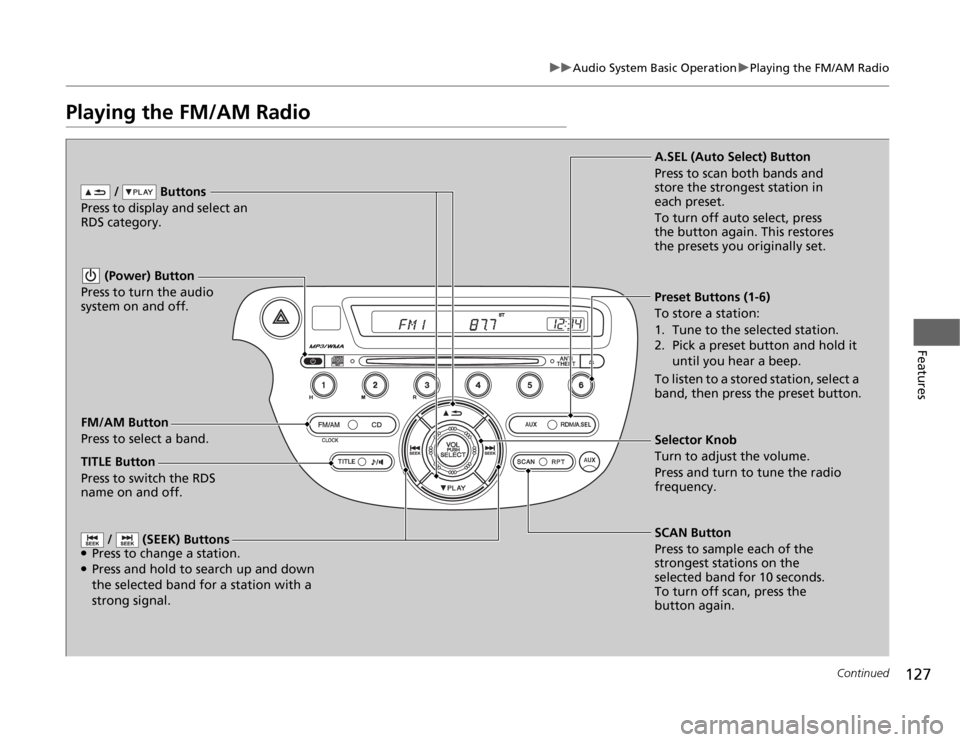
Playing the FM/AM Radio
FM/AM Button
Press to select a band. / Buttons
Press to display and select an
RDS category.
SCAN Button
Press to sample each of the
strongest stations on the
selected band for 10 seconds.
To turn off scan, press the
button again. (Power) Button
Press to turn the audio
system on and off.Preset Buttons (1-6)
To store a station:
1. Tune to the selected station.
2. Pick a preset button and hold it
until you hear a beep.
To listen to a stored station, select a
band, then press the preset button.
/ (SEEK) Buttons
●Press to change a station.●Press and hold to search up and down
the selected band for a station with a
strong signal.
Selector Knob
Turn to adjust the volume.
Press and turn to tune the radio
frequency. A.SEL (Auto Select) Button
Press to scan both bands and
store the strongest station in
each preset.
To turn off auto select, press
the button again. This restores
the presets you originally set.
TITLE Button
Press to switch the RDS
name on and off.
Page 130 of 286

129
uuAudio System Basic OperationuPlaying a CD
Continued
Features
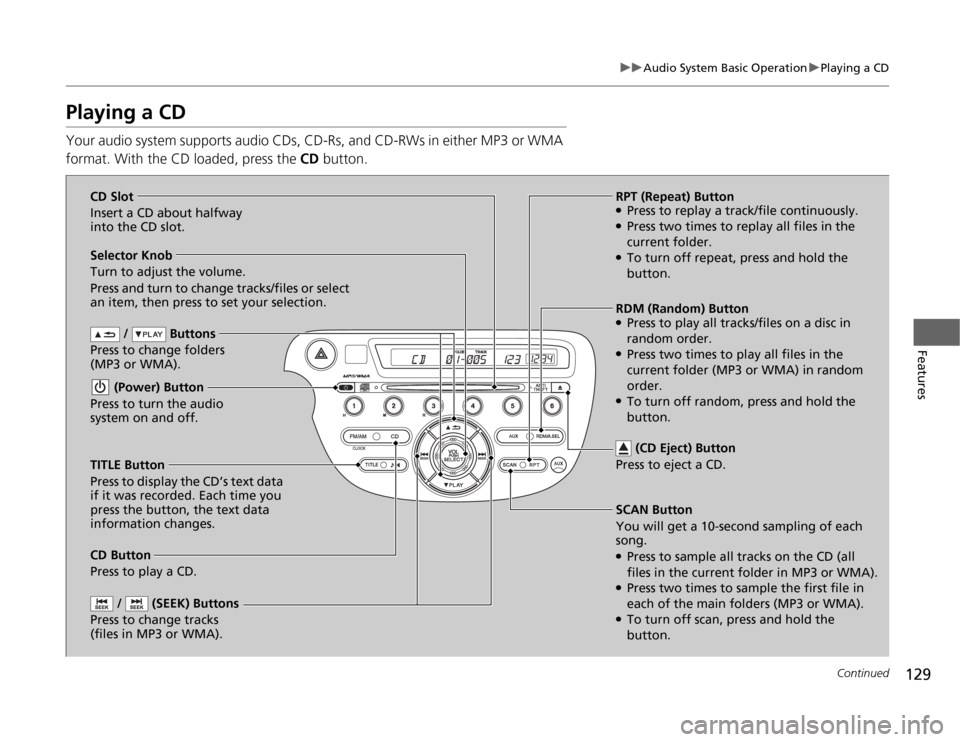
Playing a CDYour audio system supports audio CDs, CD-Rs, and CD-RWs in either MP3 or WMA
format. With the CD loaded, press the CD button.
/ Buttons
Press to change folders
(MP3 or WMA).
SCAN Button
You will get a 10-second sampling of each
song.●Press to sample all tracks on the CD (all
files in the current folder in MP3 or WMA).●Press two times to sample the first file in
each of the main folders (MP3 or WMA).●To turn off scan, press and hold the
button. (Power) Button
Press to turn the audio
system on and off.
/ (SEEK) Buttons
Press to change tracks
(files in MP3 or WMA).
RPT (Repeat) Button●Press to replay a track/file continuously.●Press two times to replay all files in the
current folder.●To turn off repeat, press and hold the
button. Selector Knob
Turn to adjust the volume.
Press and turn to change tracks/files or select
an item, then press to set your selection.
CD Button
Press to play a CD. (CD Eject) Button
Press to eject a CD.
TITLE Button
Press to display the CD’s text data
if it was recorded. Each time you
press the button, the text data
information changes.RDM (Random) Button
●Press to play all tracks/files on a disc in
random order.●Press two times to play all files in the
current folder (MP3 or WMA) in random
order.●To turn off random, press and hold the
button. CD Slot
Insert a CD about halfway
into the CD slot.