2012 HONDA FIT Reset
[x] Cancel search: ResetPage 128 of 286
127
uuAudio System Basic OperationuPlaying the FM/AM Radio
Continued
Features
Playing the FM/AM Radio
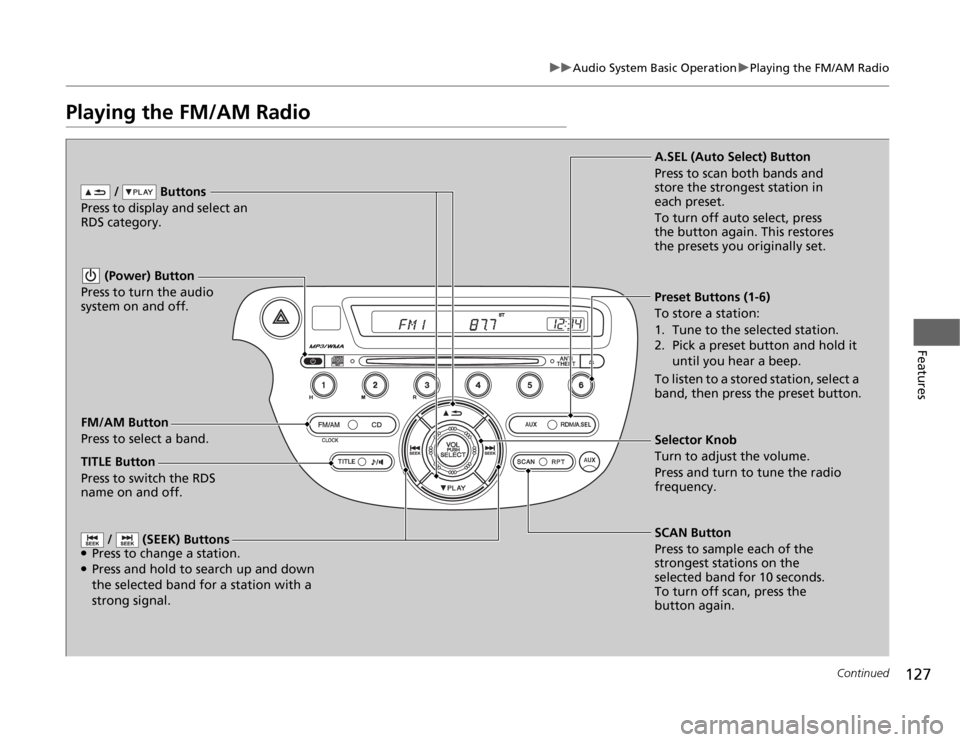
FM/AM Button
Press to select a band. / Buttons
Press to display and select an
RDS category.
SCAN Button
Press to sample each of the
strongest stations on the
selected band for 10 seconds.
To turn off scan, press the
button again. (Power) Button
Press to turn the audio
system on and off.Preset Buttons (1-6)
To store a station:
1. Tune to the selected station.
2. Pick a preset button and hold it
until you hear a beep.
To listen to a stored station, select a
band, then press the preset button.
/ (SEEK) Buttons
●Press to change a station.●Press and hold to search up and down
the selected band for a station with a
strong signal.
Selector Knob
Turn to adjust the volume.
Press and turn to tune the radio
frequency. A.SEL (Auto Select) Button
Press to scan both bands and
store the strongest station in
each preset.
To turn off auto select, press
the button again. This restores
the presets you originally set.
TITLE Button
Press to switch the RDS
name on and off.
Page 129 of 286
uuAudio System Basic OperationuPlaying the FM/AM Radio
128Features
Provides text data information related to your selected RDS capable FM station.■
RDS INFO ON
Press the TITLE button while listening to an RDS capable station. RDS INFO ON
appears, and the station name is displayed.
■
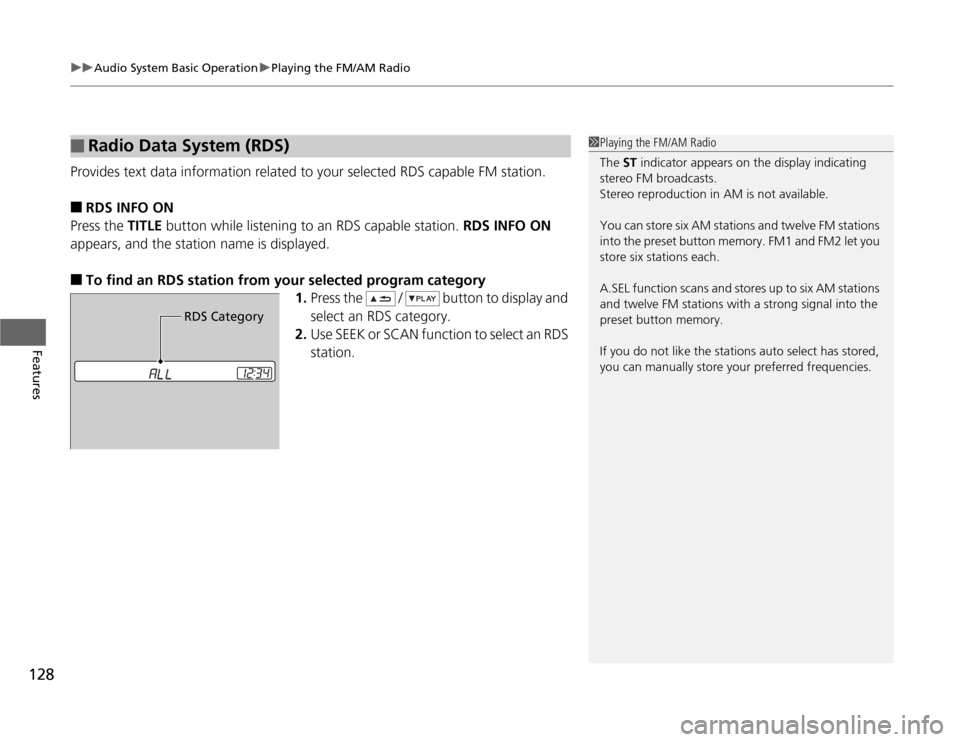
To find an RDS station from your selected program category
1.Press the / button to display and
select an RDS category.
2.Use SEEK or SCAN function to select an RDS
station.
■
Radio Data System (RDS)
1Playing the FM/AM Radio
The ST indicator appears on the display indicating
stereo FM broadcasts.
Stereo reproduction in AM is not available.
You can store six AM stations and twelve FM stations
into the preset button memory. FM1 and FM2 let you
store six stations each.
A.SEL function scans and stores up to six AM stations
and twelve FM stations with a strong signal into the
preset button memory.
If you do not like the stations auto select has stored,
you can manually store your preferred frequencies.
RDS Category
Page 151 of 286
uuBluetooth® HandsFreeLink®
*uHFL Menus
150Features
This command group allows you to change or customize HFL basic settings.■
To set a four-digit passcode to lock the HFL system for security
1.Say “System Setup.”
2.Say “Security.”
3.Follow the HFL prompts and say the four-digit number of your choice.
4.Follow the HFL prompts and confirm the number.
■
To change the security passcode
1.Say “System Setup.”
2.Say “Change Passcode” after the prompts.
3.Say the new four-digit passcode after the HFL prompts.
4.Follow the HFL prompts.
■
To select a ring tone or a prompt as the incoming call notification
1.Say “System Setup.”
2.Say “Call Notification” after the prompts.
3.Say “Ring Tone” or “Prompt” after the prompts. For no audible notification, say
“Off.”
■
System Setup
1System Setup
Press the button before a command.
Once a passcode is set, you are required to enter the
passcode with every new key cycle to use HFL.
If you forget the code, go to your dealer to have the
passcode reset. You can also cancel the passcode by
clearing all the data stored in the HFL system.
2To clear the system P. 151
The default setting of the incoming notification is a
ring tone.
Page 196 of 286
195
Continued
Maintenance
Maintenance Minder
TM
If the engine oil life is less than 15%, you will see the Maintenance Minder messages
appear on the information display every time you turn the ignition switch to ON
(w
.
The messages notify you when to change the engine oil, or when to bring your
vehicle to a dealer for indicated maintenance services.
To Use Maintenance Minder
TM
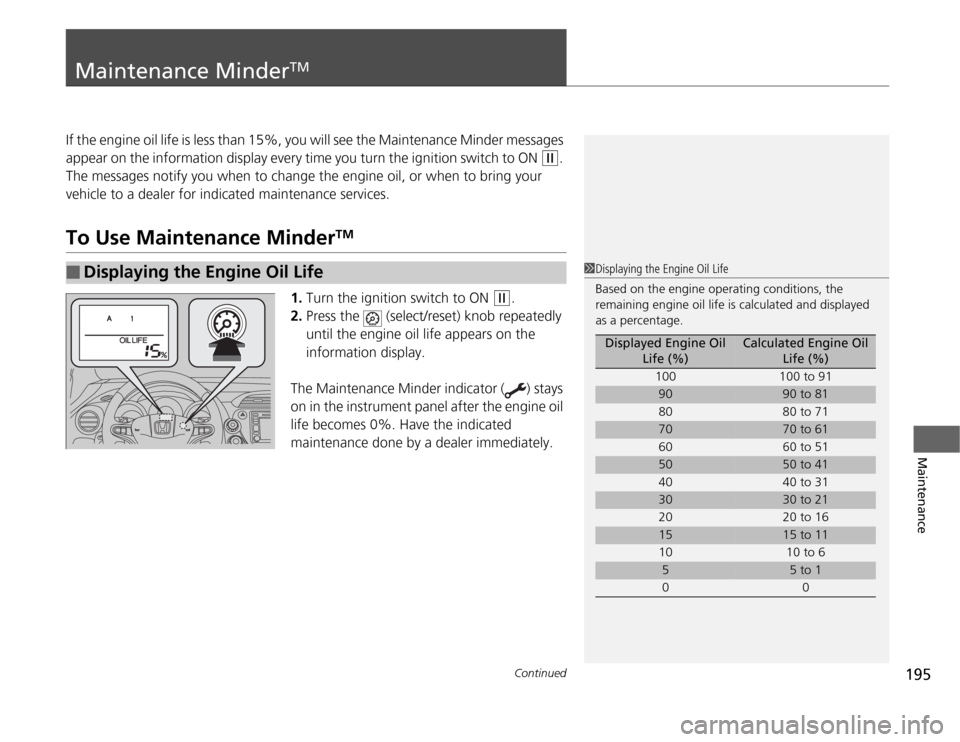
1.Turn the ignition switch to ON
(w
.
2.Press the (select/reset) knob repeatedly
until the engine oil life appears on the
information display.
The Maintenance Minder indicator ( ) stays
on in the instrument panel after the engine oil
life becomes 0%. Have the indicated
maintenance done by a dealer immediately.
■
Displaying the Engine Oil Life
1Displaying the Engine Oil Life
Based on the engine operating conditions, the
remaining engine oil life is calculated and displayed
as a percentage.
Displayed Engine Oil
Life (%)
Calculated Engine Oil
Life (%)
100 100 to 91
90
90 to 81
80 80 to 71
70
70 to 61
60 60 to 51
50
50 to 41
40 40 to 31
30
30 to 21
20 20 to 16
15
15 to 11
10 10 to 6
5
5 to 1
00
Page 197 of 286
196
uuMaintenance Minder
TMuTo Use Maintenance Minder
TM
Maintenance
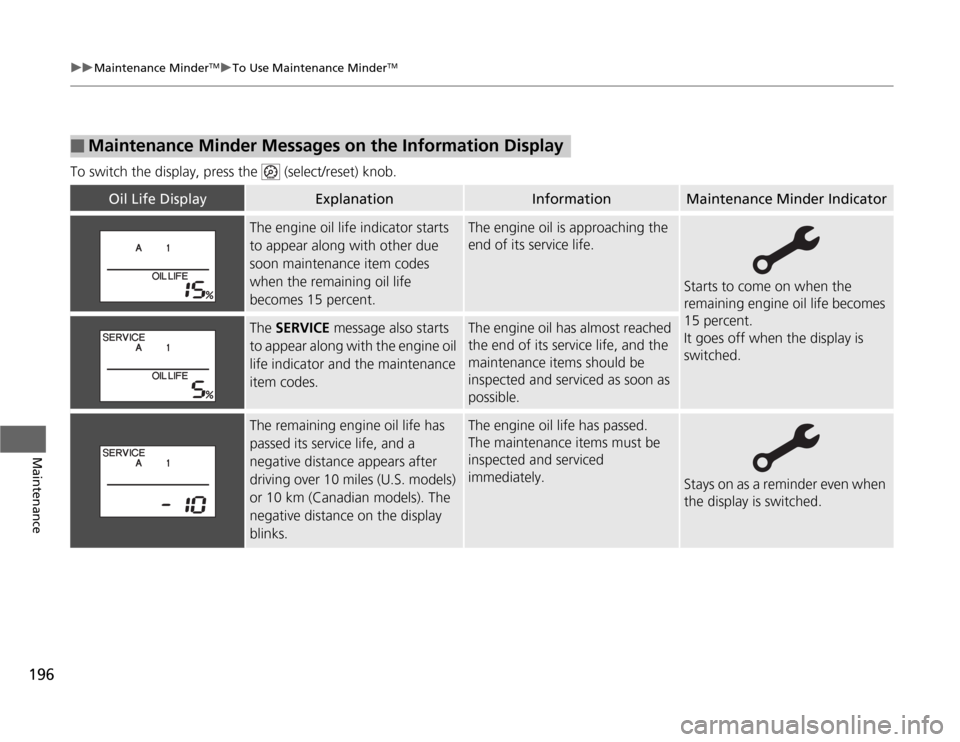
To switch the display, press the (select/reset) knob.■
Maintenance Minder Messages on the Information Display
Oil Life Display
Explanation
Information
Maintenance Minder Indicator
The engine oil life indicator starts
to appear along with other due
soon maintenance item codes
when the remaining oil life
becomes 15 percent.
The engine oil is approaching the
end of its service life.
Starts to come on when the
remaining engine oil life becomes
15 percent.
It goes off when the display is
switched.
The SERVICE message also starts
to appear along with the engine oil
life indicator and the maintenance
item codes.
The engine oil has almost reached
the end of its service life, and the
maintenance items should be
inspected and serviced as soon as
possible.
The remaining engine oil life has
passed its service life, and a
negative distance appears after
driving over 10 miles (U.S. models)
or 10 km (Canadian models). The
negative distance on the display
blinks.
The engine oil life has passed.
The maintenance items must be
inspected and serviced
immediately.
Stays on as a reminder even when
the display is switched.
Page 198 of 286

197
uuMaintenance Minder
TMuTo Use Maintenance Minder
TM
Continued
Maintenance
■
Maintenance Service Items
1Maintenance Service Items•Independent of the Maintenance Minder
information, replace the brake fluid every 3 years.•Inspect idle speed every 160,000 miles (256,000
km).•Adjust the valves during services A, B, 1, 2, or 3 if
they are noisy.
Maintenance Minder Message Maintenance
Minder Indicator
Sub Items Main Item
*1: If a message SERVICE does not appear more than 12 months after the display is reset, change the
engine oil every year.
*2: Canadian A/T models only
# : See information on maintenance and emissions warranty.CODE
Maintenance Main Items
A
●
Replace engine oil
*1
B
●
Replace engine oil and oil filter
●
Inspect front and rear brakes/service as necessary
●
Check parking brake adjustment
●
Inspect tie rod ends, steering gearbox, and boots
●
Inspect suspension components
●
Inspect driveshaft boots
●
Inspect brake hoses and lines (Including ABS/VSA)
●
Inspect all fluid levels and condition of fluids
●
Inspect exhaust system
#
●
Inspect fuel lines and connections
#
●
Check expiration date for TRK bottle
*2
*3: If you drive in dusty conditions, replace the air cleaner element every 15,000 miles (24,000 km).
*4: If you drive primarily in urban areas that have high concentrations of soot in the air from industry and
from diesel-powered vehicles, replace every 15,000 miles (24,000 km).
*5: If you tow a Fit behind a motorhome, the transmission fluid must be changed every 2 years or 30,000
miles (48,000 km), whichever comes first. (For A/T only)CODE
Maintenance Sub Items
1
●
Rotate tires
2
●
Replace air cleaner element
*3
●
Replace dust and pollen filter
*4
●
Inspect drive belt
3
●
Replace transmission fluid
*5
4
●
Replace spark plugs
●
Inspect valve clearance
5
●
Replace engine coolant
Page 199 of 286
uuMaintenance Minder
TMuTo Use Maintenance Minder
TM
198Maintenance
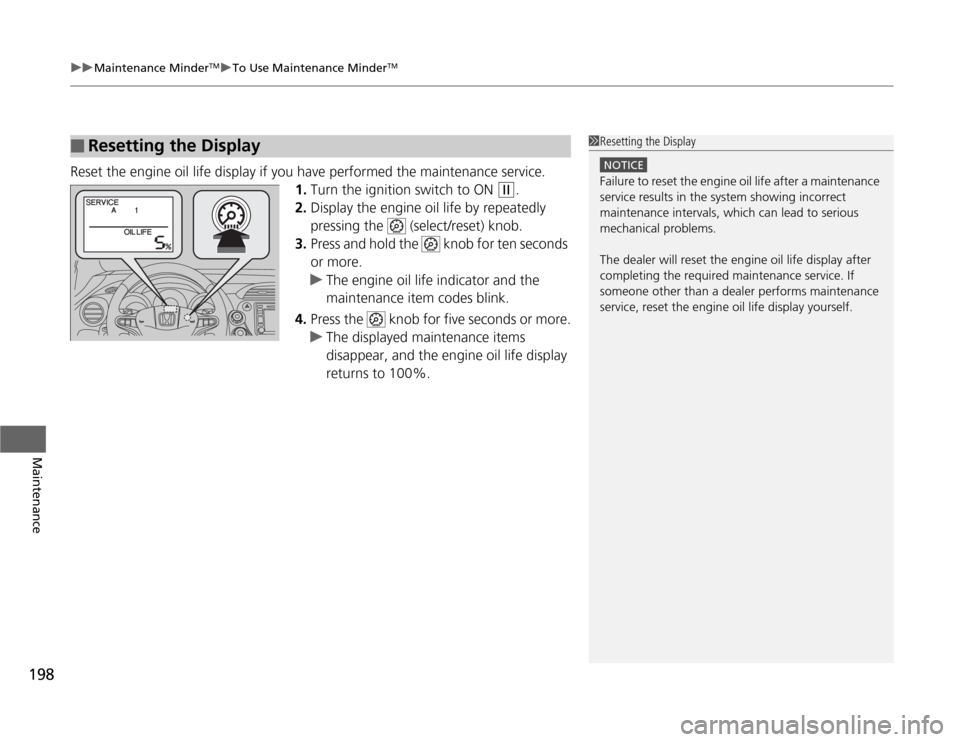
Reset the engine oil life display if you have performed the maintenance service.
1.Turn the ignition switch to ON
(w
.
2.Display the engine oil life by repeatedly
pressing the (select/reset) knob.
3.Press and hold the knob for ten seconds
or more.
uThe engine oil life indicator and the
maintenance item codes blink.
4.Press the knob for five seconds or more.
uThe displayed maintenance items
disappear, and the engine oil life display
returns to 100%.
■
Resetting the Display
1Resetting the Display
NOTICEFailure to reset the engine oil life after a maintenance
service results in the system showing incorrect
maintenance intervals, which can lead to serious
mechanical problems.
The dealer will reset the engine oil life display after
completing the required maintenance service. If
someone other than a dealer performs maintenance
service, reset the engine oil life display yourself.
Page 232 of 286

231
Maintenance
BatteryChecking the Battery
Check the battery condition monthly. Look at
the test indicator window and check the
terminals for corrosion.
If your vehicle’s battery is disconnected or goes dead:
•The audio system
* is disabled.
2Entering the Audio Security Code P. 124
•The clock resets.
2Setting the Clock P. 76
•The navigation system
* is disabled.
2Refer to the navigation system manual
Charging the BatteryDisconnect both battery cables to prevent damaging your vehicle’s electrical system.
Always disconnect the negative (–) cable first, and reconnect it last.
1BatteryWARNING: Battery post, terminals,
and related accessories contain lead
and lead compounds.
Wash your hands after handling.The test indicator’s color information is on the
battery.
When you find corrosion, clean the battery terminals
by applying a baking powder and water solution.
Rinse the terminals with water. Cloth/towel dry the
battery. Coat the terminals with grease to help
prevent future corrosion.
3
WARNING
The battery gives off explosive hydrogen
gas during normal operation.
A spark or flame can cause the battery to
explode with enough force to kill or
seriously hurt you.
When conducting any battery
maintenance, wear protective clothing and
a face shield, or have a skilled technician do
it.
Test Indicator Window
* Not available on all models