Page 337 of 435
Unscrew and remove the engine oil
fill cap on top of the valve cover.
Pour in the oil slowly and caref ully so
you do not spill any. Clean up any
spills immediately. Spilled oil could
damage components in the engine
compartment.Reinstall the engine oil f ill cap, and
tighten it securely. Wait a f ew
minutes, and recheck the oil level on
the engine oil dipstick. Do not f ill
above the upper mark; you could
damage the engine.
Oil is a major contributor to your
engine’s perf ormance and longevity.
Always use a premium-grade 0W-20
detergent oil displaying the API
Certif ication Seal. This seal indicates
the oil is energy conserving, and that
it meets the American Petroleum
Institute’s latest requirements.
CONT INUED
Recommended Engine Oil
A dding Engine Oil
333
ENGINE OIL FILL CAP
Maint enance
2012 Crosstour
Page 344 of 435
Check the f luid level with the engine
at normal operating temperature.Park the vehicle on level ground.
Start the engine, let it run until the
radiator f an comes on, then shut
of f the engine. For accurate
results, wait about 60 seconds (but
no longer than 90 seconds) bef ore
doing step 2. Insert the dipstick all the way into
the transmission securely as
shown in the illustration.
Remove the dipstick (yellow loop)
f rom the transmission, and wipe it
with a clean cloth.
Remove the dipstick and check
the f luid level. It should be
between the upper and lower
marks.
1. 2.
3.
4.
Automatic Transmission
T ransmission Fluid
340
UPPER
MARK
LOWER
MARK
DIPSTICK
Maint enance
2012 Crosstour
Page 345 of 435

If the level is below the lower
mark, add f luid into the dipstick
hole to bring it to the level
between the upper and lower
marks.
Pour the f luid slowly and caref ully
so you do not spill any. Clean up
any spill immediately; it could
damage components in the engine
compartment.Insert the dipstick all the way back
into the transmission securely as
shown in the illustration.
The transmission should be drained
and ref illed with new f luid according
to the Maintenance Minder (see
page ).
If you are not sure how to add f luid,
contact your dealer.
Always use Honda ATF DW-1
(automatic transmission f luid).
5.
6.
331
T ransmission Fluid
341
TM
Use only Honda ATF DW-1 (automatic
transmission f luid). Do not mix with
other transmission f luids.
Using transmission f luid other than
Honda ATF DW-1 may cause
deterioration in transmission operation
and durability, and could result in
damage to the transmission.
Damage resulting f rom the use of
transmission f luid other than Honda
ATF DW-1 is not covered by the Honda
new vehicle warranty.
Maint enance
2012 Crosstour
Page 350 of 435

To change the passenger’s side
bulb, start the engine, turn the
steering wheel all the way to the
lef t, and turn of f the engine. To
change the driver’s side bulb, turn
the steering wheel to the right.
Use a f lat-tip screwdriver to
remove the holding clip f rom the
inner f ender, and remove the
screw with a Phillips-head
screwdriver.Pull the inner f ender cover away
f rom the f ender and bumper.
Remove the electrical connector
f rom the bulb by pushing on the
tab to unlock it, then slide the
connector of f the bulb.
Remove the bulb by turning it
approximately one-quarter turn
counterclockwise.Install the new bulb, and turn it
one-quarter turn clockwise to lock
it in place.
Push the electrical connector onto
the bulb.
Turn on the headlights to test the
new bulb.
Put the inner f ender cover in place.
Install the holding clip. Lock it in
placebypushingonthecenter.
Tighten the screw securely.
3.
4.
5.
1.
2. 6.
7.
8.
9.
L ow Beam Headlight
Lights
346
BULB
TAB
SCREW HOLDING CLIP
ELECTRICAL CONNECTOR
Maint enance
2012 Crosstour
Page 352 of 435
Install the new bulb and turn it
clockwise to lock it in place.
Turn on the lights to make sure
the new bulb is working. Insert the socket back into the
headlight assembly. Turn it
clockwise to lock it in place.
Reinstall the coolant reserve tank.Use a f lat-tip screwdriver to
remove the holding clip f rom the
inner f ender, and remove the
screw with a Phillips-head
screwdriver.
To change the bulb on the
driver’s side, start the engine,
turn the steering wheel all the
way to the right, then turn off the
engine. To change the bulb
on the passenger’s side, turn the
steering wheel to the left.
Reinstall the splash separator and
duct securely. Reinstall the
f astener and secure it by pushing
on the head until it locks.
6.
1.
7. 5. 4.
2.
Passenger’s side
Driver’s Side
Replacing a Front
Side Marker Light Bulb
Lights
348
SCREW HOLDING CLIP
Maint enance
2012 Crosstour
Page 353 of 435
CONT INUED
Open the tailgate. Place a cloth on
the edge of the cover to prevent
scratches. Remove the covers by
caref ully prying on the edge with a
small f lat-tip screwdriver.
Insert the socket back into the
headlight assembly. Turn it
clockwise to lock it in place.
Turn on the lights to make sure
the new bulb is working.
Put the inner f ender cover in place.
Install the holding clip. Lock it in
placebypushingonthecenter.
Tighten the screw securely.
Remove the socket from the
headlight assembly by turning it
one-quarter turn counterclockwise.
Pull the burned out bulb straight
out of its socket.
Push the new bulb straight into
the socket until it bottoms. 5.
6.
7.
1.
3.
4. Replacing Rear Bulbs
Lights
349
SOCKET
COVER
BULB
Maint enance
2012 Crosstour
Page 354 of 435
Turn on the lights to make sure
the new bulb is working.
Align the clips on the taillight
assembly with the holes in the
body, then push the taillight
assembly into place. Tighten the
two mounting screws securely and
reinstall the covers.
Use a Phillips-head screwdriver to
remove the taillight assembly
mounting screw under each cover.
Pull the taillight assembly out of
thebodybyslidingitoutside.
Determine which of the three
bulbs is burned out: stop/taillight,
back-up light or turn signal light. Remove the socket by turning it
one-quarter turn counterclockwise.
Pull the bulb straight out of its
socket. Push the new bulb straight
into the socket until it bottoms.
Insert the socket back into the
light assembly. Turn it clockwise
to lock it in place.8.
9.
2.
3.
4. 5.
6.
7.
Lights
350
BULB
SCREW
SOCKET
TAILLIGHT ASSEMBLY
Maint enance
2012 Crosstour
Page 356 of 435

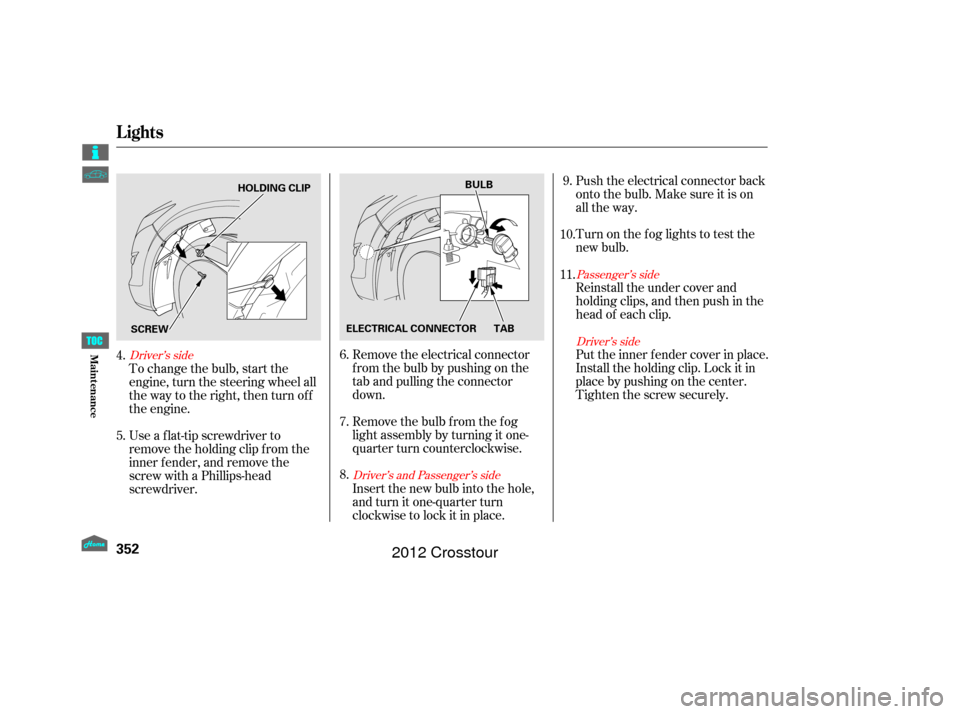
To change the bulb, start the
engine, turn the steering wheel all
the way to the right, then turn off
the engine.Remove the electrical connector
f rom the bulb by pushing on the
tab and pulling the connector
down.
Remove the bulb f rom the f og
light assembly by turning it one-
quarter turn counterclockwise.
Use a f lat-tip screwdriver to
remove the holding clip f rom the
inner f ender, and remove the
screw with a Phillips-head
screwdriver. Push the electrical connector back
onto the bulb. Make sure it is on
all the way.
Turn on the f og lights to test the
new bulb.
Put the inner f ender cover in place.
Install the holding clip. Lock it in
placebypushingonthecenter.
Tighten the screw securely.
Insert the new bulb into the hole,
and turn it one-quarter turn
clockwise to lock it in place. Reinstall the under cover and
holdingclips,andthenpushinthe
head of each clip.
6.
7.
8.
4.
5. 9.
11. 10.
Passenger’s side Driver’s side
Driver’s side
Driver’s and Passenger’s side
Lights
352
ELECTRICAL CONNECTOR TAB
SCREW BULB
HOLDING CLIP
Maint enance
2012 Crosstour