Page 314 of 435

It only helps with the
steering control during braking.
such as trying to take a
corner too f ast or making a sudden
lane change. Always drive at a safe
speed f or the road and weather
conditions.
Always steer moderately
when you are braking hard. Severe
or sharp steering wheel movement
can still cause your vehicle to veer
into oncoming traffic or off the road. on loose or
uneven surf aces, such as gravel or
snow, than a vehicle without anti-
lock.
Test your brakes as instructed on
page . If the brakes f eel normal,
drive slowly and have your vehicle
repaired by your dealer as soon as
possible. Avoid sudden hard braking
which could cause the rear wheels to
lock up and possibly lead to a loss of
control. If the ABS indicator and the brake
system indicator come on together,
and the parking brake is f ully
released, the EBD system may also
be shut down.
388 A BS does not reduce the time or
distance it takes to stop the
vehicle.
A BS will not prevent a skid that
results f rom changing direction
abruptly,
A BS cannot prevent a loss of
stability. A vehicle with A BS may require a
longer distance to stop
Import ant Saf et y Reminders
Anti-lock Brakes (ABS)
310
Driving
2012 Crosstour
Page 316 of 435

Driving with varying tire or wheel
sizes may cause the VSA to
malf unction. When replacing tires,
make sure they are of the same size
and type as your original tires (see
page ).
VSA is turned on every time you
start the engine, even if
you turned it off the last time
you drove the vehicle.
If you install winter tires, make
sure they are the same size
as those that were originally
supplied with your vehicle.
Exercise the same caution
during winter driving as you
would if your vehicle was not
equipped with VSA.
In certain unusual conditions when
your vehicle gets stuck in shallow
mud or f resh snow, it may be easier
to free it with the VSA temporarily
switched of f . When the VSA system
is of f , the traction control system is
alsooff.Youshouldonlyattemptto
f ree your vehicle with the VSA of f if
you are not able to f ree it when the
VSA is on.
Immediately af ter f reeing your
vehicle, be sure to switch the VSA on
again. We do not recommend driving
your vehicle with the VSA and
traction control systems switched off.
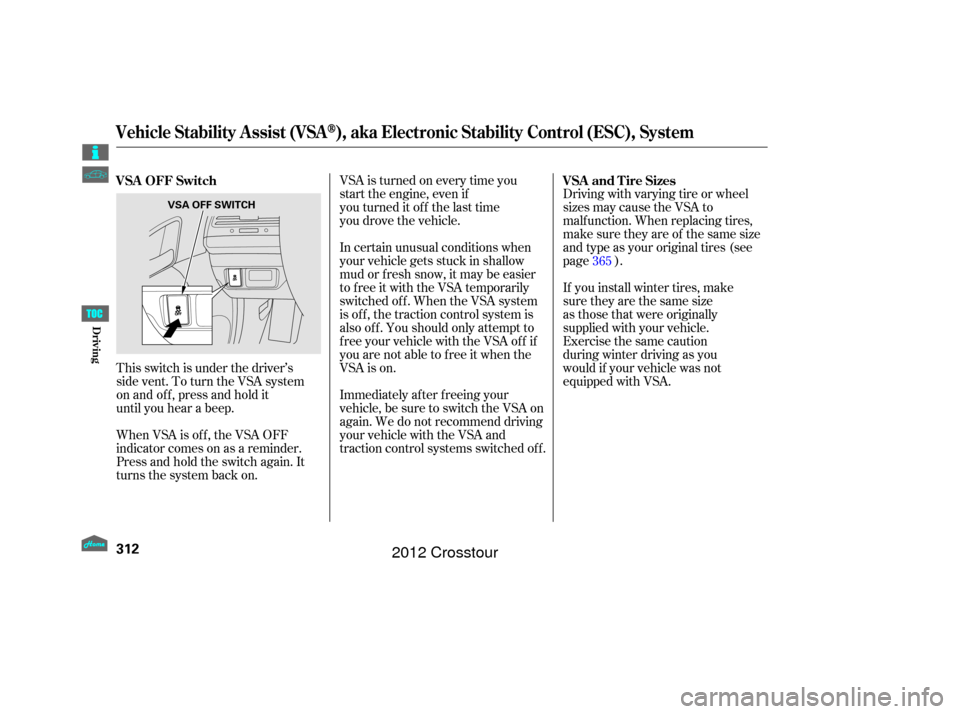
This switch is under the driver’s
side vent. To turn the VSA system
on and off, press and hold it
until you hear a beep.
When VSA is off, the VSA OFF
indicator comes on as a reminder.
Press and hold the switch again. It
turns the system back on. 365
VSA and Tire Sizes
VSA OFF Switch
Vehicle Stability A ssist (VSA), aka Electronic Stability Control (ESC), System
312
VSA OFF SWITCH
Driving
2012 Crosstour
Page 319 of 435

As required by the FCC:This device complies with Part 15 of theFCC rules. Operation is subject to thef ollowing two conditions: (1) This devicemay not cause harmf ul interf erence, and(2) this device must accept anyinterf erence received, includinginterf erence that may cause undesiredoperation.
Changes or modif ications not expresslyapproved by the party responsible f orcompliance could void the user’sauthority to operate the equipment.
This device complies with IndustryCanada Standard RSS-210.Operation is subject to the f ollowing twoconditions: (1) this device may not causeinterf erence, and (2) this device mustaccept any interf erence that may causeundesired operation of the device.
If you have a f lat tire, the low tire
pressure indicator will come on.
Replace the flat tire with the
compact spare tire (see page ). The low tire pressure indicator or
the TPMS indicator will go off, after
several miles (kilometers) driving,
when you replace the spare tire with
the specif ied regular tire equipped
with the tire pressure monitor sensor.
Never use a puncture-repairing agent
in a f lat tire. If used, you will have to
replace the tire pressure sensor.
Havetheflattirerepairedbyyour
dealer as soon as possible.
After you replace the flat tire with
thecompactsparetire,thelowtire
pressure indicator stays on. This is
normal; the system is not monitoring
the spare tire pressure. Manually
check the spare tire pressure to be
sure it is correct. Af ter several miles
(kilometers) driving with the
compact spare tire, the TPMS
indicator comes on and the low tire
pressure indicator goes of f . Each wheel (except the compact
sparetirewheel)isequippedwitha
tire pressure sensor. You must use
TPMS specif ic wheels. It is
recommended that you always have
your tires serviced by your dealer or
qualif ied technician. 372
Changing a T ire with T PMS
Tire Pressure Monitoring System (TPMS)
315
Driving
2012 Crosstour
Page 326 of 435
Always drive slowly and have
someone guide you when backing up.
Grip the of the steering wheel,
then turn the wheel to the left to get
the trailer to move to the lef t. Turn
the wheel to the right to move the
trailer to the right.
Follow all normal precautions
when parking, including firmly
setting the parking brake
and putting the transmission in
Park. Also, place wheel chocks at
each of the trailer’s tires.Your vehicle is not designed to be
towed behind a motor home. If your
vehicle needs to be towed in an
emergency, see page .
397
bottom
Towing a Trailer
Backing Up
ParkingTowing Your Vehicle
322
Driving
2012 Crosstour
Page 347 of 435

�µ�µ
Always use Honda Power Steering
Fluid. You may use another power
steering f luid as an emergency
replacement, but have the power
steering system f lushed and ref illed
with Honda PSF as soon as possible.
A low power steering f luid level can
indicate a leak in the system. Check
the f luid level f requently, and have
the system inspected as soon as
possible.
Pour the f luid slowly and caref ully
so you do not spill any. Clean up
any spills immediately; it could
damage components in the engine
compartment. Check the level on the side of the
reservoir when the engine is cold.
The f luid should be between the
UPPER LEVEL and LOWER LEVEL.
If not, add power steering f luid to the
UPPER LEVEL. The timing belt should be replaced
according to the Maintenance
Minder (see page ).
Replace the timing belt every 60,000
miles (100,000 km) if you regularly
drive your vehicle in any of the
f ollowing conditions:
In very high temperatures
(over 110°F, 43°C).
In very low temperatures
(under 20°F, 29°C).
Frequently towing a trailer. 331
Timing Belt
Power Steering Fluid
Power Steering Fluid, Timing Belt
343
UPPER LEVEL
LOWER LEVELTM
Turning the steering wheel to f ull lef t
or right lock and holding it there can
damage the power steering pump.
Maint enance
2012 Crosstour
Page 350 of 435

To change the passenger’s side
bulb, start the engine, turn the
steering wheel all the way to the
lef t, and turn of f the engine. To
change the driver’s side bulb, turn
the steering wheel to the right.
Use a f lat-tip screwdriver to
remove the holding clip f rom the
inner f ender, and remove the
screw with a Phillips-head
screwdriver.Pull the inner f ender cover away
f rom the f ender and bumper.
Remove the electrical connector
f rom the bulb by pushing on the
tab to unlock it, then slide the
connector of f the bulb.
Remove the bulb by turning it
approximately one-quarter turn
counterclockwise.Install the new bulb, and turn it
one-quarter turn clockwise to lock
it in place.
Push the electrical connector onto
the bulb.
Turn on the headlights to test the
new bulb.
Put the inner f ender cover in place.
Install the holding clip. Lock it in
placebypushingonthecenter.
Tighten the screw securely.
3.
4.
5.
1.
2. 6.
7.
8.
9.
L ow Beam Headlight
Lights
346
BULB
TAB
SCREW HOLDING CLIP
ELECTRICAL CONNECTOR
Maint enance
2012 Crosstour
Page 352 of 435
Install the new bulb and turn it
clockwise to lock it in place.
Turn on the lights to make sure
the new bulb is working. Insert the socket back into the
headlight assembly. Turn it
clockwise to lock it in place.
Reinstall the coolant reserve tank.Use a f lat-tip screwdriver to
remove the holding clip f rom the
inner f ender, and remove the
screw with a Phillips-head
screwdriver.
To change the bulb on the
driver’s side, start the engine,
turn the steering wheel all the
way to the right, then turn off the
engine. To change the bulb
on the passenger’s side, turn the
steering wheel to the left.
Reinstall the splash separator and
duct securely. Reinstall the
f astener and secure it by pushing
on the head until it locks.
6.
1.
7. 5. 4.
2.
Passenger’s side
Driver’s Side
Replacing a Front
Side Marker Light Bulb
Lights
348
SCREW HOLDING CLIP
Maint enance
2012 Crosstour
Page 356 of 435

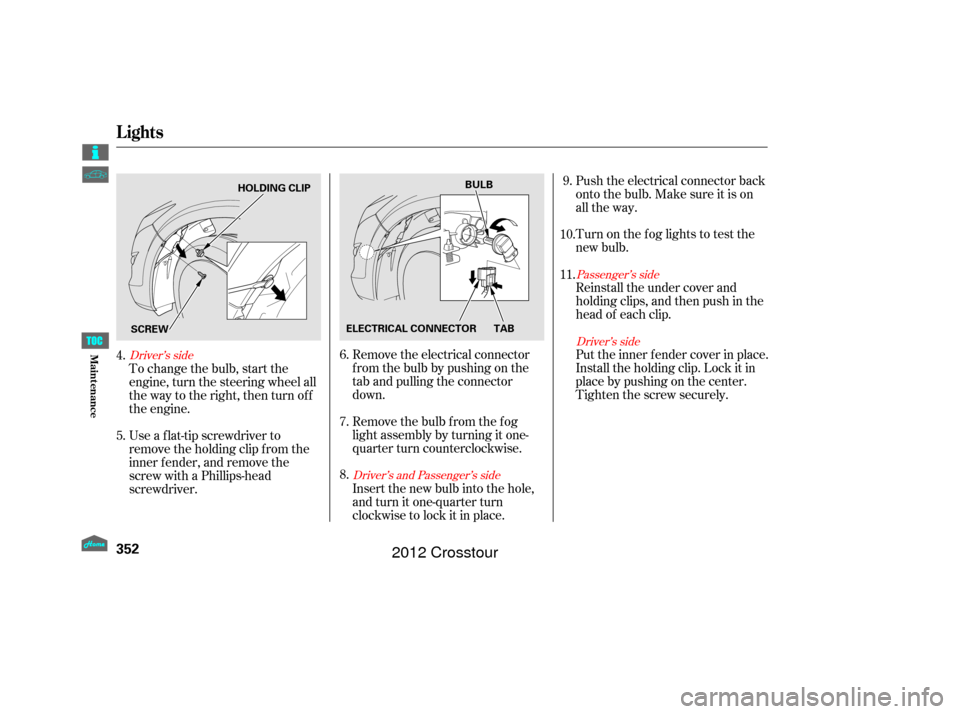
To change the bulb, start the
engine, turn the steering wheel all
the way to the right, then turn off
the engine.Remove the electrical connector
f rom the bulb by pushing on the
tab and pulling the connector
down.
Remove the bulb f rom the f og
light assembly by turning it one-
quarter turn counterclockwise.
Use a f lat-tip screwdriver to
remove the holding clip f rom the
inner f ender, and remove the
screw with a Phillips-head
screwdriver. Push the electrical connector back
onto the bulb. Make sure it is on
all the way.
Turn on the f og lights to test the
new bulb.
Put the inner f ender cover in place.
Install the holding clip. Lock it in
placebypushingonthecenter.
Tighten the screw securely.
Insert the new bulb into the hole,
and turn it one-quarter turn
clockwise to lock it in place. Reinstall the under cover and
holdingclips,andthenpushinthe
head of each clip.
6.
7.
8.
4.
5. 9.
11. 10.
Passenger’s side Driver’s side
Driver’s side
Driver’s and Passenger’s side
Lights
352
ELECTRICAL CONNECTOR TAB
SCREW BULB
HOLDING CLIP
Maint enance
2012 Crosstour