Page 156 of 361
155
uuAudio System Basic OperationuPlaying the AM/FM Radio
Continued
Features
Playing the AM/FM Radio
FM Button / Buttons
Press to display and select an
RDS category.
SCAN Button
Press to sample each of the
strongest stations on the
selected band for 10 seconds.
To turn off scan, press the
button again. (Power) Button
Press to turn the audio
system on and off.Preset Buttons (1-6)
To store a station:
1. Tune to the selected station.
2. Pick a preset button and hold it until you hear a beep.
To listen to a stored station, select a
band, then press the preset button.
SEEK/SKIP Buttons
Press to search up and down
the selected band for a
station with a strong signal. SETUP Button
Press to display menu items.
Selector Knob
Turn to adjust the volume.
Press and turn to tune the radio
frequency.
AM Button
Press to select a band.
FM/AM Button
*
Press to select a band.
* Not available on all models
Page 159 of 361
158
uuAudio System Basic OperationuPlaying the XM® Radio *
Features
Playing the XM
® Radio *
/ Buttons
Press to skip to the next
category, and to skip to
the previous category.
(XM ®) Button
Press to select XM ® Radio.
(Power) Button
Press to turn the audio system on and off.
SEEK/SKIP Buttons
Press or to previous or
next channel.SETUP Button
Press to display menu items.
Selector Knob
Turn to adjust the volume.
Press and turn to select channels.
Preset Buttons (1-6)
To store a channel:
1. Tune to the selected channel.
2. Pick a preset button and hold it
until you hear a beep.
To listen to a stored channel, select
XM, then press the preset button.
SCAN Button
Press to sample all channels (in the
channel mode), or channels within a
category (in the category mode).
Each sampling continues for a few
seconds. Press SCAN again to cancel
scanning and continue listening to the channel.
* Not available on all models
Page 162 of 361
Continued161
uuAudio System Basic OperationuPlaying a CD
Features
1.Press to switch the display to a folder list.
2. Rotate to select a folder.
3. Press to change the display to a list of
files in that folder.
4. Rotate to select a file, then press .
■How to Select a File from a Folder with the Selector Knob (MP3/WMA)1Playing a CD
NOTICEDo not use CDs with adhesive labels. The label can
cause the CD to jam in the unit.
WMA files protected by digital rights management
(DRM) cannot be played.
The audio system displays Unsupported, then skips
to the next file.
Text data appears on the display under the following
circumstances: • When you select a new folder, file, or track.
• When you change the audio mode to CD.
• When you insert a CD.
If you eject the CD but do not remove it from the slot,
the system reloads the CD automatically after several
seconds.
Folder Selection Track Selection
Page 173 of 361

uuAudio System Basic OperationuPlaying Bluetooth ® Audio
172
Features
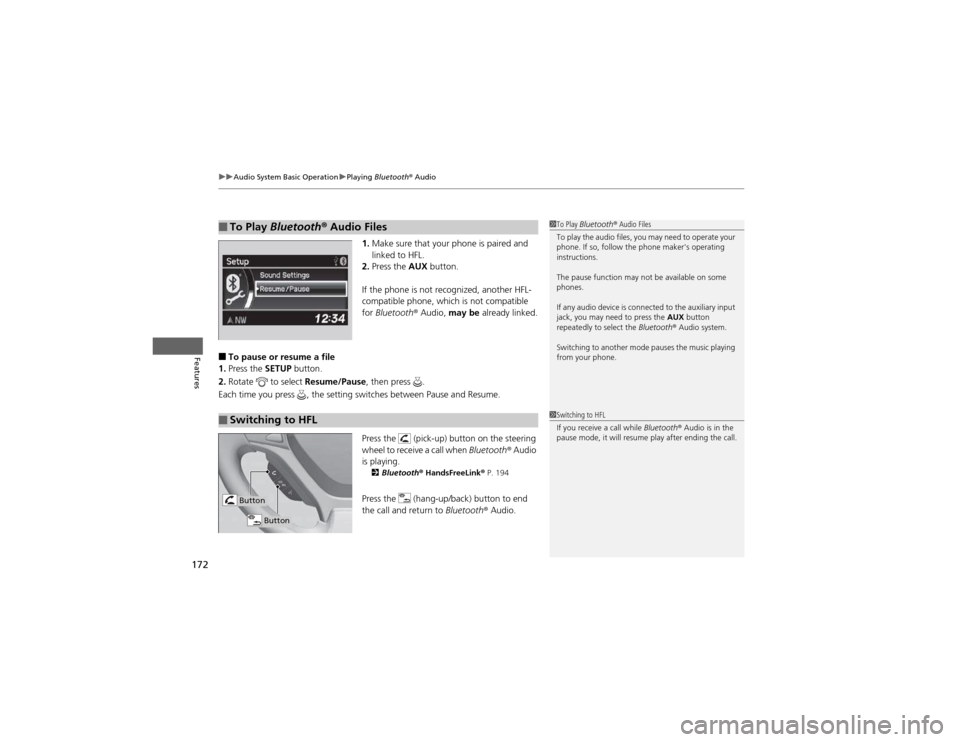
1. Make sure that your phone is paired and
linked to HFL.
2. Press the AUX button.
If the phone is not recognized, another HFL-
compatible phone, which is not compatible for Bluetooth ® Audio, may be already linked.
■ To pause or resume a file
1. Press the SETUP button.
2. Rotate to select Resume/Pause, then press .
Each time you press , the setting switches between Pause and Resume.
Press the (pick-up) button on the steering
wheel to receive a call when Bluetooth® Audio
is playing. 2 Bluetooth ® HandsFreeLink ® P. 194
Press the (hang-up/back) button to end
the call and return to Bluetooth® Audio.
■To Play Bluetooth ® Audio Files1To Play Bluetooth ® Audio Files
To play the audio files, you may need to operate your
phone. If so, follow the phone maker's operating instructions.
The pause function may not be available on some
phones.
If any audio device is connected to the auxiliary input
jack, you may need to press the AUX button
repeatedly to select the Bluetooth® Audio system.
Switching to another mode pauses the music playing
from your phone.
■Switching to HFL1Switching to HFL
If you receive a call while Bluetooth® Audio is in the
pause mode, it will resume play after ending the call.
Button
Button
Page 181 of 361
uuRear Entertainment System*uOperating the System
180
Features
■ SETUP button on the remote
Press the SETUP button while the DVD is
playing to see the available options. Use the
and buttons to highlight the option and
then press ENT.
Disp Adjust:
You can adjust the overhead screen’s Brightness, Contrast , Black Level , Color ,
and Tint. To return to the default display setting, select Reset.
After you make all the adjustments, the screen goes back to the top SETUP screen,
or press the CANCEL button to return.
Aspect Ratio:
You can select the screen mode with a different aspect ratio from Normal, Wide ,
Zoom , and Full. After you select the mode, it takes about one second to return to
the play mode with the selected ratio.
Language:
You can select the display language from English, French , and Spanish .1SETUP button on the remote
Some DVD formats do not allow for some of the
setting adjustments.
Page 194 of 361
193
uuGeneral Information on the Audio SystemuCompatible iPod® and USB Flash Drives
Features
Compatible iPod ® and USB Flash Drives
• Use a recommended USB flash drive of 256 MB or higher.
• Some digital audio players may not be compatible.
• Some USB flash drives (e.g., a device with security lockout) may not work.
• Some software files may not allow for audio play or text data display.
• Some versions of MP3, WMA, or AAC formats may be unsupported.
■iPod ® Model Compatibility
ModeliPod classic ® 80GB/160GBiPod classic ® 120GBiPod classic ® 160GB (launch in 2009)iPod ® (5th generation)iPod nano ®iPod touch ®iPhone ® 3GSiPhone ® 4
■USB Flash Drives
1iPod ® Model Compatibility
This system may not work with all software versions
of these devices.
1USB Flash Drives
Files on the USB flash drive are played in their stored
order. This order may be different from the order
displayed on your PC or device.
Page 226 of 361

225
Driving
This chapter discusses driving, refueling, and information on items such as accessories.
Before Driving Driving Preparation .......................... 226
Maximum Load Limit........................ 229
Towing a Trailer Towing Preparation .......................... 231
Driving Safely with a Trailer .............. 234
Towing Your Vehicle ........................ 235
Off-Highway Driving Guidelines General Information ......................... 237
Important Safety Precautions............ 237
Avoiding Trouble ............................. 238
When Driving Starting the Engine .......................... 239
Precautions While Driving................. 241 Automatic Transmission ................... 242
Shifting ............................................ 243
Cruise Control ................................. 245
VSA® (Vehicle Stability Assist), aka ESC
(Electronic Stability Control), System ...... 248
REAL TIME AWD with Intelligent Control System™ *
......................................... 250
TPMS (Tire Pressure Monitoring System) ... 250Tire Pressure Monitoring System (TPMS) -
Required Federal Explanation ......... 251
Braking Brake System ................................... 253
ABS (Anti-lock Brake System) ........... 255 Brake Assist System ......................... 256
Parking Your Vehicle When Stopped ................................ 257
Parking ............................................ 257
Multi-View Rear Camera .................. 258
Refueling
Fuel Information .............................. 259
How to Refuel ................................. 260
Fuel Economy .................................... 262
Improving Fuel Economy .................. 262
Accessories and Modifications Accessories ...................................... 263
Modifications................................... 263
* Not available on all models
Page 236 of 361

235
uuTowing a TraileruTowing Your Vehicle
Continued
Driving
Towing Your Vehicle
Your vehicle can be towed behind a motorhome.
Perform the following procedure before towing your vehicle. 1.Check the transmission fluid level.
uMake sure the fluid level is between the upper and lower marks.
2. Start the engine.
3. Depress the brake pedal. Move the shift lever through all its positions.
4. Shift to
(D and hold for five seconds, then to (N. Let the engine run for three
minutes, then turn it off.
5. Release the parking brake.
6. Leave the ignition switch in ACCESSORY
(q .uMake sure the steering wheel does not lock.
7. Turn off all the electric devices. Do not use any accessory power sockets.
uThis can prevent the battery from running down.
■When Your Vehicle is Towed Behind a Motorhome
1Towing Your Vehicle
NOTICEFailure to follow the recommended instructions
exactly will result in severe automatic transmission
damage. If you cannot shift the transmission or start
the engine, your vehicle must be transported on a
flat-bed truck or trailer.
Do not exceed 65 mph (100 km/h).
To avoid damage to the AWD system, your vehicle
must be towed with all four wheels on the ground.
Consult your towing parts sales or rental agency if
any other items are recommended or required for
your towing situation.
If you tow your vehicle behind a motorhome, the
transmission fluid must be changed every 2 years or
30,000 miles (48,000 km), whichever comes first.
AWD models
1When Your Vehicle is Towed Behind a Motorhome
NOTICESevere transmission damage will occur if the vehicle is
shifted from (R to (N and then towed with the drive
wheels on the ground.