Page 3 of 345
2
Quick Reference Guide
Quick Reference Guide
Visual Index
❙System Indicators (P 66)
❙Gauges (P 78)
❙Information Display *
(P 80)
❙Navigation System *
() See Navigation System Manual
❙Audio System *
(P 144)
❙Hazard Warning Button
❙Heating and Cooling *
System
(P 140)
❙Rear Window Defogger (P 123)
❙Seat Heater Switches *
(P 139)
❙Ignition Switch (P 117)
❙Steering Wheel Adjustments
(P 124)
❙ (Vehicle Stability Assist (VSA ®
)
System OFF) Button *
(P 223)
❙ECON Button *
(P 123)
❙Multi-Information Display *
(P 82)
❙Heated Mirror Button *
(P 123)
❙ (Vehicle Stability Assist (VSA ®
)
System OFF) Button *
(P 223)
Page 7 of 345
Visual Index
6Quick Reference Guide
❙Maintenance Under the Hood (P 251)
❙Windshield Wipers (P 121, 278)
❙Tires (P 280, 299)
❙Fog Lights *
(P 120, 272)
❙Door Lock/Unlock Control (P 101)
❙Power Door Mirrors*
(P 125)
❙Headlights (P 118, 268)
❙Front Turn Signal/Parking/Side Marker Lights (P 118, 273)
❙How to Refuel (P 235)
❙High-Mount Brake Light *
(P 277)
❙Emergency Trunk Release Lever
(P 111)
❙Opening/Closing the Trunk (P 109)
❙Back-Up Lights (P 275)
❙Brake/Taillights (P 275)
❙Rear Turn Signal Lights (P 275)
❙Rear Side Marker Lights (P 275)
Page 13 of 345

12
Quick Reference Guide
Heating and Cooling*
System (P 140)
● Rotate the fan control dial to adjust the fan speed and airflow.
● Press the Mode buttons ( / / / ) to select the vents air flows from.
● Rotate the temperature control dial to adjust the temperature.
● Use the button for maximum cool setting.
● Rotate the fan control dial to OFF to turn the system off.
● Press the button to defrost the windshield.
Fan Control Dial
(Rear Window Defogger/ Heated Mirror *
) Button
(Windshield
Defroster) Button
A/C (Air Conditioning) Button *
Air flows from floor and
windshield defroster vents.
Air flows from floor vents.
Air flows from floor and
dashboard vents.
Air flows from dashboard
vents.
Button
Button
Button
*
(Recirculation) Button
Temperature
Control Dial Button
Button
Clock
(P 98)
a Press the CLOCK knob to access the
clock adjustment mode screen.
b Turn the CLOCK knob to adjust the
hours.
c Press the CLOCK knob. The display
switches to minute adjustment.
d Turn the CLOCK knob to adjust the
minutes.
e Press the CLOCK knob to complete clock adjustment.
The navigation system receives signals from
GPS satellites, updating the clock
automatically.
Models without navigation system
Models with navigation system
Page 68 of 345

67
uuIndicatorsu
Continued
Instrument Panel
IndicatorNameOn/BlinkingExplanationMessage*
Malfunction
Indicator Lamp
●
Comes on when you turn the
ignition switch to ON
(w , and goes
off either when the engine starts or
after several seconds if the engine
is not started. If "readiness codes"
have not been set, it blinks five
times before it goes off.
● Comes on if there is a problem
with the emissions control system.
● Blinks when a misfire in the
engine's cylinders is detected.
● Readiness codes are part of the on board
diagnostics for the emissions control
systems.
2Testing of Readiness Codes P. 331
● Comes on while driving - Have the
vehicle checked by a dealer.
● Blinks while driving - Stop in a safe
place where there are no flammable
objects. Stop the engine for 10 minutes
or more, and wait for it to cool down.
Then, take the vehicle to a dealer. 2If the Malfunction Indicator Lamp
Comes On or Blinks P. 314
Charging System
Indicator
●
Comes on when you turn the
ignition switch to ON
(w , and goes
off when the engine starts.
● Comes on when the battery is not charging.
● Comes on while driving - Turn off the
heating and cooling *
system and rear
defogger in order to reduce electricity
consumption. 2If the Charging System Indicator
Comes On P. 313
Shift Position
Indicator*●
Indicates in which position your shift lever is.2 Shifting P. 215—
Indicator
* Not available on all models
Page 98 of 345

97
Controls
This chapter explains how to operate the various controls necessary for driving.
Setting the Clock ................................ 98
Locking and Unlocking the Doors
Key Types and Functions ... ................. 99
Locking/Unlocking the Doors from the Outside .......................................... 101
Locking/Unlocking the Doors from the
Inside ............................................. 103
Childproof Door Locks ..................... 104
Auto Door Locking/Unlocking *
........ 105
Opening and Closing the Trunk ....... 109
Security System ................................ 112
Immobilizer System .......................... 112
Security System Alarm *
.................... 112
Opening and Closing the Windows ..... 114Opening and Closing the Moonroof*...... 116Operating the Switches Around the
Steering WheelIgnition Switch ................................. 117
Turn Signals ..................................... 118
Light Switches.................................. 118Fog Lights *
...................................... 120
Daytime Running Lights ................... 120
Wipers and Washers ........................ 121
Brightness Control ........................... 122 Rear Defogger/Heated Door Mirror *
Button ........................................... 123
ECON Button *
................................. 123
Adjusting the Steering Wheel........... 124 Adjusting the Mirrors
....................... 125
Interior Rearview Mirror ................... 125
Power Door Mirrors *
....................... 125
Adjusting the Seats .......................... 126
Adjusting the Seat Positions ............. 126
Interior Lights/Interior Convenience Items ................................................ 134
Interior Lights .................................. 134
Interior Convenience Items .............. 135
Heating and Cooling *
....................... 140
Using Vents, Heating and A/C *
........ 140
* Not available on all models
Page 124 of 345

123
uuOperating the Switches Around the Steering WheeluRear Defogger/Heated Door Mirror*
Button
Controls
Rear Defogger/Heated Door Mirror *
Button
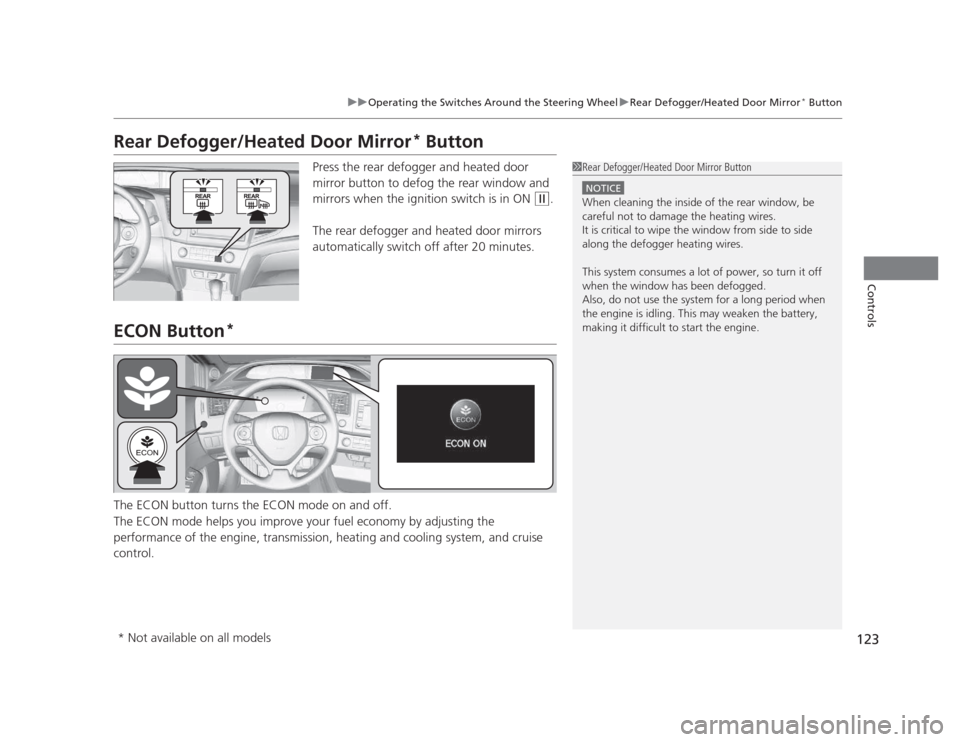
Press the rear defogger and heated door
mirror button to defog the rear window and
mirrors when the ignition switch is in ON
(w .
The rear defogger and heated door mirrors
automatically switch off after 20 minutes.
ECON Button *
The ECON button turns the ECON mode on and off.
The ECON mode helps you improve your fuel economy by adjusting the
performance of the engine, transmission, heating and cooling system, and cruise control.
1Rear Defogger/Heated Door Mirror Button
NOTICE
When cleaning the inside of the rear window, be careful not to damage the heating wires.
It is critical to wipe the window from side to side
along the defogger heating wires.
This system consumes a lot of power, so turn it off
when the window has been defogged.
Also, do not use the system for a long period when
the engine is idling. This may weaken the battery,
making it difficult to start the engine.
* Not available on all models
Page 212 of 345

211
Continued
Driving
When Driving
Starting the Engine
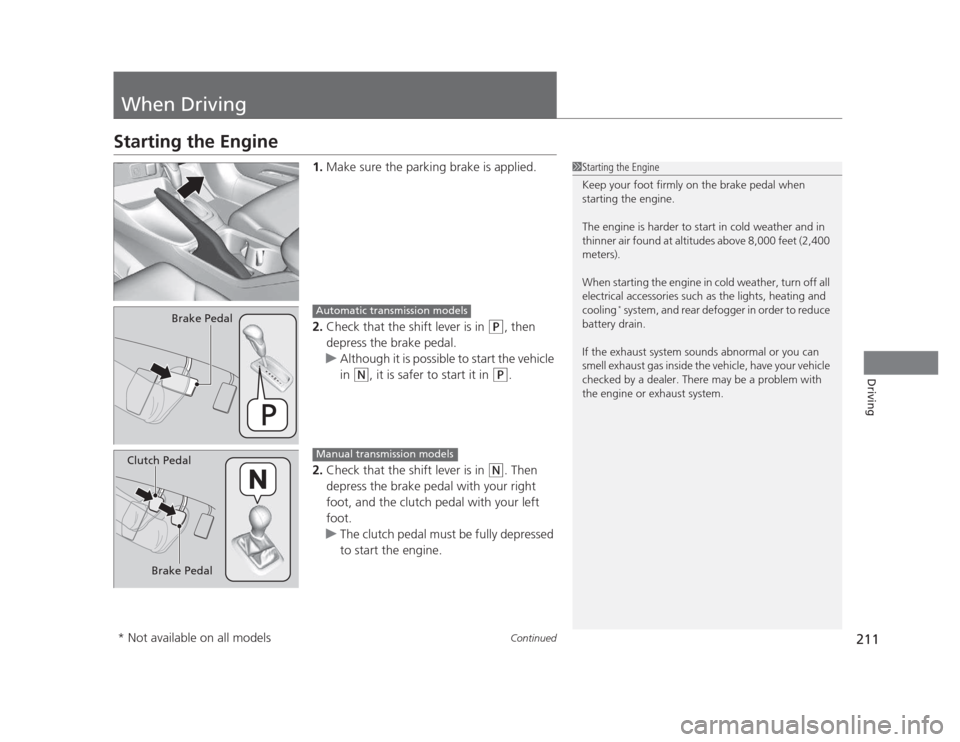
1.Make sure the parking brake is applied.
2. Check that the shift lever is in
(P , then
depress the brake pedal.
uAlthough it is possible to start the vehicle
in
(N , it is safer to start it in (P.
2. Check that the shift lever is in
(N . Then
depress the brake pedal with your right
foot, and the clutch pedal with your left foot.
uThe clutch pedal must be fully depressed
to start the engine.
1Starting the Engine
Keep your foot firmly on the brake pedal when
starting the engine.
The engine is harder to start in cold weather and in
thinner air found at altitudes above 8,000 feet (2,400 meters).
When starting the engine in cold weather, turn off all
electrical accessories such as the lights, heating and cooling *
system, and rear defogger in order to reduce
battery drain.
If the exhaust system sounds abnormal or you can
smell exhaust gas inside the vehicle, have your vehicle
checked by a dealer. There may be a problem with
the engine or exhaust system.
Brake PedalAutomatic transmission models
Brake Pedal
Clutch Pedal
Manual transmission models
* Not available on all models
Page 314 of 345

313
Handling the Unexpected
Indicator, Coming On/Blinking
If the Low Oil Pressure Indicator Comes On■Reasons for the indicator to come on
Comes on when the engine oil pressure is low. ■ What to do as soon as the indicator comes on
1. Immediately park the vehicle in a safe place.
2. If necessary, turn the hazard warning lights on.
■ What to do after parking the vehicle
1. Stop the engine and let it sit for about one minute.
2. Open the hood and check the oil level.
uAdd oil as necessary.
3. Start the engine and check the low oil pressure indicator.
uThe light goes out: Start driving again.
uThe light does not go out within 10 seconds: Stop the engine and
contact a dealer for repairs immediately.
If the Charging System Indicator Comes On
■Reasons for the indicator to come on
Comes on when the battery is not being charged. ■ What to do when the indicator comes on
Turn off the heating and cooling *
system, rear defogger, and other
electrical systems, and immediately contact a dealer for repairs.
1If the Low Oil Pressure Indicator Comes On
NOTICE
Running the engine with low oil pressure can cause
serious mechanical damage almost immediately.
1If the Charging System Indicator Comes On
If you need to stop temporarily, do not turn off the
engine. Restarting the engine may rapidly discharge the battery.
* Not available on all models