2012 HONDA CIVIC Ignition switch
[x] Cancel search: Ignition switchPage 251 of 345

uuMaintenance Minder™uTo Use Maintenance MinderTM
250
Maintenance
Reset the engine oil life display if you have performed the maintenance service. 1. Turn the ignition switch to ON
(w .
2. Go to the Maintenance info screen.
2 Displaying the Engine Oil Life and Maintenance Items P. 247
3. Press the SOURCE button.
uThe oil life reset mode is displayed on the multi-information display.
4. Select Yes with the button, then press the SOURCE button.
uThe displayed maintenance items disappear, and the engine oil life display returns to 100%.
uAny maintenance items that are necessary for your vehicle at the next
maintenance service will appear.
To cancel the oil life reset mode, select No, then press the SOURCE button.
■Resetting the Display1Resetting the Display
NOTICE
Failure to reset the engine oil life after a maintenance
service results in the system showing incorrect
maintenance intervals, which can lead to serious
mechanical problems.
The dealer will reset the engine oil life display after
completing the required maintenance service. If
someone other than a dealer performs maintenance
service, reset the engine oil life display yourself.
SOURCE
5
Engine oil
Air filters
2345Engine
Oil Life
SOURCE
Button Button
–
Maintenance Item Codes
–
Page 300 of 345

299
Continued
Handling the Unexpected
If a Tire Goes Flat
Changing a Flat Tire
If a tire goes flat while driving, grasp the steering wheel firmly, and brake gradually
to reduce speed. Then, stop in a safe place. Replace the flat tire with a compact
spare tire. Go to a dealer as soon as possible to have the full size tire repaired or
replaced. 1.
Park the vehicle on firm, level, and non-slippery ground.
2. Put the shift lever in
(P .
2. Put the shift lever in
(R .
3. Set the parking brake.
4. Turn on the hazard warning lights and turn the ignition switch to LOCK
(0.
1Changing a Flat Tire
Periodically check the tire pressure of the compact
spare. It should be set to the specified pressure.
Specified Pressure: 60 psi (420 kPa, 4.2 kgf/cm 2
)
When driving with the compact spare tire, keep the
vehicle speed under 50 mph (80 km/h). Replace with
a full size tire as soon as possible.
The compact spare tire and wheel in your vehicle are
specifically for this model.
Do not use them with another vehicle.
Do not use another type of compact spare tire or
wheel with your vehicle.
Do not mount tire chains on a compact spare tire.
If a chain-mounted front tire goes flat, remove one of
the full-size rear tires and replace it with the compact
spare tire. Remove the flat front tire and replace it
with the full size tire that was removed from the rear.
Mount the tire chains on the front tire.
Do not use a puncture-repairing agent on a flat tire,
as it can damage the tire pressure sensor.
U.S. models only
Automatic transmission models
Manual transmission models
All models
Page 307 of 345

306
Handling the Unexpected
Engine Does Not Start
Checking the Engine
If the engine does not start, turn the ignition switch to START
(e and check the
starter.
Starter conditionChecklist
Starter doesn’t turn or turns
over slowly.
The battery may be dead. Check
each of the items on the right and
respond accordingly.Check brightness of the interior light.
Turn on interior lights and check brightness. ● If the interior lights are dim or do not come on at all
2Battery P. 289
● If the interior lights come on normally 2 Fuses P. 318
The starter turns over normally
but the engine doesn’t start.
There may be a problem with the
fuse. Check each of the items on
the right and respond accordingly.Review the engine start procedure.
Follow its instructions, and try to start the engine again.
2 Starting the Engine P. 211
Check the immobilizer system indicator.
When the immobilizer system indicator is blinking, the engine cannot be started.
2Immobilizer System P. 112
Check the fuel level.
There should be enough fuel in the tank. 2 Fuel Gauge P. 78
Check the fuse.
Check all fuses, or have the vehicle checked by a dealer.
2Inspecting and Changing Fuses P. 320
If the problem continues:
2Emergency Towing P. 321
1Checking the Engine
If you must start the vehicle immediately, use an
assisting vehicle to jump start it.
2 Jump Starting P. 307
Page 311 of 345

310
Handling the Unexpected
Shift Lever Does Not Move
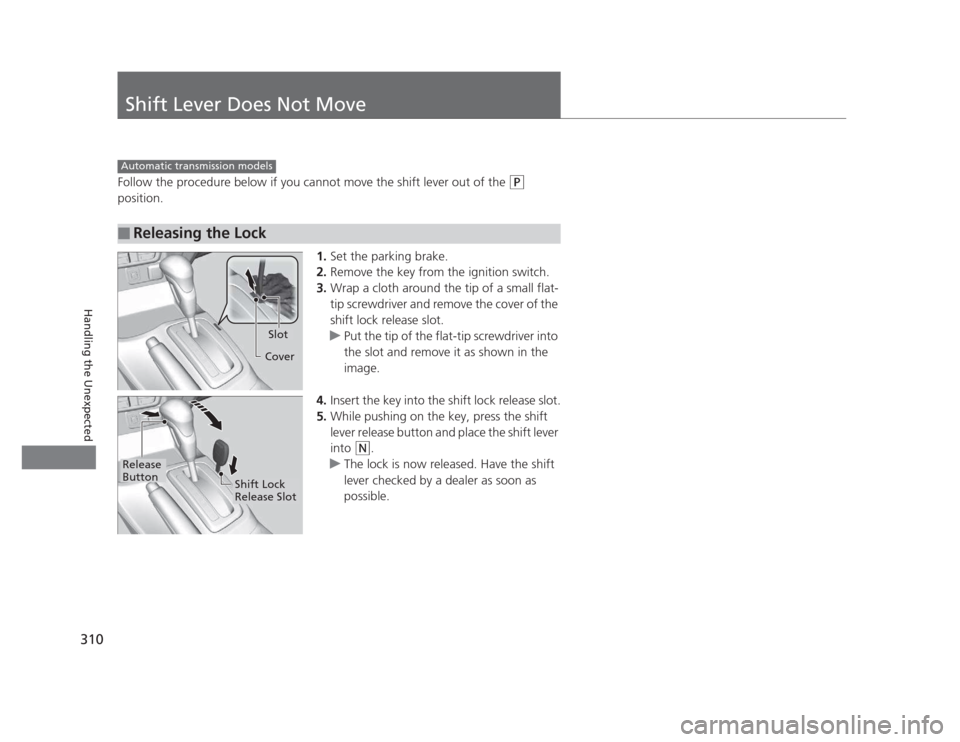
Follow the procedure below if you cannot move the shift lever out of the (P
position.
1.Set the parking brake.
2. Remove the key from the ignition switch.
3. Wrap a cloth around the tip of a small flat-
tip screwdriver and remove the cover of the
shift lock release slot.
uPut the tip of the flat-tip screwdriver into
the slot and remove it as shown in the image.
4. Insert the key into the shift lock release slot.
5. While pushing on the key, press the shift
lever release button and place the shift lever
into
(N .
uThe lock is now released. Have the shift
lever checked by a dealer as soon as
possible.
■Releasing the Lock
Automatic transmission models
Slot
Cover
Release
Button
Shift Lock
Release Slot
Page 319 of 345

318
Handling the Unexpected
Fuses
Fuse Locations
If any electrical devices are not working,
turn the ignition switch to LOCK
(0 and
check to see if any applicable fuse is blown.
Fuse locations are shown on the fuse box
cover. Locate the fuse in question by the
fuse number and box cover number.
Located near the brake fluid reservoir. Push
the tabs to open the box.
■Engine Compartment Fuse Box
■ Circuit protected and fuse rating
Circuit ProtectedAmps
1
EPS70 A
−−
ABS/VSA Motor30 A
ABS/VSA FSR30 A
−−
Main Fuse100 A
2
IG Main50 A
Fuse Box Main 60 A
Fuse Box Main 260 A
Headlight Main 30 A
−−
Rear Defogger 30 A −−
Blower 40 A −−
Sub Fan Motor 20 A
Main Fan Motor 20 A
3−−
4 Left Headlight Low Beam 10 A
5Starter DIAG, ST MG7.5 A
6 Right Headlight Low Beam 10 A
7−−
8− −
9−−
10 − −
11Oil Level7.5 A
12 Fog Lights *
(20 A)
13Driver’s Power Seat Sliding *(20 A)
14 Hazard 10 A
15FI Sub15 A
16 IG Coil 15 A
17Stop15 A
18 Horn 10 A
19Premium Amp *(20 A)
20 INJ (15 A)
21IGP15 A
22 DBW 15 A
23H/L LO20 A
24 Driver’s Power Seat
Reclining * (20 A)
25MG Clutch7.5 A
26 − −
27SMALL20 A
28 Interior Lights 7.5 A
29Backup10 A
Circuit ProtectedAmps
* Not available on all models
Page 321 of 345

320
uuFusesuInspecting and Changing Fuses
Handling the Unexpected
Inspecting and Changing Fuses1.Turn the ignition switch to LOCK
(0 . Turn
headlights and all accessories off.
2. Remove the fuse box cover.
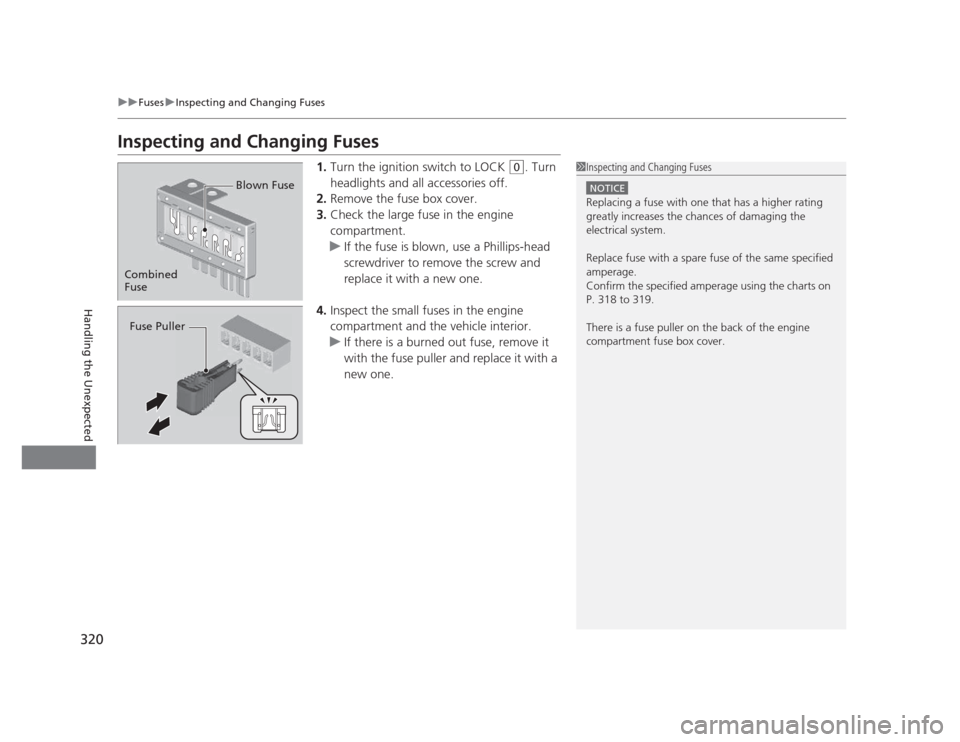
3. Check the large fuse in the engine compartment.
uIf the fuse is blown, use a Phillips-head
screwdriver to remove the screw and
replace it with a new one.
4. Inspect the small fuses in the engine
compartment and the vehicle interior.
uIf there is a burned out fuse, remove it
with the fuse puller and replace it with a
new one.
1Inspecting and Changing Fuses
NOTICE
Replacing a fuse with one that has a higher rating
greatly increases the chances of damaging the
electrical system.
Replace fuse with a spare fuse of the same specified
amperage.
Confirm the specified amperage using the charts on
P. 318 to 319.
There is a fuse puller on the back of the engine compartment fuse box cover.
Combined
Fuse Blown Fuse
Fuse Puller
Page 332 of 345

331
Continued
Information
Emissions Testing
Testing of Readiness Codes
Your vehicle uses "readiness codes," as part of its onboard self diagnostic system.
Some states refer to these codes during testing to see if your vehicle's emissions
components are working properly.
The codes may not be read if you go through the testing just after the battery has
gone dead or been disconnected.
To check if they are set, turn the ignition switch to ON
(w
, without starting the
engine. The malfunction indicator lamp will come on for several seconds. If it then
goes off, the readiness codes are set. If it blinks five times, the readiness codes are not set.
If you are required to have your vehicle tested before the readiness codes are ready,
prepare the vehicle for retesting by doing the following: 1. Fill the gas tank to approximately 3/4 full.
2. Park the vehicle and leave the engine off for 6 hours or more.
3. Make sure the ambient temperature is between 40°F and 95°F (4°C and 35°C).
4. Start the engine without touching the accelerator pedal, and let it idle for 20
seconds.
5. Keep the vehicle in
(P (automatic transmission) or (N (manual transmission).
Increase the engine speed to 2,000 rpm, and hold it there for about 3 minutes.
6. Let the engine idle with your foot off the accelerator for 20 seconds.
1Testing of Readiness Codes
The readiness codes are erased when the battery is
disconnected, and set again only after several days of
driving under a variety of conditions.
If a testing facility determines that the readiness
codes are not set, you may be requested to return at
a later date to complete the test.
If the testing facility determines the readiness codes
are still not set, see a dealer.
Page 341 of 345

340
INDEX
HFL Status Display.................................... 178
Making a Call .......................................... 195
Options During a Call .............................. 200
Phone Setup ............................................ 183
Receiving a Call ....................................... 199
Speed Dial ............................................... 192
To Clear the System ................................. 190
To Create a Security PIN........................... 188
Hazard Warning Button ............................... 2
Head Restraints ......................................... 129
Headlights ................................................. 118
Aiming .................................................... 268
Automatic Operation ............................... 119
Dimming ......................................... 118, 120
Operating ................................................ 118
Heaters (Seat) ............................................ 139
Heating and Cooling System .................... 140
Cooling ................................................... 142
Defrosting the Windshield and
Windows ............................................... 142
Dust and Pollen Filter ............................... 291
Heating ................................................... 141
HFL (HandsFreeLink ®
)............................... 177
High-Beam Indicator .................................. 73
I
Identification Numbers ............................ 328
Engine and Transmission.......................... 328
Vehicle Identification ............................... 328
Ignition Switch .......................................... 117 Illumination Control
................................. 122
Knob ....................................................... 122
Immobilizer System .................................. 112
Indicator.................................................... 74
Indicators .................................................... 66
ABS (Anti-lock Brake System)..................... 69
Charging System ............................... 67, 313
CRUISE CONTROL ............................. 75, 221
CRUISE MAIN .................................... 75, 220
Daytime Running Lights............................. 71
Door Open .......................................... 27, 70
ECON Mode ...................................... 75, 123
EPS (Electric Power Steering
System) ........................................... 71, 315
Fog Light ................................................... 73
High Temperature ..................................... 69
High-Beam ................................................ 73
Immobilizer System ................................... 74
i-VTEC ................................................. 75, 79
Lights On .................................................. 73
Low Fuel ................................................... 68
Low Oil Pressure ................................ 66, 313
Low Temperature ...................................... 74
Low Tire Pressure .............................. 72, 225
Low Tire Pressure/TPMS ............. 72, 225, 226
Maintenance Minder ......................... 75, 243
Malfunction Indicator Lamp............... 67, 314
Parking Brake and Brake System ........ 66, 315
REV ..................................................... 75, 79
Seat Belt Reminder .............................. 29, 68
Security System Alarm ............................... 74 Shift Position............................................. 67
Side Airbag Off ................................... 48, 73
Supplemental Restraint System ........... 46, 69
System Message ....................................... 72
TPMS ................................................ 71, 227
Transmission ............................................. 68
Trunk Open .............................................. 71
Turn Signal ............................................... 73 VSA
®
(Vehicle Stability Assist)
System ............................................ 70, 223
VSA ®
OFF .......................................... 70, 224
Washer Level ............................................ 75
Information .............................................. 323
Information Display ................................... 80
Instant Fuel Economy .......................... 78, 85
Instrument Panel ........................................ 65
Brightness Control .................................. 122
Interior Lights ........................................... 134
Interior Rearview Mirror ......................... 125
i-VTEC and REV Indicators ......................... 79
J
Jack (Wheel Nut Wrench) ........................ 302
Jump Starting ........................................... 307
K
Key Number Tag ...................................... 100
Keyless Lockout Prevention ..................... 102