Page 241 of 345

240
Maintenance
Before Performing Maintenance
Inspection and Maintenance
For your safety, perform all listed inspections and maintenance to keep your vehicle
in good condition. If you become aware of any abnormality (noise, smell, insufficient
brake fluid, oil residue on the ground, etc.), have your vehicle inspected by a dealer.
(Note, however, that service at a dealer is not mandatory to keep your warranties in
effect.) Refer to the separate maintenance booklet for detailed maintenance and inspection information. ■Daily inspections
Perform inspections before long distance trips, when washing the vehicle, or when refueling. ■ Periodic inspections
• Check the automatic transmission fluid level monthly.
2 Automatic Transmission Fluid P. 263
• Check the brake fluid level monthly.
2 Brake/Clutch Fluid P. 266
• Check the tire pressure monthly. Examine the tread for wear and foreign objects.
2 Checking and Maintaining Tires P. 280
• Check the operation of the exterior lights monthly.
2 Replacing Light Bulbs P. 268
• Check the condition of the wiper blades at least every six months.
2 Checking and Maintaining Wiper Blades P. 278
■Types of Inspection and Maintenance
1Inspection and Maintenance
Maintenance, replacement, or repair of
emissions control devices and systems may be
done by any automotive repair establishment or
individuals using parts that are "certified" to EPA standards.
According to state and federal regulations, failure to
perform maintenance on the maintenance main
items marked with # will not void your emissions
warranties. However, all maintenance services should
be performed in accordance with the intervals
indicated by the information display *
/multi-
information display *
.
2 Maintenance Service Items P. 245, 249
If you want to perform complex maintenance tasks
that require more skills and tools, you can purchase a
subscription to the Service Express website at
www.techinfo.honda.com .
2 Authorized Manuals P. 335
If you want to perform maintenance yourself, make
sure that you have the necessary tools and skills first.
After performing maintenance, update the records in
the separate maintenance booklet.
U.S. models
* Not available on all models
Page 252 of 345
251
Continued
Maintenance
Maintenance Under the Hood
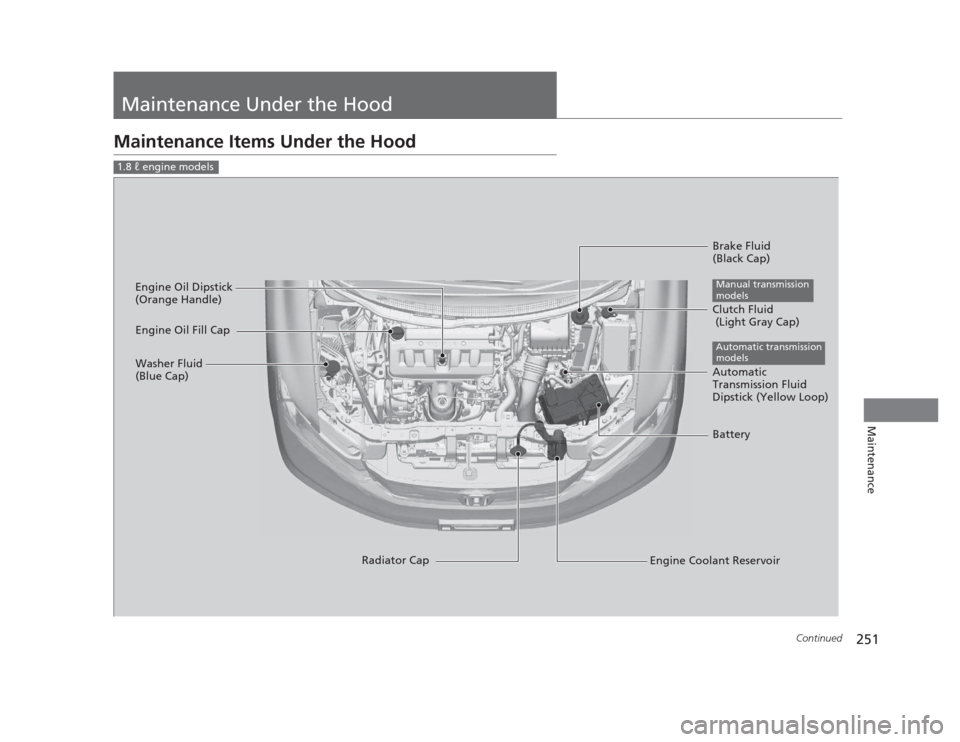
Maintenance Items Under the Hood
1.8 � engine models
Brake Fluid
(Black Cap)
Engine Coolant Reservoir
Radiator Cap
Washer Fluid
(Blue Cap)
Engine Oil Dipstick
(Orange Handle)
Clutch Fluid
(Light Gray Cap)
Manual transmission
models
Engine Oil Fill Cap
Automatic
Transmission Fluid
Dipstick (Yellow Loop)
Automatic transmission
models
Battery
Page 253 of 345
252
uuMaintenance Under the HooduMaintenance Items Under the Hood
Maintenance
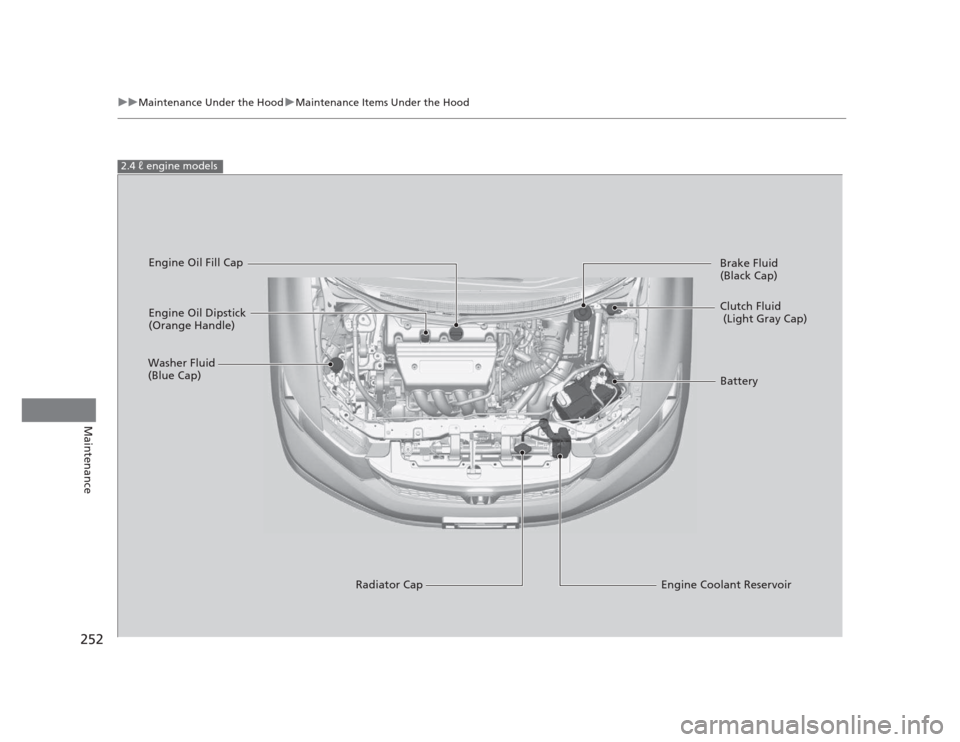
2.4 � engine models
Engine Oil Dipstick
(Orange Handle)
Washer Fluid
(Blue Cap)
Engine Coolant Reservoir
Radiator Cap Brake Fluid
(Black Cap)
Engine Oil Fill Cap
Clutch Fluid
(Light Gray Cap)
Battery
Page 254 of 345

253
uuMaintenance Under the HooduOpening the Hood
Maintenance
Opening the Hood1.Park the vehicle on a level surface, and set
the parking brake.
2. Pull the hood release handle under the
lower left corner of the dashboard.
uThe hood will pop up slightly.
3. Push up the hood latch lever in the center
of the hood to release the lock mechanism,
and open the hood.
4. Remove the support rod from the clamp
using the grip. Mount the support rod in
the hood.
When closing, remove the support rod, and
stow it in the clamp, then gently lower the
hood. Remove your hand at a height of
approximately 12 inches (30 cm) and let the
hood close.
1Opening the Hood
NOTICE
Do not open the hood when the wiper arms are raised.
The hood will strike the wipers, and may damage
either the hood or the wipers.
When closing the hood, check that the hood is
securely latched.
If the hood latch lever moves stiffly, or if you can
open the hood without lifting the lever, the latch
mechanism should be cleaned and lubricated.
Hood Release Handle
Pull
Lever
Support Rod Grip
Clamp
Page 261 of 345

uuMaintenance Under the HooduChanging the Engine Oil and Oil Filter
260
Maintenance
5. Remove the oil filter and dispose of the
remaining oil.
6. Check that the filter gasket is not stuck to
the engine contact surface.
uIf it is stuck, you must detach it.
7. Wipe away dirt and dust adhering to the
contact surface of the engine block, and
install a new oil filter.
uApply a light coat of new engine oil to
the oil filter rubber seal.
8. Put a new washer on the drain bolt, then
reinstall the drain bolt.
uTightening torque:
29 lbf�ft (39 N�m, 4.0 kgf�m)
30 lbf�ft (40 N�m, 4.0 kgf�m)
9. Pour the recommended engine oil into the engine.
uEngine oil change capacity (including filter):
3.9 US qt (3.7 L)
4.4 US qt (4.2 L)
10. Reinstall the engine oil fill cap securely and
start the engine.
11. Run the engine for a few minutes, and
then check that there is no leak from the
drain bolt or oil filter.
12. Stop the engine, wait for three minutes,
and then check the oil level on the dipstick.
uIf necessary, add more engine oil.
1Changing the Engine Oil and Oil Filter
You will need a special wrench to replace the oil
filter. You can buy this wrench from a dealer.
When installing the new oil filter, follow the
instructions supplied with the oil filter.
Reinstall the engine oil fill cap. Start the engine. The
low oil pressure indicator should go off within five
seconds. If it does not, turn off the engine, and check your work.
2.4 � engine models
Oil Filter
1.8 � engine models
Oil Filter
1.8 � engine models
2.4 � engine models
1.8 � engine models
2.4 � engine models
Page 269 of 345

268
Maintenance
Replacing Light Bulbs
Headlight Bulbs
When replacing, use the following bulbs.1.Remove the coupler.
uIt can be removed by pushing the tab.
2. Rotate the old bulb to the left to remove.
3. Insert a new bulb into the headlight
assembly and turn it to the right.
4. Insert the coupler into the connector of the
bulb.
High beam headlight: 60 W (HB3)
Low beam headlight: 51 W (HB4)
■High Beam Headlight
1Headlight Bulbs
NOTICE
Halogen bulbs get very hot when lit.
Oil, perspiration, or a scratch on the glass can cause
the bulb to overheat and shatter.
The headlight aim is set by the factory, and does not
need to be adjusted. However, if you regularly carry
heavy items in the trunk or tow a trailer, have the
aiming readjusted at a dealer or by a qualified
technician.
The HB3 and HB4 types are halogen bulbs.
When replacing a bulb, handle it by its base, and
protect the glass from contact with your skin or hard
objects. If you touch the glass, clean it with
denatured alcohol and a clean cloth.
The exterior lights' inside lenses (headlights, brake
lamps, etc.) may fog temporarily after a vehicle wash
or while driving in the rain. This does not impact the
exterior light function.
However, if you see a large amount of water or ice
accumulated inside the lenses, have your vehicle
inspected by a dealer.
Tab
Coupler
Bulb
Page 270 of 345
Continued269
uuReplacing Light BulbsuHeadlight Bulbs
Maintenance
1.Remove the holding clips (A). Push up the
tab, and remove the cover of the air intake
duct and its upper part.
1. Unlock the holding clips (B), then remove
the cover of the air intake duct.
Fold in the upper part of the air intake duct
to get enough working space.
■Low Beam Headlights1Low Beam Headlights
Pull the clip straight up to remove it.
Keep the head of the clip raised when you insert it,
push until it clicks.
Holding clip (A-type)
Cover
Tab Clip (A)
Air
Intake Duct
Driver side
1.8 � engine models
Cover
Clip (B)
Air Intake Duct
2.4 � engine models
Page 271 of 345
uuReplacing Light BulbsuHeadlight Bulbs
270
Maintenance
2. Remove the holding clip (C) using a flat-tip
screwdriver, then remove the upper part of
the windshield washer reservoir.
1Low Beam Headlights
Press down the central pin until it clicks to unlock it.
Push the central pin back to lock the clip. Then, insert
the clip into the hole and press on the central pin until it is flat.
Holding clip (B-type)
Central pin
Push until
the pin is
flat.
Clip (C)Passenger side
All models
. Push up the
tab, and remove the cover of the air intake
duct and its upper part.
1. Unlock the holdi")
 using a flat-tip
screwdriver, then remove the upper part of
the windshield washer reservoir.
1Low Beam Headlig")