Page 216 of 345
215
uuWhen DrivinguShifting
Continued
Driving
Shifting
Change the shift position in accordance with your driving needs. ■Shift lever positions
Automatic transmission models
1Shifting
You cannot turn the ignition switch to LOCK
(0 and
remove the key unless the shift lever is in
(P .
The vehicle may move forward very slightly even in
(N while the engine is cold.
Depress the brake pedal firmly and, when necessary,
apply the parking brake.Park
Used when parking or st arting the
engine
ReverseUsed when reversing
Neutral
Used when idling
Drive
Used for normal driving (gears change
between 1st and 5th automatically)
Drive (D3)
Used when:● Going up or down hills
● Towing a trailer in hilly terrain
Second
Used to increase engine braking
(the transmission is locked in 2nd gear)
First
Used to further increase engine braking
(the transmission is locked in 1st gear)
Release Button
Page 217 of 345

uuWhen DrivinguShifting
216
Driving
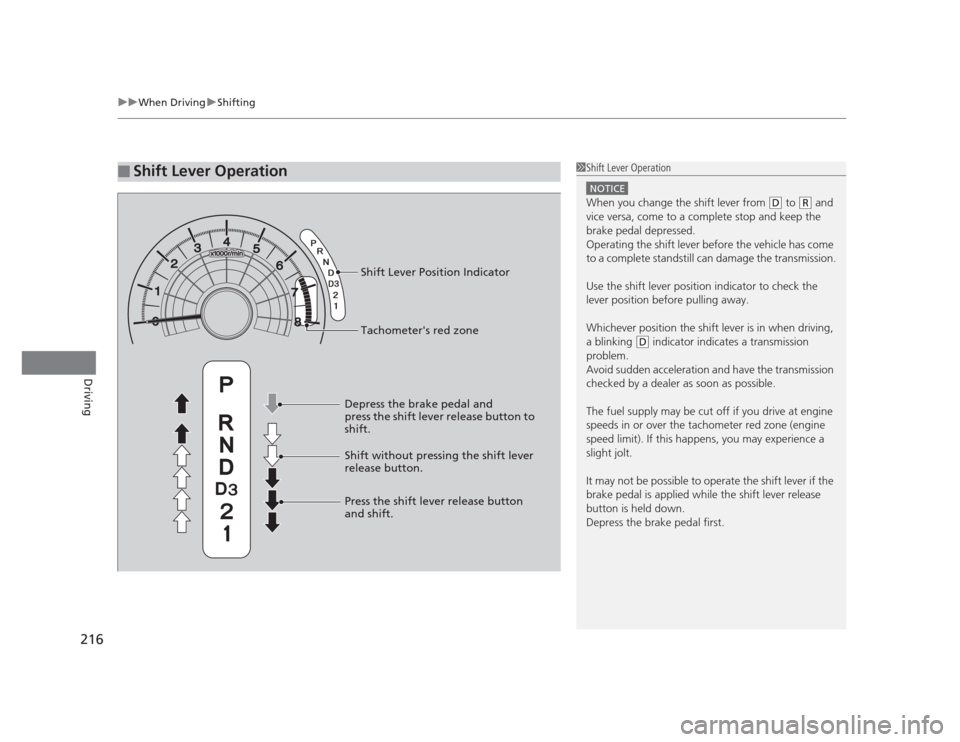
■Shift Lever Operation1Shift Lever Operation
NOTICE
When you change the shift lever from (D to (R and
vice versa, come to a complete stop and keep the
brake pedal depressed.
Operating the shift lever before the vehicle has come
to a complete standstill can damage the transmission.
Use the shift lever position indicator to check the
lever position before pulling away.
Whichever position the shift lever is in when driving,
a blinking
(D indicator indicates a transmission
problem.
Avoid sudden acceleration and have the transmission
checked by a dealer as soon as possible.
The fuel supply may be cut off if you drive at engine
speeds in or over the tachometer red zone (engine
speed limit). If this happens, you may experience a
slight jolt.
It may not be possible to operate the shift lever if the
brake pedal is applied while the shift lever release
button is held down.
Depress the brake pedal first.Tachometer's red zone
Shift Lever Position Indicator
Depress the brake pedal and
press the shift lever release button to
shift.
Shift without pressing the shift lever
release button.
Press the shift lever release button
and shift.
Page 219 of 345
uuWhen DrivinguShifting
218
Driving
When you are not shifting, do not rest your
foot on the clutch pedal. This can cause your clutch to wear out faster. 5-speed manual
transmission1Shifting
Recommended Shift Points
Driving in the highest gear that allows the engine to
run and accelerate smoothly helps to optimize fuel
economy and effective emissions control. The
following shift points are recommended:
If you exceed the maximum speed for the gear you
are in, the engine speed will enter into the
tachometer's red zone. When this happens, you may
experience a slight jolt. Shift Up Normal Acceleration
1st to 2nd15 mph (24 km/h)
2nd to 3rd 27 mph (43 km/h)
3rd to 4th39 mph (63 km/h)
4th to 5th 53 mph (85 km/h)
Shift Up Normal Acceleration
1st to 2nd17 mph (27 km/h)
2nd to 3rd 29 mph (46 km/h)
3rd to 4th37 mph (59 km/h)
4th to 5th 43 mph (69 km/h)
5th to 6th49 mph (79 km/h)
5-speed manual transmission models
6-speed manual transmission models
6-speed manual
transmission
Page 230 of 345

229
Continued
Driving
Braking
Brake System
Use the parking brake to keep the vehicle stationary when parking.
To apply:
Pull the lever fully up without pressing the
release button.
To release: 1.Pull the lever slightly, and press and hold
the release button.
2. Lower the lever down all the way, then
release the button.
■Parking Brake1Parking Brake
NOTICE
Release the parking brake fully before driving. The
rear brakes and axle can be damaged if you drive
with the parking brake applied.
If you start driving without fully releasing the parking
brake, a buzzer sounds as a warning, and "RELEASE
PARKING BRAKE" appears on the multi-information display *
.
Always apply the parking brake when parking.
To prevent the parking brake from freezing when the
outside temperature is extremely cold, do not apply
it, but do the following:
Put the shift lever in
(P , then use a block or other
wheel chock to stop the wheels from turning.
Put the shift lever in
(R or (1, then use a block or
other wheel chock to stop the wheels from turning.
Automatic transmission models
Manual transmission models
* Not available on all models
Page 231 of 345

uuBrakinguBrake System
230
Driving
Your vehicle is equipped with front disc brakes. The brakes on the rear wheels may
be disc or drum, depending on the model. A power assist helps reduce the effort
needed on the brake pedal. The brake assist system increases the stopping force
when you depress the brake pedal hard in an emergency situation. The anti-lock
brake system (ABS) helps you retain steering control when braking very hard. 2 Brake Assist System P. 232
2 ABS (Anti-lock Brake System) P. 231
■Foot Brake1Foot Brake
Check the brakes after driving through deep water,
or if there is a buildup of road surface water. If
necessary, dry the brakes by lightly depressing the
pedal several times.
If you hear a continuous metallic friction sound when
applying the brakes, the brake pads need to be
replaced. Have the vehicle checked by a dealer.
Constantly using the brake pedal while going down a
long hill builds up heat, which reduces the brake
effectiveness. Apply engine braking by taking your
foot off the accelerator pedal and downshifting to a
lower gear. With manual transmission use a lower
gear for greater engine braking.
Do not rest your foot on the brake pedal while
driving, as it will lightly apply the brakes and cause
them to lose effectiveness over time and reduce pad
life. It will also confuse drivers behind you.
Page 232 of 345

231
uuBrakinguABS (Anti-lock Brake System)
Driving
ABS (Anti-lock Brake System)
Helps prevent the wheels from locking up, and helps you retain steering control by
pumping the brakes rapidly, much faster than you.
The electronic brake distribution (EBD) system, which is part of the ABS, also
balances the front-to-rear braking distribution according to vehicle loading.
You should never pump the brake pedal. Let the ABS work for you by always
keeping firm, steady pressure on the brake pedal. This is sometimes referred to as
"stomp and steer." ■ABS operation
The brake pedal may pulsate slightly when the ABS is working. Keep holding the
pedal firmly down. On dry pavement, you will need to press on the brake pedal very
hard before the ABS activates. However, you may feel the ABS activate immediately
if you are trying to stop on snow or ice.
When the vehicle speed goes under 6 mph (10 km/h), the ABS stops.
■ABS1ABS (Anti-lock Brake System)
NOTICE
The ABS may not function correctly if you use an
incorrect tire type and size.
When the ABS indicator comes on while driving,
there may be a problem with the system.
While normal braking is not affected, there is a
possibility of the ABS not operating. Have the vehicle checked by a dealer immediately.
The ABS does not reduce the time or distance it takes
to stop the vehicle. It only helps with steering control
during hard braking.
In the following cases, your vehicle may need more
stopping distance than a vehicle without the ABS: • When driving on rough road surfaces, including
when driving on uneven surfaces, such as gravel or
snow.
• When tire chains are installed.
You may hear a motor sound coming from the
engine compartment while system checks are being
performed immediately after starting the engine or
while driving. This is normal.
Page 233 of 345
232
uuBrakinguBrake Assist System
Driving
Brake Assist System
Designed to assist the driver by generating greater braking force when you depress
the brake pedal hard during emergency braking.
■ Brake assist system operation
Press the brake pedal firmly for more powerful braking.
When brake assist operates, the pedal may wiggle slightly and an operating noise
may be heard. This is normal. Keep holding the brake pedal firmly down.
■Brake Assist System
Page 240 of 345

239
Maintenance
This chapter discusses basic maintenance.
Before Performing Maintenance Inspection and Maintenance ............ 240
Safety When Performing Maintenance..... 241
Parts and Fluids Used in Maintenance Service ........................................... 242
Maintenance Minder™ .................... 243
Maintenance Under the Hood Maintenance Items Under the Hood ..... 251
Opening the Hood ........................... 253
Recommended Engine Oil ...... .......... 254
Oil Check ......................................... 255
Adding Engine Oil ............................ 257
Changing the Engine Oil and Oil Filter ..... 258
Engine Coolant ................................ 261
Transmission Fluid ............................ 263
Brake/Clutch Fluid ............................ 266
Refilling Window Washer Fluid......... 267
Replacing Light Bulbs ....................... 268
Checking and Maintaining Wiper
Blades .......................................... 278
Checking and Maintaining Tires Checking Tires ................................. 280
Tire and Loading Information Label ...... 281
Tire Labeling .................................... 281
DOT Tire Quality Grading (U.S. Vehicles)....... 283
Wear Indicators................................ 285 Tire Service Life ................................ 285
Tire and Wheel Replacement ........... 286
Tire Rotation .................................... 287
Winter Tires ..................................... 288
Battery ............................................... 289
Remote Transmitter Care *
Replacing the Battery ....................... 290
Heating and Cooling *
System
Maintenance ................................... 291
Cleaning
Interior Care .................................... 292
Exterior Care.................................... 294
* Not available on all models