Page 130 of 345

Continued129
uuAdjusting the SeatsuAdjusting the Seat Positions
Controls
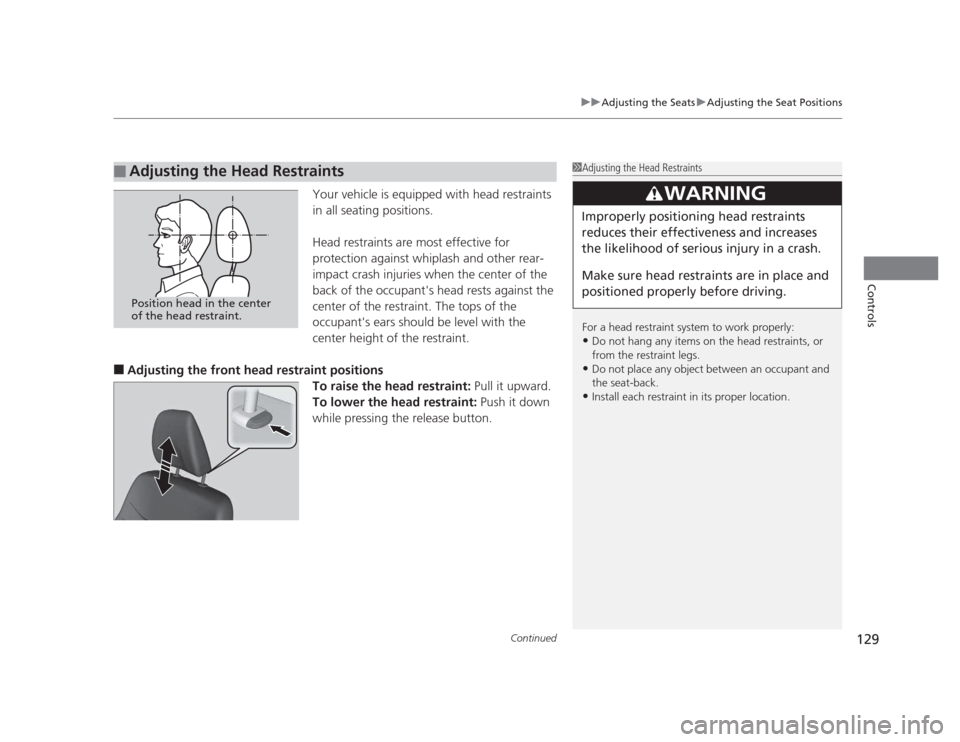
Your vehicle is equipped with head restraints
in all seating positions.
Head restraints are most effective for
protection against whiplash and other rear-
impact crash injuries when the center of the
back of the occupant's head rests against the
center of the restraint. The tops of the
occupant's ears should be level with the
center height of the restraint.
■ Adjusting the front head restraint positions
To raise the head restraint: Pull it upward.
To lower the head restraint: Push it down
while pressing the release button.
■Adjusting the Head Restraints1Adjusting the Head Restraints
For a head restraint system to work properly: • Do not hang any items on the head restraints, or
from the restraint legs.
• Do not place any object between an occupant and
the seat-back.
• Install each restraint in its proper location.
3WARNING
Improperly positioning head restraints
reduces their effectiveness and increases
the likelihood of serious injury in a crash.
Make sure head restraints are in place and
positioned properly before driving.
Position head in the center
of the head restraint.
Page 131 of 345

uuAdjusting the SeatsuAdjusting the Seat Positions
130
Controls
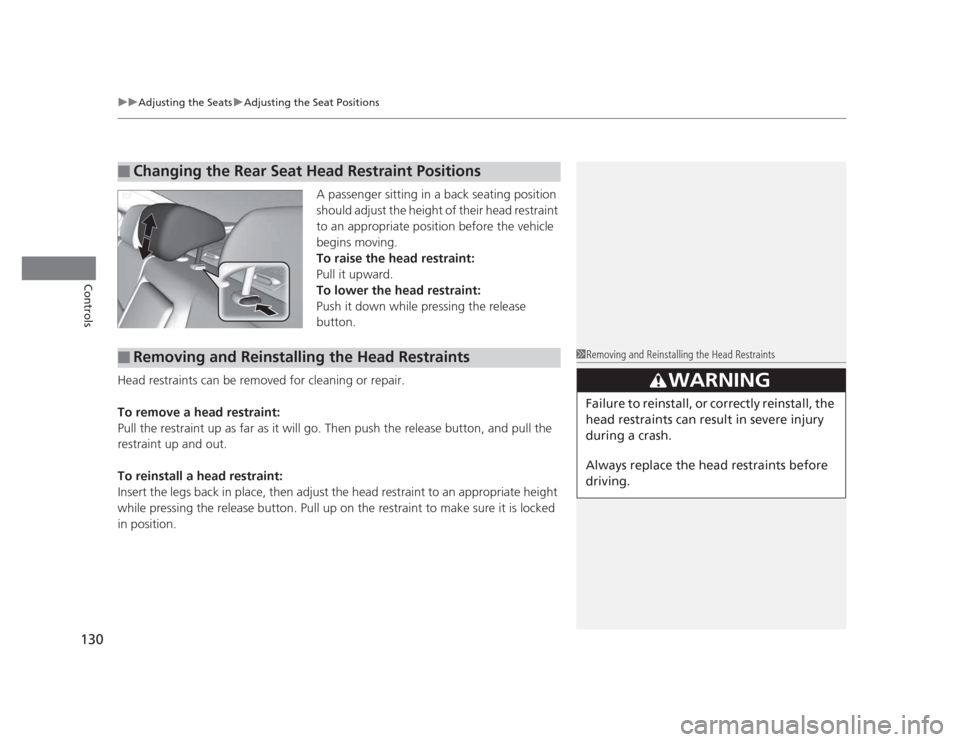
A passenger sitting in a back seating position
should adjust the height of their head restraint
to an appropriate position before the vehicle
begins moving.
To raise the head restraint:
Pull it upward.
To lower the head restraint:
Push it down while pressing the release
button.
Head restraints can be removed for cleaning or repair.
To remove a head restraint:
Pull the restraint up as far as it will go. Then push the release button, and pull the
restraint up and out.
To reinstall a head restraint:
Insert the legs back in place, then adjust the head restraint to an appropriate height
while pressing the release button. Pull up on the restraint to make sure it is locked
in position.
■Changing the Rear Seat Head Restraint Positions
■Removing and Reinstallin g the Head Restraints1Removing and Reinstalling the Head Restraints
3WARNING
Failure to reinstall, or correctly reinstall, the
head restraints can result in severe injury
during a crash.
Always replace the head restraints before
driving.
Page 132 of 345

131
uuAdjusting the SeatsuAdjusting the Seat Positions
Controls
After all occupants have adjusted their seats and head restraints, and put on their
seat belts, it is very important that they continue to sit upright, well back in their
seats, with their feet on the floor, until the vehicle is safely parked and the engine is off.
Sitting improperly can increase the chance of injury during a crash. For example, if an occupant slouches, lies down, turns sideways, sits forward, leans forward or
sideways, or puts one or both feet up, the chance of injury during a crash is greatly increased.
In addition, an occupant who is out of position in the front seat can be seriously or
fatally injured in a crash by striking interior parts of the vehicle or being struck by an inflating front airbag.
■Maintain a Proper Sitting Position1Maintain a Proper Sitting Position
3WARNING
Sitting improperly or out of position can
result in serious injury or death in a crash.
Always sit upright, well back in the seat,
with your feet on the floor.
Page 133 of 345

132
uuAdjusting the SeatsuRear Seats
Controls
Rear Seats1.Remove the center shoulder belt from the
guide.
2. Pull the release lever in the trunk to release
the lock.
3. Fold the seat-back down.
If the rear head restraints get caught on the
front seat-backs, remove the head restraints. 2 Removing and Reinstalling the Head
Restraints P. 130
■Folding Down the Rear Seats1Folding Down the Rear Seats
The rear seat-back(s *
) can be folded down to
accommodate bulkier items in the trunk.
Never drive with the seat-back folded down and the
trunk lid open.
2 Exhaust Gas Hazard P. 62
To lock the seat-back upright, push it backwards until
it locks.
When returning a seat-back to its original position,
push it firmly back. Also, make sure all rear shoulder
belts are positioned in front of the seat-back, and the
center shoulder belt is re-positioned in the guide.
Make sure that the folded seat-back does not press against the front passenger seat, as this can cause the
weight sensors in the front passenger seat to work
improperly. 2 Passenger Airbag Off Indicator P. 47
Also make sure all items in the trunk or items
extending through the opening into the rear
seats are properly secured. Loose items can fly
forward if you have to brake hard.
Guide
Center
Shoulder
Belt
Release Lever
* Not available on all models
Page 134 of 345
133
uuAdjusting the SeatsuArmrest
Controls
ArmrestPull down the armrest in the center seat-back.
■Using the Rear Seat Armrest *
* Not available on all models
Page 140 of 345

139
uuInterior Lights/Interior Convenience ItemsuInterior Convenience Items
Controls
The ignition switch must be in ON (w to use
the seat heaters. The HI setting heats the seats faster than the LO setting.
There is no heater in the passenger's seat-
back due to the side airbag cutoff system.
While in HI, the heater cycles on and off.
uThe appropriate indicator will be on
while the seat heater is on. Briefly press
the switch on the opposite side to turn
the heater off. The indicator will be off.
When a comfortable temperature is
reached, select LO to keep the seat warm.
■Seat Heaters *1Seat Heaters
Do not use the seat heaters even in LO when the
engine is off. Under such conditions, the battery may
be weakened, making the engine difficult to start.
In the LO setting, the heater runs continuously and
does not automatically turn off.
3WARNING
Heat induced burns are possible when
using seat heaters.
Persons with a diminish
ed ability to sense
temperature (e.g., persons with diabetes,
lower-limb nerve damage, or paralysis) or
with sensitive skin should not use seat
heaters.
* Not available on all models
Page 146 of 345

145
uuAudio System*uUSB Adapter Cable
*
Features
USB Adapter Cable *
1.Unclip the USB connector and loosen the
adapter cable.
2. Install the iPod ®
dock connector or the USB
flash drive to the USB connector.
Auxiliary Input Jack
Use the jack to connect standard audio devices. 1.Open the AUX cover.
2. Connect a standard audio device to the
input jack using a 1/8 inch (3.5 mm) stereo
miniplug.
uThe audio system automatically switches
to the AUX mode.
1USB Adapter Cable •Do not leave the iPod ®
or USB flash drive in the
vehicle. Direct sunlight and high temperatures may damage it.
• Do not use an extension cable with the USB
adapter cable.
• Do not connect the iPod ®
or USB flash drive using a
hub.
• Do not use a device such as a card reader or hard
disk drive, as the device or your files may be damaged.
• We recommend backing up your data before using
the device in your vehicle.
• Displayed messages may vary depending on the
device model and software version.
If the audio system does not recognize the iPod ®
, try
reconnecting it a few times or reboot the device. To
reboot, follow the manufacturer's instructions provided with the iPod ®
or visit www.apple.com/
ipod .
1Auxiliary Input Jack
To switch the mode, press any of the audio mode
buttons. You can return to the AUX mode by
pressing the AUX button.
You cannot use the auxiliary input jack if you replace
the audio system.
State or local laws may limit the circumstances in
which you can launch or control your attached audio device.
* Not available on all models
Page 148 of 345

147
Features
Audio System Basic Operation*
To use the audio system function, the ignition switch must be in ACCESSORY (q
or
ON
(w .
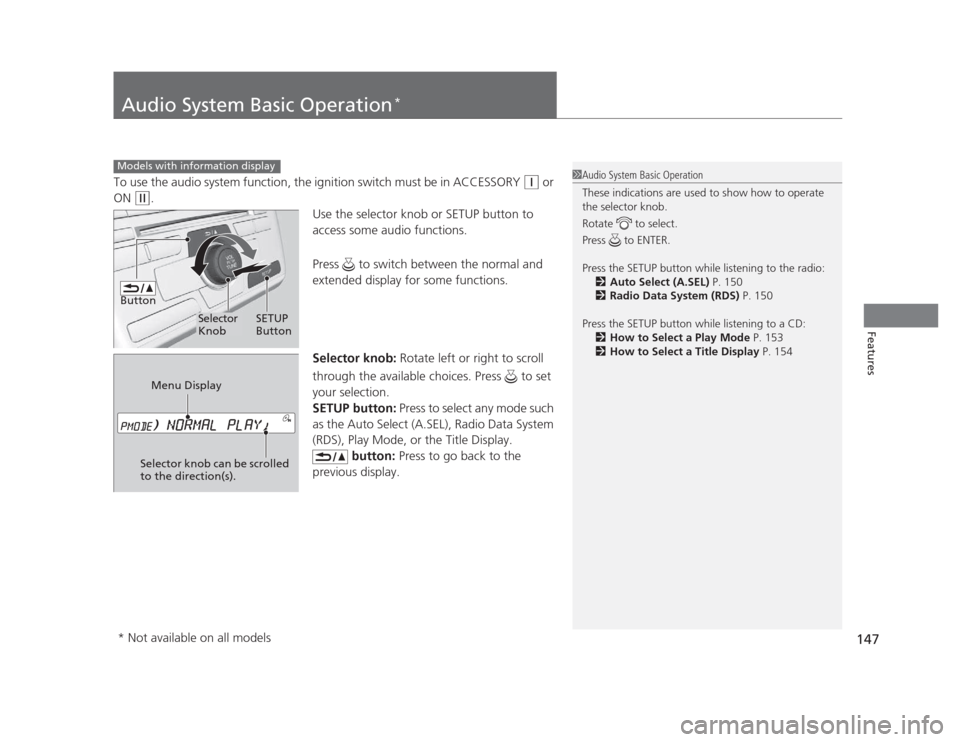
Use the selector knob or SETUP button to
access some audio functions.
Press to switch between the normal and
extended display for some functions.
Selector knob: Rotate left or right to scroll
through the available choices. Press to set
your selection.
SETUP button: Press to select any mode such
as the Auto Select (A.SEL), Radio Data System
(RDS), Play Mode, or the Title Display. button: Press to go back to the
previous display.
Models with information display1Audio System Basic Operation
These indications are used to show how to operate
the selector knob.
Rotate to select.
Press to ENTER.
Press the SETUP button while listening to the radio: 2 Auto Select (A.SEL) P. 150
2 Radio Data System (RDS) P. 150
Press the SETUP button while listening to a CD: 2 How to Select a Play Mode P. 153
2 How to Select a Title Display P. 154
Button
Selector Knob SETUP
Button
Menu Display
Selector knob can be scrolled
to the direction(s).
* Not available on all models