Page 125 of 345

124
uuOperating the Switches Around the Steering WheeluAdjusting the Steering Wheel
Controls
Adjusting the Steering Wheel
The steering wheel height and distance from your body can be adjusted so that you
can comfortably grip the steering wheel in an appropriate driving posture.1.Pull the steering wheel adjustment lever up.
uThe steering wheel adjustment lever is
under the steering column.
2. Move the steering wheel up or down, and
in or out.
uMake sure you can see the instrument
panel gauges and indicators.
3. Push the steering wheel adjustment lever
down to lock the steering wheel in position.
uAfter adjusting the position, make sure
you have securely locked the steering
wheel in place by trying to move it up,
down, in, and out.
1Adjusting the Steering Wheel
Make any steering wheel adjustments before you
start driving.
3WARNING
Adjusting the steering wheel position while
driving may cause you to lose control of the
vehicle and be seriously injured in a crash.
Adjust the steering wheel only when the
vehicle is stopped.To adjust
To lockLever
Page 127 of 345

126
Controls
Adjusting the Seats
Adjusting the Seat PositionsAdjust the driver's seat as far back as possible
while allowing you to maintain full control of
the vehicle. You should be able to sit upright,
well back in the seat and be able to
adequately press the pedals without leaning
forward, and grip the steering wheel
comfortably. The passenger's seat should be
adjusted in a similar manner, so that it is as far
back from the front airbag in the dashboard as possible.
■ Adjusting the front power seat *
1Adjusting the Seats
The National Highway Traffic Safety Administration
and Transport Canada recommend that drivers allow
at least 10 inches (25 cm) between the center of the
steering wheel and the chest.
Always make seat adjustments before driving.
3WARNING
Sitting too close to a front airbag can result
in serious injury or death if the front
airbags inflate.
Always sit as far back from the front
airbags as possible while maintaining
control of the vehicle.
Move back.
Allow sufficient space.
Horizontal Position
Adjustment
Height Adjustment
Seat-back Angle
Adjustment
Driver side only
* Not available on all models
Page 129 of 345

uuAdjusting the SeatsuAdjusting the Seat Positions
128
Controls
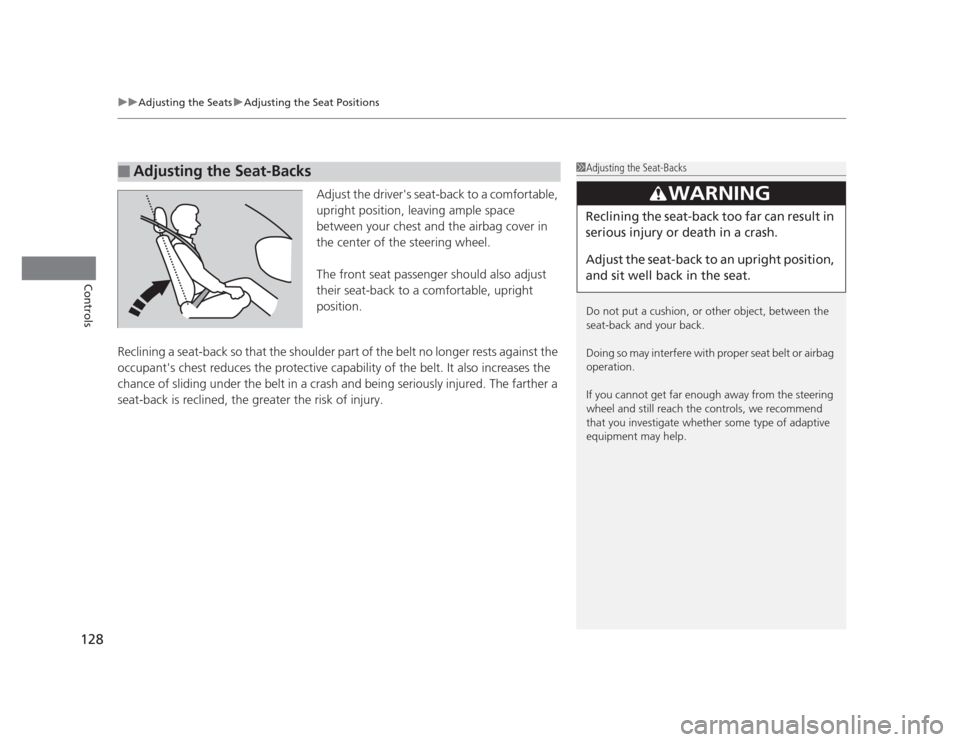
Adjust the driver's seat-back to a comfortable,
upright position, leaving ample space
between your chest and the airbag cover in
the center of the steering wheel.
The front seat passenger should also adjust
their seat-back to a comfortable, upright
position.
Reclining a seat-back so that the shoulder part of the belt no longer rests against the
occupant's chest reduces the protective capabil ity of the belt. It also increases the
chance of sliding under the belt in a crash and being seriously injured. The farther a
seat-back is reclined, the greater the risk of injury.
■Adjusting the Seat-Backs1Adjusting the Seat-Backs
Do not put a cushion, or other object, between the
seat-back and your back.
Doing so may interfere with proper seat belt or airbag
operation.
If you cannot get far enough away from the steering
wheel and still reach the controls, we recommend
that you investigate whether some type of adaptive
equipment may help.
3WARNING
Reclining the seat-back too far can result in
serious injury or death in a crash.
Adjust the seat-back to an upright position,
and sit well back in the seat.
Page 145 of 345

144
Features
Audio System*
About Your Audio System
On models with navigation system, see the Navigation System Manual for operation
of the audio system,
Bluetooth®
HandsFreeLink ®
, and voice commands for these
features.
The audio system features AM/FM radio. It can also play CDs and WMA/MP3 files.
You can operate the audio system from the buttons and switches on the panel.
The audio system features AM/FM radio. It can also play audio CDs, WMA/MP3/AAC files, iPods ®
, USB flash drives, and Bluetooth®
devices *
.
You can operate the audio system from the buttons and switches on the panel, or
the remote controls on the steering wheel.
1About Your Audio System
Video CDs, DVDs, and 3-inch (8-cm) mini CDs are not
supported.
iPod ®
is a registered trademark owned by Apple Inc.
MP3 and AAC are standard audio compression
formats. WMA is an audio compression format
developed by Microsoft Corporation.
Models with information display
Models with multi-information display
Remote Control iPod
®
USB Flash
Drive
* Not available on all models
Page 156 of 345

155
Features
Audio System Basic Operation*
To use the audio system function, the ignition switch must be in ACCESSORY (q
or
ON
(w .
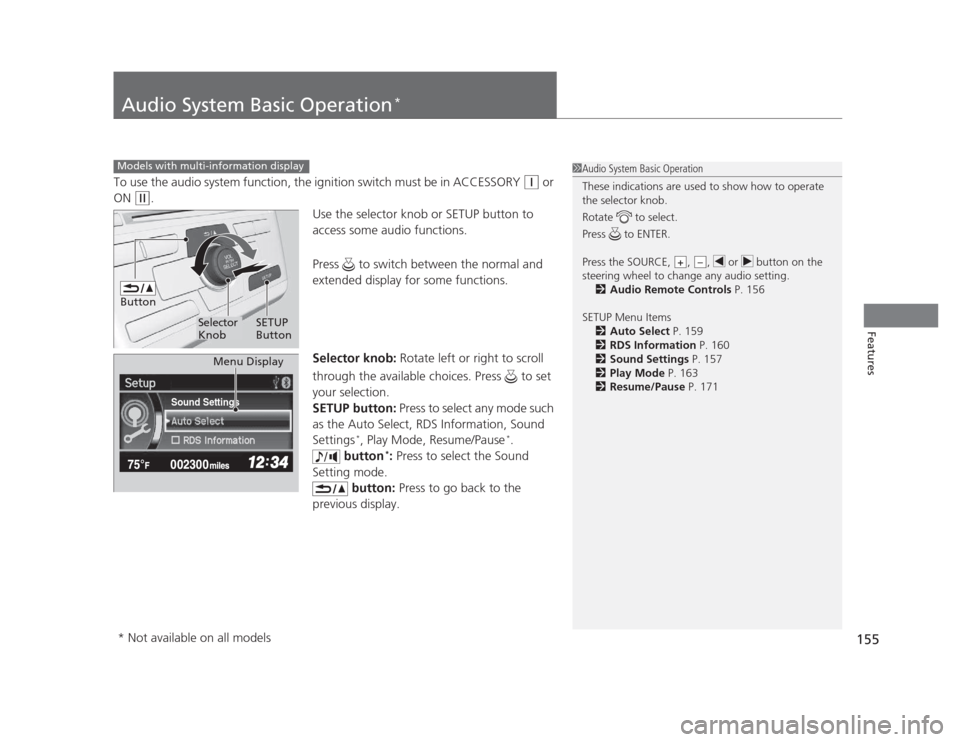
Use the selector knob or SETUP button to
access some audio functions.
Press to switch between the normal and
extended display for some functions.
Selector knob: Rotate left or right to scroll
through the available choices. Press to set
your selection.
SETUP button: Press to select any mode such
as the Auto Select, RDS Information, Sound Settings *
, Play Mode, Resume/Pause *
.
button *
: Press to select the Sound
Setting mode. button: Press to go back to the
previous display.
Models with multi-information display1Audio System Basic Operation
These indications are used to show how to operate
the selector knob.
Rotate to select.
Press to ENTER.
Press the SOURCE, , , or button on the
steering wheel to change any audio setting. 2 Audio Remote Controls P. 156
SETUP Menu Items 2 Auto Select P. 159
2 RDS Information P. 160
2 Sound Settings P. 157
2 Play Mode P. 163
2 Resume/Pause P. 171
+–
Button
Selector Knob SETUP
Button
Sound Settings
Menu Display
* Not available on all models
Page 160 of 345
Continued159
uuAudio System Basic Operation*uPlaying the AM/FM Radio
Features
Use the auto select feature to scan both bands and store the strongest station in each preset.
1.Press the SETUP button.
2. Rotate to select Auto Select, then press
.
To turn off auto select, press again. This
restores the presets you originally set.
■Auto Select1Playing the AM/FM Radio
The ST indicator appears on the display indicating
stereo FM broadcasts.
Stereo reproduction in AM is not available.
Switching the Audio Mode
Press the SOURCE button on the steering wheel. 2 Audio Remote Controls P. 156
You can store six AM stations and twelve FM stations
into the preset button memory. FM1 and FM2 let you
store six stations each.
Auto Select function scans and stores up to six AM
stations and twelve FM stations with a strong signal
into the preset button memory.
If you do not like the stations auto select has stored,
you can manually store your preferred frequencies.
Sound Settings
Page 172 of 345

171
uuAudio System Basic Operation*uPlaying
Bluetooth ®
Audio
Features
1. Make sure that your phone is paired and
linked to HFL.
2. Press the AUX button.
If the phone is not recognized, another HFL-
compatible phone, which is not compatible
for Bluetooth ®
Audio, may be already linked.
■ To pause or resume a file
1. Press the SETUP button.
2. Rotate to select Resume/Pause, then press .
Each time you press , the setting switches between Pause and Resume.
Press the (pick-up) button on the steering
wheel to receive a call when Bluetooth®
Audio
is playing. 2 Bluetooth ®
HandsFreeLink ®
P. 177
Press the (hang-up/back) button to end
the call and return to Bluetooth®
Audio.
■To Play Bluetooth ®
Audio Files1To Play Bluetooth ®
Audio Files
To play the audio files, you may need to operate your
phone. If so, follow the phone maker's operating instructions.
The pause function may not be available on some
phones.
If any audio device is connected to the auxiliary input
jack, you may need to press the AUX button
repeatedly to select the Bluetooth®
Audio system.
Switching to another mode pauses the music playing
from your phone.
Sound Settings
■Switching to HFL1Switching to HFL
If you receive a call while Bluetooth®
Audio is in the
pause mode, it will resume play after ending the call.
Button
Button
Page 178 of 345

177
Continued
Features
Bluetooth ®
HandsFreeLink ®*
For models with the navigation system, see Navigation System Manual for how to operate the
Bluetooth®
HandsFreeLink ®
.
Bluetooth ®
HandsFreeLink ®
(HFL) allows you to place and receive phone calls using
your vehicle's audio system, without handling your cell phone.
Using HFL
(Pick-up) button: Press to go directly to the Phone screen or to answer an
incoming call.
(Hang-up/back) button: Press to end a call or to cancel a command.
(TALK) button: Press to call a number with a stored voice tag.
PHONE button: Press to go directly to the Phone screen.
Selector knob: Rotate to select an item on the screen, then press .
■HFL Buttons
1Bluetooth®
HandsFreeLink ®
To use HFL, you need a Bluetooth-compatible cell
phone. For a list of compatible phones, pairing
procedures, and special feature capabilities:
• U.S.: Visit www.handsfreelink.honda.com , or call
(888) 528-7876.
• Canada: Visit www.handsfreelink.ca , or call (888)
528 -7876.
Voice control tips • Aim the vents away from the ceiling and close the
windows, as noise coming from them may interfere
with the microphone.
• Press and release the button when you want to
call a number using a stored voice tag. Speak
clearly and naturally after a beep.
• If the microphone picks up voices other than yours,
the command may be misinterpreted.
• To change the volume level, use the audio system's
volume knob or the remote audio controls on the
steering wheel.Models with navigation system
Models without navigation system
TALK Button
Volume up
Microphone
Hang-up/Back Button
Pick-up
Button
Volume
down
Selector Knob
PHONE
Button
* Not available on all models