Page 221 of 345

220
uuWhen DrivinguCruise Control*
Driving
Cruise Control *
Maintains a constant vehicle speed without having to keep your foot on the
accelerator. Use cruise control on freeways or open roads where you can travel at a
constant speed with little acceleration or deceleration.
1Cruise Control
It may not be possible to maintain a constant speed
when driving uphill or downhill.
When not using cruise control:
Turn off cruise control by pressing the CRUISE
button.
While in the ECON mode, it may take relatively more
time to accelerate to maintain the set speed.
3WARNING
Improper use of the cruise control can lead
to a crash.
Use the cruise control only when traveling
on open highways in good weather.
1.8 � engine models
■ Shift positions for cruise control:
In
(D or (d
When to use
Always keep sufficient distance
between you and the vehicle in
front of you.
Automatic transmission models
■Vehicle speed for cruise control:
Desired speed in a range above
roughly 25 mph (40 km/h) ~
How to useCRUISE MAIN is on in the
instrument panel.
Cruise control is ready to use.
■ Press the CRUISE button on
the steering wheel.
* Not available on all models
Page 230 of 345

229
Continued
Driving
Braking
Brake System
Use the parking brake to keep the vehicle stationary when parking.
To apply:
Pull the lever fully up without pressing the
release button.
To release: 1.Pull the lever slightly, and press and hold
the release button.
2. Lower the lever down all the way, then
release the button.
■Parking Brake1Parking Brake
NOTICE
Release the parking brake fully before driving. The
rear brakes and axle can be damaged if you drive
with the parking brake applied.
If you start driving without fully releasing the parking
brake, a buzzer sounds as a warning, and "RELEASE
PARKING BRAKE" appears on the multi-information display *
.
Always apply the parking brake when parking.
To prevent the parking brake from freezing when the
outside temperature is extremely cold, do not apply
it, but do the following:
Put the shift lever in
(P , then use a block or other
wheel chock to stop the wheels from turning.
Put the shift lever in
(R or (1, then use a block or
other wheel chock to stop the wheels from turning.
Automatic transmission models
Manual transmission models
* Not available on all models
Page 234 of 345
233
Driving
Parking Your Vehicle
When Stopped 1.Always use the parking brake when you park your vehicle.
2. Make sure the parking brake is set firmly, or your vehicle may roll if parked on an
incline.
Parking 1.Depress the brake pedal firmly with the shift lever in
(D .
2. Apply the parking brake while holding the brake pedal down.
3. Move the shift lever to
(P .
4. Turn off the engine.
1Parking Your Vehicle
Do not park your vehicle near flammable objects,
such as dry grass, oil, or timber.
Heat from the exhaust can cause a fire.
1When Stopped
NOTICE
The following can damage the transmission: •Depressing the accelerator and brake pedals
simultaneously.
• Holding the vehicle in place when facing uphill by
depressing the accelerator pedal.
• Moving the shift lever into
(P before the vehicle
stops completely.
Automatic transmission models
1Parking
Raise the wiper arms when snow is expected.Automatic transmission models
Page 241 of 345

240
Maintenance
Before Performing Maintenance
Inspection and Maintenance
For your safety, perform all listed inspections and maintenance to keep your vehicle
in good condition. If you become aware of any abnormality (noise, smell, insufficient
brake fluid, oil residue on the ground, etc.), have your vehicle inspected by a dealer.
(Note, however, that service at a dealer is not mandatory to keep your warranties in
effect.) Refer to the separate maintenance booklet for detailed maintenance and inspection information. ■Daily inspections
Perform inspections before long distance trips, when washing the vehicle, or when refueling. ■ Periodic inspections
• Check the automatic transmission fluid level monthly.
2 Automatic Transmission Fluid P. 263
• Check the brake fluid level monthly.
2 Brake/Clutch Fluid P. 266
• Check the tire pressure monthly. Examine the tread for wear and foreign objects.
2 Checking and Maintaining Tires P. 280
• Check the operation of the exterior lights monthly.
2 Replacing Light Bulbs P. 268
• Check the condition of the wiper blades at least every six months.
2 Checking and Maintaining Wiper Blades P. 278
■Types of Inspection and Maintenance
1Inspection and Maintenance
Maintenance, replacement, or repair of
emissions control devices and systems may be
done by any automotive repair establishment or
individuals using parts that are "certified" to EPA standards.
According to state and federal regulations, failure to
perform maintenance on the maintenance main
items marked with # will not void your emissions
warranties. However, all maintenance services should
be performed in accordance with the intervals
indicated by the information display *
/multi-
information display *
.
2 Maintenance Service Items P. 245, 249
If you want to perform complex maintenance tasks
that require more skills and tools, you can purchase a
subscription to the Service Express website at
www.techinfo.honda.com .
2 Authorized Manuals P. 335
If you want to perform maintenance yourself, make
sure that you have the necessary tools and skills first.
After performing maintenance, update the records in
the separate maintenance booklet.
U.S. models
* Not available on all models
Page 252 of 345
251
Continued
Maintenance
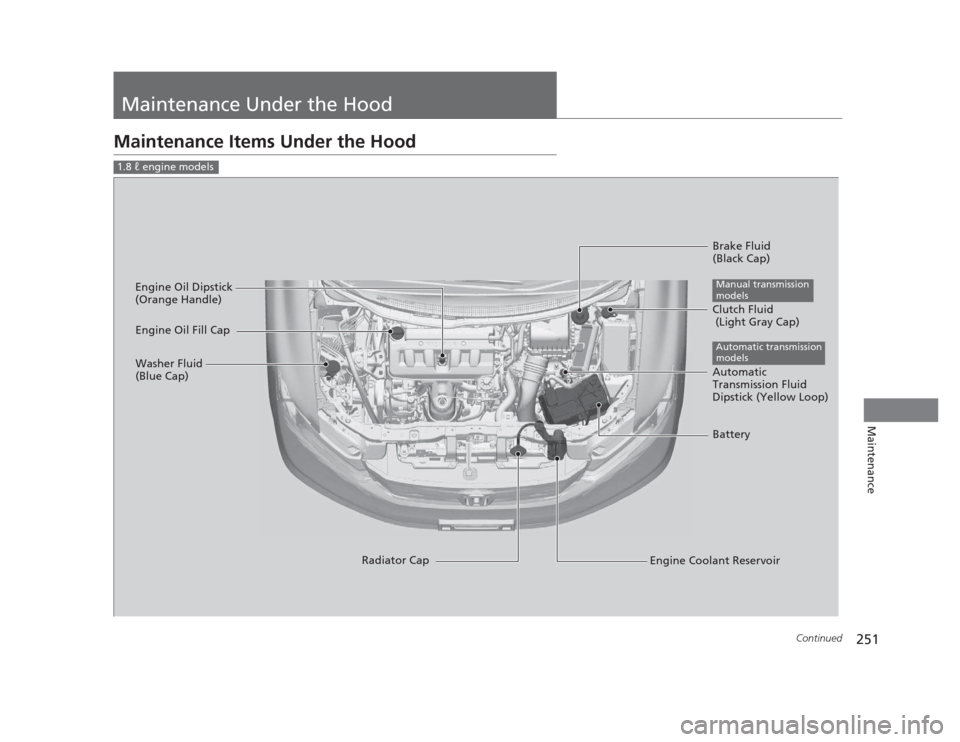
Maintenance Under the Hood
Maintenance Items Under the Hood
1.8 � engine models
Brake Fluid
(Black Cap)
Engine Coolant Reservoir
Radiator Cap
Washer Fluid
(Blue Cap)
Engine Oil Dipstick
(Orange Handle)
Clutch Fluid
(Light Gray Cap)
Manual transmission
models
Engine Oil Fill Cap
Automatic
Transmission Fluid
Dipstick (Yellow Loop)
Automatic transmission
models
Battery
Page 264 of 345

263
uuMaintenance Under the HooduTransmission Fluid
Continued
Maintenance
Transmission Fluid
Check the fluid level when the engine is at normal operating temperature.1.Park on level ground, and start the engine.
2. Wait until the radiator fan starts and then
turn off the engine.
uPerform step 3 after waiting for about 60
seconds (less than 90 seconds).
3. Remove the dipstick (yellow loop) from the
transmission and wipe it with a clean cloth.
4. Insert the dipstick all the way back into the
transmission securely, as shown in the image.
5. Remove the dipstick and check the fluid level.
uIt should be between the upper and
lower marks in the HOT range.
6. If the level is below the lower mark, add
fluid into the dipstick hole to bring it to the
level between the upper and lower marks,
and have your vehicle checked by a dealer immediately.
■Automatic Transmission Fluid
Specified fluid: Honda ATF DW-1 (automatic transmission fluid)
1Automatic Transmission Fluid
NOTICE
Do not mix Honda ATF DW-1 with other
transmission fluids.
Using a transmission fluid other than Honda ATF
DW-1 may adversely affect the operation and
durability of your vehicle's transmission, and damage
the transmission.
Any damage caused by using a transmission fluid that
is not equivalent to Honda ATF DW-1 is not covered
by Honda's new vehicle warranty.
NOTICE
Pour the fluid slowly and carefully so you do not spill
any. Clean up any spills immediately; they can
damage components in the engine compartment.Upper Mark
Lower Mark
HOT
Range
Page 300 of 345

299
Continued
Handling the Unexpected
If a Tire Goes Flat
Changing a Flat Tire
If a tire goes flat while driving, grasp the steering wheel firmly, and brake gradually
to reduce speed. Then, stop in a safe place. Replace the flat tire with a compact
spare tire. Go to a dealer as soon as possible to have the full size tire repaired or
replaced. 1.
Park the vehicle on firm, level, and non-slippery ground.
2. Put the shift lever in
(P .
2. Put the shift lever in
(R .
3. Set the parking brake.
4. Turn on the hazard warning lights and turn the ignition switch to LOCK
(0.
1Changing a Flat Tire
Periodically check the tire pressure of the compact
spare. It should be set to the specified pressure.
Specified Pressure: 60 psi (420 kPa, 4.2 kgf/cm 2
)
When driving with the compact spare tire, keep the
vehicle speed under 50 mph (80 km/h). Replace with
a full size tire as soon as possible.
The compact spare tire and wheel in your vehicle are
specifically for this model.
Do not use them with another vehicle.
Do not use another type of compact spare tire or
wheel with your vehicle.
Do not mount tire chains on a compact spare tire.
If a chain-mounted front tire goes flat, remove one of
the full-size rear tires and replace it with the compact
spare tire. Remove the flat front tire and replace it
with the full size tire that was removed from the rear.
Mount the tire chains on the front tire.
Do not use a puncture-repairing agent on a flat tire,
as it can damage the tire pressure sensor.
U.S. models only
Automatic transmission models
Manual transmission models
All models
Page 311 of 345
310
Handling the Unexpected
Shift Lever Does Not Move
Follow the procedure below if you cannot move the shift lever out of the (P
position.
1.Set the parking brake.
2. Remove the key from the ignition switch.
3. Wrap a cloth around the tip of a small flat-
tip screwdriver and remove the cover of the
shift lock release slot.
uPut the tip of the flat-tip screwdriver into
the slot and remove it as shown in the image.
4. Insert the key into the shift lock release slot.
5. While pushing on the key, press the shift
lever release button and place the shift lever
into
(N .
uThe lock is now released. Have the shift
lever checked by a dealer as soon as
possible.
■Releasing the Lock
Automatic transmission models
Slot
Cover
Release
Button
Shift Lock
Release Slot