Page 55 of 345
.
Some have a rigid-type connec tor, while others hav")
uuChild SafetyuSafety of Infants and Small Children
54
Safe DrivingMost child seats are LATCH-compatible (Lower Anchors and Tethers for CHildren).
Some have a rigid-type connec tor, while others have a flexible-type connector. Both
are equally easy to use. Some existing and previously owned child seats can only be
installed using the seat belt. Whichever type you choose, follow the child seat
manufacturer's use and care instructions as well as the instructions in this manual.
Proper installation is key to maximizing your child's safety.
In seating positions and vehicles not equipped with LATCH, a LATCH compatible
child seat can be installed using th e seat belt and a top tether for added security.
This is because all child seats are required to be designed so that they can be secured
with a lap belt or the lap part of a lap/shoulder belt. In addition, the child seat
manufacturer may advise that a seat belt be used to attach a LATCH-compatible seat
once a child reaches a specified weight. Please read the child seat owner’s manual
for proper installation instructions. ■ Important consideration when selecting a child seat
Make sure the child seat meets the following three requirements: • The child seat is the correct type and size for the child.
• The child seat is the correct type for the seating position.
• The child seat is compliant with Federal Motor Vehicle Safety Standard 213 or
Canadian Motor Vehicle Safety Standard 213.
■Selecting a Child Seat1Selecting a Child Seat
Installation of a LATCH-compatible child seat is
simple.
LATCH-compatible child seats have been developed
to simplify the installation process and reduce the
likelihood of injuries caused by incorrect installation.
Page 113 of 345

112
Controls
Security System
Immobilizer System
The immobilizer system prevents a key that has not been pre-registered from
starting the engine. Each key contains electronic transmitters that use electronic
signals to verify the key.
Pay attention to the following when inserting the key into the ignition switch: •Do not allow objects that emit strong radio waves near the ignition switch.
• Make sure the key is not covered by or touching a metal object.
• Do not bring a key from another vehicle's immobilizer system near the ignition
switch.
Security System Alarm *
The security system alarm activates when the doors, trunk, or hood are opened
without the key, or remote transmitter. ■ When the security system alarm activates
The horn sounds intermittently and all of the exterior lights flash.■ To deactivate the security system alarm
Unlock the vehicle using the key, or remote transmitter. The system, along with the
horn and flashing lights, is deactivated.
1Immobilizer System
NOTICE
Leaving the ignition key in the vehicle can result in
theft or accidental movement of the vehicle.
Always take the ignition key with you whenever you
leave the vehicle unattended.
Do not alter the system or add other devices to it.
Doing so may damage the system and make your
vehicle inoperable.
1Security System Alarm
The security alarm continues for a maximum of two
minutes until the security system deactivates.
* Not available on all models
Page 114 of 345

113
uuSecurity SystemuSecurity System Alarm*
Controls
■
Setting the security system alarm
The security system alarm automatically sets when the following conditions have
been met: • The ignition switch is in LOCK
(0 , and the key has been removed from the
ignition switch.
• The hood and trunk are closed.
• All doors are locked with the key or the remote transmitter.
■ When the security system alarm sets
The security system indicator in the instrument panel blinks. When the blinking
interval changes after about 15 seconds, the security system is set. ■ To cancel the security system alarm
The security system is canceled when the vehicle is unlocked using the key or remote
transmitter, or the ignition switch is turned to ON
(w . The security system indicator
goes off at the same time.
■The panic button on the remote
transmitter
If you press the panic button for
approximately one second, the following will
occur for about 30 seconds: • The horn sounds.
• Some exterior lights flash.
■ Canceling panic mode
Press any button on the remote transmitter, or turn the ignition switch to ON
(w .
■Panic Mode
1Security System Alarm
Do not set the security system alarm when someone
is in the vehicle or a window is open. The system can
accidentally activate when:•Unlocking the door with the lock tab or the master
door lock switch.
• Opening the trunk with the trunk release or the
emergency trunk opener.
If the battery goes dead after you have set the
security system alarm, the security alarm may go off
once the battery is recharged or replaced.
If this occurs, deactivate the security system alarm by
unlocking a door using the key or remote transmitter.
Do not attempt to alter this system or add another device to it.
Panic
Button
Page 130 of 345

Continued129
uuAdjusting the SeatsuAdjusting the Seat Positions
Controls
Your vehicle is equipped with head restraints
in all seating positions.
Head restraints are most effective for
protection against whiplash and other rear-
impact crash injuries when the center of the
back of the occupant's head rests against the
center of the restraint. The tops of the
occupant's ears should be level with the
center height of the restraint.
■ Adjusting the front head restraint positions
To raise the head restraint: Pull it upward.
To lower the head restraint: Push it down
while pressing the release button.
■Adjusting the Head Restraints1Adjusting the Head Restraints
For a head restraint system to work properly: • Do not hang any items on the head restraints, or
from the restraint legs.
• Do not place any object between an occupant and
the seat-back.
• Install each restraint in its proper location.
3WARNING
Improperly positioning head restraints
reduces their effectiveness and increases
the likelihood of serious injury in a crash.
Make sure head restraints are in place and
positioned properly before driving.
Position head in the center
of the head restraint.
Page 203 of 345

202
Driving
Before Driving
Driving Preparation
Check the following items before you start driving. •Make sure there are no obstructions on the windows, door mirrors, exterior
lights, or other parts of the vehicle.
uRemove any frost, snow, or ice.
uRemove any snow on the roof, as this can slip down and obstruct your field of
vision while driving. If frozen solid, remove ice once it has softened.
uWhen removing ice from around the wheels, be sure not to damage the wheel
or wheel components.
• Make sure the hood is securely closed.
uIf the hood opens while driving, your front view will be blocked.
• Make sure the tires are in good condition.
uCheck air pressure, check for damage and excessive wear.
2 Checking and Maintaining Tires P. 280
• Make sure there are no people or objects behind or around the vehicle.
uThere are blind spots from the inside.
■Exterior Checks1Exterior Checks
NOTICE
When doors are frozen shut, use warm water around
the door edges to melt any ice. Do not try to force
them open, as this can damage the rubber trim
around the doors. When done, wipe dry to avoid further freezing.
Do not pour warm water into the key cylinder.
You will be unable to insert key if the water freezes in
the hole.
Page 240 of 345

239
Maintenance
This chapter discusses basic maintenance.
Before Performing Maintenance Inspection and Maintenance ............ 240
Safety When Performing Maintenance..... 241
Parts and Fluids Used in Maintenance Service ........................................... 242
Maintenance Minder™ .................... 243
Maintenance Under the Hood Maintenance Items Under the Hood ..... 251
Opening the Hood ........................... 253
Recommended Engine Oil ...... .......... 254
Oil Check ......................................... 255
Adding Engine Oil ............................ 257
Changing the Engine Oil and Oil Filter ..... 258
Engine Coolant ................................ 261
Transmission Fluid ............................ 263
Brake/Clutch Fluid ............................ 266
Refilling Window Washer Fluid......... 267
Replacing Light Bulbs ....................... 268
Checking and Maintaining Wiper
Blades .......................................... 278
Checking and Maintaining Tires Checking Tires ................................. 280
Tire and Loading Information Label ...... 281
Tire Labeling .................................... 281
DOT Tire Quality Grading (U.S. Vehicles)....... 283
Wear Indicators................................ 285 Tire Service Life ................................ 285
Tire and Wheel Replacement ........... 286
Tire Rotation .................................... 287
Winter Tires ..................................... 288
Battery ............................................... 289
Remote Transmitter Care *
Replacing the Battery ....................... 290
Heating and Cooling *
System
Maintenance ................................... 291
Cleaning
Interior Care .................................... 292
Exterior Care.................................... 294
* Not available on all models
Page 252 of 345
251
Continued
Maintenance
Maintenance Under the Hood
Maintenance Items Under the Hood
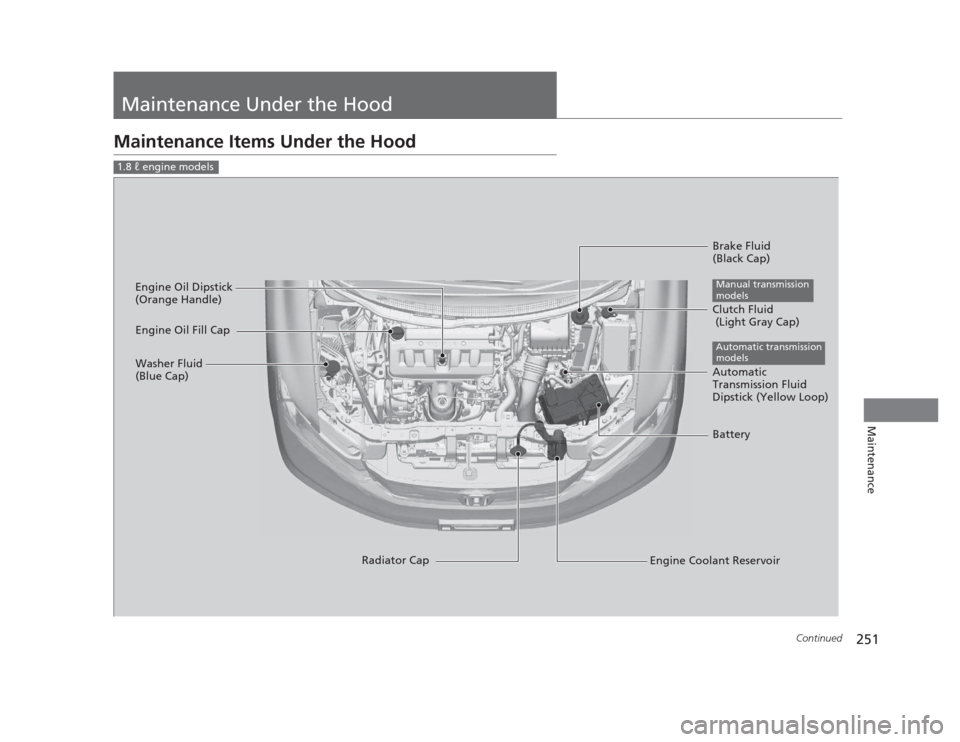
1.8 � engine models
Brake Fluid
(Black Cap)
Engine Coolant Reservoir
Radiator Cap
Washer Fluid
(Blue Cap)
Engine Oil Dipstick
(Orange Handle)
Clutch Fluid
(Light Gray Cap)
Manual transmission
models
Engine Oil Fill Cap
Automatic
Transmission Fluid
Dipstick (Yellow Loop)
Automatic transmission
models
Battery
Page 253 of 345
252
uuMaintenance Under the HooduMaintenance Items Under the Hood
Maintenance
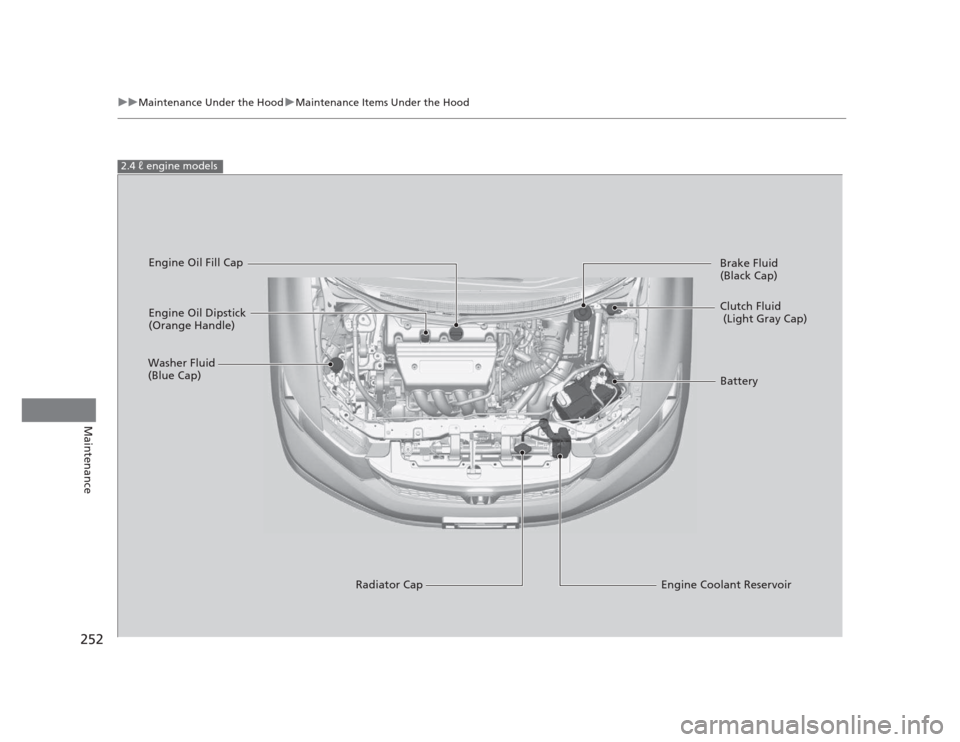
2.4 � engine models
Engine Oil Dipstick
(Orange Handle)
Washer Fluid
(Blue Cap)
Engine Coolant Reservoir
Radiator Cap Brake Fluid
(Black Cap)
Engine Oil Fill Cap
Clutch Fluid
(Light Gray Cap)
Battery