Page 263 of 345

uuMaintenance Under the HooduEngine Coolant
262
Maintenance
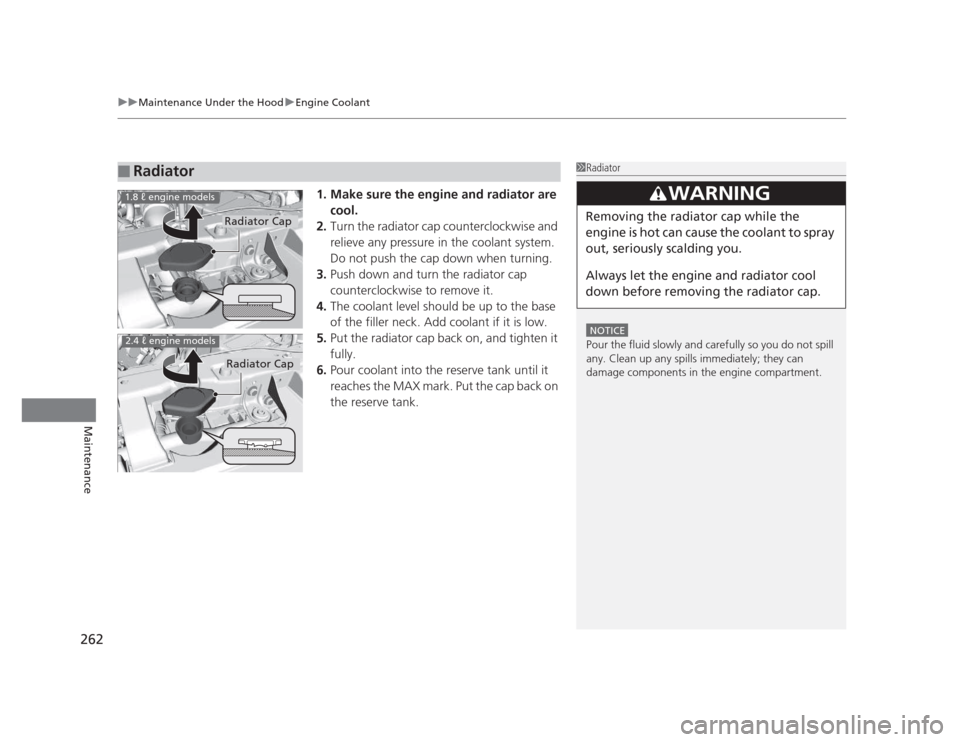
1. Make sure the engine and radiator are cool.
2. Turn the radiator cap counterclockwise and
relieve any pressure in the coolant system.
Do not push the cap down when turning.
3. Push down and turn the radiator cap
counterclockwise to remove it.
4. The coolant level should be up to the base
of the filler neck. Add coolant if it is low.
5. Put the radiator cap back on, and tighten it
fully.
6. Pour coolant into the reserve tank until it
reaches the MAX mark. Put the cap back on the reserve tank.
■Radiator1Radiator
NOTICE
Pour the fluid slowly and carefully so you do not spill
any. Clean up any spills immediately; they can
damage components in the engine compartment.
3WARNING
Removing the radiator cap while the
engine is hot can cause the coolant to spray
out, seriously scalding you.
Always let the engine and radiator cool
down before removing the radiator cap.Radiator Cap
1.8 � engine models
2.4 � engine models
Radiator Cap
Page 264 of 345

263
uuMaintenance Under the HooduTransmission Fluid
Continued
Maintenance
Transmission Fluid
Check the fluid level when the engine is at normal operating temperature.1.Park on level ground, and start the engine.
2. Wait until the radiator fan starts and then
turn off the engine.
uPerform step 3 after waiting for about 60
seconds (less than 90 seconds).
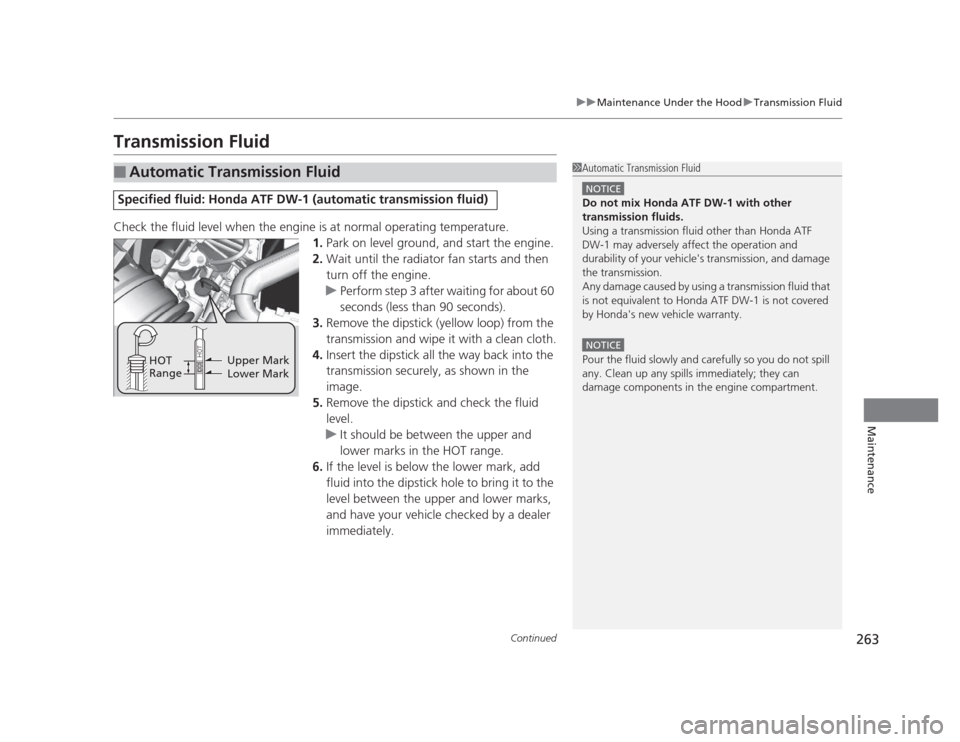
3. Remove the dipstick (yellow loop) from the
transmission and wipe it with a clean cloth.
4. Insert the dipstick all the way back into the
transmission securely, as shown in the image.
5. Remove the dipstick and check the fluid level.
uIt should be between the upper and
lower marks in the HOT range.
6. If the level is below the lower mark, add
fluid into the dipstick hole to bring it to the
level between the upper and lower marks,
and have your vehicle checked by a dealer immediately.
■Automatic Transmission Fluid
Specified fluid: Honda ATF DW-1 (automatic transmission fluid)
1Automatic Transmission Fluid
NOTICE
Do not mix Honda ATF DW-1 with other
transmission fluids.
Using a transmission fluid other than Honda ATF
DW-1 may adversely affect the operation and
durability of your vehicle's transmission, and damage
the transmission.
Any damage caused by using a transmission fluid that
is not equivalent to Honda ATF DW-1 is not covered
by Honda's new vehicle warranty.
NOTICE
Pour the fluid slowly and carefully so you do not spill
any. Clean up any spills immediately; they can
damage components in the engine compartment.Upper Mark
Lower Mark
HOT
Range
Page 265 of 345
uuMaintenance Under the HooduTransmission Fluid
264
Maintenance
Check the fluid level when the engine is at normal operating temperature. 1.Park the vehicle on level ground.
2. Remove the bolts with a wrench, then
carefully remove the under cover.
3. Remove the holding clip and the bolt, then
bend down the front edge of the left side
under cover as shown in the image.
■Manual Transmission Fluid
Specified fluid: Honda Manual Transmission Fluid (MTF)
1Manual Transmission Fluid
If Honda MTF is not available, you may use the API
certificated SAE 0 W-20 or 5 W-20 viscosity motor oil
as a temporary measure.
Replace with MTF as soon as possible. Motor oil does
not contain the proper additives for the transmission
and continued use can cause decreased shifting
performance and lead to transmission damage.
Under CoverBolt
1.8 � engine
models
1.8 � engine models
Bolt
Clip
Left Side
Under Cover1.8 � engine
models
Page 266 of 345
265
uuMaintenance Under the HooduTransmission Fluid
Maintenance
4.Remove the transmission filler bolt and
washer. Carefully feel inside the bolt hole
with your fingers.
uCheck if the fluid level is up to the edge
of the bolt hole.
5. If the fluid level is not up to the edge of the
bolt hole, add Honda Manual Transmission
Fluid (MTF) until it runs out of the hole.
6. Put a new washer on the filler bolt, then
reinstall the filler bolt.
uTightening torque:
33 lbf�ft (44 N�m, 4.5 kgf�m)
7. Reinstall the left side under cover with the
holding clip and the bolt.
8. Reinstall the under cover with the bolts.
1.8 � engine models
2.4 � engine models
All models
1.8 � engine models
Page 268 of 345
267
uuMaintenance Under the HooduRefilling Window Washer Fluid
Maintenance
Refilling Window Washer Fluid
Check the amount of window washer fluid using the washer fluid level gauge on the cap.If the level is low, fill the washer reservoir.
1Refilling Window Washer Fluid
NOTICE
Do not use engine antifreeze or a vinegar/water
solution in the windshield washer reservoir.
Antifreeze can damage your vehicle's paint. A
vinegar/water solution can damage the windshield washer pump.
Level Gauge
Page 270 of 345
Continued269
uuReplacing Light BulbsuHeadlight Bulbs
Maintenance
1.Remove the holding clips (A). Push up the
tab, and remove the cover of the air intake
duct and its upper part.
1. Unlock the holding clips (B), then remove
the cover of the air intake duct.
Fold in the upper part of the air intake duct
to get enough working space.
■Low Beam Headlights1Low Beam Headlights
Pull the clip straight up to remove it.
Keep the head of the clip raised when you insert it,
push until it clicks.
Holding clip (A-type)
Cover
Tab Clip (A)
Air
Intake Duct
Driver side
1.8 � engine models
Cover
Clip (B)
Air Intake Duct
2.4 � engine models
Page 274 of 345
273
uuReplacing Light BulbsuFront Turn Signal/Parking/Side Marker Light Bulbs
Continued
Maintenance
Front Turn Signal/Parking/Side Marker Light Bulbs
When replacing, use the following bulbs.1.Turn the steering wheel all the way to the
opposite side from the light being replaced.
Passenger side: Turn the steering wheel to
the left.
Driver side: Turn the steering wheel to the
right.
2. Remove the holding clips, and pull the inner
fender back.
2 Low Beam Headlights P. 271
3. Detach the air intake duct tube and swing it out of the inner fender.
Front Turn Signal/Parking/Side Marker Light: 28/8 W
Clip
Inner
Fender
Air
Intake
Duct Tube
2.4 � engine models
Page 278 of 345
277
uuReplacing Light BulbsuHigh-Mount Brake Light Bulb
Maintenance
High-Mount Brake Light Bulb
When replacing, use the following bulb.1.Open the trunk.
2. Turn the socket to the left and remove it.
3. Remove the old bulb and insert a new bulb.
High-mount brake light bulbs are LED type. Have an authorized Honda dealer
inspect and replace the light bulbs.
High-Mount Brake Light: 21 W
1.8 � engine models
Bulb
Socket
2.4 � engine models