2012 GMC SIERRA 1500 horn
[x] Cancel search: hornPage 9 of 556
Black plate (3,1)GMC Sierra Owner Manual - 2012 - CRC - 11/15/11
In Brief 1-3
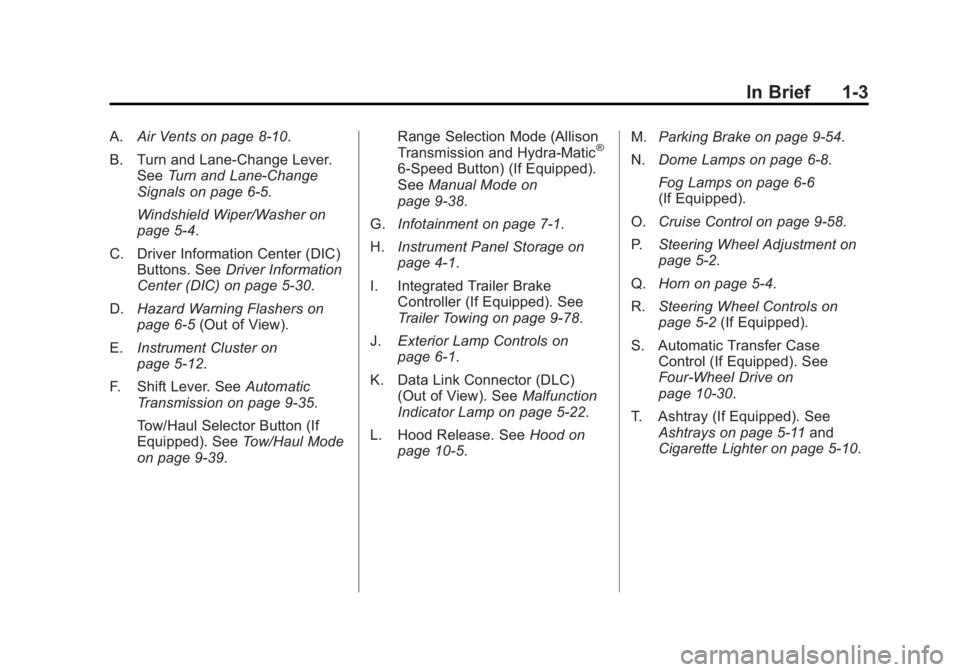
A.Air Vents on page 8‑10.
B. Turn and Lane‐Change Lever. See Turn and Lane-Change
Signals on page 6‑5.
Windshield Wiper/Washer on
page 5‑4.
C. Driver Information Center (DIC) Buttons. See Driver Information
Center (DIC) on page 5‑30.
D. Hazard Warning Flashers on
page 6‑5 (Out of View).
E. Instrument Cluster on
page 5‑12.
F. Shift Lever. See Automatic
Transmission on page 9‑35.
Tow/Haul Selector Button (If
Equipped). See Tow/Haul Mode
on page 9‑39. Range Selection Mode (Allison
Transmission and Hydra-Matic®
6‐Speed Button) (If Equipped).
See
Manual Mode on
page 9‑38.
G. Infotainment on page 7‑1.
H. Instrument Panel Storage on
page 4‑1.
I. Integrated Trailer Brake Controller (If Equipped). See
Trailer Towing on page 9‑78.
J. Exterior Lamp Controls on
page 6‑1.
K. Data Link Connector (DLC) (Out of View). See Malfunction
Indicator Lamp on page 5‑22.
L. Hood Release. See Hood on
page 10‑5. M.
Parking Brake on page 9‑54.
N. Dome Lamps on page 6‑8.
Fog Lamps on page 6‑6
(If Equipped).
O. Cruise Control on page 9‑58.
P. Steering Wheel Adjustment on
page 5‑2.
Q. Horn on page 5‑4.
R. Steering Wheel Controls on
page 5‑2 (If Equipped).
S. Automatic Transfer Case Control (If Equipped). See
Four-Wheel Drive on
page 10‑30.
T. Ashtray (If Equipped). See Ashtrays on page 5‑11 and
Cigarette Lighter on page 5‑10.
Page 13 of 556
Black plate (7,1)GMC Sierra Owner Manual - 2012 - CRC - 11/15/11
In Brief 1-7
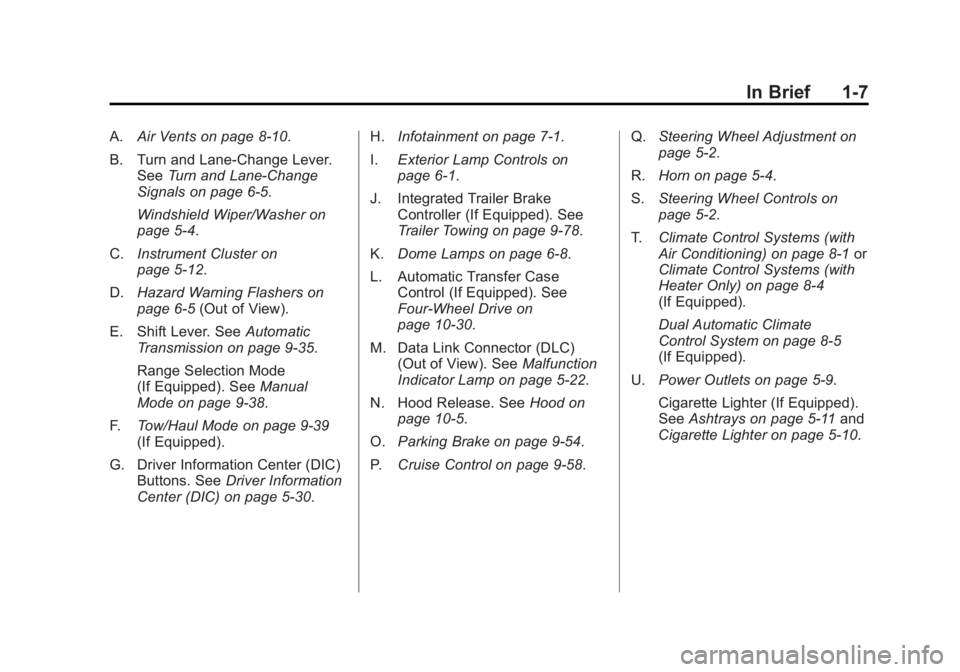
A.Air Vents on page 8‑10.
B. Turn and Lane‐Change Lever. See Turn and Lane-Change
Signals on page 6‑5.
Windshield Wiper/Washer on
page 5‑4.
C. Instrument Cluster on
page 5‑12.
D. Hazard Warning Flashers on
page 6‑5 (Out of View).
E. Shift Lever. See Automatic
Transmission on page 9‑35.
Range Selection Mode
(If Equipped). See Manual
Mode on page 9‑38.
F. Tow/Haul Mode on page 9‑39
(If Equipped).
G. Driver Information Center (DIC) Buttons. See Driver Information
Center (DIC) on page 5‑30. H.
Infotainment on page 7‑1.
I. Exterior Lamp Controls on
page 6‑1.
J. Integrated Trailer Brake Controller (If Equipped). See
Trailer Towing on page 9‑78.
K. Dome Lamps on page 6‑8.
L. Automatic Transfer Case Control (If Equipped). See
Four-Wheel Drive on
page 10‑30.
M. Data Link Connector (DLC) (Out of View). See Malfunction
Indicator Lamp on page 5‑22.
N. Hood Release. See Hood on
page 10‑5.
O. Parking Brake on page 9‑54.
P. Cruise Control on page 9‑58. Q.
Steering Wheel Adjustment on
page 5‑2.
R. Horn on page 5‑4.
S. Steering Wheel Controls on
page 5‑2.
T. Climate Control Systems (with
Air Conditioning) on page 8‑1 or
Climate Control Systems (with
Heater Only) on page 8‑4
(If Equipped).
Dual Automatic Climate
Control System on page 8‑5
(If Equipped).
U. Power Outlets on page 5‑9.
Cigarette Lighter (If Equipped).
See Ashtrays on page 5‑11 and
Cigarette Lighter on page 5‑10.
Page 47 of 556

Black plate (3,1)GMC Sierra Owner Manual - 2012 - CRC - 11/15/11
Keys, Doors, and Windows 2-3
If there is a decrease in the RKE
operating range:
.Check the distance. The
transmitter may be too far from
the vehicle.
.Check the location. Other
vehicles or objects may be
blocking the signal.
.Check the transmitter's battery.
See“Battery Replacement” later
in this section.
.If the transmitter is still not
working correctly, see your
dealer or a qualified technician
for service.
Remote Keyless Entry
(RKE) System Operation
The Remote Keyless Entry (RKE)
transmitter functions work up to
60 m (195 ft) away from the vehicle.
There are other conditions which
can affect the performance of the
transmitter. See Remote Keyless
Entry (RKE) System on page 2‑2.
With Remote Start (without
Remote Start Similar)
/(Remote Vehicle Start): For
vehicles with this feature, press
/
to start the engine from outside the
vehicle using the RKE transmitter.
See Remote Vehicle Start on
page 2‑5 for additional information.
Q(Lock):Press to lock all the
doors.
If enabled through the Driver
Information Center (DIC), the turn
signal lamps flash once to indicate
locking has occurred. If enabled
through the DIC, the horn chirps when
Qis pressed again within
three seconds. See Vehicle
Personalization (With DIC Buttons)
on page 5‑48 for additional
information.
Pressing
Qarms the content
theft‐deterrent system. See
Anti-theft Alarm System on
page 2‑11.
K(Unlock): Press once to unlock
only the driver door. If
Kis pressed
again within three seconds, all
remaining doors unlock. The interior
lamps may come on and stay on for
20 seconds or until the ignition is
turned on.
If enabled through the DIC, the turn
signal lamps flash twice to indicate
unlocking has occurred. See Vehicle
Personalization (With DIC Buttons)
on page 5‑48. If enabled through the
DIC, the exterior lights may turn on.
See “Approach Lighting” under
Vehicle Personalization (With DIC
Buttons) on page 5‑48.
Page 48 of 556
Black plate (4,1)GMC Sierra Owner Manual - 2012 - CRC - 11/15/11
2-4 Keys, Doors, and Windows
PressingKon the RKE transmitter
disarms the content theft‐deterrent
system. See Anti-theft Alarm
System on page 2‑11.
L(Vehicle Locator/Panic
Alarm): Press and release to
locate the vehicle. The turn signal
lamps flash and the horn sounds
three times.
Press and hold
Lfor more than
two seconds to activate the panic
alarm. The turn signal lamps flash
and the horn sounds repeatedly for
30 seconds. The alarm turns off
when the ignition is moved to
ON/RUN or
Lis pressed again.
The ignition must be in LOCK/OFF
for the panic alarm to work.
Programming Transmitters to
the Vehicle
Only RKE transmitters programmed
to this vehicle will work. If a
transmitter is lost or stolen, a
replacement can be purchased and
programmed through your dealer. When the replacement transmitter
is programmed to this vehicle, all
remaining transmitters must also be
reprogrammed. Any lost or stolen
transmitters will no longer work
once the new transmitter is
programmed. Each vehicle can
have up to eight transmitters
programmed to it. See your dealer
for transmitter programming.
Battery Replacement
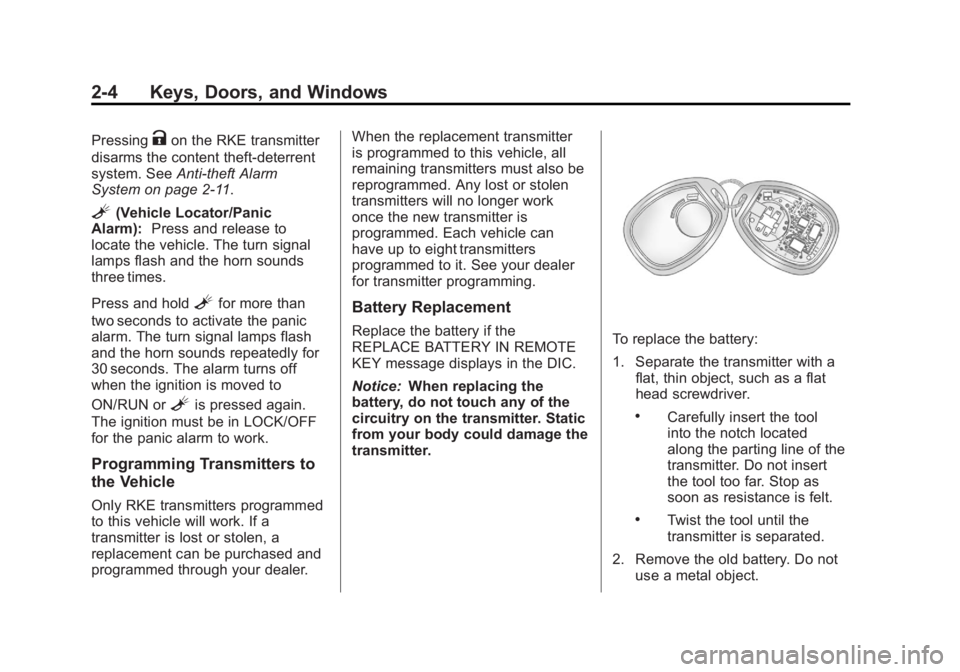
Replace the battery if the
REPLACE BATTERY IN REMOTE
KEY message displays in the DIC.
Notice:
When replacing the
battery, do not touch any of the
circuitry on the transmitter. Static
from your body could damage the
transmitter.To replace the battery:
1. Separate the transmitter with a flat, thin object, such as a flat
head screwdriver.
.Carefully insert the tool
into the notch located
along the parting line of the
transmitter. Do not insert
the tool too far. Stop as
soon as resistance is felt.
.Twist the tool until the
transmitter is separated.
2. Remove the old battery. Do not use a metal object.
Page 56 of 556
Black plate (12,1)GMC Sierra Owner Manual - 2012 - CRC - 11/15/11
2-12 Keys, Doors, and Windows
If the delayed locking feature is
active, the alarm will not be
activated until all doors are
closed and the security light
goes off.
3. Close all doors. The security light will stop flashing and go off
after approximately 30 seconds.
The system is armed when the
security light goes off.
If a locked driver door is opened
without using the RKE transmitter, a
10 second pre-alarm will occur. The
horn will chirp and the lights will
flash. If the key is not placed in the
ignition and turned to START or the
door is not unlocked by pressing
the unlock button on the RKE
transmitter during the 10 second
pre-alarm, the alarm will go off.
The vehicle's headlamps will flash
and the horn will sound for about
30 seconds, then will turn off to save
the battery power.
The theft-deterrent system will not
activate if the doors are locked with
the key or the manual door lock. It activates only if you use the
power door lock switch or the RKE
transmitter. The vehicle can be
started with the correct key if the
alarm is set off.
To avoid setting off the alarm by
accident:
.If you do not want to activate
the theft-deterrent system, the
vehicle should be locked with
the door key after the doors are
closed.
.Always unlock a door with the
RKE transmitter.
If the alarm is set off, press unlock
on the RKE transmitter or place the
key in the ignition and turn it to
START.
Testing the Alarm
To test the alarm:
1. Lower the driver window and open the driver door.
2. Press lock on the RKE transmitter. 3. Close the door and wait for the
security light to go out.
4. Reach in through the window, unlock the door with the manual
door lock, and open the door.
This should set off the alarm.
If the alarm does not sound when it
should but the headlamps flash,
check to see if the horn works. The
horn fuse may be blown. To replace
the fuse, see Fuses and Circuit
Breakers on page 10‑44.
If the alarm does not sound or the
headlamps do not flash, see your
dealer for service.
Immobilizer
See Radio Frequency Statement on
page 13‑20 for information
regarding Part 15 of the Federal
Communications Commission (FCC)
rules and Industry Canada
Standards RSS-GEN/210/220/310.
Page 139 of 556
Black plate (1,1)GMC Sierra Owner Manual - 2012 - CRC - 11/15/11
Instruments and Controls 5-1
Instruments and
Controls
Controls
Steering Wheel Adjustment . . . 5-2
Steering Wheel Controls . . . . . . 5-2
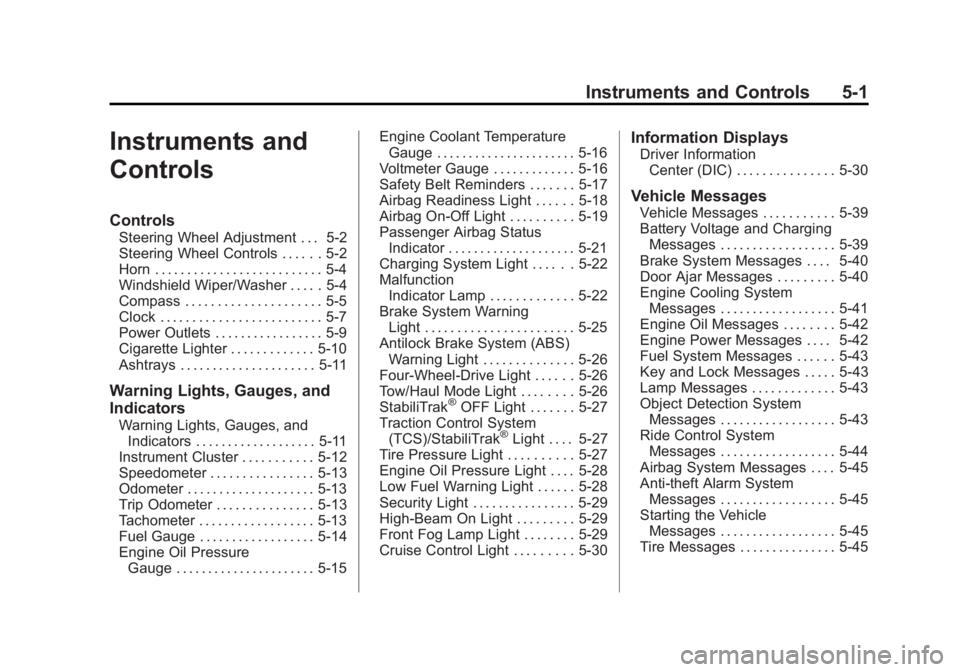
Horn . . . . . . . . . . . . . . . . . . . . . . . . . . 5-4
Windshield Wiper/Washer . . . . . 5-4
Compass . . . . . . . . . . . . . . . . . . . . . 5-5
Clock . . . . . . . . . . . . . . . . . . . . . . . . . 5-7
Power Outlets . . . . . . . . . . . . . . . . . 5-9
Cigarette Lighter . . . . . . . . . . . . . 5-10
Ashtrays . . . . . . . . . . . . . . . . . . . . . 5-11
Warning Lights, Gauges, and
Indicators
Warning Lights, Gauges, andIndicators . . . . . . . . . . . . . . . . . . . 5-11
Instrument Cluster . . . . . . . . . . . 5-12
Speedometer . . . . . . . . . . . . . . . . 5-13
Odometer . . . . . . . . . . . . . . . . . . . . 5-13
Trip Odometer . . . . . . . . . . . . . . . 5-13
Tachometer . . . . . . . . . . . . . . . . . . 5-13
Fuel Gauge . . . . . . . . . . . . . . . . . . 5-14
Engine Oil Pressure Gauge . . . . . . . . . . . . . . . . . . . . . . 5-15 Engine Coolant Temperature
Gauge . . . . . . . . . . . . . . . . . . . . . . 5-16
Voltmeter Gauge . . . . . . . . . . . . . 5-16
Safety Belt Reminders . . . . . . . 5-17
Airbag Readiness Light . . . . . . 5-18
Airbag On-Off Light . . . . . . . . . . 5-19
Passenger Airbag Status Indicator . . . . . . . . . . . . . . . . . . . . 5-21
Charging System Light . . . . . . 5-22
Malfunction Indicator Lamp . . . . . . . . . . . . . 5-22
Brake System Warning Light . . . . . . . . . . . . . . . . . . . . . . . 5-25
Antilock Brake System (ABS) Warning Light . . . . . . . . . . . . . . 5-26
Four-Wheel-Drive Light . . . . . . 5-26
Tow/Haul Mode Light . . . . . . . . 5-26
StabiliTrak
®OFF Light . . . . . . . 5-27
Traction Control System (TCS)/StabiliTrak
®Light . . . . 5-27
Tire Pressure Light . . . . . . . . . . 5-27
Engine Oil Pressure Light . . . . 5-28
Low Fuel Warning Light . . . . . . 5-28
Security Light . . . . . . . . . . . . . . . . 5-29
High-Beam On Light . . . . . . . . . 5-29
Front Fog Lamp Light . . . . . . . . 5-29
Cruise Control Light . . . . . . . . . 5-30
Information Displays
Driver Information Center (DIC) . . . . . . . . . . . . . . . 5-30
Vehicle Messages
Vehicle Messages . . . . . . . . . . . 5-39
Battery Voltage and ChargingMessages . . . . . . . . . . . . . . . . . . 5-39
Brake System Messages . . . . 5-40
Door Ajar Messages . . . . . . . . . 5-40
Engine Cooling System Messages . . . . . . . . . . . . . . . . . . 5-41
Engine Oil Messages . . . . . . . . 5-42
Engine Power Messages . . . . 5-42
Fuel System Messages . . . . . . 5-43
Key and Lock Messages . . . . . 5-43
Lamp Messages . . . . . . . . . . . . . 5-43
Object Detection System Messages . . . . . . . . . . . . . . . . . . 5-43
Ride Control System Messages . . . . . . . . . . . . . . . . . . 5-44
Airbag System Messages . . . . 5-45
Anti-theft Alarm System Messages . . . . . . . . . . . . . . . . . . 5-45
Starting the Vehicle Messages . . . . . . . . . . . . . . . . . . 5-45
Tire Messages . . . . . . . . . . . . . . . 5-45
Page 142 of 556
Black plate (4,1)GMC Sierra Owner Manual - 2012 - CRC - 11/15/11
5-4 Instruments and Controls
3. Press and release¨to move up
one track within the selected
category.
b/g(Mute/Push to Talk): Press
to silence the vehicle speakers only.
Press again to turn the sound on.
For vehicles with Bluetooth or
OnStar systems, press and hold for
longer than two seconds to interact
with those systems. See Bluetooth
on page 7‑48 andOnStar Overview
on page 14‑1 for more information.
SRCE (Source/Voice
Recognition): Press to switch
between the radio and CD, and for
equipped vehicles, the DVD, front
auxiliary, and rear auxiliary.
For vehicles with the navigation
system, press and hold this button
for longer than one second to
initiate voice recognition. See “Voice
Recognition” in the Navigation
System manual for more
information.
¨(Seek): Press to go to the
next radio station while in AM,
FM, or XM™.
For vehicles with or without a
navigation system:
Press
¨to go to the next track or
chapter while sourced to the CD or
DVD slot.
Press
¨to select a track or a folder
when navigating folders on an iPod
or USB device.
For vehicles with a navigation
system:
1. Press and hold
¨until a beep is
heard, to place the radio into
SCAN mode. A station will play
for five seconds before moving
to the next station.
2. To stop the SCAN function, press
¨again. While listening to a CD/DVD, press
and hold
¨to quickly move forward
through the tracks. Release to stop
on the desired track.
+
e: Press to increase volume.
−
e: Press to decrease volume.
Horn
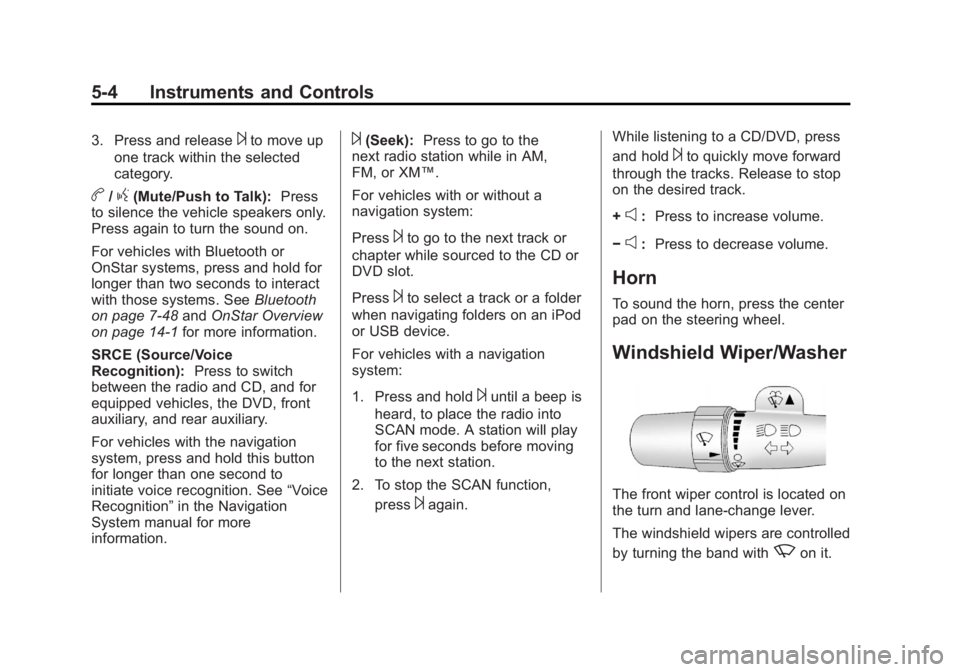
To sound the horn, press the center
pad on the steering wheel.
Windshield Wiper/Washer
The front wiper control is located on
the turn and lane‐change lever.
The windshield wipers are controlled
by turning the band with
zon it.
Page 188 of 556
Black plate (50,1)GMC Sierra Owner Manual - 2012 - CRC - 11/15/11
5-50 Instruments and Controls
Press the customization button until
AUTO DOOR UNLOCK appears on
the DIC display. Press the set/reset
button once to access the settings
for this feature. Then press the
customization button to scroll
through the following settings:
OFF:None of the doors will
automatically unlock.
DRIVER AT KEY OUT: Only the
driver door will unlock when the key
is taken out of the ignition.
DRIVER IN PARK: Only the driver
door will unlock when the vehicle is
shifted into P (Park).
ALL AT KEY OUT: All of the doors
will unlock when the key is taken
out of the ignition.
ALL IN PARK (default): All of the
doors will unlock when the vehicle is
shifted into P (Park).
NO CHANGE: No change will be
made to this feature. The current
setting will remain. To select a setting, press the set/
reset button while the desired
setting is displayed on the DIC.
REMOTE DOOR LOCK
This feature allows you to select the
type of feedback received when
locking the vehicle with the Remote
Keyless Entry (RKE) transmitter.
You will not receive feedback when
locking the vehicle with the RKE
transmitter if the doors are open.
See
Remote Keyless Entry (RKE)
System Operation on page 2‑3 for
more information.
Press the customization button until
REMOTE DOOR LOCK appears on
the DIC display. Press the set/reset
button once to access the settings
for this feature. Then press the
customization button to scroll
through the following settings:
OFF: There will be no feedback
when you press the lock button on
the RKE transmitter. LIGHTS ONLY:
The exterior lamps
will flash when you press the lock
button on the RKE transmitter.
HORN ONLY: The horn will sound
on the second press of the lock
button on the RKE transmitter.
HORN & LIGHTS (default): The
exterior lamps will flash when you
press the lock button on the RKE
transmitter, and the horn will sound
when the lock button is pressed
again within five seconds of the
previous command.
NO CHANGE: No change will be
made to this feature. The current
setting will remain.
To select a setting, press the set/
reset button while the desired
setting is displayed on the DIC.
REMOTE DOOR UNLOCK
This feature allows you to select the
type of feedback received when
unlocking the vehicle with the
Remote Keyless Entry (RKE)
transmitter. You will not receive
feedback when unlocking the