2012 GMC SIERRA 1500 bulb
[x] Cancel search: bulbPage 2 of 556
Black plate (2,1)GMC Sierra Owner Manual - 2012 - CRC - 11/15/11
2012 GMC Sierra Owner ManualM
Ride Control Systems . . . . . . . . 9-55
Cruise Control . . . . . . . . . . . . . . . . 9-58
Object Detection Systems . . . . 9-61
Fuel . . . . . . . . . . . . . . . . . . . . . . . . . . 9-68
Towing . . . . . . . . . . . . . . . . . . . . . . . 9-74
Conversions and
Add-Ons . . . . . . . . . . . . . . . . . . . 9-105
Vehicle Care . . . . . . . . . . . . . . . . . 10-1
General Information . . . . . . . . . . 10-2
Vehicle Checks . . . . . . . . . . . . . . . 10-4
Headlamp Aiming . . . . . . . . . . . 10-37
Bulb Replacement . . . . . . . . . . 10-39
Electrical System . . . . . . . . . . . . 10-43
Wheels and Tires . . . . . . . . . . . 10-50
Jump Starting . . . . . . . . . . . . . . . 10-88
Towing . . . . . . . . . . . . . . . . . . . . . . 10-93
Appearance Care . . . . . . . . . . . 10-98 Service and Maintenance
. . . 11-1
General Information . . . . . . . . . . 11-1
Maintenance Schedule . . . . . . . 11-3
Special Application
Services . . . . . . . . . . . . . . . . . . . . 11-8
Additional Maintenance and Care . . . . . . . . . . . . . . . . . . . . 11-9
Recommended Fluids,
Lubricants, and Parts . . . . . . 11-12
Maintenance Records . . . . . . . 11-16
Technical Data . . . . . . . . . . . . . . . 12-1
Vehicle Identification . . . . . . . . . 12-1
Vehicle Data . . . . . . . . . . . . . . . . . . 12-2 Customer Information
. . . . . . . 13-1
Customer Information . . . . . . . . 13-1
Reporting Safety Defects . . . . 13-17
Vehicle Data Recording and
Privacy . . . . . . . . . . . . . . . . . . . . 13-19
OnStar . . . . . . . . . . . . . . . . . . . . . . . 14-1
OnStar Overview . . . . . . . . . . . . . 14-1
OnStar Services . . . . . . . . . . . . . . 14-2
OnStar Additional
Information . . . . . . . . . . . . . . . . . . 14-5
Index . . . . . . . . . . . . . . . . . . . . . i-1
Page 206 of 556
Black plate (6,1)GMC Sierra Owner Manual - 2012 - CRC - 11/15/11
6-6 Lighting
Holding the turn signal lever for
more than one second will cause
the turn signals to flash until you
release the lever.
The lever returns to its starting
position whenever it is released.
If after signaling a turn or a lane
change the arrows flash rapidly or
do not come on, a signal bulb could
be burned out.
Have the bulbs replaced. If the bulb
is not burned out, check the fuse.
SeeFuses and Circuit Breakers on
page 10‑44.
Turn Signal On Chime
If the turn signal is left on for more
than 1.2 km (0.75 mi), a chime will
sound at each flash of the turn
signal and the message TURN
SIGNAL ON will also appear in the
Driver Information Control (DIC). To
turn the chime and message off,
move the turn signal lever to the off
position.Fog Lamps
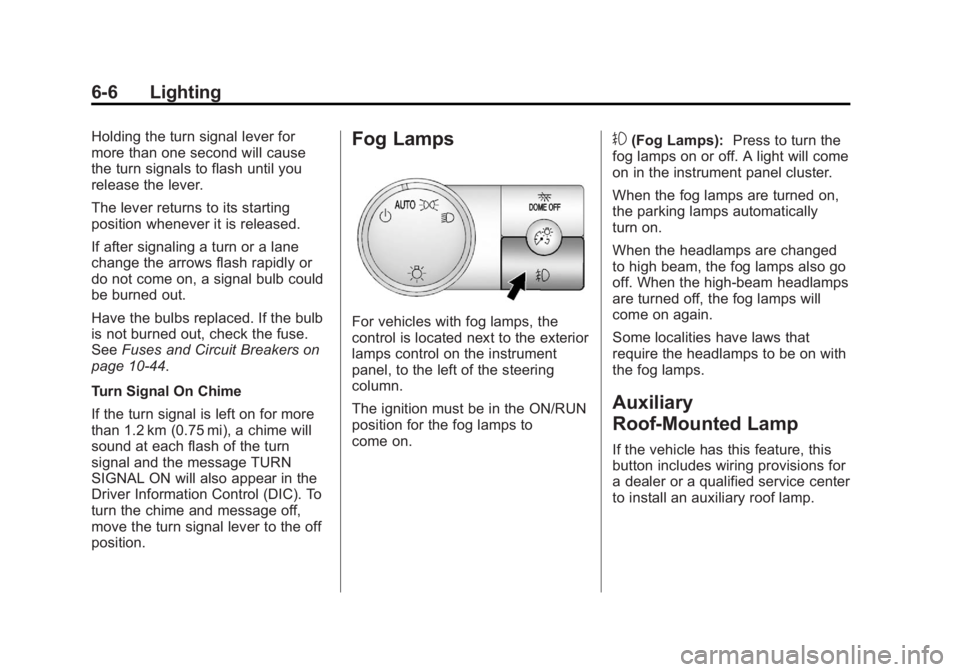
For vehicles with fog lamps, the
control is located next to the exterior
lamps control on the instrument
panel, to the left of the steering
column.
The ignition must be in the ON/RUN
position for the fog lamps to
come on.
#(Fog Lamps): Press to turn the
fog lamps on or off. A light will come
on in the instrument panel cluster.
When the fog lamps are turned on,
the parking lamps automatically
turn on.
When the headlamps are changed
to high beam, the fog lamps also go
off. When the high-beam headlamps
are turned off, the fog lamps will
come on again.
Some localities have laws that
require the headlamps to be on with
the fog lamps.
Auxiliary
Roof-Mounted Lamp
If the vehicle has this feature, this
button includes wiring provisions for
a dealer or a qualified service center
to install an auxiliary roof lamp.
Page 352 of 556
Black plate (76,1)GMC Sierra Owner Manual - 2012 - CRC - 11/15/11
9-76 Driving and Operating
Backing Up
Hold the bottom of the steering
wheel with one hand. To move the
trailer to the left, move that hand to
the left. To move the trailer to the
right, move your hand to the right.
Always back up slowly and,
if possible, have someone
guide you.
Making Turns
Notice:Making very sharp turns
while trailering could cause the
trailer to come in contact with the
vehicle. The vehicle could be
damaged. Avoid making very
sharp turns while trailering.
When turning with a trailer, make
wider turns than normal. Do this
so the trailer will not strike soft
shoulders, curbs, road signs, trees,
or other objects. Avoid jerky or
sudden maneuvers. Signal well in
advance. If the trailer turn signal bulbs burn
out, the arrows on the instrument
panel will still flash for turns. It is
important to check occasionally to
be sure the trailer bulbs are still
working.
Driving on Grades
Reduce speed and shift to a
lower gear
beforestarting down a
long or steep downgrade. If the
transmission is not shifted down, the
brakes might get hot and no longer
work well.
Vehicles can tow in D (Drive). Shift
the transmission to a lower gear if
the transmission shifts too often
under heavy loads and/or hilly
conditions.
The Tow/Haul Mode may be used if
the transmission shifts too often.
See Tow/Haul Mode on page 9‑39.
When towing at high altitude on
steep uphill grades, consider the
following: Engine coolant will boil at
a lower temperature than at normal
altitudes. If the engine is turned off immediately after towing at high
altitude on steep uphill grades, the
vehicle may show signs similar to
engine overheating. To avoid this,
let the engine run while parked,
preferably on level ground, with the
automatic transmission in P (Park)
for a few minutes before turning the
engine off. If the overheat warning
comes on, see
Engine Overheating
on page 10‑22.
Parking on Hills
{WARNING
Parking the vehicle on a hill
with the trailer attached can be
dangerous. If something goes
wrong, the rig could start to move.
People can be injured, and both
the vehicle and the trailer can be
damaged. When possible, always
park the rig on a flat surface.
Page 387 of 556
Black plate (1,1)GMC Sierra Owner Manual - 2012 - CRC - 11/15/11
Vehicle Care 10-1
Vehicle Care
General Information
General Information . . . . . . . . . . 10-2
California Proposition65 Warning . . . . . . . . . . . . . . . . . 10-3
California Perchlorate Materials Requirements . . . . 10-3
Accessories and Modifications . . . . . . . . . . . . . . . 10-3
Vehicle Checks
Doing Your OwnService Work . . . . . . . . . . . . . . . 10-4
Hood . . . . . . . . . . . . . . . . . . . . . . . . 10-5
Engine Compartment Overview . . . . . . . . . . . . . . . . . . . 10-6
Engine Oil . . . . . . . . . . . . . . . . . . . 10-7
Engine Oil Life System . . . . . 10-10
Automatic Transmission Fluid (4-Speed Transmission) . . . 10-11
Automatic Transmission Fluid (6-Speed
Transmission) . . . . . . . . . . . . . 10-14
Engine Air Cleaner/Filter . . . . 10-17
Cooling System . . . . . . . . . . . . 10-18
Engine Coolant . . . . . . . . . . . . . 10-19
Engine Overheating . . . . . . . . 10-22 Overheated Engine
Protection
Operating Mode . . . . . . . . . . . 10-24
Engine Fan . . . . . . . . . . . . . . . . . 10-24
Power Steering Fluid . . . . . . . 10-25
Washer Fluid . . . . . . . . . . . . . . . 10-26
Brakes . . . . . . . . . . . . . . . . . . . . . 10-27
Brake Fluid . . . . . . . . . . . . . . . . . 10-28
Battery . . . . . . . . . . . . . . . . . . . . . 10-30
Four-Wheel Drive . . . . . . . . . . . 10-30
Front Axle . . . . . . . . . . . . . . . . . . 10-31
Rear Axle . . . . . . . . . . . . . . . . . . 10-32
Noise Control System . . . . . . 10-34
Starter Switch Check . . . . . . . 10-35
Automatic Transmission Shift Lock Control Function
Check . . . . . . . . . . . . . . . . . . . . . 10-35
Ignition Transmission Lock Check . . . . . . . . . . . . . . . . . . . . . 10-35
Park Brake and P (Park) Mechanism Check . . . . . . . . 10-36
Wiper Blade Replacement . . . . . . . . . . . . . . 10-36
Glass Replacement . . . . . . . . 10-37
Headlamp Aiming
Headlamp Aiming . . . . . . . . . . 10-37
Bulb Replacement
Bulb Replacement . . . . . . . . . . 10-39
Halogen Bulbs . . . . . . . . . . . . . . 10-39
Headlamps, Front Turn Signal, Sidemarker, and
Parking Lamps . . . . . . . . . . . . 10-39
Pick-Up Box Identification and Fender Marker
Lamps . . . . . . . . . . . . . . . . . . . . 10-40
Taillamps (Chassis Cab Models) . . . . . . . . . . . . . . . . . . . 10-40
Taillamps, Turn Signal, Stoplamps, and Back-Up
Lamps . . . . . . . . . . . . . . . . . . . . 10-41
Center High-Mounted Stoplamp (CHMSL) and
Cargo Lamp . . . . . . . . . . . . . . 10-42
License Plate Lamp . . . . . . . . 10-42
Replacement Bulbs . . . . . . . . . 10-43
Electrical System
Electrical System Overload . . . . . . . . . . . . . . . . . . 10-43
Fuses and Circuit Breakers . . . . . . . . . . . . . . . . . . 10-44
Engine Compartment Fuse Block . . . . . . . . . . . . . . . . . . . . . 10-44
Instrument Panel Fuse Block . . . . . . . . . . . . . . . . . . . . . 10-48
Page 425 of 556
Black plate (39,1)GMC Sierra Owner Manual - 2012 - CRC - 11/15/11
Vehicle Care 10-39
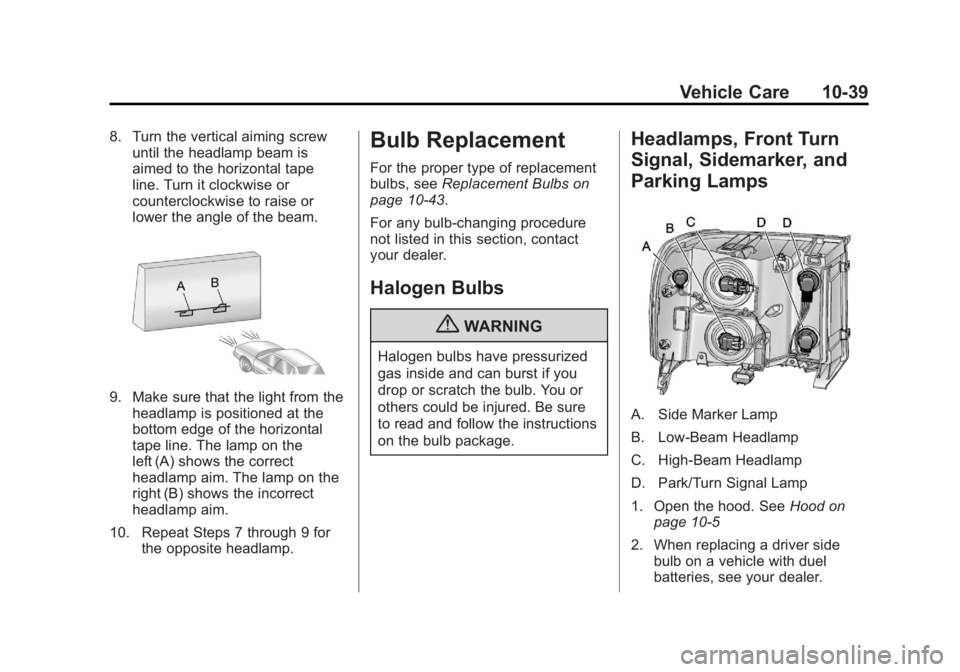
8. Turn the vertical aiming screwuntil the headlamp beam is
aimed to the horizontal tape
line. Turn it clockwise or
counterclockwise to raise or
lower the angle of the beam.
9. Make sure that the light from theheadlamp is positioned at the
bottom edge of the horizontal
tape line. The lamp on the
left (A) shows the correct
headlamp aim. The lamp on the
right (B) shows the incorrect
headlamp aim.
10. Repeat Steps 7 through 9 for the opposite headlamp.
Bulb Replacement
For the proper type of replacement
bulbs, see Replacement Bulbs on
page 10‑43.
For any bulb‐changing procedure
not listed in this section, contact
your dealer.
Halogen Bulbs
{WARNING
Halogen bulbs have pressurized
gas inside and can burst if you
drop or scratch the bulb. You or
others could be injured. Be sure
to read and follow the instructions
on the bulb package.
Headlamps, Front Turn
Signal, Sidemarker, and
Parking Lamps
A. Side Marker Lamp
B. Low-Beam Headlamp
C. High-Beam Headlamp
D. Park/Turn Signal Lamp
1. Open the hood. See Hood on
page 10‑5
2. When replacing a driver side bulb on a vehicle with duel
batteries, see your dealer.
Page 426 of 556
Black plate (40,1)GMC Sierra Owner Manual - 2012 - CRC - 11/15/11
10-40 Vehicle Care
3. When replacing a bulb on thepassenger side, remove the
Engine Air Cleaner cover. See
Engine Air Cleaner/Filter on
page 10‑17 for more information.
4. Reach in and access the bulb sockets from inside the engine
compartment.
5. Turn the bulb socket counterclockwise to remove it
from the headlamp assembly
and pull it straight out.
6. Unplug the electrical connector from the old bulb by releasing
the clips on the bulb socket.
7. Replace it with a new bulb.
8. Plug in the electrical connector.
9. Reinstall the new bulb socket into the headlamp assembly and
turn it clockwise to secure.Pick-Up Box Identification
and Fender Marker
Lamps
The pick-up box identification lamps
are LEDs. For replacement of the
LED lighting assembly contact your
dealer.
To replace a pickup box fender
marker lamp bulb:
1. Press the tab from the back toremove the lamp.
2. Turn the bulb socket counterclockwise to remove
from the lamp assembly.
3. Gently pry the bulb from the socket.
4. Install the new bulb in socket.
5. Reinstall socket into lamp assembly.
6. Reinstall the lamp assembly.
Taillamps (Chassis Cab
Models)
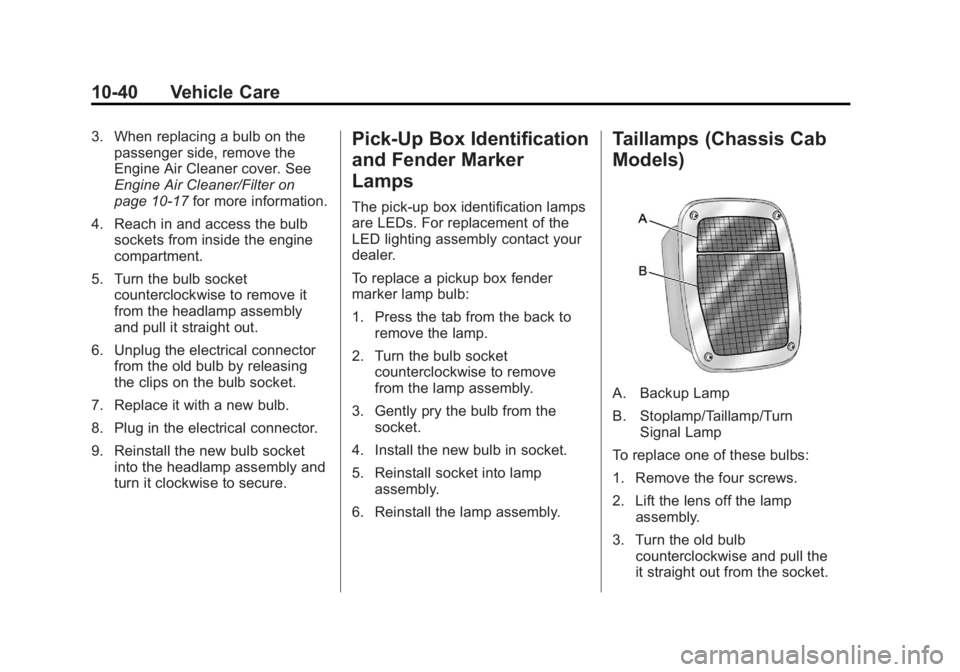
A. Backup Lamp
B. Stoplamp/Taillamp/Turn Signal Lamp
To replace one of these bulbs:
1. Remove the four screws.
2. Lift the lens off the lamp assembly.
3. Turn the old bulb counterclockwise and pull the
it straight out from the socket.
Page 427 of 556
Black plate (41,1)GMC Sierra Owner Manual - 2012 - CRC - 11/15/11
Vehicle Care 10-41
4. Install a new bulb into thesocket, turn it clockwise, and
press it in until it is tight.
5. Reinstall the lens and the four screws.
Taillamps, Turn Signal,
Stoplamps, and Back-Up
Lamps
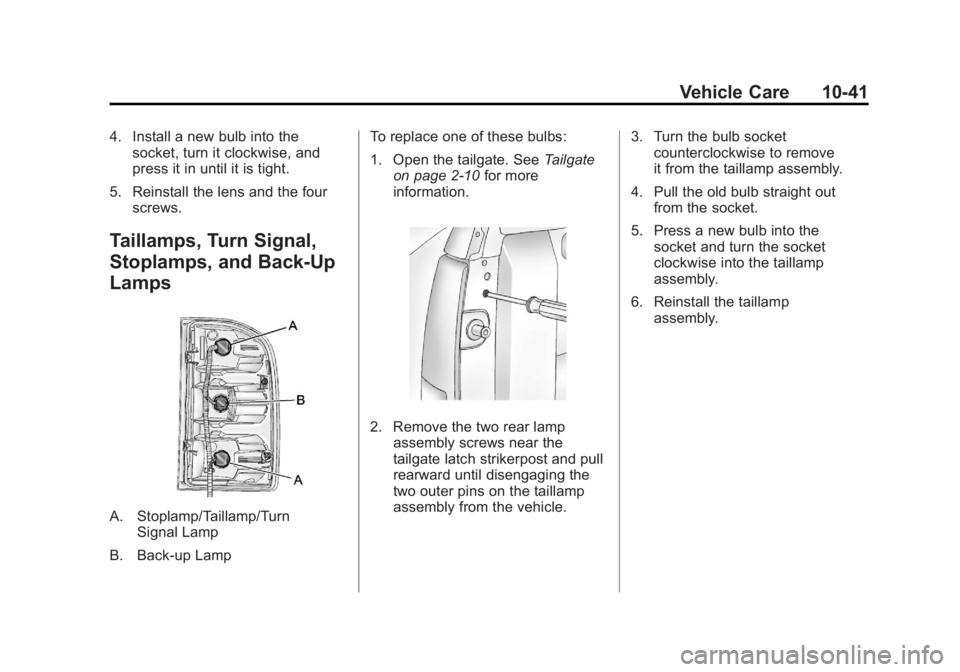
A. Stoplamp/Taillamp/Turn Signal Lamp
B. Back-up Lamp To replace one of these bulbs:
1. Open the tailgate. See
Tailgate
on page 2‑10 for more
information.
2. Remove the two rear lamp assembly screws near the
tailgate latch strikerpost and pull
rearward until disengaging the
two outer pins on the taillamp
assembly from the vehicle. 3. Turn the bulb socket
counterclockwise to remove
it from the taillamp assembly.
4. Pull the old bulb straight out from the socket.
5. Press a new bulb into the socket and turn the socket
clockwise into the taillamp
assembly.
6. Reinstall the taillamp assembly.
Page 428 of 556
Black plate (42,1)GMC Sierra Owner Manual - 2012 - CRC - 11/15/11
10-42 Vehicle Care
Center High-Mounted
Stoplamp (CHMSL) and
Cargo Lamp
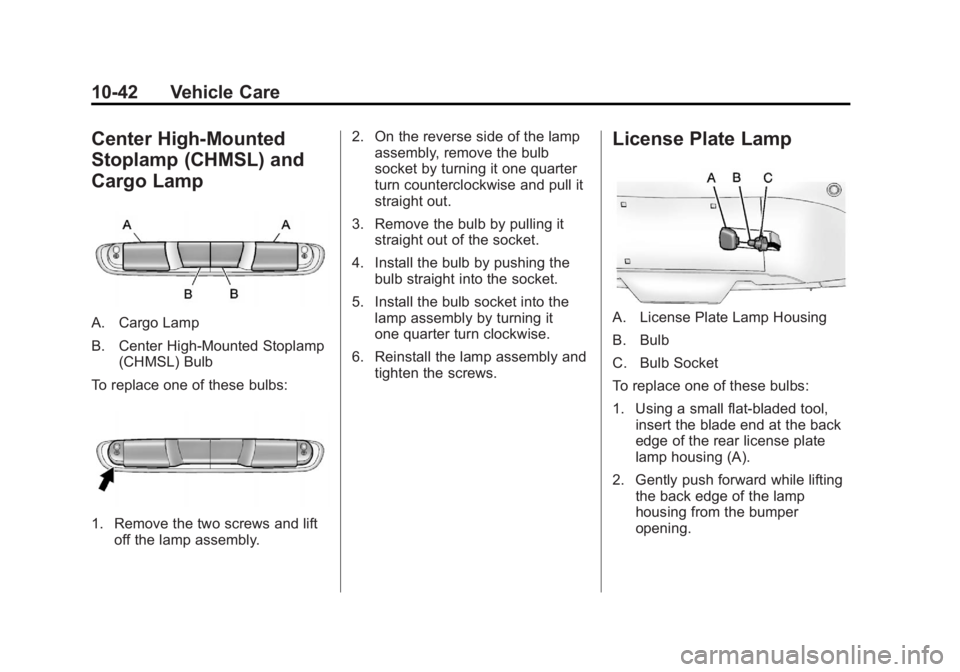
A. Cargo Lamp
B. Center High-Mounted Stoplamp(CHMSL) Bulb
To replace one of these bulbs:
1. Remove the two screws and lift off the lamp assembly. 2. On the reverse side of the lamp
assembly, remove the bulb
socket by turning it one quarter
turn counterclockwise and pull it
straight out.
3. Remove the bulb by pulling it straight out of the socket.
4. Install the bulb by pushing the bulb straight into the socket.
5. Install the bulb socket into the lamp assembly by turning it
one quarter turn clockwise.
6. Reinstall the lamp assembly and tighten the screws.
License Plate Lamp
A. License Plate Lamp Housing
B. Bulb
C. Bulb Socket
To replace one of these bulbs:
1. Using a small flat-bladed tool,insert the blade end at the back
edge of the rear license plate
lamp housing (A).
2. Gently push forward while lifting the back edge of the lamp
housing from the bumper
opening.