2012 GMC SIERRA 1500 ABS
[x] Cancel search: ABSPage 5 of 556
Black plate (5,1)GMC Sierra Owner Manual - 2012 - CRC - 11/15/11
Introduction v
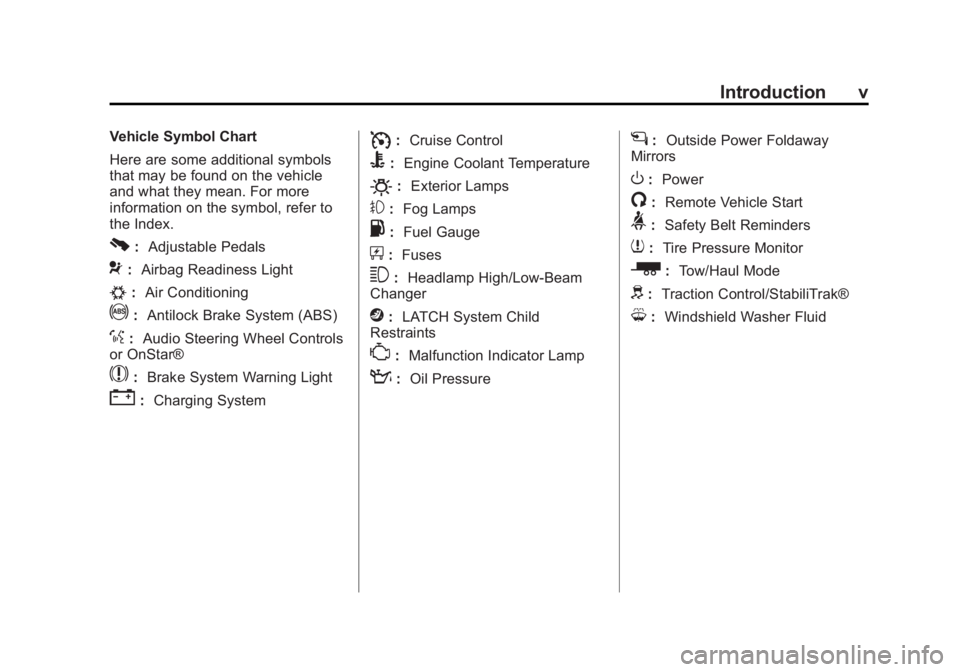
Vehicle Symbol Chart
Here are some additional symbols
that may be found on the vehicle
and what they mean. For more
information on the symbol, refer to
the Index.
0:Adjustable Pedals
9:Airbag Readiness Light
#:Air Conditioning
!:Antilock Brake System (ABS)
%:Audio Steering Wheel Controls
or OnStar®
$: Brake System Warning Light
":Charging System
I:Cruise Control
B: Engine Coolant Temperature
O:Exterior Lamps
#:Fog Lamps
.: Fuel Gauge
+:Fuses
3: Headlamp High/Low-Beam
Changer
j: LATCH System Child
Restraints
*: Malfunction Indicator Lamp
::Oil Pressure
g:Outside Power Foldaway
Mirrors
O: Power
/:Remote Vehicle Start
>:Safety Belt Reminders
7:Tire Pressure Monitor
_: Tow/Haul Mode
d:Traction Control/StabiliTrak®
M:Windshield Washer Fluid
Page 34 of 556
Black plate (28,1)GMC Sierra Owner Manual - 2012 - CRC - 11/15/11
1-28 In Brief
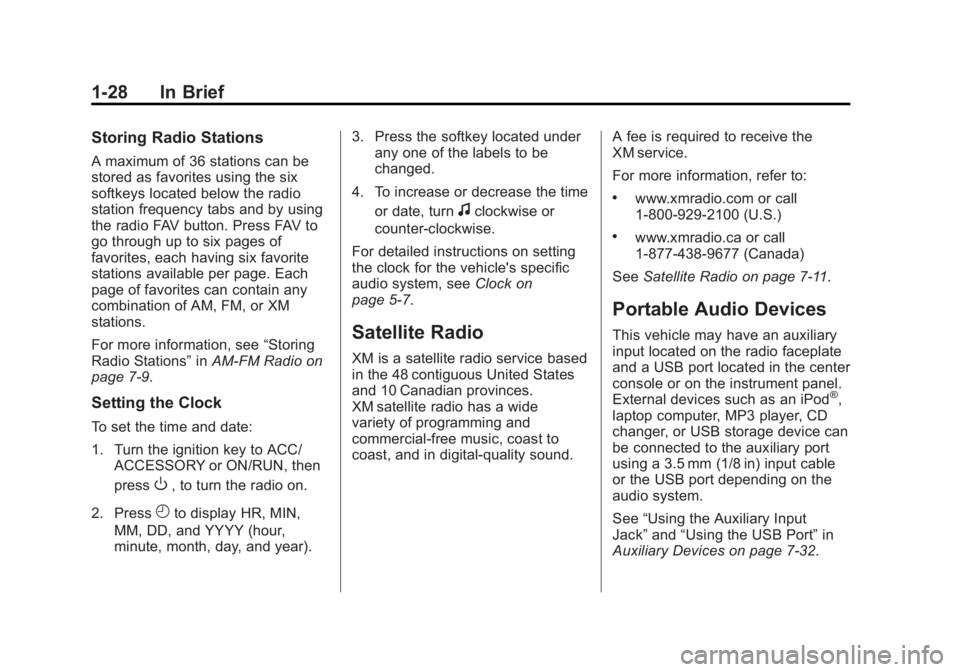
Storing Radio Stations
A maximum of 36 stations can be
stored as favorites using the six
softkeys located below the radio
station frequency tabs and by using
the radio FAV button. Press FAV to
go through up to six pages of
favorites, each having six favorite
stations available per page. Each
page of favorites can contain any
combination of AM, FM, or XM
stations.
For more information, see“Storing
Radio Stations” inAM-FM Radio on
page 7‑9.
Setting the Clock
To set the time and date:
1. Turn the ignition key to ACC/
ACCESSORY or ON/RUN, then
press
O, to turn the radio on.
2. Press
Hto display HR, MIN,
MM, DD, and YYYY (hour,
minute, month, day, and year). 3. Press the softkey located under
any one of the labels to be
changed.
4. To increase or decrease the time or date, turn
fclockwise or
counter‐clockwise.
For detailed instructions on setting
the clock for the vehicle's specific
audio system, see Clock on
page 5‑7.
Satellite Radio
XM is a satellite radio service based
in the 48 contiguous United States
and 10 Canadian provinces.
XM satellite radio has a wide
variety of programming and
commercial-free music, coast to
coast, and in digital-quality sound. A fee is required to receive the
XM service.
For more information, refer to:
.www.xmradio.com or call
1-800-929-2100 (U.S.)
.www.xmradio.ca or call
1-877-438-9677 (Canada)
See Satellite Radio on page 7‑11.
Portable Audio Devices
This vehicle may have an auxiliary
input located on the radio faceplate
and a USB port located in the center
console or on the instrument panel.
External devices such as an iPod
®,
laptop computer, MP3 player, CD
changer, or USB storage device can
be connected to the auxiliary port
using a 3.5 mm (1/8 in) input cable
or the USB port depending on the
audio system.
See “Using the Auxiliary Input
Jack” and“Using the USB Port” in
Auxiliary Devices on page 7‑32.
Page 84 of 556
Black plate (16,1)GMC Sierra Owner Manual - 2012 - CRC - 11/15/11
3-16 Seats and Restraints
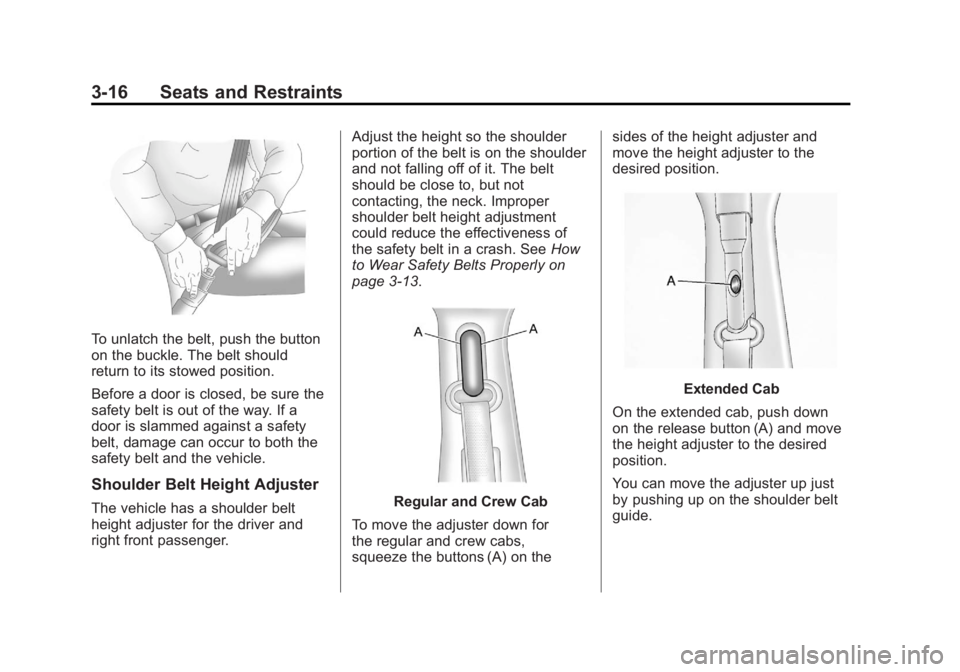
To unlatch the belt, push the button
on the buckle. The belt should
return to its stowed position.
Before a door is closed, be sure the
safety belt is out of the way. If a
door is slammed against a safety
belt, damage can occur to both the
safety belt and the vehicle.
Shoulder Belt Height Adjuster
The vehicle has a shoulder belt
height adjuster for the driver and
right front passenger.Adjust the height so the shoulder
portion of the belt is on the shoulder
and not falling off of it. The belt
should be close to, but not
contacting, the neck. Improper
shoulder belt height adjustment
could reduce the effectiveness of
the safety belt in a crash. See
How
to Wear Safety Belts Properly on
page 3‑13.Regular and Crew Cab
To move the adjuster down for
the regular and crew cabs,
squeeze the buttons (A) on the sides of the height adjuster and
move the height adjuster to the
desired position.
Extended Cab
On the extended cab, push down
on the release button (A) and move
the height adjuster to the desired
position.
You can move the adjuster up just
by pushing up on the shoulder belt
guide.
Page 85 of 556
Black plate (17,1)GMC Sierra Owner Manual - 2012 - CRC - 11/15/11
Seats and Restraints 3-17
After you move the adjuster to
where you want it, try to move it
down, without squeezing the buttons
for the regular and crew cabs,
or without pushing the release
button for extended cabs, to make
sure it has locked into position.
Safety Belt Pretensioners
This vehicle has safety belt
pretensioners for front outboard
occupants. Although the safety belt
pretensioners cannot be seen, they
are part of the safety belt assembly.
They can help tighten the safety
belts during the early stages of a
moderate to severe frontal, near
frontal, or rear crash if the threshold
conditions for pretensioner
activation are met. And, if your
vehicle has side impact airbags,
safety belt pretensioners can help
tighten the safety belts in a side
crash or a rollover event.Pretensioners work only once. If the
pretensioners activate in a crash,
they will need to be replaced, and
probably other new parts for the
vehicle's safety belt system. See
Replacing Safety Belt System Parts
after a Crash on page 3‑21.
Rear Safety Belt Comfort
Guides
This vehicle may have rear shoulder
belt comfort guides. If not, they are
available through your dealer. The
guides may provide added safety
belt comfort for older children who
have outgrown booster seats and
for some adults. When installed and
properly adjusted, the comfort guide
positions the belt away from the
neck and head.
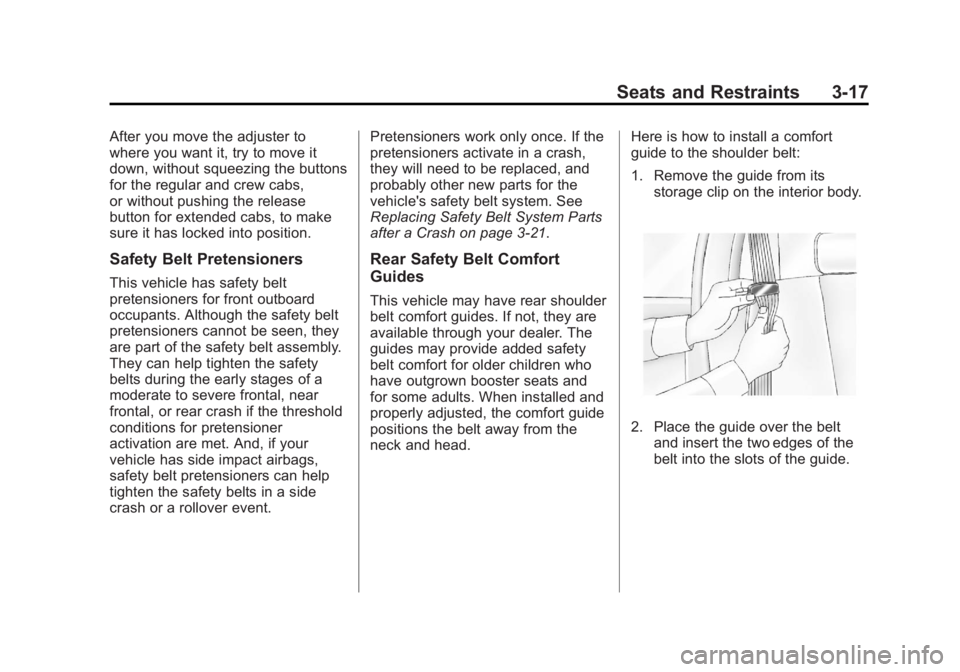
Here is how to install a comfort
guide to the shoulder belt:
1. Remove the guide from its
storage clip on the interior body.
2. Place the guide over the beltand insert the two edges of the
belt into the slots of the guide.
Page 119 of 556
Black plate (51,1)GMC Sierra Owner Manual - 2012 - CRC - 11/15/11
Seats and Restraints 3-51
Be sure to read the instructions
following to properly install a child
restraint using these loops.
Do not secure a child restraint in a
position without a top tether anchor
if a national or local law requires
that the top tether be attached, or if
the instructions that come with the
child restraint say that the top tether
must be attached.
According to accident statistics,
children and infants are safer
when properly restrained in a child
restraint system or infant restraint
system secured in a rear seating
position. SeeWhere to Put the
Restraint on page 3‑45 for
additional information.Securing a Child Restraint
Designed for the LATCH
System
{WARNING
If a LATCH-type child restraint is
not attached to anchors, the child
restraint will not be able to protect
the child correctly. In a crash, the
child could be seriously injured
or killed. Install a LATCH-type
child restraint properly using the
anchors, or use the vehicle safety
belts to secure the restraint,
following the instructions that
came with the child restraint and
the instructions in this manual.
{WARNING
Do not attach more than one
child restraint to a single anchor,
except for the center top tether
anchors in the crew and extended
cabs. Attaching more than one
child restraint to a single anchor
could cause the anchor or
attachment to come loose or even
break during a crash. A child or
others could be injured. To reduce
the risk of serious or fatal injuries
during a crash, attach only one
child restraint per anchor.
Page 139 of 556
Black plate (1,1)GMC Sierra Owner Manual - 2012 - CRC - 11/15/11
Instruments and Controls 5-1
Instruments and
Controls
Controls
Steering Wheel Adjustment . . . 5-2
Steering Wheel Controls . . . . . . 5-2
Horn . . . . . . . . . . . . . . . . . . . . . . . . . . 5-4
Windshield Wiper/Washer . . . . . 5-4
Compass . . . . . . . . . . . . . . . . . . . . . 5-5
Clock . . . . . . . . . . . . . . . . . . . . . . . . . 5-7
Power Outlets . . . . . . . . . . . . . . . . . 5-9
Cigarette Lighter . . . . . . . . . . . . . 5-10
Ashtrays . . . . . . . . . . . . . . . . . . . . . 5-11
Warning Lights, Gauges, and
Indicators
Warning Lights, Gauges, andIndicators . . . . . . . . . . . . . . . . . . . 5-11
Instrument Cluster . . . . . . . . . . . 5-12
Speedometer . . . . . . . . . . . . . . . . 5-13
Odometer . . . . . . . . . . . . . . . . . . . . 5-13
Trip Odometer . . . . . . . . . . . . . . . 5-13
Tachometer . . . . . . . . . . . . . . . . . . 5-13
Fuel Gauge . . . . . . . . . . . . . . . . . . 5-14
Engine Oil Pressure Gauge . . . . . . . . . . . . . . . . . . . . . . 5-15 Engine Coolant Temperature
Gauge . . . . . . . . . . . . . . . . . . . . . . 5-16
Voltmeter Gauge . . . . . . . . . . . . . 5-16
Safety Belt Reminders . . . . . . . 5-17
Airbag Readiness Light . . . . . . 5-18
Airbag On-Off Light . . . . . . . . . . 5-19
Passenger Airbag Status Indicator . . . . . . . . . . . . . . . . . . . . 5-21
Charging System Light . . . . . . 5-22
Malfunction Indicator Lamp . . . . . . . . . . . . . 5-22
Brake System Warning Light . . . . . . . . . . . . . . . . . . . . . . . 5-25
Antilock Brake System (ABS) Warning Light . . . . . . . . . . . . . . 5-26
Four-Wheel-Drive Light . . . . . . 5-26
Tow/Haul Mode Light . . . . . . . . 5-26
StabiliTrak
®OFF Light . . . . . . . 5-27
Traction Control System (TCS)/StabiliTrak
®Light . . . . 5-27
Tire Pressure Light . . . . . . . . . . 5-27
Engine Oil Pressure Light . . . . 5-28
Low Fuel Warning Light . . . . . . 5-28
Security Light . . . . . . . . . . . . . . . . 5-29
High-Beam On Light . . . . . . . . . 5-29
Front Fog Lamp Light . . . . . . . . 5-29
Cruise Control Light . . . . . . . . . 5-30
Information Displays
Driver Information Center (DIC) . . . . . . . . . . . . . . . 5-30
Vehicle Messages
Vehicle Messages . . . . . . . . . . . 5-39
Battery Voltage and ChargingMessages . . . . . . . . . . . . . . . . . . 5-39
Brake System Messages . . . . 5-40
Door Ajar Messages . . . . . . . . . 5-40
Engine Cooling System Messages . . . . . . . . . . . . . . . . . . 5-41
Engine Oil Messages . . . . . . . . 5-42
Engine Power Messages . . . . 5-42
Fuel System Messages . . . . . . 5-43
Key and Lock Messages . . . . . 5-43
Lamp Messages . . . . . . . . . . . . . 5-43
Object Detection System Messages . . . . . . . . . . . . . . . . . . 5-43
Ride Control System Messages . . . . . . . . . . . . . . . . . . 5-44
Airbag System Messages . . . . 5-45
Anti-theft Alarm System Messages . . . . . . . . . . . . . . . . . . 5-45
Starting the Vehicle Messages . . . . . . . . . . . . . . . . . . 5-45
Tire Messages . . . . . . . . . . . . . . . 5-45
Page 146 of 556
Black plate (8,1)GMC Sierra Owner Manual - 2012 - CRC - 11/15/11
5-8 Instruments and Controls
5. Press theHbutton again until
the clock display stops flashing
to set the currently displayed
time, or wait until the flashing
stops after five seconds and the
current time displayed
automatically sets.
MP3 Radios with a Single CD
or a Single CD and DVD Player
To adjust the time and date:
1. Turn the ignition key to ACC/ ACCESSORY or ON/RUN, then
press the
Obutton to turn the
radio on.
2. Press the
Hbutton to display
HR, MIN, MM, DD, YYYY (hour,
minute, month, day, and year).
3. Press the softkey located under any one of the tabs to change
that setting. 4. To increase the time or date, do
one of the following:
.Press the softkey below the
selected tab.
.Press the¨SEEK button.
.Press the\FWD button.
.Turn thefknob clockwise.
5. To decrease the time or date, do one of the following:
.Press the©SEEK button.
.Press thesREV button.
.Turn thefknob
counterclockwise. To change the time default setting
from 12 hour to 24 hour or to change
the date default setting from month/
day/year to day/month/year:
1. Press the
Hbutton and then
the softkey located below the
forward arrow tab. 12H, 24H, the
date MM/DD (month and day),
and DD/MM (day and month)
displays.
2. Press the softkey located below the desired option.
3. Press the
Hbutton again to
apply the desired option, or let
the screen time out.
MP3 Radio with a Six-Disc CD
Player
To set the time and date:
1. Turn the ignition key to ACC/ ACCESSORY or ON/RUN, then
press the
Obutton to turn the
radio on.
Page 147 of 556
Black plate (9,1)GMC Sierra Owner Manual - 2012 - CRC - 11/15/11
Instruments and Controls 5-9
2. Press the MENU button andthen the softkey under the
Htab
to display HR, MIN, MM, DD,
YYYY (hour, minute, month, day,
and year).
3. Press the softkey located under any one of the tabs to change
that setting.
4. To increase the time or date, do one of the following:
.Press the softkey below the
selected tab.
.Press the¨SEEK button.
.Press the\FWD button.
.Turn thefknob clockwise.
5. To decrease the time or date, do one of the following:
.Press the©SEEK button.
.Press thesREV button.
.Turn thefknob
counterclockwise. To change the time default setting
from 12 hour to 24 hour or to change
the date default setting from month/
day to day/month:
1. Press the MENU button
and then the softkey under
the
Htab.
2. Press the softkey located below the forward arrow tab. 12H, 24H,
the date MM/DD (month and
day), and DD/MM (day and
month) displays.
3. Press the softkey located below the desired option.
4. Press the MENU button again to apply the desired option, or let
the screen time out.
Power Outlets
Accessory power outlets can
be used to plug in electrical
equipment, such as a cell phone,
MP3 player, etc.
The vehicle may have two
accessory power outlets located
below the climate control system,
or may have one accessory power
outlet and one cigarette lighter. The
cigarette lighter is designed to fit
only in the receptacle closest to the
driver.
There may be another accessory
power outlet in the rear cargo area.
If the vehicle has a floor console,
there is an accessory power outlet
inside the storage bin and one on
the rear of the floor console.
Remove the cover to access and
replace when not in use.