2012 FORD SUPER DUTY maintenance
[x] Cancel search: maintenancePage 265 of 454
Your vehicle may be equipped with a temporary or conventional spare
tire. If the spare tire is different in size (diameter and/or width), tread
type (All-Season or All-Terrain) or is from a different manufacturer other
than the road tires on your vehicle, your spare tire is considered
“temporary”. Consult information on the Tire Label or Safety Compliance
Certification Label for limitations when using.
Trailer towing safety tips
General
•Ensure that the trailer, safety chains and 7–pin electrical connectors
are securely fastened.
•Make sure the truck receiver, draw bar and coupler are properly
connected and adjusted.
•Check rear view and side mirrors for proper visibility especially when
towing a trailer wider than the truck.
•When turning, make wide turns to allow trailer tires to properly clear
any obstacles.
•Operate the vehicle at lower speeds than you would when not towing
a trailer; the likelihood of trailer sway is greater at higher speeds.
•Be prepared for trailer sway due to buffeting when larger vehicles
pass in either direction.
•If you will be towing a trailer frequently in hot weather, hilly
conditions, at GCWR, or any combination of these factors, consider
refilling your rear axle with synthetic gear lubricant if not already so
equipped. Refer toMaintenance product specifications and
capacitiesin theMaintenance and Specificationschapter for the
proper axle lubricant. Remember that regardless of the rear axle
lubricant used, do not tow a trailer for the first 500 miles (800 km) of
a new vehicle, and that the first 500 miles (800 km) of towing be done
at no faster than 70 mph (113 km/h) with no full-throttle starts.
Loading
•Trailer loads should be evenly distributed front-to-back and
left-to-right.
•Never exceed truck, trailer, receiver, ball, tongue, tire or coupler
loading recommendations.
•Keep the center of gravity low for best handling.
Braking
•Anticipate stops; allow more distance and time to stop than normal.
Tires, Wheels and Loading
265
2012 F-250/350/450/550(f23)
Owners Guide, 1st Printing
USA(fus)
Page 272 of 454
Note:Cranking may be stopped at any time by turning the key to the off
position.
3. After idling for a few seconds, release the parking brake, apply the
brake, shift into gear and drive.
Note:If the engine does not start on the first try, turn the key to the off
position, wait 10 seconds and try Step 2 again. If the engine still fails to
start, press the accelerator to the floor and try Step 2 again, keeping the
accelerator on the floor until the engine begins to accelerate above
cranking speeds; this will allow the engine to crank with the fuel shut off
in case the engine is flooded with fuel.
Your vehicle may have remote start capability. Refer toRemote entry
systemin theLocks and Securitychapter.
Cold weather starting (flexible fuel vehicles only)
The starting characteristics of all grades of E
85ethanol make it
unsuitable for use when ambient temperatures fall below 0°F (-18°C).
Consult your fuel distributor for the availability of winter grade ethanol.
As the outside temperature approaches freezing, ethanol fuel distributors
should supply winter grade ethanol (same as with unleaded gasoline). If
summer grade ethanol is used in cold weather conditions, 0°F to 32°F
(-18°C to 0°C), you may experience increased cranking times, rough idle
or hesitation until the engine has warmed up.
You may experience a decrease in peak performance when the engine is
cold when operating on E
85ethanol.
Do not crank the engine for more than 10 seconds at a time as starter
damage may occur. If the engine fails to start, turn the key to off and
wait 30 seconds before trying again.
Do not use starting fluid such as ether in the air intake system. Such
fluid could cause immediate explosive damage to the engine and possible
personal injury.
If you should experience cold weather starting problems on E
85ethanol,
and neither an alternative brand of E
85ethanol nor an engine block
heater is available, the addition of unleaded gasoline to your tank will
improve cold starting performance. Your vehicle is designed to operate
on E
85ethanol alone, unleaded gasoline alone, or any mixture of the two.
SeeChoosing the right fuelin theMaintenance and Specifications
chapter for more information on ethanol.
Driving
272
2012 F-250/350/450/550(f23)
Owners Guide, 1st Printing
USA(fus)
Page 314 of 454
WARNING:Always set the parking brake fully and make sure
the gearshift is latched in P (Park). Turn the ignition to the off
position and remove the key whenever you leave your vehicle.
WARNING:If the parking brake is fully released, but the brake
warning lamp remains illuminated, the brakes may not be
working properly. See your authorized dealer.
4WD systems
4WD (when you select a 4WD mode), uses all four wheels to power the
vehicle. This increases traction, enabling you to drive over terrain and
road conditions that a conventional two-wheel drive vehicle cannot.
Power is supplied to all four wheels through a transfer case. On 4WD
vehicles, the transfer case allows you to select 4WD when necessary.
Information on transfer case operation and shifting procedures can be
found in theDrivingchapter. Information on transfer case maintenance
can be found in theMaintenance and Specificationschapter. You
should become thoroughly familiar with this information before you
operate your vehicle.
Normal characteristics
On some 4WD models, the initial shift from two-wheel drive to 4x4 while
the vehicle is moving can cause some momentary clunk and ratcheting
sounds. This is the front drivetrain coming up to speed and the
automatic locking hubs engaging and is not cause for concern.
Sand
When driving over sand, try to keep all four wheels on the most solid
area of the trail. Avoid reducing the tire pressures but shift to a lower
gear and drive steadily through the terrain. Apply the accelerator slowly
and avoid spinning the wheels.
Avoid excessive speed because vehicle momentum can work against you
and cause the vehicle to become stuck to the point that assistance may
be required from another vehicle. Remember, you may be able to back
out the way you came if you proceed with caution.
Note:If air is released from your tires, the Tire Pressure Monitoring
System (TPMS) indicator light may illuminate (if equipped).
Driving
314
2012 F-250/350/450/550(f23)
Owners Guide, 1st Printing
USA(fus)
Page 317 of 454

Should you start to slide while driving on snowy or icy roads, turn the
steering wheel in the direction of the slide until you regain control.
Avoid sudden applications of power and quick changes of direction on
snow and ice. Apply the accelerator slowly and steadily when starting
from a full stop.
Avoid sudden braking as well. Although a 4WD vehicle may accelerate
better than a two-wheel drive vehicle in snow and ice, it won’t stop any
faster, because as in other vehicles, braking occurs at all four wheels. Do
not become overconfident as to road conditions.
Make sure you allow sufficient distance between you and other vehicles
for stopping. Drive slower than usual and consider using one of the lower
gears. In emergency stopping situations, avoid locking of the wheels. Use
a “squeeze” technique, push on the brake pedal with a steadily increasing
force which allows the wheels to brake yet continue to roll so that you
may steer in the direction you want to travel. If you lock the wheels,
release the brake pedal and repeat the squeeze technique. If your vehicle
is equipped with a Four Wheel Anti-Lock Brake System (ABS), apply the
brake steadily. Do not “pump” the brakes. Refer to theBrakessection of
this chapter for additional information on the operation of the anti-lock
brake system.
WARNING:If you are driving in slippery conditions that require
tire cables, then it is critical that you drive cautiously. Keep
speeds down, allow for longer stopping distances and avoid aggressive
steering to reduce the chances of a loss of vehicle control which can
lead to serious injury or death. If the rear end of the vehicle slides
while cornering, steer in the direction of the slide until you regain
control of the vehicle.
Maintenance and modifications
The suspension and steering systems on your vehicle have been designed
and tested to provide predictable performance whether loaded or empty
and durable load carrying capability. For this reason, Ford Motor
Company strongly recommends that you do not make modifications such
as adding or removing parts (such as lift kits or stabilizer bars) or by
using replacement parts not equivalent to the original factory equipment.
Any modifications to a vehicle that raise the center of gravity can make
it more likely the vehicle will roll over as a result of a loss of control.
Ford Motor Company recommends that caution be used with any vehicle
equipped with a high load or device (such as ladder racks or pickup box
cover).
Driving
317
2012 F-250/350/450/550(f23)
Owners Guide, 1st Printing
USA(fus)
Page 320 of 454
Operating the vehicle with the snowplow attached
Do not use your vehicle for snow removal until it has been driven at
least 500 miles (800 km).
The attached snowplow blade restricts airflow to the radiator, and may
cause the engine to run at a higher temperature: Attention to engine
temperature is especially important when outside temperatures are
above freezing. Angle the blade to maximize airflow to the radiator and
monitor engine temperature to determine whether a left or right angle
provides the best performance.
Follow the severe duty schedule in yourscheduled maintenance
informationfor engine oil and transmission fluid change intervals.
Snowplowing with your airbag-equipped vehicle
Your vehicle is equipped with a driver and passenger airbag
Supplemental Restraint System (SRS) The SRS is designed to activate in
certain frontal and offset frontal collisions when the vehicle sustains
sufficient longitudinal deceleration.
Careless or high speed driving while plowing snow which results in
sufficient vehicle decelerations can deploy the airbag. Such driving also
increases the risk of accidents.
WARNING:All occupants of the vehicle, including the driver,
should always properly wear their safety belts, even when an air
bag supplemental restraint system (SRS) is provided.
Never remove or defeat the “tripping mechanisms” designed into the
snow removal equipment by its manufacturer. Doing so may cause
damage to the vehicle and the snow removal equipment as well as
possible airbag deployment.
WARNING:Do not attempt to service, repair, or modify the air
bag supplemental restraint system (SRS) or its fuses. See your
Ford or Lincoln Mercury dealer.
WARNING:Additional equipment such as snowplow equipment
may effect the performance of the airbag sensors increasing the
risk of injury. Please refer to theBody Builders Layout Bookfor
instructions about the appropriate installation of additional equipment.
Driving
320
2012 F-250/350/450/550(f23)
Owners Guide, 1st Printing
USA(fus)
Page 326 of 454
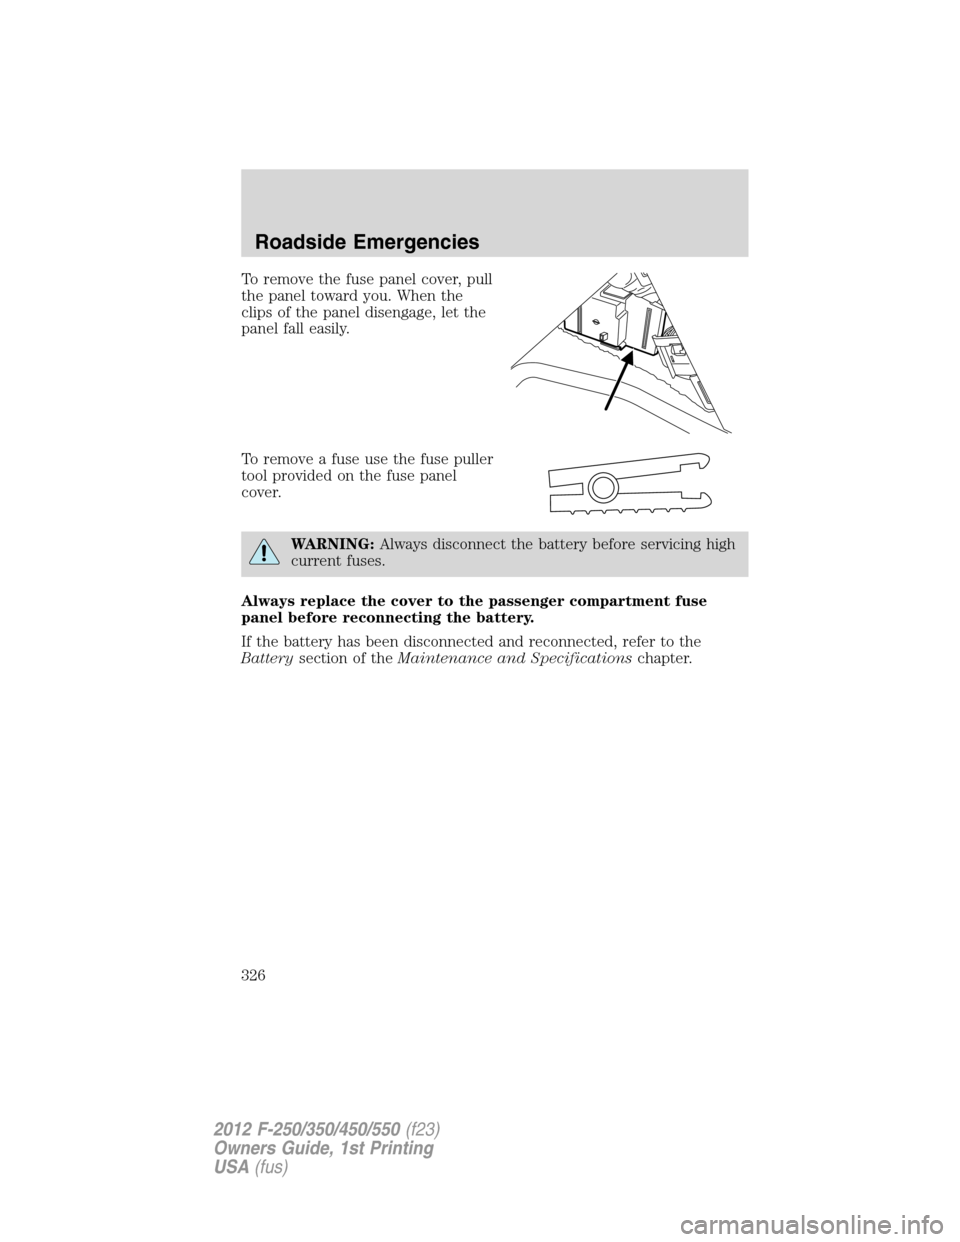
To remove the fuse panel cover, pull
the panel toward you. When the
clips of the panel disengage, let the
panel fall easily.
To remove a fuse use the fuse puller
tool provided on the fuse panel
cover.
WARNING:Always disconnect the battery before servicing high
current fuses.
Always replace the cover to the passenger compartment fuse
panel before reconnecting the battery.
If the battery has been disconnected and reconnected, refer to the
Batterysection of theMaintenance and Specificationschapter.
Roadside Emergencies
326
2012 F-250/350/450/550(f23)
Owners Guide, 1st Printing
USA(fus)
Page 330 of 454
WARNING:Always disconnect the battery before servicing high
current fuses.
WARNING:To reduce risk of electrical shock, always replace
the cover to the power distribution box before reconnecting the
battery or refilling fluid reservoirs.
If the battery has been disconnected and reconnected, refer to the
Batterysection of theMaintenance and Specificationschapter.
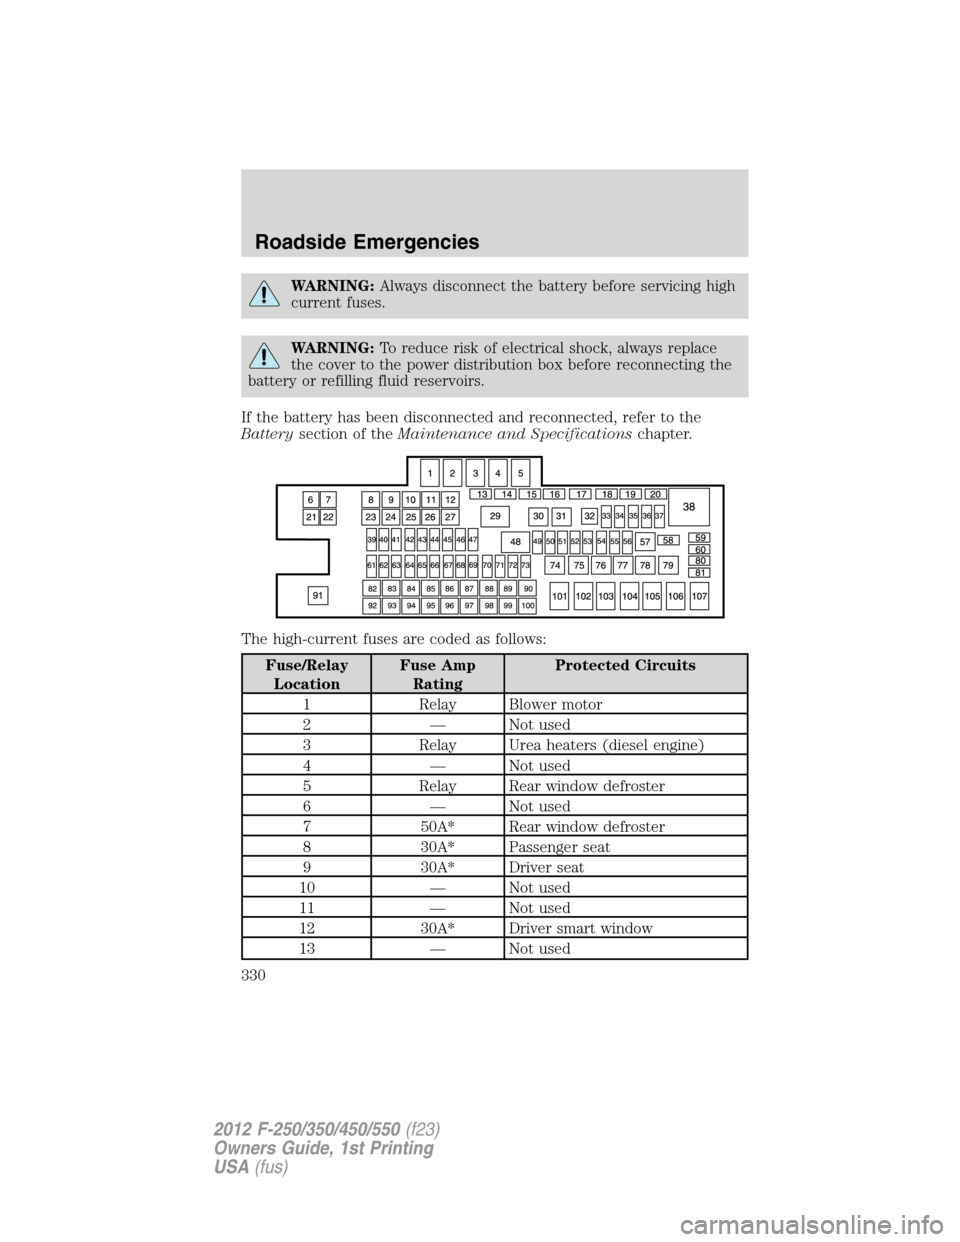
The high-current fuses are coded as follows:
Fuse/Relay
LocationFuse Amp
RatingProtected Circuits
1 Relay Blower motor
2 — Not used
3 Relay Urea heaters (diesel engine)
4 — Not used
5 Relay Rear window defroster
6 — Not used
7 50A* Rear window defroster
8 30A* Passenger seat
9 30A* Driver seat
10 — Not used
11 — Not used
12 30A* Driver smart window
13 — Not used
Roadside Emergencies
330
2012 F-250/350/450/550(f23)
Owners Guide, 1st Printing
USA(fus)
Page 350 of 454
4. Slide the wheel partially under the vehicle and install the retainer
through the wheel center. Pull on the cable to align the components at
the end of the cable.
5. Turn the jack handle clockwise until the tire is raised to its stowed
position underneath the vehicle. The effort to turn the jack handle
increases significantly and the spare tire carrier ratchets or slips when
the tire is raised to the maximum tightness. Tighten to the best of your
ability, to the point where the ratchet/slip occurs, if possible. The spare
tire carrier will not allow you to overtighten. If the spare tire carrier
ratchets or slips with little effort, take the vehicle to your authorized
dealer for assistance at your earliest convenience.
6. Check that the tire lies flat against the frame and is properly
tightened. Try to push or pull, then turn the tire to be sure it will not
move. Loosen and retighten, if necessary. Failure to properly stow the
spare tire may result in failure of the winch cable and loss of the tire.
7. Repeat this tightness check procedure when servicing the spare tire
pressure (every six months, perscheduled maintenance information),
or at any time that the spare tire is disturbed through service of other
components.
8. If removed, install the spare tire lock (if equipped) into the bumper
drive tube with the spare tire lock key (if equipped) and jack handle.
WHEEL LUG NUT TORQUE SPECIFICATIONS
On vehicles equipped with single rear wheels, retighten the lug nuts to
the specified torque at 500 miles (800 km) after any wheel disturbance
(tire rotation, changing a flat tire, wheel removal, etc.).
On vehicles equipped with dual rear wheels, retighten the wheel lug nuts
to the specified torque at 100 miles (160 km), and again at 500 miles
(800 km) of new vehicle operation and after any wheel disturbance (tire
rotation, changing a flat tire, wheel removal, etc.).
Bolt size Wheel lug nut torque*
ft-lb N•m
M14 x 1.5 165 224
* Torque specifications are for nut and bolt threads free of dirt and
rust. Use only Ford recommended replacement fasteners.
It is important to follow the proper wheel mounting and lug nut torque
procedures.
Roadside Emergencies
350
2012 F-250/350/450/550(f23)
Owners Guide, 1st Printing
USA(fus)