Page 331 of 454
Fuse/Relay
LocationFuse Amp
RatingProtected Circuits
14 — Not used
15 Diode Fuel pump (diesel engine)
16 — Not used
17 15A** Heated mirror
18 — Not used
19 — Not used
20 — Not used
21 — Not used
22 30A* Trailer tow electric brake
23 40A* Blower motor
24 — Not used
25 30A* Wipers
26 30A* Trailer tow park lamps
27 25A* Urea heaters (diesel engine)
28 — Buss bar
29 Relay Trailer tow park lamps
30 Relay A/C clutch
31 Relay Wipers
32 — Not used
33 15A** Vehicle power (VPWR) 1
34 15A** VPWR 2 (diesel engine)
20A** VPWR 2 (gas engine)
35 10A** VPWR 3
36 15A** VPWR 4 (diesel engine)
20A** VPWR 4 (gas engine)
37 10A** VPWR 5 (diesel engine)
38 Relay Powertrain control module
(PCM) (diesel engine),
Electronic control module (ECM)
(gas engine)
39 10A** 4x4 hub lock
Roadside Emergencies
331
2012 F-250/350/450/550(f23)
Owners Guide, 1st Printing
USA(fus)
Page 333 of 454
Fuse/Relay
LocationFuse Amp
RatingProtected Circuits
67 — Not used
68 10A** Fuel pump relay coil
69 — Not used
70 10A** Trailer tow backup lamp
71 10A** Cannister vent (gas engine)
72 10A** PCM/ECM relay coil feed
keep-alive power
73 — Not used
74 Relay Trailer tow left-hand stop/turn
75 Relay Trailer tow right-hand stop/turn
76 Relay Backup lamp
77 — Not used
78 — Not used
79 — Not used
80 — Not used
81 — Not used
82 20A* Auxiliary power point #2
83 20A* Auxiliary power point #1
84 30A* 4x4 shift motor
85 30A* Heated/cooled seats
86 25A* ABS coil feed
87 20A* Auxiliary power point #5
88 — Not used
89 40A* Starter motor
90 25A* Trailer tow battery charge
91 — Not used
92 20A* Auxiliary power point #4
93 20A* Auxiliary power point #3
94 25A* Upfitter #1
95 25A* Upfitter #2
96 50A* ABS pump
Roadside Emergencies
333
2012 F-250/350/450/550(f23)
Owners Guide, 1st Printing
USA(fus)
Page 334 of 454

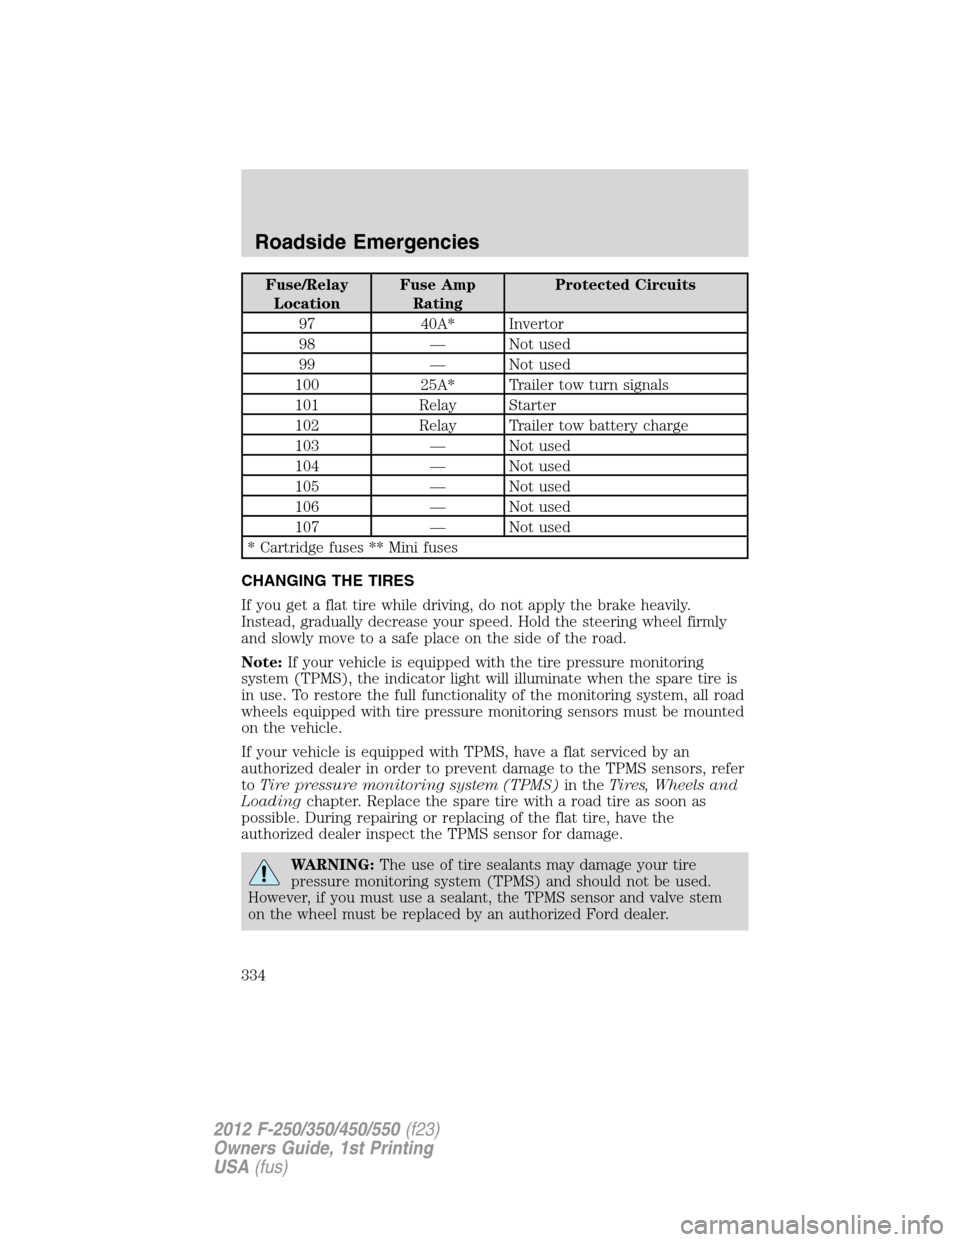
Fuse/Relay
LocationFuse Amp
RatingProtected Circuits
97 40A* Invertor
98 — Not used
99 — Not used
100 25A* Trailer tow turn signals
101 Relay Starter
102 Relay Trailer tow battery charge
103 — Not used
104 — Not used
105 — Not used
106 — Not used
107 — Not used
* Cartridge fuses ** Mini fuses
CHANGING THE TIRES
If you get a flat tire while driving, do not apply the brake heavily.
Instead, gradually decrease your speed. Hold the steering wheel firmly
and slowly move to a safe place on the side of the road.
Note:If your vehicle is equipped with the tire pressure monitoring
system (TPMS), the indicator light will illuminate when the spare tire is
in use. To restore the full functionality of the monitoring system, all road
wheels equipped with tire pressure monitoring sensors must be mounted
on the vehicle.
If your vehicle is equipped with TPMS, have a flat serviced by an
authorized dealer in order to prevent damage to the TPMS sensors, refer
toTire pressure monitoring system (TPMS)in theTires, Wheels and
Loadingchapter. Replace the spare tire with a road tire as soon as
possible. During repairing or replacing of the flat tire, have the
authorized dealer inspect the TPMS sensor for damage.
WARNING:The use of tire sealants may damage your tire
pressure monitoring system (TPMS) and should not be used.
However, if you must use a sealant, the TPMS sensor and valve stem
on the wheel must be replaced by an authorized Ford dealer.
Roadside Emergencies
334
2012 F-250/350/450/550(f23)
Owners Guide, 1st Printing
USA(fus)
Page 336 of 454

•Ground clearance and parking at curbs
•Winter weather driving capability
•Wet weather driving capability
It is not recommended that the vehicle be operated in 4WD modes with
a temporary emergency spare tire. If 4WD operation is necessary, do not
operate above speeds of 10 mph (16 km/h) or for distances above
50 miles (80 km).
3.Full-size dissimilar spare without label on wheel
When driving with the full-size dissimilar spare tire/wheel,do not:
•Exceed 70 mph (113 km/h)
•Use more than one dissimilar spare tire/wheel at a time
•Use commercial car washing equipment
•Use snow chains on the end of the vehicle with the dissimilar spare
tire/wheel
The usage of a full-size dissimilar spare tire/wheel can lead to
impairment of the following:
•Handling, stability and braking performance
•Comfort and noise
•Ground clearance and parking at curbs
•Winter weather driving capability
•Wet weather driving capability
•All-Wheel driving capability (if applicable)
•Load leveling adjustment (if applicable)
When driving with the full-size dissimilar spare tire/wheel additional
caution should be given to:
•Towing a trailer
•Driving vehicles equipped with a camper body
•Driving vehicles with a load on the cargo rack
Drive cautiously when using a full-size dissimilar spare tire/wheel and
seek service as soon as possible.
Roadside Emergencies
336
2012 F-250/350/450/550(f23)
Owners Guide, 1st Printing
USA(fus)
Page 341 of 454
1. Turn engine off and block the
wheel that is diagonally opposite of
the flat tire using the wheel chock,
if equipped.If the vehicle is a
4x4,lock the manual hub on the
wheel.
2. Remove the jack, jack handle, lug wrench and spare tire from the
stowage locations.
3. Use the tip of the lug wrench to remove any wheel trim.
4. Loosen each wheel lug nut one-half turn counterclockwise but do not
remove them until the wheel is raised off the ground.
The following steps apply to F–250/F–350 Single Rear Wheel
(SRW) vehicles only:
5. Insert the hooked end of the jack
handle into the jack and use the
handle to slide the jack under the
vehicle.
6. Position the jack according to the
following guides:
•Front (4x2)
Roadside Emergencies
341
2012 F-250/350/450/550(f23)
Owners Guide, 1st Printing
USA(fus)
Page 346 of 454

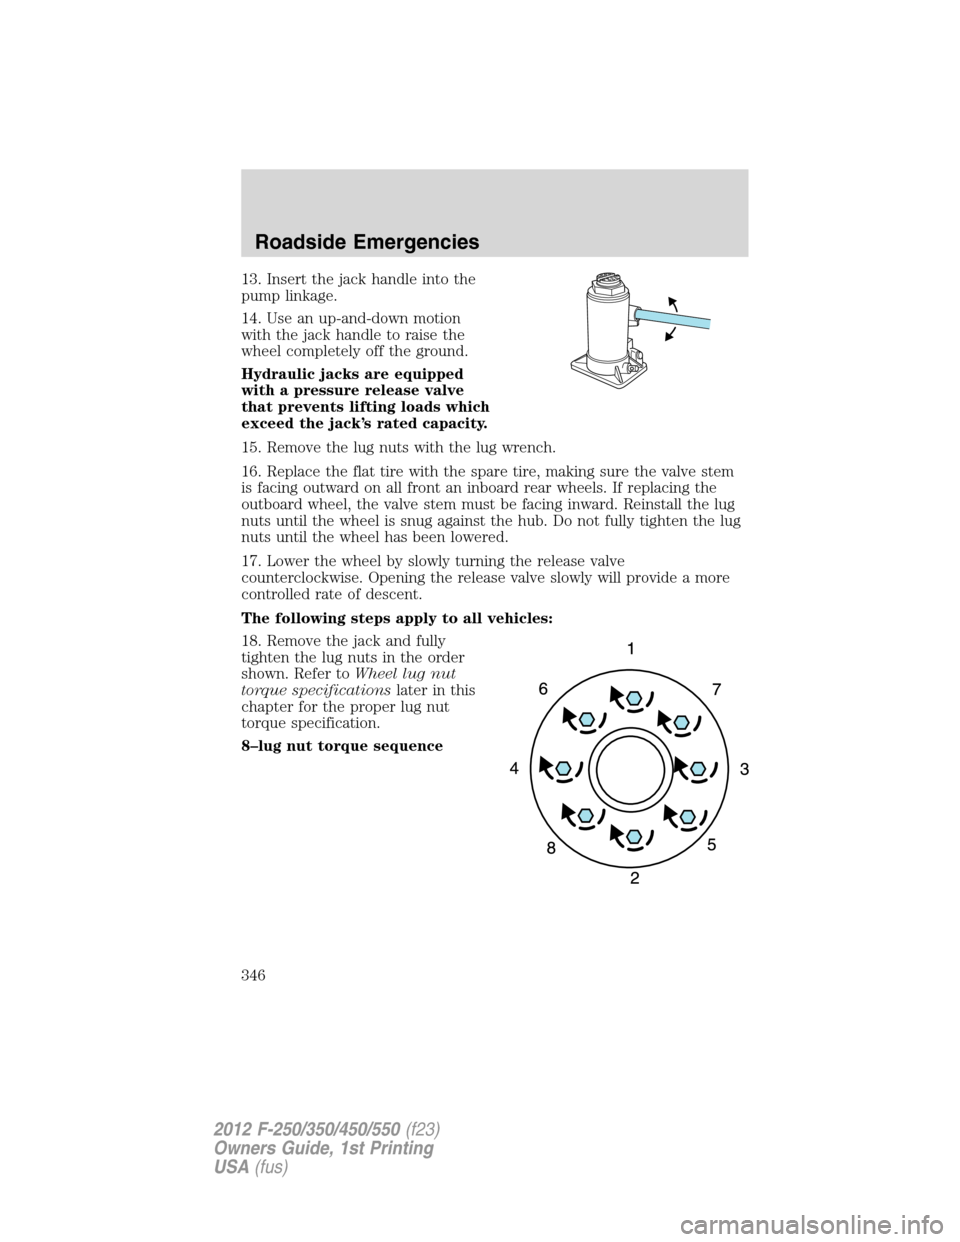
13. Insert the jack handle into the
pump linkage.
14. Use an up-and-down motion
with the jack handle to raise the
wheel completely off the ground.
Hydraulic jacks are equipped
with a pressure release valve
that prevents lifting loads which
exceed the jack’s rated capacity.
15. Remove the lug nuts with the lug wrench.
16. Replace the flat tire with the spare tire, making sure the valve stem
is facing outward on all front an inboard rear wheels. If replacing the
outboard wheel, the valve stem must be facing inward. Reinstall the lug
nuts until the wheel is snug against the hub. Do not fully tighten the lug
nuts until the wheel has been lowered.
17. Lower the wheel by slowly turning the release valve
counterclockwise. Opening the release valve slowly will provide a more
controlled rate of descent.
The following steps apply to all vehicles:
18. Remove the jack and fully
tighten the lug nuts in the order
shown. Refer toWheel lug nut
torque specificationslater in this
chapter for the proper lug nut
torque specification.
8–lug nut torque sequence
Roadside Emergencies
346
2012 F-250/350/450/550(f23)
Owners Guide, 1st Printing
USA(fus)
Page 347 of 454
10–lug nut torque sequence
19. Stow the flat tire. Refer toStowing the flat/spare tireif the vehicle
is equipped with a spare tire carrier.
20. Stow the jack, jack handle and lug wrench. Make sure the jack is
securely fastened so it does not rattle when driving.
21. Unblock the wheels.
The following step applies to F–250/F–350 Single Rear Wheel
(SRW) vehicles only:
22. When installing the wheel center
ornaments, ensure that the
ornament retention towers on the
back side of the ornament are
aligned with the studs/lug nuts. The
retention towers are designed to be
installed over the studs/nuts and
retain to the flange on the lug nut.
Roadside Emergencies
347
2012 F-250/350/450/550(f23)
Owners Guide, 1st Printing
USA(fus)
Page 348 of 454
If the ornament retention towers are
aligned between the studs/lug nuts,
the ornament is improperly
installed. This improper installation
may appear and sound correct, but
will not keep the ornament on the
vehicle. Ornaments improperly
installed in this manner will fall off
or become loose with minimal force
or impact.
Installing dual rear wheel ornaments
1. Align the ornament with the lug
nuts.
•(1) is the clip and (2) is the
flange.
2. Hold the ornament so that all of
the retention clips are sitting on the
flange of the lug nuts.
3. Use your hand or rubber mallet to
tap the ornament in a star pattern.
There should be an even gap
between the ornament and the
wheel.
12
Roadside Emergencies
348
2012 F-250/350/450/550(f23)
Owners Guide, 1st Printing
USA(fus)