Page 1 of 306
Introduction 4
Vehicle Inspection Guide 10
Instrument Cluster 20
Warning lights and chimes 20
Gauges 28
Message center 30
Entertainment Systems 34
AM/FM stereo 34
AM/FM stereo with CD 36
Auxiliary input jack 43
USB port 45
SYNC�46
Climate Controls 47
Manual heating and air conditioning 47
Lights 50
Headlamps 50
Turn signal control 51
Interior lamps 52
Bulb replacement 52
Driver Controls 55
Windshield wiper/washer control 55
Steering wheel adjustment 56
Power windows 58
Mirrors 59
Speed control 63
Upfitter controls 65
Locks and Security 67
Keys 67
Locks 67
Table of Contents
1
2012 F-650/750(f67)
Supplement, 2nd Printing
USA(fus)
Page 26 of 306

Traction control (if equipped)
(diesel engine only):Illuminates
and flashes slowly if the Off Road or
Mud/Snow mode is selected.
Illuminates and flashes rapidly
during a traction control event.
Traction control (if equipped)
(gasoline engine only):
Illuminates when the traction
control is active. If the light remains
on, have the system serviced
immediately, refer to theDrivingchapter for more information.
Trailer anti-lock brake system
(ABS):Illuminates briefly when the
engine is powered-up and only when
a PLC trailer or a PLC diagnostic
tool is connected. If the light
remains on after the vehicle is
started, continues to flash or fails to
illuminate, have the system serviced
immediately.
Turn signal:Illuminates when the
left or right turn signal or the
hazard lights are turned on. If the
indicators stay on or flash faster, check for a burned out bulb.
Wait to start (diesel engine
only):Illuminates when the air
intake heater is in operation and
special starting procedures are
required. Refer toStartingin theDrivingchapter.
WARNING:If equipped with an air intake heater, DO NOT use
ether or any other starting fluids. The use of starting fluids
(ether) in an engine equipped with an air intake heater could result in
damage and/or personal injury.
Instrument Cluster
26
2012 F-650/750(f67)
Supplement, 2nd Printing
USA(fus)
Page 51 of 306

WARNING:Always remember to turn on your headlamps at
dusk or during inclement weather. The Daytime Running Lamp
(DRL) system does not activate your tail lamps and generally may not
provide adequate lighting during these conditions. Failure to activate
your headlamps under these conditions may result in a collision.
PANEL DIMMER CONTROL
Use to adjust the brightness of the
instrument panel and all applicable
lit components in the vehicle during
headlamp and parking lamp
operation.
•Tapthetoporbottomofthe
control to brighten/dim all interior
lit components incrementally, or
•Press and hold at the first
position the top or bottom of the
control until the desired lighting level is reached.
AIMING THE HEADLAMPS
The headlamps on your vehicle are properly aimed at the assembly plant.
If your vehicle has been in an accident the alignment of your headlamps
should be checked by a qualified service technician.
TURN SIGNAL CONTROL
•Push down to activate the left
turn signal.
•Push up to activate the right turn
signal.
If your vehicle is a tractor, the turn signals may not shut off when a turn
is completed; this is normal. Please see your dealer if there are any
questions on the options your vehicle has been equipped with.
Lights
51
2012 F-650/750(f67)
Supplement, 2nd Printing
USA(fus)
Page 52 of 306
INTERIOR LAMPS
Map lamps (if equipped)
To turn on the map lamps, press the
control next to each lamp. The
dome lamp turns on when:
•any door is opened,
•any of the remote entry controls
are pressed and the ignition is
off.
EXTERIOR LAMPS
Bulb inspection
It is a good safety practice to check
operation of headlamps, parking
lamps, turn signals, clearance and
marker lamps, instrument panel and
control lamps each day.
Using the right bulbs
Function Bulbs Trade number
Headlamps 2 H6054
Front turn signal lamps 2 1157
Front sidemarker/Park lamps 2 (amber) 194
Brake/Tail/Stop/Rear turn
signal/License lamps1 bulb each
side1157
Back-up lamps 2 1156
Front clearance and identification
lamps5 194
Dome lamp 1 105
To replace all instrument panel lights - see your dealer
Lights
52
2012 F-650/750(f67)
Supplement, 2nd Printing
USA(fus)
Page 53 of 306
Bulb replacement
Replacing headlamp bulbs
To remove the headlamp bulbs:
1. Make sure the headlamp control is in the
position.
2. Remove the four screws and
move the parking lamp assembly
away from the headlamp bulb.
3. Remove the four screws and the
retaining bracket from the headlamp
bulb.
4. Pull the headlamp bulb out of the
housing, disconnect the electrical
connector and remove the headlamp
bulb.
5. To complete installation, follow
the removal procedure in reverse
order.
Replacing front parking lamp/turn signal/side marker bulbs
To remove the parking lamp/turn signal bulbs:
1. Make sure the headlamp control is in the
position and the turn
signals are off.
Lights
53
2012 F-650/750(f67)
Supplement, 2nd Printing
USA(fus)
Page 54 of 306

2. Remove the four screws from the
lamp assembly.
3. Carefully lower the lamp assembly
and pull the bulb socket straight out
of the lamp assembly.
4. Carefully pull the bulb straight
out of the socket and push in the
new bulb.
5. To complete installation, follow
the removal procedure in reverse order.
Replacing front clearance and identification lamp bulbs
To change the cab marker bulbs:
1. Make sure the headlamp control
is in the
position, then remove
the screw and lens from the lamp
assembly.
2. Carefully pull the bulb straight
out of the socket and push in the
new bulb.
3. Install the lens on lamp assembly
with screw.
Replacing brake/tail/rear turn signal/back-up/license plate lamp bulbs
The brake/tail/turn
signal/back-up/license plate lamp
bulbs are located in the same
portion of the tail lamp assembly.
Follow the same steps to replace
any of these bulbs:
1. Make sure the headlamp control
is in the
position and the turn
signals are off, then remove the four
screws and the lamp lens from lamp
assembly.
2. Carefully pull the bulb straight out of the socket and push in the new
bulb.
3. Install the lens on the lamp assembly with the four screws.
Lights
54
2012 F-650/750(f67)
Supplement, 2nd Printing
USA(fus)
Page 62 of 306

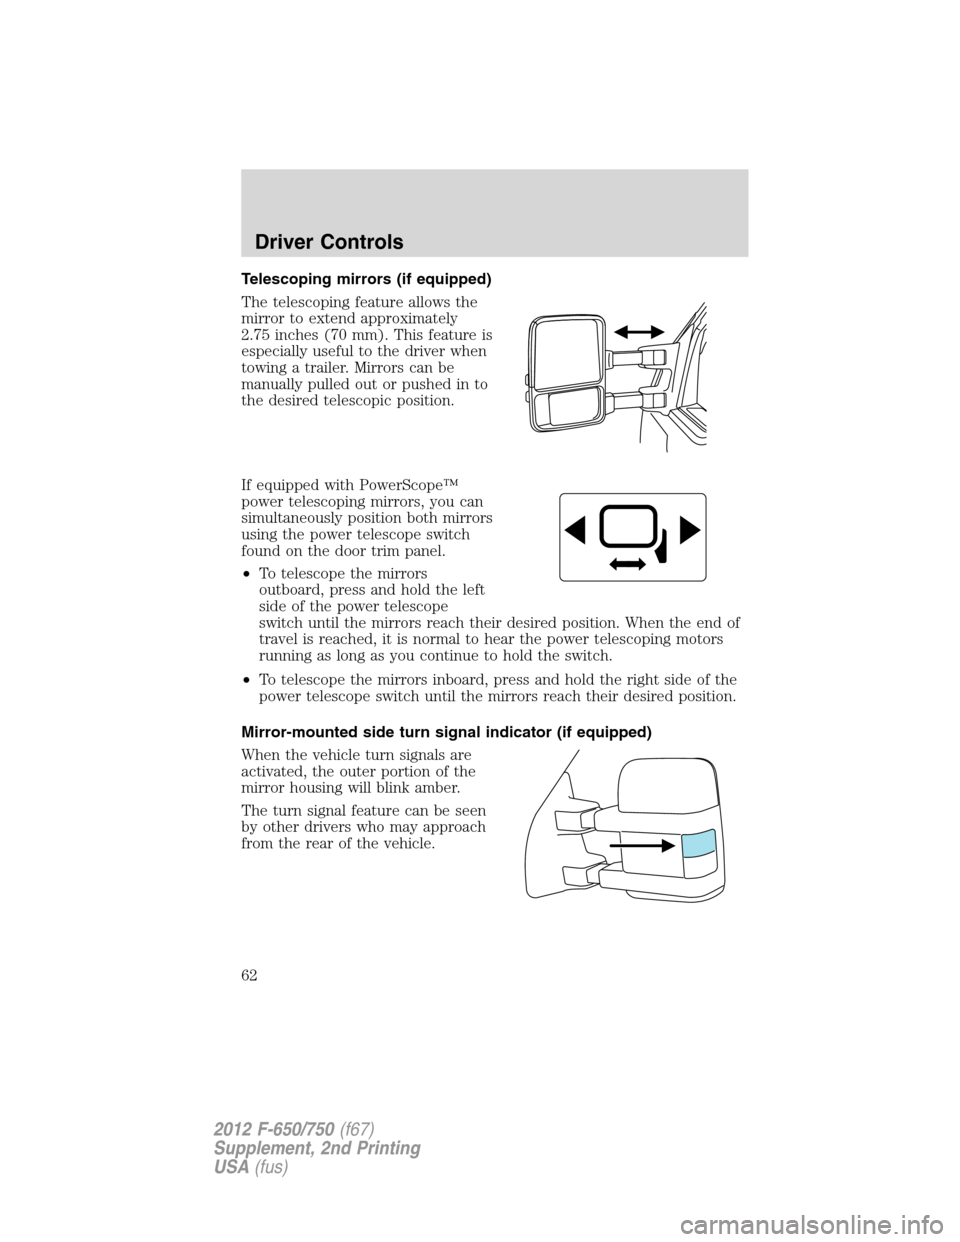
Telescoping mirrors (if equipped)
The telescoping feature allows the
mirror to extend approximately
2.75 inches (70 mm). This feature is
especially useful to the driver when
towing a trailer. Mirrors can be
manually pulled out or pushed in to
the desired telescopic position.
If equipped with PowerScope™
power telescoping mirrors, you can
simultaneously position both mirrors
using the power telescope switch
found on the door trim panel.
•To telescope the mirrors
outboard, press and hold the left
side of the power telescope
switch until the mirrors reach their desired position. When the end of
travel is reached, it is normal to hear the power telescoping motors
running as long as you continue to hold the switch.
•To telescope the mirrors inboard, press and hold the right side of the
power telescope switch until the mirrors reach their desired position.
Mirror-mounted side turn signal indicator (if equipped)
When the vehicle turn signals are
activated, the outer portion of the
mirror housing will blink amber.
The turn signal feature can be seen
by other drivers who may approach
from the rear of the vehicle.
Driver Controls
62
2012 F-650/750(f67)
Supplement, 2nd Printing
USA(fus)
Page 148 of 306

Preparing to tow
Use the proper equipment for towing a trailer and make sure it is
properly attached to your vehicle. See your dealer or a reliable trailer
dealer if you require assistance.
Hitches
Do not use hitches that clamp onto the vehicle’s bumper or attach to the
axle. You must distribute the load in your trailer so that 10–15% of the
total weight of the trailer is on the tongue.
Safety chains
Always connect the trailer’s safety chains to the frame or hook retainers
of the vehicle hitch. To connect the trailer’s safety chains, cross the
chains under the trailer tongue and allow slack for turning corners.
If you use a rental trailer, follow the instructions that the rental agency
gives to you.
Do not attach safety chains to the bumper.
Trailer brakes
Electric brakes and manual, automatic or surge-type trailer brakes are safe
if installed properly and adjusted to the manufacturer’s specifications. The
trailer brakes must meet local and Federal regulations.
WARNING:Do not connect a trailer’s hydraulic brake system
directly to your vehicle’s brake system. Your vehicle may not
have enough braking power and your chances of having a collision
greatly increase.
Trailer lamps
Trailer lamps are required on most towed vehicles. Your vehicle may be
equipped with one of two possible trailer wiring designs. Make sure all
running lights, brake lights, turn signals and hazard lights are working.
See your dealer or trailer rental agency for proper instructions and
equipment for hooking up trailer lamps.
Driving while you tow
When towing a trailer:
•Do not drive faster than 70 mph (113 km/h) during the first 500 miles
(800 km) of trailer towing and don’t make full-throttle starts.
Driving
148
2012 F-650/750(f67)
Supplement, 2nd Printing
USA(fus)