Page 323 of 448
To remove the fuse panel cover, pull
the panel toward you. When the
clips of the panel disengage, let the
panel fall easily.
To remove a fuse use the fuse puller
tool provided on the fuse panel
cover.
WARNING: Always disconnect the battery before servicing high
current fuses.
Always replace the cover to the passenger compartment fuse
panel before reconnecting the battery.
If the battery has been disconnected and reconnected, refer to the
Battery section of the Maintenance and Specifications chapter.Roadside Emergencies
323
2012 F-250/350/450/550 (f23)
Owners Guide, 4th Printing
USA (fus)
Page 327 of 448
Power distribution box
The power distribution box is located in the engine compartment. The
power distribution box contains high-current fuses that protect your
vehicle’s main electrical systems from overloads.
WARNING: Always disconnect the battery before servicing high
current fuses.
WARNING: To reduce risk of electrical shock, always replace
the cover to the power distribution box before reconnecting the
battery or refilling fluid reservoirs.
If the battery has been disconnected and reconnected, refer to the
Battery section of the Maintenance and Specifications chapter.
The high-current fuses are coded as follows:
Fuse/Relay
Location Fuse Amp
Rating Protected Circuits
1 Relay Blower motor
2 — Not used
3 Relay Urea heaters (diesel engine)
4 — Not used
5 Relay Rear window defroster
6 — Not used
7 50A* Rear window defroster
8 30A* Passenger seat
9 30A* Driver seat Roadside Emergencies
327
2012 F-250/350/450/550 (f23)
Owners Guide, 4th Printing
USA (fus)
Page 346 of 448

Stowing the flat/spare tire
Note: Failure to follow spare tire stowage instructions may result in
failure of cable or loss of spare tire.
If you are stowing a tire that requires reattaching it to the
vehicle with a tether, perform these steps first, then proceed with
the steps following.
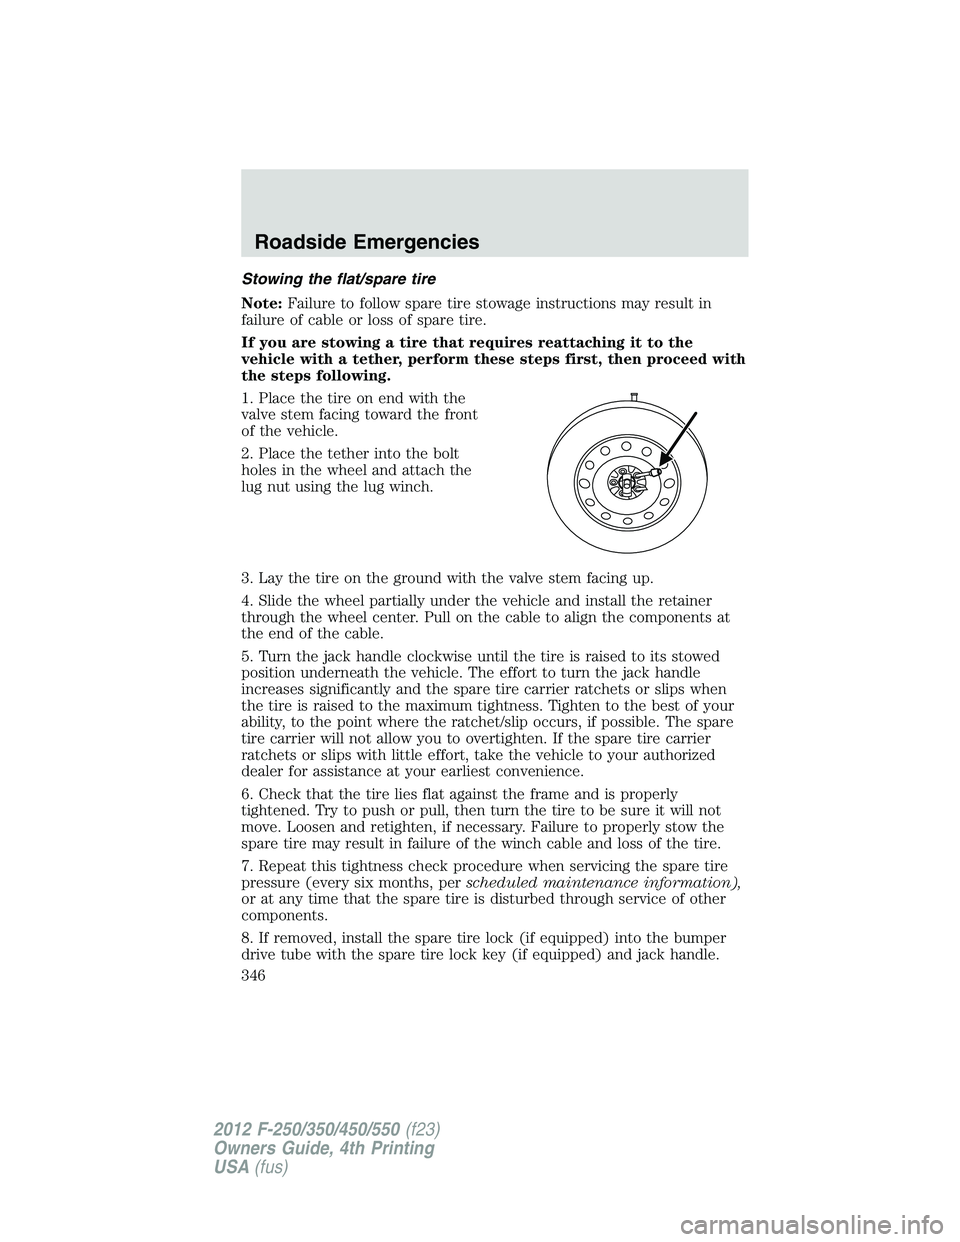
1. Place the tire on end with the
valve stem facing toward the front
of the vehicle.
2. Place the tether into the bolt
holes in the wheel and attach the
lug nut using the lug winch.
3. Lay the tire on the ground with the valve stem facing up.
4. Slide the wheel partially under the vehicle and install the retainer
through the wheel center. Pull on the cable to align the components at
the end of the cable.
5. Turn the jack handle clockwise until the tire is raised to its stowed
position underneath the vehicle. The effort to turn the jack handle
increases significantly and the spare tire carrier ratchets or slips when
the tire is raised to the maximum tightness. Tighten to the best of your
ability, to the point where the ratchet/slip occurs, if possible. The spare
tire carrier will not allow you to overtighten. If the spare tire carrier
ratchets or slips with little effort, take the vehicle to your authorized
dealer for assistance at your earliest convenience.
6. Check that the tire lies flat against the frame and is properly
tightened. Try to push or pull, then turn the tire to be sure it will not
move. Loosen and retighten, if necessary. Failure to properly stow the
spare tire may result in failure of the winch cable and loss of the tire.
7. Repeat this tightness check procedure when servicing the spare tire
pressure (every six months, per scheduled maintenance information),
or at any time that the spare tire is disturbed through service of other
components.
8. If removed, install the spare tire lock (if equipped) into the bumper
drive tube with the spare tire lock key (if equipped) and jack handle.Roadside Emergencies
346
2012 F-250/350/450/550 (f23)
Owners Guide, 4th Printing
USA (fus)
Page 353 of 448

GETTING THE SERVICES YOU NEED
Warranty repairs to your vehicle must be performed by an authorized
dealer. While any authorized dealer handling your vehicle line will
provide warranty service, we recommend you return to your selling
authorized dealer who wants to ensure your continued satisfaction.
Please note that certain warranty repairs require special training,
equipment or both, so not all authorized dealers are authorized to
perform all warranty repairs. This means that, depending on the
warranty repair needed, you may have to take your vehicle to another
authorized dealer.
A reasonable time must be allowed to perform a repair after taking your
vehicle to the authorized dealer. Repairs will be made using Ford or
Motorcraft parts, or remanufactured or other parts that are authorized by
Ford.
Away from home
If you are away from home when your vehicle needs service, contact the
Ford Customer Relationship Center or use the online resources listed
below to find the nearest authorized dealer.
In the United States:
Mailing address
Ford Motor Company
Customer Relationship Center
P.O. Box 6248
Dearborn, MI 48121
Telephone
1-800-392-3673 (FORD)
(TDD for the hearing impaired: 1-800-232-5952)
Online
Additional information and resources are available online at
www.fordowner.com
These are some of the items that can be found online:
• U.S. dealer locator by Dealer Name, City/State, or Zip Code
• Owner Guides
• Maintenance Schedules
• Recalls
• Ford Extended Service Plans Customer Assistance
353
2012 F-250/350/450/550 (f23)
Owners Guide, 4th Printing
USA (fus)
Page 368 of 448

LEATHER SEATS FOR THE KING RANCH � EDITION ONLY
(IF EQUIPPED)
Your vehicle is equipped with seating covered in premium, top-grain
leather which is extremely durable, but still requires special care and
maintenance in order to ensure longevity and comfort.
Regular cleaning and conditioning will maintain the appearance of the
leather.
Cleaning
For dirt, use a vacuum cleaner then use a clean, damp cloth or soft brush.
For routine cleaning, wipe the surface with a soft, damp cloth. For more
thorough cleaning, wipe the surface with a mild soap and water solution.
• Clean spills as quickly as possible.
• Test any cleaner or stain remover on an inconspicuous part of the
leather as cleaners may darken the leather.
• Do not spill coffee, ketchup, mustard, orange juice or oil-based
products on the leather as they may permanently stain the leather.
• Do not use household cleaning products, alcohol solutions, solvents or
cleaners intended for rubber, vinyl or plastics.
Scratches
Natural Markings - Because the leather in the seat comes from genuine
steer hides, there will be evidence of naturally occurring markings, such
as small scars. These markings give character to the seating covers and
should be considered as proof of a genuine leather product.
In order to lessen the appearance of certain scratches and other wear
marks, apply conditioner on the affected area following the same
instructions as in the Conditioning section.
Conditioning
Bottles of King Ranch � Leather Conditioner are available at the King
Ranch � Saddle Shop. Visit the website at www.krsaddleshop.com ,or
telephone (in the United States) 1–800–282–KING (5464). If you are
unable to obtain King Ranch � Leather Conditioner, use another premium
leather conditioner.
• Clean the surfaces using the steps outlined in the Cleaning section.
• Ensure the leather is dry then apply a nickel-sized amount of
conditioner to a clean, dry cloth.
• Rub the conditioner into leather until it disappears. Allow the
conditioner to dry and repeat the process for the entire interior. If a
film appears, wipe off film with a dry, clean cloth.Cleaning
368
2012 F-250/350/450/550 (f23)
Owners Guide, 4th Printing
USA (fus)
Page 370 of 448

SERVICE RECOMMENDATIONS
To help you service your vehicle, we provide scheduled maintenance
information which makes tracking routine service easy.
If your vehicle requires professional service, your authorized dealer can
provide the necessary parts and service. Check your Warranty Guide to
find out which parts and services are covered.
Use only recommended fuels, lubricants, fluids and service parts
conforming to specifications. Motorcraft � parts are designed and built to
provide the best performance in your vehicle.
PRECAUTIONS WHEN SERVICING YOUR VEHICLE
• Do not work on a hot engine.
• Make sure that nothing gets caught in moving parts.
• Do not work on a vehicle with the engine running in an enclosed
space, unless you are sure you have enough ventilation.
• Keep all open flames and other burning material (such as cigarettes)
away from the battery and all fuel related parts.
Working with the engine off
1. Set the parking brake and ensure the gearshift is securely latched in P
(Park).
2. Turn off the engine and remove the key.
3. Block the wheels to prevent the vehicle from moving unexpectedly.
Working with the engine on
WARNING: To reduce the risk of vehicle damage and/or
personal burn injuries, do not start your engine with the air
cleaner removed and do not remove it while the engine is running.
1. Set the parking brake and shift to P (Park).
2. Block the wheels.Maintenance and Specifications
370
2012 F-250/350/450/550 (f23)
Owners Guide, 4th Printing
USA (fus)
Page 371 of 448
OPENING THE HOOD
1. Inside the vehicle, pull the hood
release handle located under the
bottom left corner of the instrument
panel.
2. Go to the front of the vehicle to
release the auxiliary latch located at
the top center of the grille. Slide the
handle left to release the auxiliary
latch.
3. Lift the hood until the lift
cylinders hold it open.
IDENTIFYING COMPONENTS IN THE ENGINE COMPARTMENT
Refer to the diesel supplement for diesel engine component locations. Maintenance and Specifications
371
2012 F-250/350/450/550 (f23)
Owners Guide, 4th Printing
USA (fus)
Page 372 of 448
6.2L V8 gasoline engine
1. Windshield washer fluid reservoir
2. Engine oil dipstick
3. Automatic transmission fluid dipstick
4. Brake fluid reservoir
5. Engine coolant reservoir
6. Power distribution box
7. Air filter assembly
8. Power steering fluid reservoir
9. Engine oil filler cap
10. Battery 1 2 3 4 5 6
10
9
8 7Maintenance and Specifications
372
2012 F-250/350/450/550 (f23)
Owners Guide, 4th Printing
USA (fus)