2012 FORD EXPEDITION air suspension
[x] Cancel search: air suspensionPage 233 of 400
8. With the ignition on and all doors closed, let the vehicle, now with
trailer and weight distributing bars connected, sit for a few minutes to
let the air suspension re-settle.
9. Re-measure the height of the top of the front wheel opening,
repeating steps 7-9 as necessary to obtain a fender height approximately
halfway between H1 and H2 after the air suspension has settled.
10. Check that the trailer is level. If not level, remove the trailer, adjust
the ball height accordingly, and repeat steps4-10.
WARNING:Do not adjust a weight-distributing hitch to any
position where the rear bumper of the vehicle is higher than it
was before attaching the trailer. Doing so will defeat the function of
the weight-distributing hitch, which may cause unpredictable handling,
and could result in serious personal injury.
Safety chains
Always connect the trailer’s safety chains to the frame or hook retainers
of the vehicle hitch. To connect the trailer’s safety chains, cross the
chains under the trailer tongue and allow slack for turning corners.
If you use a rental trailer, follow the instructions that the rental agency
gives to you.
Do not attach safety chains to the bumper.
Trailer brakes
Electric brakes and manual, automatic or surge-type trailer brakes are safe
if installed properly and adjusted to the manufacturer’s specifications. The
trailer brakes must meet local and Federal regulations.
WARNING:Do not connect a trailer’s hydraulic brake system
directly to your vehicle’s brake system. Your vehicle may not
have enough braking power and your chances of having a collision
greatly increase.
The braking system of the tow vehicle is rated for operation at the
GVWR not GCWR.
Trailer lamps
Trailer lamps are required on most towed vehicles. Make sure all running
lights, brake lights, turn signals and hazard lights are working. Contact
your authorized dealer or trailer rental agency for proper instructions
and equipment for hooking-up trailer lamps.
Tires, Wheels and Loading
233
2012 Expedition(exd)
Owners Guide, 1st Printing
USA(fus)
Page 252 of 400
AIR SUSPENSION SYSTEM (IF EQUIPPED)
The air suspension system is designed to improve ride, handling and
general vehicle performance during:
•Certain road conditions
•Steering maneuvers
•Braking
•Acceleration
This system keeps the rear of your vehicle at a constant level by
automatically adding air or releasing air from the springs. If you exceed
the load limit, the rear air suspension may not operate. The air
suspension system will stay active for 40 minutes after the ignition is
turned off to accommodate any load changes. (The air compressor may
run when the vehicle is off; this is normal.)
The air suspension system can be enabled or disabled through the
message center. Refer toMessage centerin theInstrument Cluster
chapter.
If the system is off, the rear air suspension will not operate and will not
raise (pump) or lower (vent) while the vehicle is not moving. However, if
the system determines that the vehicle is low or high and needs to make
a height adjustment while driving at speeds above 15 mph (24 km/h), the
system will pump or vent as required. Normal vehicle operation does not
require any action by the driver.
WARNING:On vehicles equipped with air suspension, turn the
air suspension and the ignition switch off prior to jacking,
hoisting or towing your vehicle.
LIMITED-SLIP AXLE (IF EQUIPPED)
This axle provides added traction on slippery surfaces, particularly when
one wheel is on a poor traction surface. Under normal conditions, the
limited slip axle functions like a standard rear axle.
Extended use of other than the manufacturer’s specified size tires on a
limited slip rear axle could result in a permanent reduction in
effectiveness. This loss of effectiveness does not affect normal driving
and should not be noticeable to the driver.
Driving
252
2012 Expedition(exd)
Owners Guide, 1st Printing
USA(fus)
Page 277 of 400
WARNING:If you are driving in slippery conditions that require
tire chains or cables, then it is critical that you drive cautiously.
Keep speeds down, allow for longer stopping distances and avoid
aggressive steering to reduce the chances of a loss of vehicle control
which can lead to serious injury or death. If the rear end of the vehicle
slides while cornering, steer in the direction of the slide until you
regain control of the vehicle.
Maintenance and modifications
The suspension and steering systems on your vehicle have been designed
and tested to provide predictable performance whether loaded or empty
and durable load carrying capability. For this reason, Ford Motor
Company strongly recommends that you do not make modifications such
as adding or removing parts (such as lift kits or stabilizer bars) or by
using replacement parts not equivalent to the original factory equipment.
Any modifications to a vehicle that raise the center of gravity can make
it more likely the vehicle will roll over as a result of a loss of control.
Ford Motor Company recommends that caution be used with any vehicle
equipped with a high load or device (such as ladder racks or pickup box
cover).
Failure to maintain your vehicle properly may void the warranty, increase
your repair cost, reduce vehicle performance and operational capabilities
and adversely affect driver and passenger safety. Frequent inspection of
vehicle chassis components is recommended if the vehicle is subjected to
heavy off-road usage.
Driving
277
2012 Expedition(exd)
Owners Guide, 1st Printing
USA(fus)
Page 287 of 400
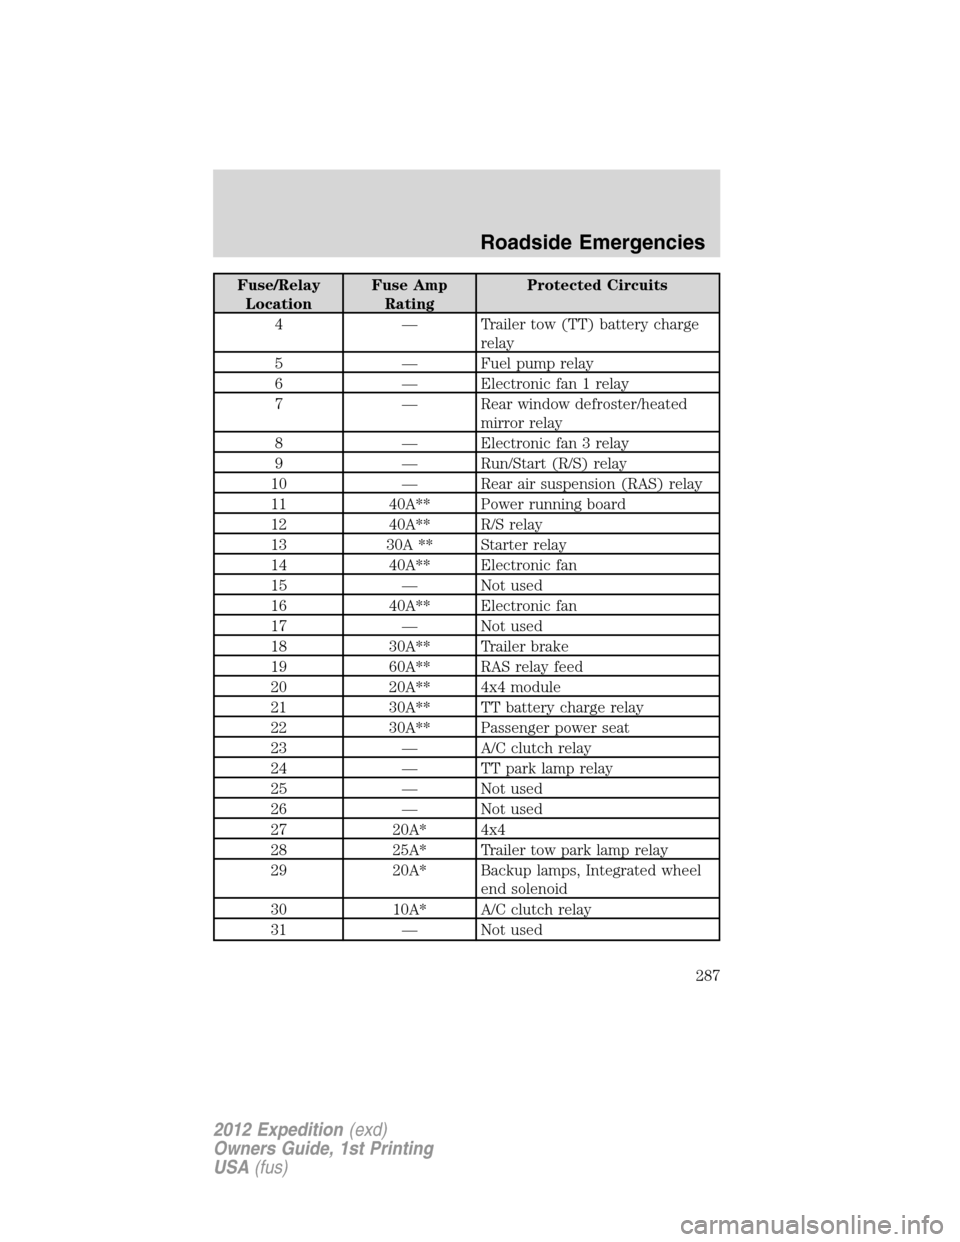
Fuse/Relay
LocationFuse Amp
RatingProtected Circuits
4 — Trailer tow (TT) battery charge
relay
5 — Fuel pump relay
6 — Electronic fan 1 relay
7 — Rear window defroster/heated
mirror relay
8 — Electronic fan 3 relay
9 — Run/Start (R/S) relay
10 — Rear air suspension (RAS) relay
11 40A** Power running board
12 40A** R/S relay
13 30A ** Starter relay
14 40A** Electronic fan
15 — Not used
16 40A** Electronic fan
17 — Not used
18 30A** Trailer brake
19 60A** RAS relay feed
20 20A** 4x4 module
21 30A** TT battery charge relay
22 30A** Passenger power seat
23 — A/C clutch relay
24 — TT park lamp relay
25 — Not used
26 — Not used
27 20A* 4x4
28 25A* Trailer tow park lamp relay
29 20A* Backup lamps, Integrated wheel
end solenoid
30 10A* A/C clutch relay
31 — Not used
Roadside Emergencies
287
2012 Expedition(exd)
Owners Guide, 1st Printing
USA(fus)
Page 294 of 400
Tire change procedure
WARNING:To help prevent the vehicle from moving when you
change a tire, be sure the parking brake is set, then block the
wheels (both front or both rear) on the opposite end of the vehicle
from the wheel being changed. If on a grade, block both opposite
wheels on the downward side of the hill.
WARNING:If the vehicle slips off the jack, you or someone else
could be seriously injured.
WARNING:On vehicles equipped with air suspension, turn off
the Air Suspension system prior to jacking, hoisting or towing
your vehicle.
WARNING:Turn off the running boards (if equipped) before
jacking or placing any object under the vehicle. Never place your
hand between the extended running board and the vehicle. A moving
running board may cause injury.
WARNING:Do not attempt to change a tire on the side of the
vehicle close to moving traffic. Pull far enough off the road to
avoid the danger of being hit when operating the jack and changing the
wheel.
Note:Passengers should not remain in the vehicle when the vehicle is
being jacked.
If your vehicle is equipped with air suspension, refer toMessage center
in theInstrument Clusterchapter for instructions on turning the air
suspension system off.
Refer to the instruction sheet (located in the rear floor compartment
behind the 3rd row seat with the jack tray tools assembly kit) for
detailed tire change instructions.
Roadside Emergencies
294
2012 Expedition(exd)
Owners Guide, 1st Printing
USA(fus)
Page 295 of 400
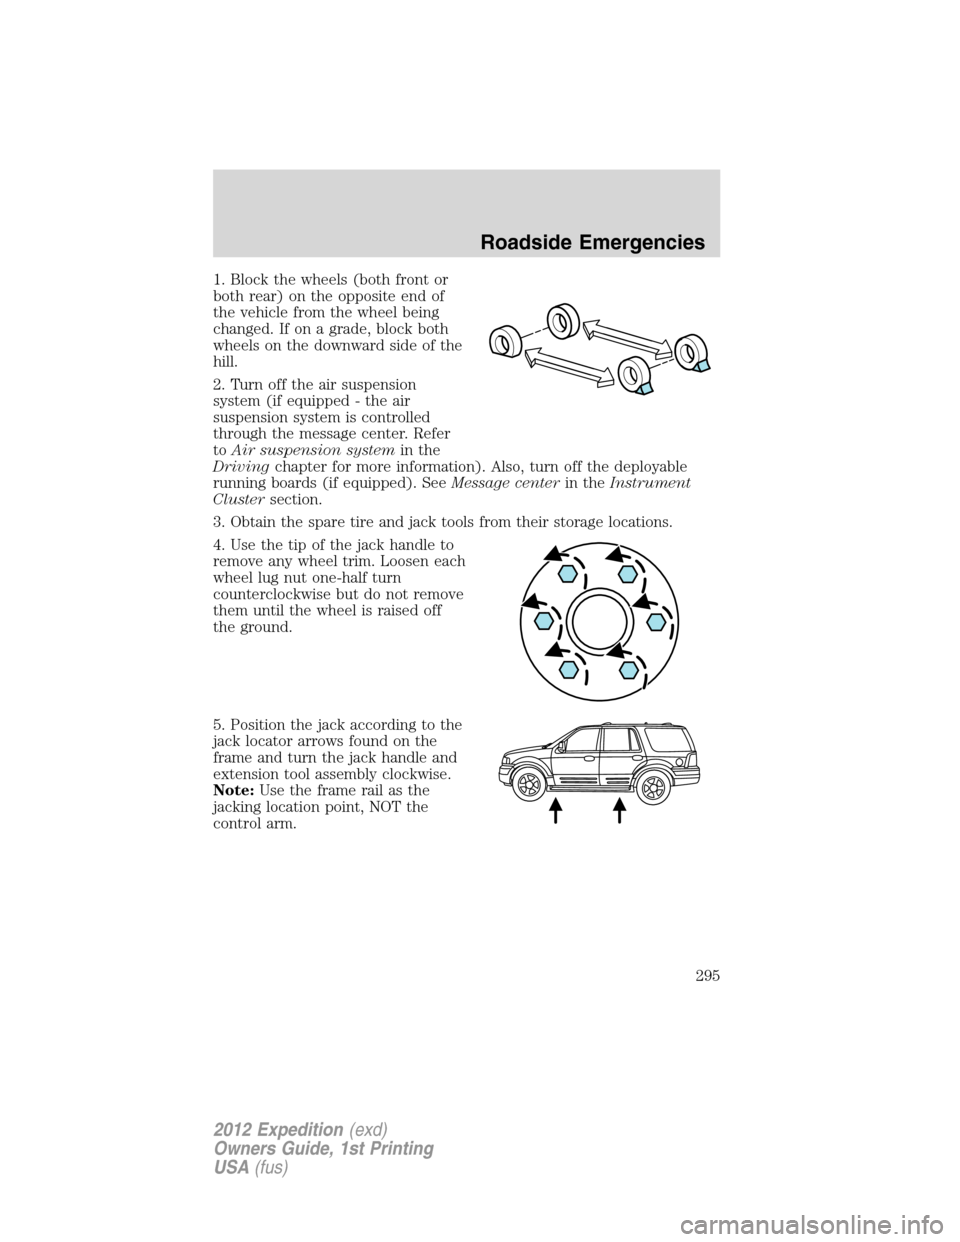
1. Block the wheels (both front or
both rear) on the opposite end of
the vehicle from the wheel being
changed. If on a grade, block both
wheels on the downward side of the
hill.
2. Turn off the air suspension
system (if equipped - the air
suspension system is controlled
through the message center. Refer
toAir suspension systemin the
Drivingchapter for more information). Also, turn off the deployable
running boards (if equipped). SeeMessage centerin theInstrument
Clustersection.
3. Obtain the spare tire and jack tools from their storage locations.
4. Use the tip of the jack handle to
remove any wheel trim. Loosen each
wheel lug nut one-half turn
counterclockwise but do not remove
them until the wheel is raised off
the ground.
5. Position the jack according to the
jack locator arrows found on the
frame and turn the jack handle and
extension tool assembly clockwise.
Note:Use the frame rail as the
jacking location point, NOT the
control arm.
Roadside Emergencies
295
2012 Expedition(exd)
Owners Guide, 1st Printing
USA(fus)
Page 297 of 400
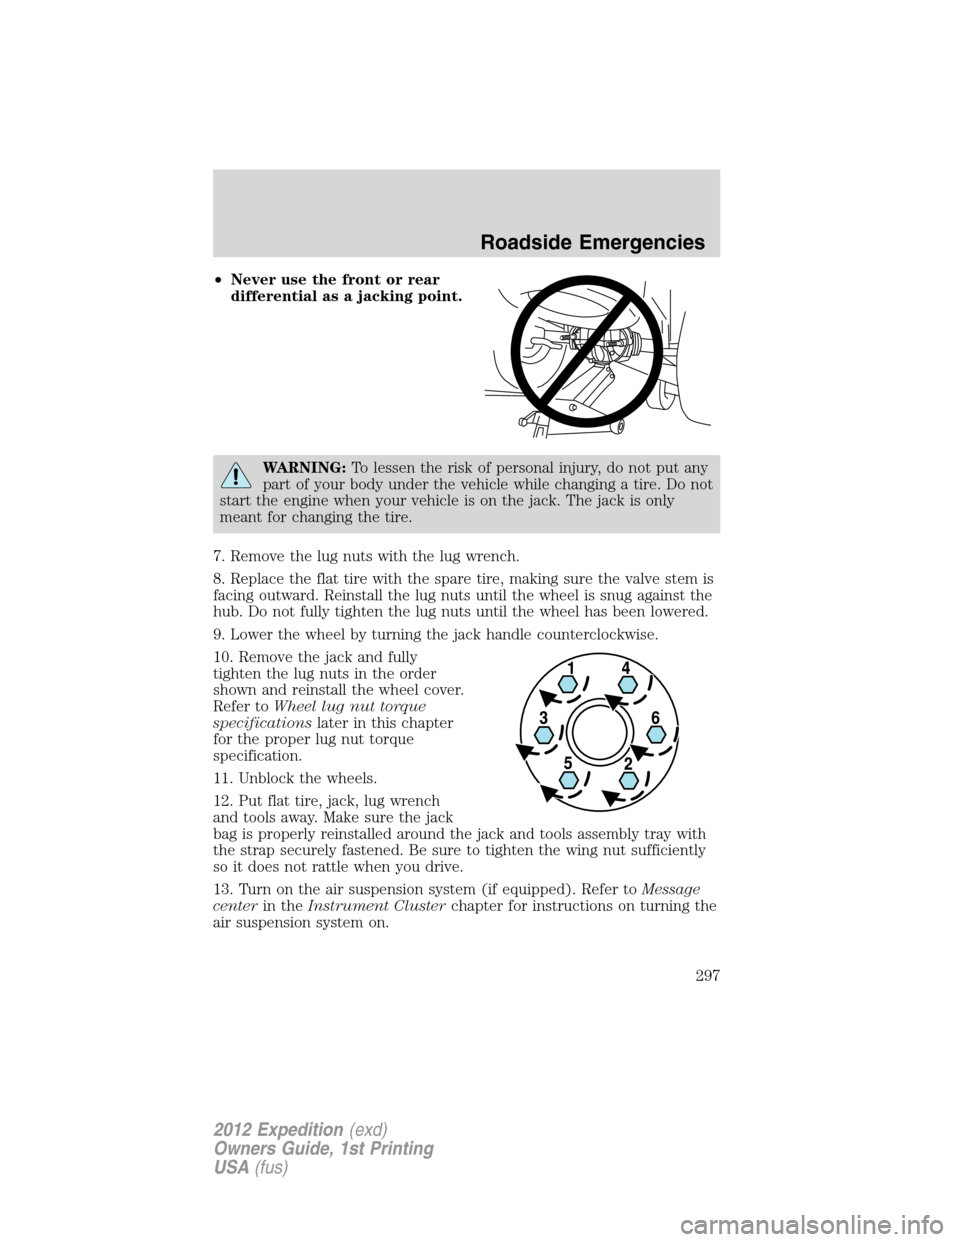
•Never use the front or rear
differential as a jacking point.
WARNING:To lessen the risk of personal injury, do not put any
part of your body under the vehicle while changing a tire. Do not
start the engine when your vehicle is on the jack. The jack is only
meant for changing the tire.
7. Remove the lug nuts with the lug wrench.
8. Replace the flat tire with the spare tire, making sure the valve stem is
facing outward. Reinstall the lug nuts until the wheel is snug against the
hub. Do not fully tighten the lug nuts until the wheel has been lowered.
9. Lower the wheel by turning the jack handle counterclockwise.
10. Remove the jack and fully
tighten the lug nuts in the order
shown and reinstall the wheel cover.
Refer toWheel lug nut torque
specificationslater in this chapter
for the proper lug nut torque
specification.
11. Unblock the wheels.
12. Put flat tire, jack, lug wrench
and tools away. Make sure the jack
bag is properly reinstalled around the jack and tools assembly tray with
the strap securely fastened. Be sure to tighten the wing nut sufficiently
so it does not rattle when you drive.
13. Turn on the air suspension system (if equipped). Refer toMessage
centerin theInstrument Clusterchapter for instructions on turning the
air suspension system on.
Roadside Emergencies
297
2012 Expedition(exd)
Owners Guide, 1st Printing
USA(fus)
Page 304 of 400
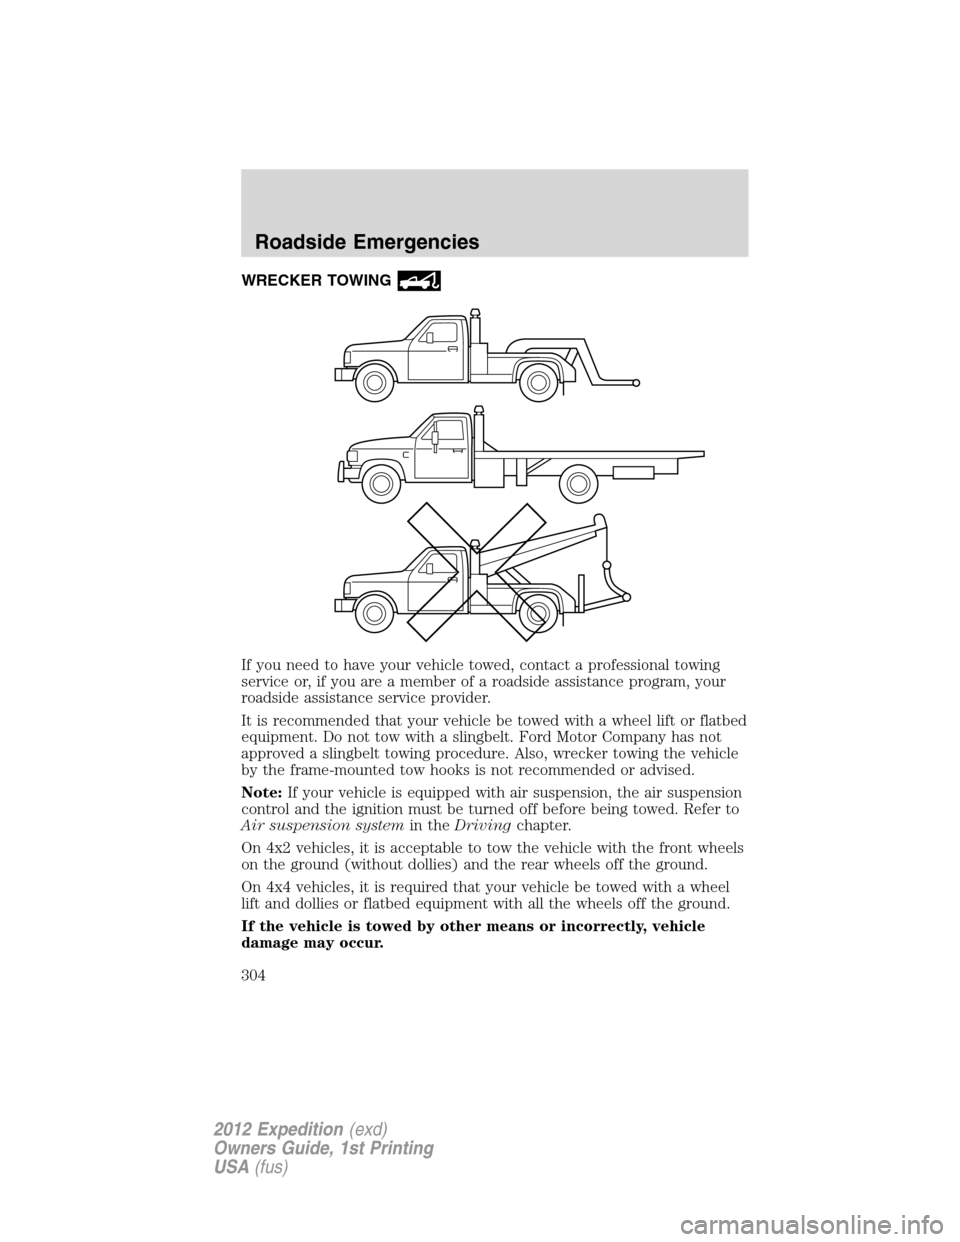
WRECKER TOWING
If you need to have your vehicle towed, contact a professional towing
service or, if you are a member of a roadside assistance program, your
roadside assistance service provider.
It is recommended that your vehicle be towed with a wheel lift or flatbed
equipment. Do not tow with a slingbelt. Ford Motor Company has not
approved a slingbelt towing procedure. Also, wrecker towing the vehicle
by the frame-mounted tow hooks is not recommended or advised.
Note:If your vehicle is equipped with air suspension, the air suspension
control and the ignition must be turned off before being towed. Refer to
Air suspension systemin theDrivingchapter.
On 4x2 vehicles, it is acceptable to tow the vehicle with the front wheels
on the ground (without dollies) and the rear wheels off the ground.
On 4x4 vehicles, it is required that your vehicle be towed with a wheel
lift and dollies or flatbed equipment with all the wheels off the ground.
If the vehicle is towed by other means or incorrectly, vehicle
damage may occur.
Roadside Emergencies
304
2012 Expedition(exd)
Owners Guide, 1st Printing
USA(fus)