2012 FIAT FREEMONT ECO mode
[x] Cancel search: ECO modePage 148 of 332

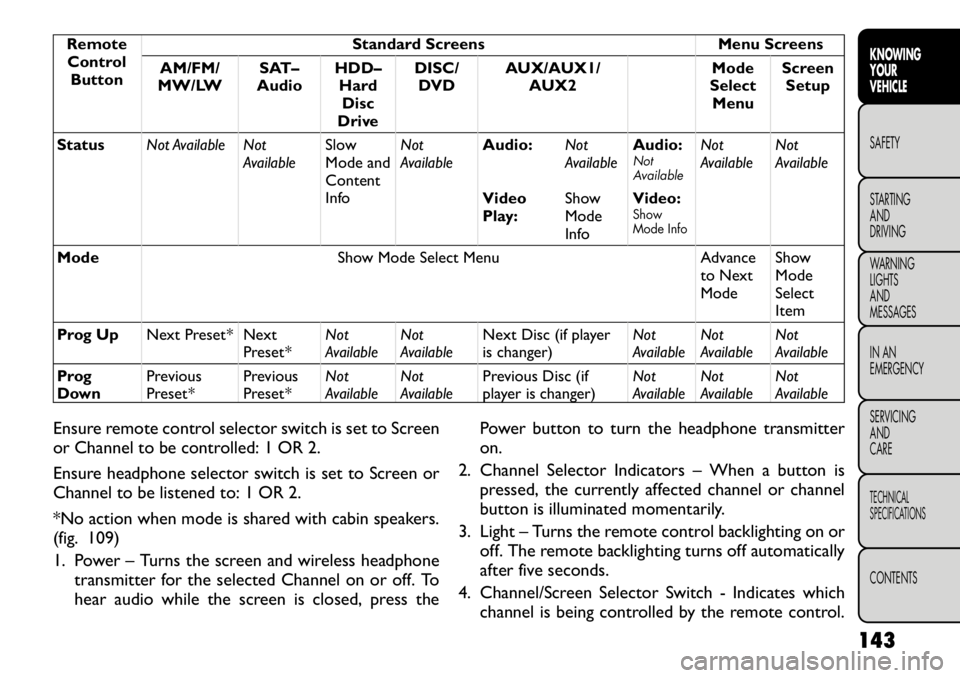
RemoteControl Button Standard Screens Menu Screens
AM/FM/
MW/LW SAT–
Audio HDD–
HardDisc
Drive DISC/
DVD AUX/AUX1/
AUX2 Mode
Select Menu Screen
Setup
Play/Pause Not Available Not
AvailableNot
AvailablePause if
playing,else
resume
play Audio:
Pause if
playing/
resumeNot
Available
Not
Available Not
Available
Video
Play: Pause if
playing/
resume
Video
Menu: Activate
selected
item
Stop Not Available Not
AvailableNot
AvailableStop Stop
Not
AvailableNot
Available Not
Available
Mute Mute/Unmute Headphones
Slow Not Available Not
AvailableNot
AvailableNot
Available Audio:
Not
AvailableNot
AvailableNot
Available Not
Available
Video
Play: Slow
play/
resume
Video
Menu: Not
Available
142
KNOWING YOUR
VEHICLE
SAFETY
STARTING AND
DRIVING
WARNING LIGHTSAND
MESSAGES
IN AN
EMERGENCY
SERVICING AND
CARETECHNICAL
SPECIFICATIONSCONTENTS
Page 149 of 332

RemoteControl Button Standard Screens Menu Screens
AM/FM/
MW/LW SAT–
Audio HDD–
HardDisc
Drive DISC/
DVD AUX/AUX1/
AUX2 Mode
Select Menu Screen
Setup
Status Not Available Not
AvailableSlow
Mode and
Content
InfoNot
Available
Audio:
Not
AvailableAudio:
Not
Available
Not
Available Not
Available
Video
Play: ShowMode
InfoVideo:
Show
Mode Info
Mode
Show Mode Select Menu Advance
to Next ModeShowModeSelect
Item
Prog Up Next Preset* Next
Preset*Not
AvailableNot
Available Next Disc (if player
is changer) Not
AvailableNot
Available Not
Available
Prog
Down Previous
Preset* Previous
Preset*Not
AvailableNot
Available Previous Disc (if
player is changer) Not
AvailableNot
Available Not
Available
Ensure remote control selector switch is set to Screen
or Channel to be controlled: 1 OR 2.
Ensure headphone selector switch is set to Screen or
Channel to be listened to: 1 OR 2.
*No action when mode is shared with cabin speakers.
(fig. 109)
1. Power – Turns the screen and wireless headphone transmitter for the selected Channel on or off. To
hear audio while the screen is closed, press the Power button to turn the headphone transmitteron.
2. Channel Selector Indicators – When a button is pressed, the currently affected channel or channel
button is illuminated momentarily.
3. Light – Turns the remote control backlighting on or off. The remote backlighting turns off automatically
after five seconds.
4. Channel/Screen Selector Switch - Indicates which channel is being controlled by the remote control.
143
KNOWING
YOURVEHICLESAFETY
STARTING ANDDRIVING
WARNING LIGHTSAND
MESSAGES
IN AN
EMERGENCY
SERVICING AND
CARETECHNICAL
SPECIFICATIONSCONTENTS
Page 154 of 332

This warranty gives you specific legal rights. You may
also have other rights, which vary from jurisdiction tojurisdiction.
What Will Unwired
®Do?Unwired
®, at its option,
will repair or replace any defective Product. Unwired
®
reserves the right to replace any discontinued Product
with a comparable model. THIS WARRANTY IS THE
SOLE WARRANTY FOR THIS PRODUCT, SETS
FORTH YOUR EXCLUSIVE REMEDY REGARDING
DEFECTIVE PRODUCTS, AND IS IN LIEU OF ALL
OTHER WARRANTIES (EXPRESS OR IMPLIED), IN-
CLUDING ANY WARRANTY OR MERCHANTABIL-
ITY OR FITNESS FOR A PARTICULAR PURPOSE.
Video Screen Operation
Displaying Video
The video screen has two different operating modes, a
video mode (when displaying video such as DVD video,
Aux video, etc.) and an information mode as shown in
Figure 5. Because the VES™ is a dual channel system,
Information Mode is displayed in a split screen format.
When in Information Mode, the left side of the screen
is referred to as Channel 1 and the right side of the
screen is referred to as Channel 2.
Only Channel 1 displays video images. When in video
mode the image is displayed on the full screen, however
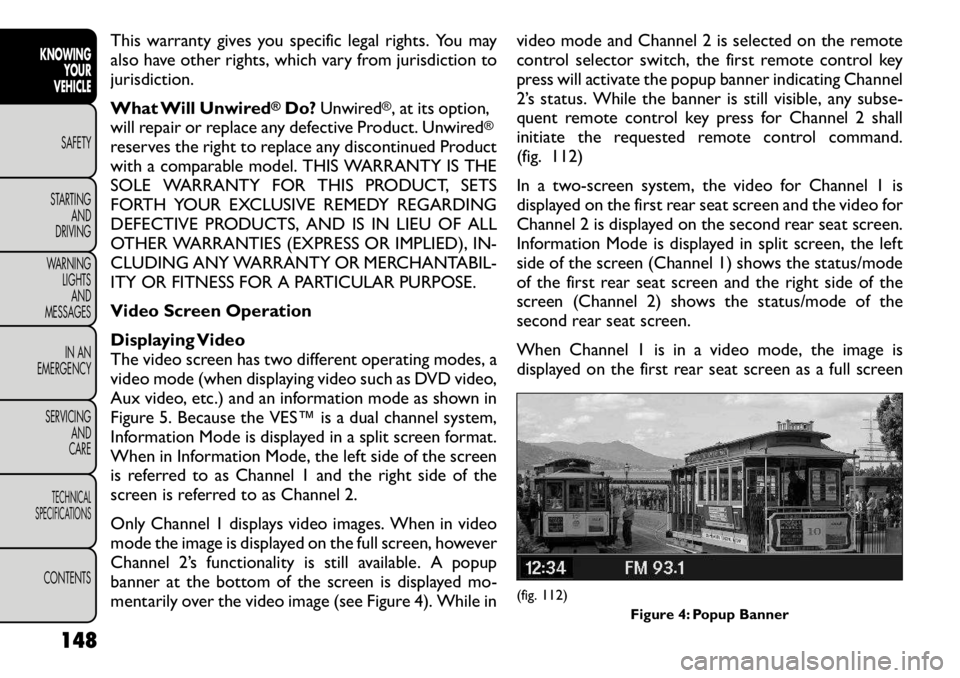
Channel 2’s functionality is still available. A popup
banner at the bottom of the screen is displayed mo-
mentarily over the video image (see Figure 4). While in video mode and Channel 2 is selected on the remote
control selector switch, the first remote control key
press will activate the popup banner indicating Channel
2’s status. While the banner is still visible, any subse-
quent remote control key press for Channel 2 shall
initiate the requested remote control command.
(fig. 112)
In a two-screen system, the video for Channel 1 is
displayed on the first rear seat screen and the video for
Channel 2 is displayed on the second rear seat screen.
Information Mode is displayed in split screen, the left
side of the screen (Channel 1) shows the status/mode
of the first rear seat screen and the right side of the
screen (Channel 2) shows the status/mode of the
second rear seat screen.
When Channel 1 is in a video mode, the image is
displayed on the first rear seat screen as a full screen
(fig. 112)
Figure 4: Popup Banner
148
KNOWING YOUR
VEHICLE
SAFETY
STARTING AND
DRIVING
WARNING LIGHTSAND
MESSAGES
IN AN
EMERGENCY
SERVICING AND
CARETECHNICAL
SPECIFICATIONSCONTENTS
Page 155 of 332

image. A popup banner at the bottom of the screen is
displayed momentarily over the video image showing
any change in status of Channel 2.
When Channel 2 is in video mode, the image is dis-
played on the second rear seat screen as a full screen
image. A popup banner at the bottom of the screen is
displayed momentarily over the video image showing
any change in status of Channel 1.
Playing A Disc On The VES™
The following actions occur automatically when a disc
is inserted into the radio on a single screen system and
into the remote DVD player on a two screen system:
• If the video screen is in the open position (the LCDscreen is visible), then the screen turns on and the
wireless headphone transmitter turns on. If the video
screen is closed, the wireless headphone transmitter
must be turned on by using the power button on the
remote control (headphones only receive audio sig-
nals if the headphones are powered on).
• After the disc is inserted, the disc begins playing to cabin speakers, wireless headphones, and rear video
screens.
Shared Modes
The VES™ and radio are capable of communicating
with each other. This allows the VES™ to output radio
audio to the headphones and the radio to output
VES™ audio to the vehicle speakers. When the radio
and VES™ are in the same (shared) mode, a VES™ icon will be visible on the radio’s display and the shared icon
will be visible on the VES™ screen. When in shared
mode, the same audio source is heard in the head-
phones and vehicle speakers simultaneously.
If the radio functions (FM, AM, or SAT) are in the
shared mode with the VES™, only the radio is able to
control the radio functions. In this case, VES™ can
share the radio mode, but not change stations until the
radio mode is changed to a mode that is different from
the VES™ selected radio mode. When shared, the
radio has priority over the VES™ or all radio modes
(FM, AM, and SAT). The VES™ has the ability to switch
tuner (AM/FM/MW/LW), SEEK, TUNE, and recall pre-
sets in radio modes as long as it is not in shared mode.
When in shared disc or satellite video mode both the
radio and the VES™ have control of the video func-
tions. The VES™ has the ability to control the follow-
ing video modes:
1. CD: Ability to Fast Forward, Rewind, and Track
Up/Down.
2. CD Changer (in radio): Ability to Disk Up/Down and program all listed CD controls (Fast Forward,
Rewind, and Track Up/Down).
The VES™ can even control radio modes or video
modes while the radio is turned off. The VES™ can
access the radio modes or disc modes by navigating to
those modes on the VES™ and activating a radio mode
or disc mode.
149
KNOWING
YOURVEHICLESAFETY
STARTING ANDDRIVING
WARNING LIGHTSAND
MESSAGES
IN AN
EMERGENCY
SERVICING AND
CARETECHNICAL
SPECIFICATIONSCONTENTS
Page 159 of 332

Disc Features control the remote DVD player's (for
versions/markets, where provided) settings of DVD
being watched in the remote player.
Listening To Audio With The Screen Closed
To listen to only audio portion of the channel with the
screen closed:
• Set the audio to the desired source and channel.
• Close the video screen.
• To change the current audio mode, press the remotecontrol’s MODE button. This will automatically se-
lect the next available audio mode without using the
Mode Select menu.
• When the screen is reopened, the video screen will automatically turn back on and show the appropriate
display menu or media.
If the screen is closed and there is no audio heard,
verify that the headphones are turned on (the ON
indicator is illuminated) and the headphone selector
switch is on the desired channel. If the headphones are
turned on, press the remote control’s power button to
turn audio on. If audio is still not heard, check that fully
charged batteries are installed in the headphones. Why Does The Screen Mode Change
Automatically?
In order to make the operation of the VES™ simple
and with the least amount of driver distraction, specific
events will cause the screen(s) to automatically switch
to DVD mode. These events are:
• Loading a disc in the DVD player (if so equipped),
• Pressing the PLAY button on the DVD player face-
plate when the disc is stopped or paused, or
• AM/FM band selection via Radio.
If your vehicle is not equipped with the separate DVD
player, the following events in the Radio will cause the
screen(s) to automatically switch to Radio Disc mode.
• Loading a disc in the radio CD/DVD player
• AM/FM band selection via Radio
Auxiliary Inputs
For each video screen there is an auxiliary (Aux jack)
device input which is used to connect external audio/
video sources to the VES™. Examples of devices that
can be connected to the Aux inputs include portable
music players, video cameras, VCR’s, game systems,
and other devices with audio and/or video outputs.
The Aux jacks are typically located on the back of the
center console or on one of the vehicles side panels in
the rear occupant area.
153
KNOWING
YOURVEHICLESAFETY
STARTING ANDDRIVING
WARNING LIGHTSAND
MESSAGES
IN AN
EMERGENCY
SERVICING AND
CARETECHNICAL
SPECIFICATIONSCONTENTS
Page 169 of 332

3. Slide the latch plate upward over the folded web-bing. The folded webbing must enter the slot at the
top of the latch plate.
4. Continue to slide the latch plate up until it clears the folded webbing.
SEAT BELTS IN PASSENGER SEATING
POSITIONS
The seat belts in the passenger seating positions are
equipped with an Automatic Locking Retractor (ALR)
or a cinching latch plate which are used to secure a
child restraint system. For additional information refer
to “Installing Child Restraints Using the Vehicle Seat
Belt” under the “Child Restraint” section. The chart
below defines the type of feature for each seatingposition.
Driver Center Passenger
First Row N/A N/A ALR
Second Row ALR ALR ALR
• N/A — Not Applicable
• ALR — Automatic Locking Retractor
If the passenger seating position is equipped with an
ALR and is being used for normal usage:
Only pull the belt webbing out far enough to comfort-
ably wrap around the occupant's mid-section so as to
not activate the ALR. If the ALR is activated, you will
hear a ratcheting sound as the belt retracts. Allow the
webbing to retract completely in this case and then
carefully pull out only the amount of webbing neces- sary to comfortably wrap around the occupant's mid-
section. Slide the latch plate into the buckle until you
hear a "click."
AUTOMATIC LOCKING RETRACTOR MODE
(ALR) (for versions/markets, where provided)
In this mode, the shoulder belt is automatically pre-
locked. The belt will still retract to remove any slack in
the shoulder belt. The Automatic Locking Mode is
available on all passenger-seating positions with a com-
bination lap/shoulder belt. Use the Automatic Locking
Mode anytime a child safety seat is installed in a seating
position that has a belt with this feature. Children
12 years old and under should always be properly
restrained in the rear seat.
How To Engage The Automatic Locking Mode
1. Buckle the combination lap and shoulder belt.
2. Grasp the shoulder portion and pull downward until
the entire belt is extracted.
3. Allow the belt to retract. As the belt retracts, you will hear a clicking sound. This indicates the safety
belt is now in the Automatic Locking Mode.
How To Disengage The Automatic LockingMode
Unbuckle the combination lap/shoulder belt and allow
it to retract completely to disengage the Automatic
Locking Mode and activate the vehicle sensitive (emer-
gency) locking mode.
163
KNOWING
YOURVEHICLESAFETYSTARTING ANDDRIVING
WARNING LIGHTSAND
MESSAGES
IN AN
EMERGENCY
SERVICING AND
CARETECHNICAL
SPECIFICATIONSCONTENTS
Page 185 of 332

seating position, adjust the head restraint to the up-
ward position and route the tether strap between the
head restraint posts underneath the head restraint.
Then, attach the hook to the tether anchor located on
the back of the seat. Finally, tighten all three straps as
you push the child restraint rearward and downward
into the seat, removing slack in the straps according to
the child restraint manufacturer's instructions.
NOTE:
• Ensure that the tether strap does not slip into the
opening between the seatbacks as you remove slack in
the strap.
• When using the ISOFIX attaching system to install a
child restraint, please ensure that all seat belts not
being used for occupant restraints are stowed and out
of reach of children. Remind all children in the vehicle
that the seat belts are not toys and that they should not
play with them. In addition, never leave unattended
children in the vehicle.
WARNING!
Improper installation of a child restraint
to the ISOFIX anchorages can lead to
failure of an infant or child restraint . The child
could be badly injured or killed. Follow the manu-
facturer's directions exactly when installing an
infant or child restraint . Installing Child Restraints Using The Vehicle
Seat Belt
The seat belts in the passenger seating positions are
equipped with an Automatic Locking Retractor (ALR)
or a cinching latch plate to secure a Child Restraint
System (CRS). These types of seat belts are designed to
keep the lap portion of the seat belt tight around the
child restraint so that it is not necessary to use a
locking clip. The ALR will make a ratcheting noise if you
extract the entire belt from the retractor and then
allow the belt to retract into the retractor. For addi-
tional information on ALR, refer to “Automatic Locking
Mode” description under “Seat Belts in Passenger Seat-
ing Positions” section. The chart below defines the
seating positions with an Automatic Locking Retractor
(ALR) or a cinching latch plate.
Driver Center Passenger
CRS Lock CRS Lock CRS Lock
First Row N/A N/A ALR
Second Row ALR ALR ALR
• N/A — Not Applicable
• ALR — Automatic Locking Retractor
Installing a Child Restraint with a Cinching Latch Plate:
1. To install a child restraint with a cinching latch plate,
first, pull enough of the seat belt webbing from the
retractor to route it through the belt path of the
child. Slide the latch plate into the buckle until you
hear a “click.”
179
KNOWING
YOURVEHICLESAFETYSTARTING ANDDRIVING
WARNING LIGHTSAND
MESSAGES
IN AN
EMERGENCY
SERVICING AND
CARETECHNICAL
SPECIFICATIONSCONTENTS
Page 198 of 332

SAFETY TIPS
TRANSPORTING PASSENGERS
NEVER TRANSPORT PASSENGERS IN THE CARGO
AREA.
WARNING!
Do not leave children or animals inside
parked vehicles in hot weather. Interior
heat build-up may cause serious injury or death.
It is extremely dangerous to ride in a cargo
area, inside or outside of a vehicle. In a collision,
people riding in these areas are more likely to be
seriously injured or killed.
Do not allow people to ride in any area of your
vehicle that is not equipped with seats and seat
belts.
Be sure everyone in your vehicle is in a seat and
using a seat belt properly.
On seven passenger models, do not drive the
vehicle with the second row passenger seat in the
easy entry/exit position (seat cushion flipped up-
ward and seat moved forward), as this position is
only intended for entering and exiting the third
row seats. Failure to follow this warning may
result in personal injury.
(Continued)(Continued)
On seven passenger models, do not allow a
passenger to sit in a third row seat with the
second row seatback(s) folded flat . In a collision,
the passenger could slide underneath the seat
belt and be seriously or even fatally injured.
EXHAUST GAS
WARNING!
Exhaust gases can injure or kill. They
contain carbon monoxide (CO), which is
colorless and odorless. Breathing it can make you
unconscious and can eventually poison you. To
avoid breathing (CO), follow these safety tips:
Do not run the engine in a closed garage or in
confined areas any longer than needed to move
your vehicle in or out of the area.
If you are required to drive with the trunk/
liftgate open, make sure that all windows are
closed and the climate control BLOWER switch is
set at high speed. DO NOT use the recirculation
mode.
If it is necessary to sit in a parked vehicle with
the engine running, adjust your heating or cooling
controls to force outside air into the vehicle. Set
the blower at high speed.
192
KNOWING YOUR
VEHICLESAFETYSTARTING AND
DRIVING
WARNING LIGHTSAND
MESSAGES
IN AN
EMERGENCY
SERVICING AND
CARETECHNICAL
SPECIFICATIONSCONTENTS