Page 19 of 391

Programming Additional Transmitters
Refer to Sentry Key�“Customer Key Programming.”
If you do not have a programmed RKE transmitter,
contact your authorized dealer for details.
General Information
This device complies with Part 15 of FCC rules and with
RS-210 of Industry Canada. Operation is subject to the
following conditions:
1. This device may not cause harmful interference.
2. This device must accept any interference that may be
received including interference that may cause undesired
operation. NOTE:
Changes or modifications not expressly ap-
proved by the party responsible for compliance could
void the user’s authority to operate the equipment.
If your RKE transmitter fails to operate from a normal
distance, check for these two conditions:
1. Weak battery in the RKE transmitter. The expected life
of a battery is five years.
2. Closeness to a radio transmitter such as a radio station
tower, airport transmitter, military base, and some mobile
or CB radios.
2
THINGS TO KNOW BEFORE STARTING YOUR VEHICLE 17
Page 35 of 391

WARNING!
•A lap belt worn too high can increase the risk of
internal injury in a collision. The belt forces won’t
be at the strong hip and pelvic bones, but across
your abdomen. Always wear the lap belt as low as
possible and keep it snug.
•A twisted belt may not protect you properly. In a
collision, it could even cut into you. Be sure the
belt is straight. If you can’t straighten a belt in
your vehicle, take it to your authorized dealer
immediately and have it fixed.
5. Position the shoulder belt on your chest so that it is
comfortable and not resting on your neck. The retractor
will withdraw any slack in the belt. 6. To release the belt, push the red button on the buckle.
The belt will automatically retract to its stowed position.
If necessary, slide the latch plate down the webbing to
allow the belt to retract fully.
WARNING!
A frayed or torn belt could rip apart in a collision and
leave you with no protection. Inspect the belt system
periodically, checking for cuts, frays, or loose parts.
Damaged parts must be replaced immediately. Do
not disassemble or modify the system. Seat belt
assemblies must be replaced after a collision if they
have been damaged (bent retractor, torn webbing,
etc.).
2
THINGS TO KNOW BEFORE STARTING YOUR VEHICLE 33
Page 39 of 391

Enhanced Seat Belt Use Reminder System
(BeltAlert�)
BeltAlert�is a feature intended to remind the driver and
front passenger (if equipped with front passenger
BeltAlert�) to fasten their seat belts. The feature is active
whenever the ignition is on. If the driver or front seat
passenger is unbelted, the Seat Belt Reminder Light will
turn on and remain on until both front seat belts are
fastened.
The BeltAlert� warning sequence begins after the vehicle
speed is over 5 mph (8 km/h), by blinking the Seat Belt
Reminder Light and sounding an intermittent chime.
Once the sequence starts, it will continue for the entire
duration or until the respective seatbelts are fastened.
After the sequence completes, the Seat Belt Reminder
Light remains illuminated until the respective seat belts
are fastened. The driver should instruct all other occu-
pants to fasten their seat belts. If a front seat belt is unbuckled while traveling at speeds greater than 5 mph
(8 km/h), BeltAlert�
will provide both audio and visual
notification.
The front passenger seat BeltAlert� is not active when the
front passenger seat is unoccupied. BeltAlert �may be
triggered when an animal or heavy object is on the front
passenger seat or when the seat is folded flat (if
equipped). It is recommended that pets be restrained in
the rear seat in pet harnesses or pet carriers that are
secured by seat belts, and cargo is properly stowed.
BeltAlert� can be enabled or disabled by your authorized
dealer. FIAT Group Automobiles does not recommend
deactivating BeltAlert�.
NOTE: Although BeltAlert� has been deactivated, the
Seat Belt Reminder Light will continue to illuminate
while the driver ’s or front passenger (if equipped with
BeltAlert�) seat belt remains unfastened.
2
THINGS TO KNOW BEFORE STARTING YOUR VEHICLE 37
Page 64 of 391

NOTE:
•Ensure that the tether strap does not slip into the
opening between the seatbacks as you remove the
slack in the strap.
•When using the LATCH attaching system to install a
child restraint, please ensure that all seat belts not
being used for occupant restraints are stowed and out
of reach of children. It is recommended that before
installing the child restraint, buckle the seat belt so the
seat belt is tucked behind the child restraint. This
should stow the seat belt out of the reach of an
inquisitive child. Remind all children in the vehicle
that the seat belts are not toys and that they should not
play with them. In addition, never leave unattended
children in the vehicle.
WARNING!
Improper installation of a child restraint to the
LATCH anchorages can lead to failure of an infant or
child restraint. The child could be badly injured or
killed. Follow the manufacturer’s directions exactly
when installing an infant or child restraint.
Installing Child Restraints Using The Vehicle Seat
Belt
The seat belts in the passenger seating positions are
equipped with an Automatic Locking Retractor (ALR) to
secure a Child Restraint System (CRS). These types of
seat belts are designed to keep the lap portion of the seat
belt tight around the child restraint so that it is not
necessary to use a locking clip. The ALR will make a
ratcheting noise if you extract the entire belt from the
retractor and then allow the belt to retract into the
62 THINGS TO KNOW BEFORE STARTING YOUR VEHICLE
Page 78 of 391
MIRRORS
Inside Day/Night Mirror
The mirror can be adjusted up, down, left, and right for
various drivers. The mirror should be adjusted to center
on the view through the rear window.
Headlight glare from vehicles behind you can be reduced
by moving the small control under the mirror to the night
position (toward the rear of the vehicle). The mirror
should be adjusted while set in the day position (toward
the windshield).
Adjusting Rearview Mirror
76 UNDERSTANDING THE FEATURES OF YOUR VEHICLE
Page 99 of 391
High Beams
With the low beams activated, push the multifunc-
tion lever towards the instrument panel to turn on
the high beams. Pull the multifunction lever toward the
steering wheel to turn off the high beams.
Flash-To-Pass
You can signal another vehicle with your headlights by
lightly pulling the multifunction lever toward the steer-
ing wheel. This will turn on the high beams until the
lever is released.
Parking Lights
To turn on the parking lights, remove the key
or turn the ignition to OFF/LOCK position and
turn on the headlights.
Daytime Running Lights — If Equipped
To activate the Daytime Running Lights (DRL), rotate the
end of the multifunction lever to the Osymbol.
NOTE: The low beams and side/taillights will not be on
with DRL.
The DRL function can be turned on or off using the
display menus. Refer to “Electronic Vehicle Information
Center (EVIC)” in “Understanding Your Instrument
Panel” for further information.
3
UNDERSTANDING THE FEATURES OF YOUR VEHICLE 97
Page 100 of 391

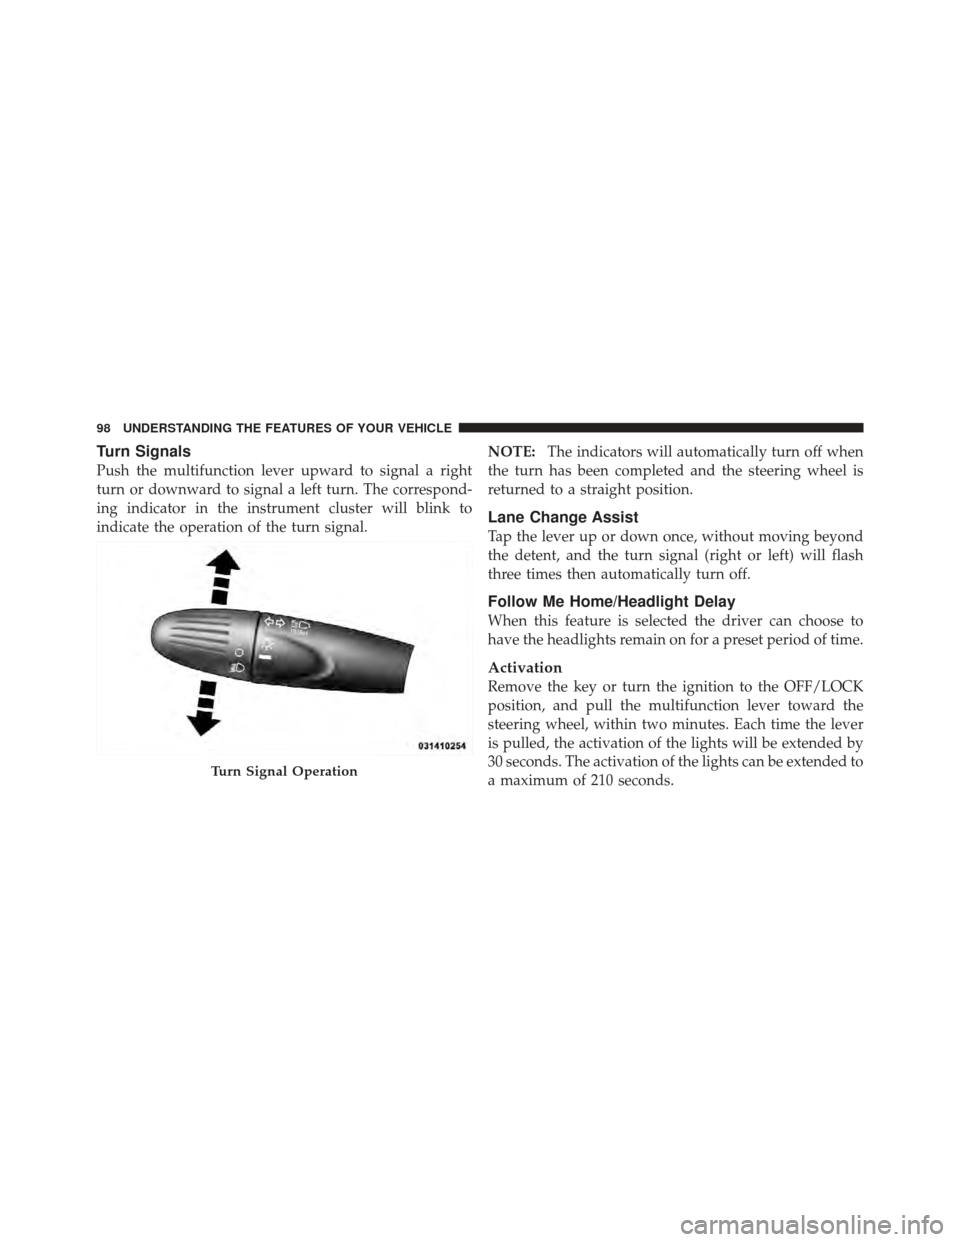
Turn Signals
Push the multifunction lever upward to signal a right
turn or downward to signal a left turn. The correspond-
ing indicator in the instrument cluster will blink to
indicate the operation of the turn signal.NOTE:
The indicators will automatically turn off when
the turn has been completed and the steering wheel is
returned to a straight position.
Lane Change Assist
Tap the lever up or down once, without moving beyond
the detent, and the turn signal (right or left) will flash
three times then automatically turn off.
Follow Me Home/Headlight Delay
When this feature is selected the driver can choose to
have the headlights remain on for a preset period of time.
Activation
Remove the key or turn the ignition to the OFF/LOCK
position, and pull the multifunction lever toward the
steering wheel, within two minutes. Each time the lever
is pulled, the activation of the lights will be extended by
30 seconds. The activation of the lights can be extended to
a maximum of 210 seconds.
Turn Signal Operation
98 UNDERSTANDING THE FEATURES OF YOUR VEHICLE
Page 101 of 391

Deactivation
Pull the multifunction lever toward the steering wheel
and hold it for more than two seconds.
Interior Lights
The interior light switches are located in the overhead
console. The interior lights can be set to three different
positions (Off/Left Position, Center Position, On/Right
Position).
Using the switch on the left overhead, press the switch to
the right from its center position and the lights are always
on. Press the switch to the left from its center position and
the lights are always off. Leave the switch in the center
position, and the lights are turned on and off when the
doors are opened or closed. The switch on the right side
of the overhead console controls the map or reading
function of the lights. Press the switch to the right to turn
on the right light and press the switch to the left to turn
on the left light.
CAUTION!
Before getting out of the vehicle be sure that the
switch is in the center position or that the lights are
off to avoid draining the battery.
Interior Light Timing (Center Position)
There are four different modes of operation that can be
activated in this position:
•When one door is opened a 3 minute timer is activated.
•When the key is removed from the ignition (within
two minutes of the ignition being turned off), a
10 second timer is activated.
•When the doors are unlocked with Key Fob a 10 sec-
ond timer is activated.
•When the doors are locked with the Key Fob the lights
will turn off.
3
UNDERSTANDING THE FEATURES OF YOUR VEHICLE 99