Page 381 of 643
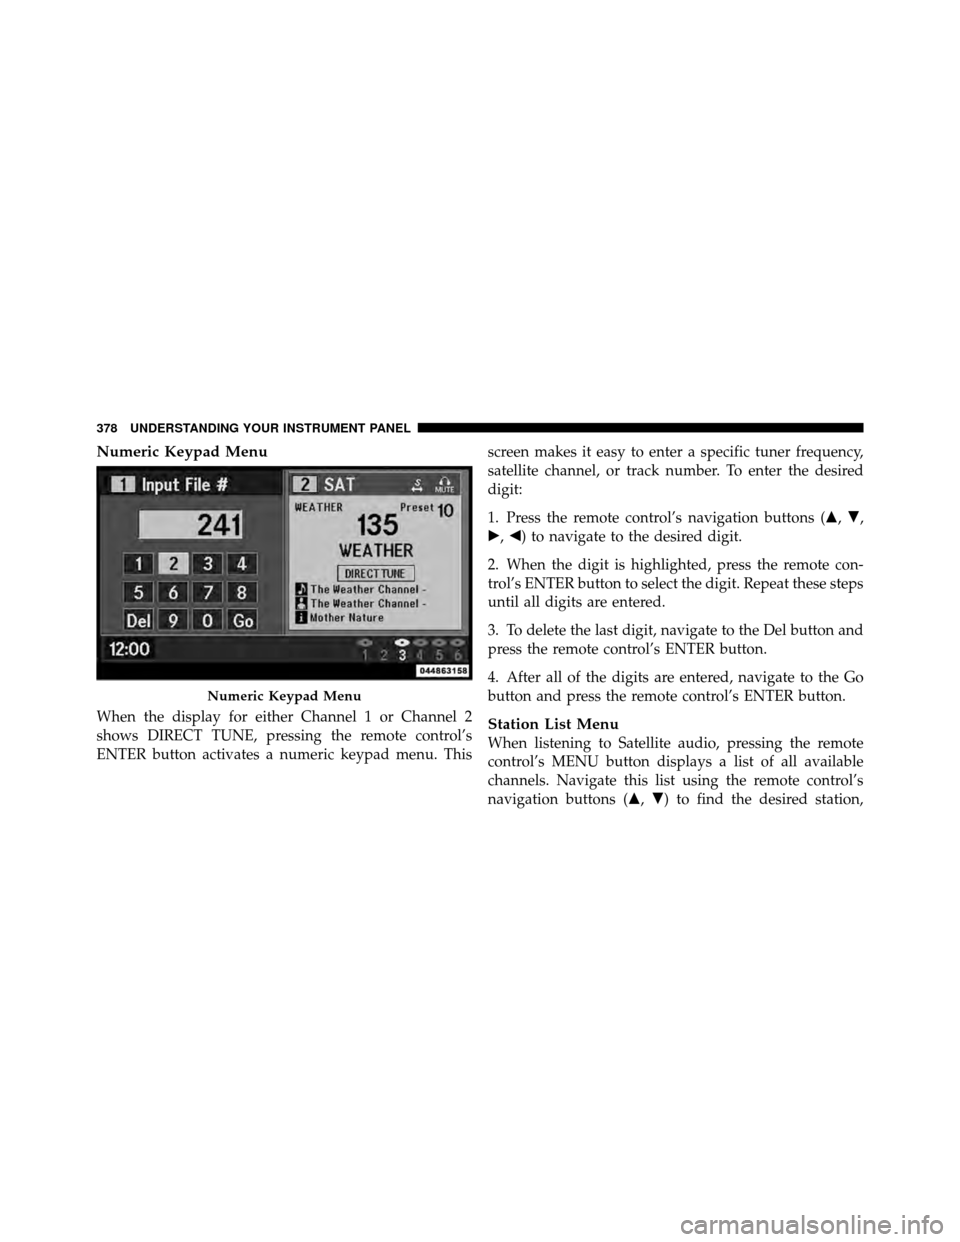
Numeric Keypad Menu
When the display for either Channel 1 or Channel 2
shows DIRECT TUNE, pressing the remote control’s
ENTER button activates a numeric keypad menu. Thisscreen makes it easy to enter a specific tuner frequency,
satellite channel, or track number. To enter the desired
digit:
1. Press the remote control’s navigation buttons (�,
�,
�, �) to navigate to the desired digit.
2. When the digit is highlighted, press the remote con-
trol’s ENTER button to select the digit. Repeat these steps
until all digits are entered.
3. To delete the last digit, navigate to the Del button and
press the remote control’s ENTER button.
4. After all of the digits are entered, navigate to the Go
button and press the remote control’s ENTER button.Station List Menu
When listening to Satellite audio, pressing the remote
control’s MENU button displays a list of all available
channels. Navigate this list using the remote control’s
navigation buttons (�, �) to find the desired station,
Numeric Keypad Menu
378 UNDERSTANDING YOUR INSTRUMENT PANEL
Page 383 of 643
control’s SETUP button activates the Display Settings
menu. These settings control the appearance of the video
on the screen. The factory default settings are already set
for optimum viewing, so there is no need to change these
settings under normal circumstances.
To change the settings, press the remote control’s navi-
gation buttons (�,�) to select an item, then press the
remote control’s navigation buttons (�, �) to change the
value for the currently selected item. To reset all values
back to the original settings, select the Default Settings
menu option and press the remote control’s ENTER
button.
Disc Features control the remote DVD player’s (if
equipped) settings of DVD being watched in the remote
player.Listening To Audio With The Screen Closed
To listen to only audio portion of the channel with the
screen closed:
•Set the audio to the desired source and channel.
•Close the video screen.
•To change the current audio mode, press the remote
control’s MODE button. This will automatically select
the next available audio mode without using the Mode
Select menu.
•When the screen is reopened, the video screen will
automatically turn back on and show the appropriate
display menu or media.
380 UNDERSTANDING YOUR INSTRUMENT PANEL
Page 387 of 643
•To change the current directory, use the remote con-
trol’s PROG Up and Down buttons.
Disc Errors
If the DVD player is unable to read the disc, a �Disc Error�
message is displayed on the VES™ and Radio displays
and the disc is automatically ejected. A dirty, damaged, or
incompatible disc format are all potential causes for a
�Disc Error� message.
If a disc has a damaged track which results in audible or
visible errors that persists for 2.0 seconds, the DVD
player will attempt to continue playing the disc by skipping forward 1.0 to 3.0 seconds at a time. If the end
of the disc is reached, the DVD player will return to the
beginning of the disc and attempt to play the start of the
first track.
The DVD player may shut down during extremely hot
conditions, such as when the vehicle’s interior tempera-
ture is above 120°F. When this occurs, the DVD player
will display
�VES High Temp� and will shut off the VES™
displays until a safe temperature is reached. This shut-
down is necessary to protect the optics of the DVD
player.
384 UNDERSTANDING YOUR INSTRUMENT PANEL
Page 390 of 643
The default rating is Level 8 (play all discs without a
password) and the default password is 0000.To set the password, activate the DVD Setup Menu and
follow these additional instructions:
•Using the remote control Left and Right cursor but-
tons, select the Rating tab.
•Highlight
�Change Password�, and then press the
remote control’s ENTER button.
•Enter the current password. Select a digit, use the
remote control Up and Down cursor buttons to set the
value for the current digit, and then press the remote
control’s Right cursor button to select the next digit.
Repeat this digit selection sequence for all four digits.
•After the four-digit password is entered, press the
remote control’s ENTER button. If the password is
correct, the set password screen is displayed.
DVD Password Entry
4
UNDERSTANDING YOUR INSTRUMENT PANEL 387
Page 391 of 643
•Using the remote control’s Up and Down cursor
buttons to set the value for the current digit and the
remote control’s Right cursor button to select digits,
enter the new password.
•After the four-digit password is entered, press the
remote control’s ENTER button to accept the change.
DVD Player Level Menu
388 UNDERSTANDING YOUR INSTRUMENT PANEL
Page 392 of 643
To set the rating, activate the DVD Setup Menu and
follow these additional instructions:
•Using the remote control’s Left and Right cursor
buttons, select the Rating tab.
•Highlight�Change Rating�, and then press the remote
control’s ENTER button.
•Enter the current password. Select a digit, use the
remote control’s Up and Down cursor buttons to set
the value for the current digit, and then press the
remote control’s Right cursor button to select the next
digit. Repeat this digit selection sequence for all four
digits.
•After the four-digit password is entered, press the
remote control’s ENTER button. If the password is
correct, the Rating Level menu is displayed.
•Using the remote control’s Up and Down cursor
buttons, select the new rating level, and then press the
remote control’s ENTER button to accept the change.
Product Agreement
This product incorporates copyright protection technol-
ogy that is protected by U.S. patents and other intellec-
tual property rights. Use of this copyright protection
technology must be authorized by Macrovision, and is
intended for home or other limited viewing uses other-
wise authorized by Macrovision. Reverse engineering or
disassembly is prohibited.
Dolby� Digital and MLP Lossless Manufactured
under license from Dolby Laboratories. �Dolby�,
�MLP Lossless�, and the double-D symbol are trademarks
of Dolby Laboratories. Confidential unpublished works.
Copyright 1992-1997 Dolby Laboratories. All right re-
served.
4
UNDERSTANDING YOUR INSTRUMENT PANEL 389
Page 401 of 643
NOTE:For maximum airflow to the rear, the center
instrument panel outlets can be directed toward the rear
seat passengers.
Economy Mode
If ECONOMY mode is desired, press the A/C button to
turn off the indicator light and the A/C compressor.
Rotate the temperature control knob to the desired
temperature.
Max A/C
For maximum cooling use the A/C and Recirculation
mode buttons at the same time.
Rear Manual Climate Control — If Equipped
The Rear Manual Climate Control system has floor air
outlets at the rear of the right side sliding door, and
overhead outlets at each outboard rear seating position.
The unit provides warm or cool air through the floor and
upper outlets. The rear blower and temperature controls for the rear
seat passengers are located in the headliner, near the
center of the vehicle.
Rear Manual Climate Controls
1 – Rear Blower
3 – Rear Mode
2 – Rear Temperature 4 – Rear Climate Control Lock
398 UNDERSTANDING YOUR INSTRUMENT PANEL
Page 403 of 643
When rear controls are locked by the front system, the
lock symbol on the temperature knob is illuminated, and
the rear overhead adjustments are inoperable.
Rear Mode Control
Headliner ModeAir comes from the outlets in the headliner. Each of
these outlets can be individually adjusted to direct
the flow of air. Moving the air vanes of the outlets to one
side will shut off the airflow.
Bi-Level Mode Air comes from both the headliner outlets and the
floor outlets.
NOTE: In many temperature positions, the Bi-Level
mode is designed to provide cooler air out of the head-
liner outlets and warmer air from the floor outlets. Floor Mode
Air comes from the floor outlets.
Automatic Temperature Control (ATC) — If
Equipped
•
Front Three-Zone ATC allows both driver and front
passenger seat occupant, and rear seat occupants to
select individual comfort settings.
•When occupants in the vehicle select the AUTO mode
operation, a comfort temperature can be set by using
the temperature up and down buttons, and the auto
blower operation will be set automatically.
•The system can be controlled manually, if desired.
•SYNC feature links the controls for all three zones,
allowing one comfort setting (driver setting) for the
cabin, if desired.
400 UNDERSTANDING YOUR INSTRUMENT PANEL