Page 118 of 643
The power mirror controls consist of mirror select but-
tons and a four-way mirror control switch. To adjust a
mirror, press either the L (left) or R (right) to select the
mirror that you want to adjust.NOTE:
A light in the selected button will illuminate
indicating the mirror is activated and can be adjusted.
Using the mirror control switch, press on any of the four
arrows for the direction that you want the mirror to
move.
Driver’s side power mirror preselected positions can be
controlled by the optional Driver Memory Seat Feature.
Refer to “Driver Memory Seat” in “Understanding The
Features Of Your Vehicle” for further information.
Heated Mirrors — If Equipped
These mirrors are heated to melt frost or ice. This
feature is activated whenever you turn on the rear
window defroster. Refer to “Rear Window Features” in
“Understanding The Features Of Your Vehicle” for fur-
ther information.Power Mirror Controls
3
UNDERSTANDING THE FEATURES OF YOUR VEHICLE 115
Page 119 of 643
Tilt Mirrors In Reverse (Available With Memory
Seat Only) — If Equipped
Tilt Mirrors in Reverse provides automatic outside mirror
positioning which will aid the drivers view of the ground
rearward of the front doors. The driver’s outside mirror
will move slightly downward from the present position
when the vehicle is shifted into REVERSE. The driver’s
outside mirror will then return to the original position
when the vehicle is shifted out of REVERSE position.
Each stored memory setting will have an associated Tilt
Mirrors in Reverse position.
NOTE:The Tilt Mirrors in Reverse feature is not en-
abled when delivered from the factory. The Tilt Mirrors in
Reverse feature can be enabled or disabled in the Elec-
tronic Vehicle Information Center (EVIC). Refer to “Elec-
tronic Vehicle Information Center (EVIC)/Customer-
Programmable Features” in “Understanding Your
Instrument Panel” for further information.
Power Folding Mirrors — If Equipped
The switch for the power folding mirrors is located
between the power mirror switches L (left) and R (right).
Press the switch once and the mirrors will fold in,
pressing the switch a second time will return the mirrors
to the normal driving position.
NOTE: Pressing the power folding mirror switch for
more than four seconds, or if the vehicle speed is greater
than 5 mph (8 km/h) will disable the folding feature.
If the mirrors are in the folded position, and vehicle
speed is equal or greater than 5 mph (8 km/h), they will
automatically unfold.
Illuminated Vanity Mirrors — If Equipped
An illuminated vanity mirror is located on the sun visor.
To use the mirror, rotate the sun visor down and swing
the mirror cover upward. The lights turn on automati-
cally. Closing the mirror cover turns off the lights.
116 UNDERSTANDING THE FEATURES OF YOUR VEHICLE
Page 150 of 643
•fully closed windows,
•dry weather conditions, and
•operation from the driver’s seat.
•Performance, such as audio clarity, echo, and loudness
to a large degree rely on the phone and network, and
not the Uconnect™ Phone.
•Echo at the phone far end can sometimes be reduced
by lowering the in-vehicle audio volume.
•In a convertible vehicle, system performance may be
compromised with the convertible top down.
Recent Calls
If your phone supports “Automatic Phonebook Down-
load”, Uconnect™ Phone can list your Outgoing, Incom-
ing and Missed Calls.
SMS
Uconnect™ Phone can read or send new messages on
your phone.
Read Messages:
If you receive a new text message while your phone is
connected to Uconnect™ Phone, an announcement will
be made to notify you that you have a new text message.
If you wish to hear the new message:
•Press thebutton.
•After the “Ready” prompt and the following beep, say
“SMS Read” or “Read Messages.”
•Uconnect™ Phone will play the new text message for
you.
After reading a message, you can “Reply” or “Forward”
the message using Uconnect™ Phone.
3
UNDERSTANDING THE FEATURES OF YOUR VEHICLE 147
Page 163 of 643
Voice Training
For users experiencing difficulty with the system recog-
nizing their voice commands or numbers the Uconnect™
Voice “Voice Training” feature may be used.
1. Press the Voice Command
button, say “System
Setup” and once you are in that menu then say “Voice
Training.” This will train your own voice to the system
and will improve recognition.
2. Repeat the words and phrases when prompted by
Uconnect™ Voice. For best results, the “Voice Training”
session should be completed when the vehicle is parked,
engine running, all windows closed, and the blower fan
switched off. This procedure may be repeated with a new
user. The system will adapt to the last trained voice only.
SEATS
Seats are a part of the Occupant Restraint System of the
vehicle.
WARNING!
•It is dangerous to ride in a cargo area, inside or
outside of a vehicle. In a collision, people riding in
these areas are more likely to be seriously injured
or killed.
•Do not allow people to ride in any area of your
vehicle that is not equipped with seats and seat
belts. In a collision, people riding in these areas
are more likely to be seriously injured or killed.
•Be sure everyone in your vehicle is in a seat and
using a seat belt properly.
Power Seats — If Equipped
Some models may be equipped with eight-way power
seats for the driver and front passenger. The power seat
switches are located on the outboard side of the seat. The
switches control the movement of the seat cushion and
the seatback.
160 UNDERSTANDING THE FEATURES OF YOUR VEHICLE
Page 164 of 643
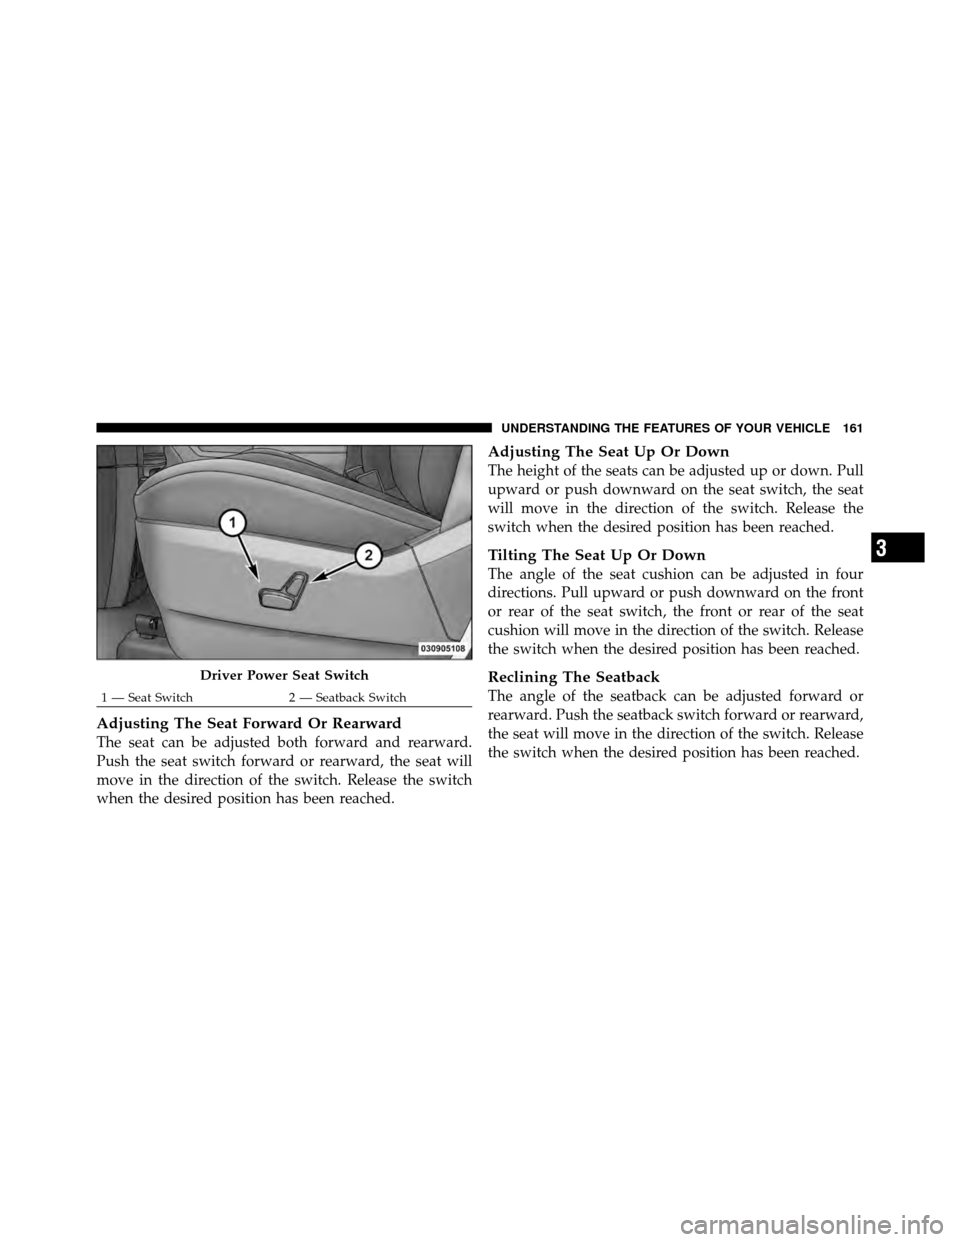
Adjusting The Seat Forward Or Rearward
The seat can be adjusted both forward and rearward.
Push the seat switch forward or rearward, the seat will
move in the direction of the switch. Release the switch
when the desired position has been reached.
Adjusting The Seat Up Or Down
The height of the seats can be adjusted up or down. Pull
upward or push downward on the seat switch, the seat
will move in the direction of the switch. Release the
switch when the desired position has been reached.
Tilting The Seat Up Or Down
The angle of the seat cushion can be adjusted in four
directions. Pull upward or push downward on the front
or rear of the seat switch, the front or rear of the seat
cushion will move in the direction of the switch. Release
the switch when the desired position has been reached.
Reclining The Seatback
The angle of the seatback can be adjusted forward or
rearward. Push the seatback switch forward or rearward,
the seat will move in the direction of the switch. Release
the switch when the desired position has been reached.
Driver Power Seat Switch
1 — Seat Switch2 — Seatback Switch
3
UNDERSTANDING THE FEATURES OF YOUR VEHICLE 161
Page 165 of 643
WARNING!
•Adjusting a seat while driving may be dangerous.
Moving a seat while driving could result in loss of
control which could cause a collision and serious
injury or death.
•Seats should be adjusted before fastening the seat
belts and while the vehicle is parked. Serious
injury or death could result from a poorly adjusted
seat belt.
•Do not ride with the seatback reclined so that the
shoulder belt is no longer resting against your
chest. In a collision you could slide under the seat
belt, which could result in serious injury or death.
CAUTION!
Do not place any article under a power seat or
impede its ability to move as it may cause damage to
the seat controls. Seat travel may become limited if
movement is stopped by an obstruction in the seat’s
path.
Power Lumbar — If Equipped
Vehicles equipped with power driver or passenger seats
may be also be equipped with power lumbar. The power
lumbar switch is located on the outboard side of the
power seat. Push the switch forward to increase the
lumbar support. Push the switch rearward to decrease
the lumbar support.
162 UNDERSTANDING THE FEATURES OF YOUR VEHICLE
Page 166 of 643
Heated Seats — If Equipped
On some models, the front and rear seats may be
equipped with heaters in both the seat cushions and
seatbacks.
WARNING!
•Persons who are unable to feel pain to the skin
because of advanced age, chronic illness, diabetes,
spinal cord injury, medication, alcohol use, ex-
haustion or other physical condition must exercise
care when using the seat heater. It may cause burns
even at low temperatures, especially if used for
long periods of time.
•Do not place anything on the seat that insulates
against heat, such as a blanket or cushion. This
may cause the seat heater to overheat. Sitting in a
seat that has been overheated could cause serious
burns due to the increased surface temperature of
the seat.
Vehicles Equipped With Remote Start
On models that are equipped with remote start, the
driver ’s heated seat can be programmed to come on
Power Lumbar Switch
3
UNDERSTANDING THE FEATURES OF YOUR VEHICLE 163
Page 167 of 643
during a remote start. Refer to “Remote Starting System
— If Equipped” in “Things To Know Before Starting Your
Vehicle” for further information.
Front Heated Seats
There are two heated seat switches that allow the driver
and passenger to operate the seats independently. The
controls for each heater are located on the switch bank
below the climate controls.
You can choose from HIGH, LOW or OFF heat settings.
Amber indicator lights in each switch indicate the level of
heat in use. Two indicator lights will illuminate for
HIGH, one for LOW and none for OFF.Press the switch once to select HIGH-level
heating. Press the switch a second time to select
LOW-level heating. Press the switch a third
time to shut the heating elements OFF. NOTE:
Once a heat setting is selected, heat will be felt
within two to five minutes.
When the HIGH-level setting is selected, the heater will
provide a boosted heat level during the initial stages of
operation. Then, the heat output will drop to the normal
HIGH-level. If the HIGH-level setting is selected, the
system will automatically switch to LOW-level after a
maximum of 60 minutes of continuous operation. At that
time, the display will change from HIGH to LOW,
indicating the change. The LOW-level setting will turn
OFF automatically after a maximum of 45 minutes.
Rear Heated Seats
On some models, the second row seats are equipped with
heaters. There are two heated seat switches that allow the
second row passengers to operate the seats indepen-
dently. The heated seat switches are located on the sliding
side door handle trim panels.
164 UNDERSTANDING THE FEATURES OF YOUR VEHICLE